Deploying Applications as Assemblies
In the previous section, we discussed how to create an assembly that consists of one or more modules. If we create a multi-file assembly, the main module in the assembly contains manifest information that identifies all the other modules in the assembly.
In this section, we're going to broaden our outlook and consider the physical organization of an entire application. Our discussions will lead us to consider three possible deployment scenarios for our application:
-
For simple applications, we can deploy our application as a single assembly.
-
For larger applications, we can split some of the functionality into separate assemblies. We can group related functionality into the same assembly, so that the CLR can load all the information it needs from a single assembly. We can relegate seldom-used functionality to a separate assembly, so that it is only loaded when required. For example, if you examine the classes in the .NET framework itself, you will see that Microsoft has included parts of namespaces in core assemblies, while other parts are relegated to secondary assemblies. We can also put resources (such as bitmaps) into another assembly, to make internationalization easier to achieve.
It is generally good practice to emphasize the logical organization of our application, by organizing our assemblies along namespace boundaries and implementing each namespace as a separate assembly.
Typically, we deploy all the assemblies into the same folder on the target computer. It's also possible to provide a configuration file that specifies a different subfolder destination for our private assemblies.
-
If we want to deploy several applications that share a lot of common code, we can create common assemblies that are shared by all the applications. We can install the common assemblies into the Global Assembly Cache (GAC) on the target computer, so that the assemblies are accessible by multiple applications. We'll discuss the GAC later in this section.
Deploying Single-Assembly Applications
This is the simplest of our three scenarios, where we want to deploy an application that comprises a single assembly. To deploy such an application, all we need to do is copy the assembly onto the target computer. This is commonly known as XCopy deployment after the DOS command XCOPY, which can be used to simply copy a complete folder structure from the distribution media onto the target computer. Of course, you'll probably use drag-and-drop or copy-and-paste to deploy the application in Explorer, but the principle is the same. There is no need to register anything in the system registry, which means there is no danger of breaking how existing applications work on the computer. This eliminates ‘DLL hell’, which can happen when traditional Windows applications are installed on a computer. Such applications nearly always update the registry in some way, which may prevent existing applications from functioning correctly.
Uninstalling simple .NET Framework applications is also straightforward. All we need to do is delete the files that were copied during installation, such as the .exe and .dll files for the assembly, plus any configuration files we installed (we'll discuss configuration files later in this chapter). Compare this situation with the way we uninstall traditional Windows applications; we need to ensure all the registry entries are cleaned up, without breaking how all the other applications work. Uninstalling traditional Windows applications always gives us that nasty suspicion that part of the application lingers on in the dark recesses of the hard disk.
| Note | There are still some situations where we might want to package our .NET applications ready for distribution. For example, if we want our application to be downloaded over the Internet, we will typically place our application into a .CAB file so that it can be downloaded more easily. Alternatively, we can package our application into an .MSI file so that Microsoft Windows Installer can install it. This will enable users to install the application using Microsoft Systems Management Server (SMS), for example. |
Deploying Applications using Private Assemblies
In this section, we'll describe how to deploy an application that contains several assemblies. For now, we'll assume these assemblies are only needed by this application, so that all the assemblies can be installed in the same folder (or sub-folder) as the main application assembly. Because these assemblies are just used by our application, they are called private assemblies.
| Note | Later, we'll describe how to create shared assemblies, which can be deployed in the central Global Assembly Cache so that they can be used by all applications. |
Deploying Private Assemblies in the Same Folder
Imagine we have a large application that provides several distinct services. It makes sense to organize this application into separate assemblies, so that the Common Language Runtime can load just the assemblies that are actually required when the user runs the application. Typically, one of the assemblies will be an .exe file, and the others will be .dll files.
Example of Deploying Assemblies in the Same Folder
Let's consider a simple example, where we have a single .exe assembly file and a single .dll assembly file. The DLL file contains useful functions that are used by the .exe file. We'll perform the following tasks:
-
Write the source code for the DLL.
-
Compile this source code into a .dll assembly file.
-
Write the source code for the executable. Use the functionality offered by the DLL, as required.
-
Compile this source code into an .exe assembly file. Tell the compiler which other assemblies we reference, so that it can resolve references to these assemblies.
-
Deploy the .exe file and .dll file. The easiest deployment scenario is to install the .exe file and .dll file in the same folder.
Here's the source code for our DLL file. The source file is named my_useful_library.cs:
using System; public class MyUsefulClass { public static void MyUsefulMethod() { Console.WriteLine("Hello world"); } } To compile this source file into a .DLL assembly file, run the C# .NET compiler as follows from the command prompt:
C:\> csc /target:library my_useful_library.cs
The /target:library compiler switch instructs the compiler to create a library (.dll) file.
Now let's look at the source code for our executable file. The source code file is named hello_world.cs.
public class HelloWorld { public static void Main() { MyUsefulClass.MyUsefulMethod(); } } To compile this source file into an .exe assembly file, run the C# compiler as follows at the .NET Framework Command Prompt window:
C:\> csc /reference:my_useful_library.dll hello_world.cs
The manifest in the executable file will contain a reference to the my_useful_library.dll assembly file, because of the /reference compiler switch.
The /reference compiler switch can be abbreviated to /r.
When we deploy our application onto the target computer, the easiest way is to install hello_world.exe and my_useful_library.dll into the same folder. We say that my_useful_library.dll is a private assembly for our application.
When the user runs hello_world.exe, the CLR searches for an assembly in one of the following locations:
-
my_useful_library.dll
-
my_useful_library\my_useful_library.dll
If the CLR can't find an assembly with a .dll file extension, it repeats the search looking for an assembly with a .exe file extension:
-
my_useful_library.exe
-
my_useful_library\my_useful_library.exe
If the assembly can't be located, the CLR throws a System.IO.FileNotFoundException.
Creating and Referencing Culture-Specific Assemblies
The .NET Framework allows us to create several different versions of an assembly, to cater for different locales. For example, we can create an English version of the assembly, a Spanish version, a French version, and so on. Microsoft uses the term culture to denote the locale of the assembly. Later in this chapter, we'll see how to use attributes to set the culture when we create an assembly.
Applications can specify to which culture of our assembly they want to bind. When the CLR probes for the specified assembly, it looks in a subdirectory with the same name as the culture. For example, if we request the my_useful_library assembly and specify the en culture (English), the runtime will probe the following locations for the assembly:
-
en\my_useful_library.dll
-
en\my_useful_library\my_useful_library.dll
-
en\my_useful_library.exe
-
en\my_useful_library\my_useful_library.exe
Deploying Private Assemblies in a Different Sub-Folder
Since applications can grow to be extremely large, placing all the assemblies in the same folder might not be the best option; for example, if we have dozens of different assemblies in our application, we might prefer to organize these assemblies into a directory structure that reflects the hierarchical namespace structure in our application.
If we want to deploy a private assembly in a differently named sub-folder, we can create an application configuration file to tell the CLR where to look. The configuration file is located in the same folder as the requesting assembly, and has a .config filename suffix. For example, the configuration file for MyApp.exe would be named MyApp.exe.config.
The application configuration file is an XML file that tells the CLR where it can find our private assemblies. We write the configuration file as part of our development activities, and deploy the configuration file along with our application.
| Note | The .NET Framework makes extensive use of XML as the standard way of expressing configuration information, and for a host of other purposes. For example, XML is used to represent data while an application is disconnected from a database (see the System.Data.DataSet class); to represent tags in ASP.NET; to pass information to and from a Web Service (see System.WebServices.WebService), and so on. |
Let's see an example of how to create and use an application configuration file. Imagine we have an application that has two assemblies, located in the following paths:
C:\MyAppFolder\MyApp.exe C:\MyAppFolder\MySubFolder\MyUsefulLibrary.dll
Here is an example of a configuration file named MyApp.exe.config. This is the configuration file for our application MyModule.exe:
<configuration> <runtime> <assemblyBinding xmlns="urn:schemas-microsoft-com:asm.v1"> <probing privatePath="MySubFolder"/> </assemblyBinding> </runtime> </configuration>
Note the following points about this configuration file:
-
The top-level element must be named configuration. The configuration element can have a variety of child elements, to configure different aspects of run-time execution.
-
The runtime child element specifies how the Common Language Runtime handles assembly loading and garbage collection.
-
The assemblyBinding child element contains information about assembly locations and versions. This element must be qualified with the XML namespace "urn:schemas-microsoft-com:asm.v1" for the CLR to identify it properly.
-
The assemblyBinding element has a child element named probing.
-
The probing element has a privatePath attribute, which specifies the name of the sub-folder where the CLR should search for private assemblies. To enable users to specify multiple folders (for different assemblies) within the same configuration file, multiple directories can be specified, separated by a semicolon.
-
Note that you must specify sub-folders here; you cannot specify an absolute folder, or a relative folder such as ..\SomeOtherFolder. This rule minimizes the chance of conflicts with assemblies installed elsewhere on the computer.
| Important | Remember that XML is case-sensitive, so you must type in the element names and attribute names exactly as shown in the example above. There are various other pieces of information we can specify in a configuration file, including network settings, cryptography settings, ASP.NET settings, and so on. For more information, see the <configuration> element in Visual Studio .NET Help. |
When the user runs MyApp.exe, the CLR now searches for the MyUsefulLibrary assembly in the following locations (in the order shown):
-
MyUsefulLibrary.dll
-
MyUsefulLibrary\MyUsefulLibrary.dll
-
MySubFolder\MyUsefulLibrary.dll
-
MySubFolder\MyUsefulLibrary\MyUsefulLibrary.dll
If the CLR can't find an assembly with a .dll file extension, it repeats the search looking for an assembly with an .exe file extension:
-
MyUsefulLibrary.exe
-
MyUsefulLibrary\MyUsefulLibrary.exe
-
MySubFolder\MyUsefulLibrary.exe
-
MySubFolder\MyUsefulLibrary\MyUsefulLibrary.exe
One final item to point out is that the application configuration file is just plain XML text, and is deployed onto the user's computer along with the application. If the user wants to organize the private assemblies into a different sub-folder hierarchy from that first envisaged, the user can edit the configuration file at any time to indicate the new location of the private assemblies. There's no need for the user to change any registry settings, so there's less chance than with COM of the user getting it wrong.
Deploying Shared Assemblies
Our previous discussions have shown how to create a private assembly, and deploy it in an application's sub-folder so that the application can access it. It's also possible to create shared assemblies, and add them to the Global Assembly Cache (GAC). The GAC holds information about all the shared assemblies that are accessible by all applications running on our computer. For example, the assemblies essential for the .NET Framework class library reside in the GAC.
This may sound a little like COM. We can create COM components that contain reusable functionality, and install these components to make use of this functionality. However, COM components are registered in the system registry, and this can cause conflicts with other versions of the component in the registry. .NET assemblies are not registered in the system registry, so the possibility of registry conflicts doesn't arise.
You may still wonder if GAC conflicts occur if we install a later version of our .NET shared assembly; they don't. When we add an assembly to the GAC, we must give our assembly a strong name. A strongly named assembly has a name, version, public key, and, optionally, culture information; these pieces of information uniquely identify the assembly, and prevent conflicts with any other assemblies.
It is worth noting, however, that Microsoft advises against making your application dependent on installing assemblies into the GAC, and recommends instead that you use private assemblies. Disk space is not regarded as a precious commodity on most platforms, and applications in separate application domains will load code separately even if it is located in the GAC, so you won't end up saving memory. Generally, keeping all of your application's files together, and avoiding dependence on GAC registration simplifies everybody's life.
| Note | One situation in which use of the GAC is unavoidable is when you are developing .NET classes that use COM+ services – also known as Serviced Components; the .NET Framework provides a means of declaring COM+ settings using attributes, which allows us to use functionalities like distributed transaction management and object pooling. Assemblies that use serviced components in COM+ Server applications should be placed in the GAC. This is because the assembly needs to be located by two host processes; the client process (to bind to the assembly's types), and the COM+ surrogate process – dllhost.exe (to load and execute the assembly). It is unlikely that both of these processes will reside in the same folder as the assembly, hence the need to install it in the GAC. |
Applications can specify precisely the assembly they want to use by providing a specific assembly name, version, public key, and optionally culture information. There is no way the application can accidentally pick up another assembly that is similar, because that other assembly would have a different name, version, public key, or culture information. This is a major step forward in the world of application deployment and configuration. It signals a possible end to DLL hell, which will be a merciful release for us all.
Note that we can only insert strongly named assemblies into the GAC; assemblies that are not strongly named (that is, assemblies that do not have a public key) cannot be added to it, because they do not contain enough information to prevent possible conflicts.
| Note | Culture information enables us to create variations of our assembly for different locales. For example, we can create one assembly that contains English text, another assembly that contains French text, and a third assembly that contains Spanish text. Each assembly can have the same name, version, and public key, but a different culture flag. |
Let's summarize what we have covered so far. If we want to create a shared assembly that can be accessed by several applications, then we must perform the following steps:
-
Create the shared assembly as a strongly-named assembly
-
Create an application that uses the shared assembly
-
Install the shared assembly into the Global Assembly Cache
Creating a Shared Assembly as a Strongly Named Assembly
To create a strongly named assembly, we must first generate a public-private key pair. Public-private keys are used extensively in the IT industry for the following security purposes:
-
A company uses its private key to sign its applications, and then distributes these applications to users.
-
Users need to verify the application comes from this trusted company. They can do this by using the company's public key to check the digital signature on the application. The only way the signature will be recognized is if it was created with the trusted company's private key (of course, this mechanism relies on the fact the company's private key really is private).
Public-private key pairs enable us to create strong names for our assemblies. The compiler uses the private key during compilation, and writes the corresponding public key into the assembly manifest. For more information about the theory of public-private key pairs, see Keys, cryptography in Visual Studio .NET Help.
Unfortunately we can't use Visual Studio .NET to create a public-private key, we need to use the Strong Name tool in the .NET Framework SDK. Open a .NET Framework command prompt window, and type the following command:
C:\> sn /k C:\classdesign\chapter08\MyKey.snk
This creates a public-private key pair file named MyKey.snk in the folder C:\MyKeyFolder. We can use this public-private key pair file to create a strongly named assembly. We've provided a simple example in the download folder called signed_assembly.cs, which looks like this:
using System; namespace MyGlobalAssembly { public class SignedMethod { public static void MyMethod() { Console.WriteLine("Hi"); } } } The file is part of a project, MyGlobalAssembly, which also contains a source file named AssemblyInfo.cs. This file defines a set of attributes that will be used by the compiler to generate additional metadata for our assembly, such as its version number and public key:
using System.Reflection; using System.Runtime.CompilerServices; // General Information about an assembly is controlled through the // following set of attributes. Change these attribute values to // modify the information associated with an assembly. // [assembly: AssemblyTitle("")] [assembly: AssemblyDescription("")] [assembly: AssemblyCompany("")] [assembly: AssemblyProduct("")] [assembly: AssemblyCopyright("")] [assembly: AssemblyTrademark("")] // Version information consists of the following four values: // // Major Version // Minor Version // Build Number // Revision // // You can specify all the values or you can default the Revision // and Build Numbers by using the '*' [assembly: AssemblyVersion("1.0.0.0")] [assembly: AssemblyDelaySign(false)] [assembly: AssemblyKeyFile("C:/classdesign/chapter08/MyKey.snk")] [assembly: AssemblyKeyName("")] In this example, [assembly: AssemblyVersion(…)] tells the compiler the version number to write to the assembly. [assembly: AssemblyKeyFile(…)] tells the compiler which public-private key file to use. This enables the compiler to generate a strongly named assembly.
Build the project from the Visual Studio .NET menu. This will create an assembly as a DLL and you can view this in the MSIL Disassembler. In the MSIL Disassembler window, double-click the MANIFEST node to view the assembly's manifest.
Notice that the manifest now includes a publickey property, which means that this is a strongly named assembly. In addition, notice that the ver property contains the precise version information we specified in AssemblyInfo.cs:
.assembly MyGlobalAssembly { ... .publickey = (00 24 00 00 04 ... AC D4 D2 40 C1 ) .hash algorithm 0x00008004 .ver 1:0:0:0 } The publickey property is a very long number. For efficiency, the Strong Name tool also generates an abbreviated version of the public key called the public key token. To see the public key token, run the Strong Name tool as follows:
C:\> sn /t C:\classdesign\chapter08\MyKey.snk
The public key token is displayed as follows (clearly, the number for the public key token will be different if you try this yourself):
Microsoft (R) .NET Framework Strong Name Utility Version 1.0.3705.0 Copyright (C) Microsoft Corporation 1998-2001. All rights reserved. Public key token is 070bcd7fade41693
Creating an Application that Uses the Shared Assembly
We've provided a simple application to use the strongly named assembly. We'll describe how to view and build this application using Visual Studio .NET first, then we'll see how to do the same from the command line. The sample Visual Studio project is called MyApp.csproj and is in the MyApp folder with the rest of the code for this chapter.
The application has a simple source file named shared_assembly.cs, which looks like this:
using MyGlobalAssembly; namespace MyApp { class SharedAssembly { static void Main() { SignedMethod.MyMethod(); } } } Notice that Main calls SignedMethod.MyMethod. The class SignedMethod is defined in the MyGlobalAssembly namespace, so we've included a using statement to import this namespace.
However, that's only half of the story. The MyGlobalAssembly namespace is defined in a different assembly, so we also have to tell the compiler which assembly to use. In Visual Studio .NET, expand the References entry in Solution Explorer. You will see that the References list includes a reference to MyGlobalAssembly. Right-click this assembly name, and select Properties from the Shortcut menu. The Properties dialog box appears as follows:
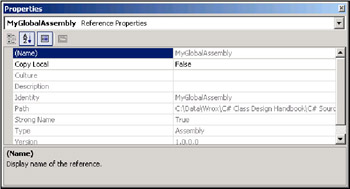
This dialog box indicates the following information about the referenced assembly:
-
The name of the assembly is MyGlobalAssembly.
-
The Copy Local flag is False. This tells the compiler not to copy the specified assembly into our application's output folder. This will force the CLR to look in the GAC for the assembly when we run the application.
| Important | When you add an assembly reference, the Copy Local flag is set to True by default. This will cause the compiler to copy the specified assembly to the output directory for our application. When you run the application, the CLR will locate and load this copy of the assembly, rather than the one in the GAC. To avoid this behavior, remember to set Copy Local to False whenever you add an assembly reference to a project if you want to use the GAC version. |
-
The Path property tells the compiler where the assembly is currently located, at development time. We set this location when we added this assembly reference to the project.
-
The Strong Name property is True, because the assembly was created as a strongly named assembly
-
The Version property indicates the version number of this strongly named assembly
If we build this application in Visual Studio .NET, the assembly reference we've just examined provides all the information required by the compiler to locate the other assembly. Alternatively, we can compile the application from the command line; in this case, we must specify an /r compiler switch at build time, to tell the compiler about the assembly:
C:\> csc /r:C:\classdesign\chapter08\MyGlobalAssembly.dll shared_assembly.cs
Everything seems to be going well, until we try to run the application. The CLR attempts to load the referenced assembly. The runtime looks in our application's folder, on the (incorrect) assumption that the assembly is a private assembly. However, the assembly isn't there, because it's a shared assembly. Therefore, the CLR throws a System.IO.FileNotFoundException, and terminates the application.
To resolve this problem, we must install the shared assembly into the Global Assembly Cache (GAC).
Installing Shared Assemblies into the Global Assembly Cache
The .NET Framework provides a runtime tool named gacutil.exe, which enables us to install to and remove assemblies from the GAC. Open a .NET Framework command-prompt window, and move to the folder where the .DLL file resides. Type the following command:
C:\> gacutil -i MyGlobalAssembly.dll
| Important | As a user, you must have Administrator privileges to install assemblies into the GAC. |
The GAC is implemented as a folder named Assembly in the Windows folder (for example, C:\Windows\Assembly), and when we install an assembly into the GAC, gacutil copies the assembly into a special sub-folder beneath the Assembly folder. The gacutil tool devises a special name for the assembly's sub-folder, based on the name, version, public key, and culture of the assembly. This eliminates any possibility of installing an assembly on top of an existing assembly that happens to have the same filename.
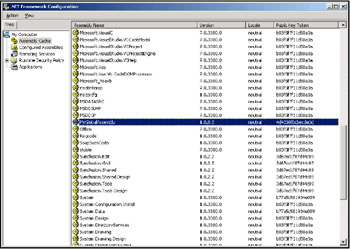
To check that our assembly has been added correctly to the GAC, we can use the .NET Framework Configuration tool. Open Control Panel, double-click Administrative Tools, and then double-click Microsoft .NET Framework Configuration. Click the Manage the Assembly Cache hyperlink. This takes us to the Assembly Cache window
Click the View List of Assemblies in the Assembly Cache hyperlink. This displays information about all the assemblies in the GAC. Scroll down the list to find the shared assembly we just inserted.
Once you've installed the shared assembly in the GAC, you can run the application. When the application refers to types and members defined in the shared assembly, the CLR inspects the application's metadata to discover which assembly it needs to load. The runtime looks for this assembly in the GAC, finds it, and loads it into memory.
EAN: 2147483647
Pages: 90