InDesign Layer Highlights
| Unlike in Photoshop and Illustrator, most layouts in InDesign contain more than one page. InDesign layouts may also include master pages, guides, and text wraps, which give working with layers a different flavor. Layers Include All PagesIllustrator artwork normally consists of a single page. Layers created in Illustrator manage the objects on that one page. Layers in InDesign, however, apply to all pages of the publication. You can't create different sets of layers on different pages. You must keep this in mind as you're designing your publication, and you must create a layer arrangement that will work with all your pages. Master Pages and LayersMaster pages in InDesign are used to create pages that contain common elements headers, footers, page numbers, and so on. Changing an object on a master page automatically changes the object on all the pages that are based on that master. Master pages share the same layers just as document pages do. Objects on a particular layer of the master page appear behind objects assigned to the same layer on a document page. Understanding this stacking order that the document page is in front of the master page is important when positioning artwork. For example, you may need to place artwork on a document page in the same spot where a page number is located on the master page (Figure 12-16). To make a master-page object appear in front of a document page object, you must put it on a layer higher in the stacking order. Figure 12-16. Page number on master page (left) is obscured by artwork placed on same layer in the document page (middle). Page number placed on a higher layer remains visible (right).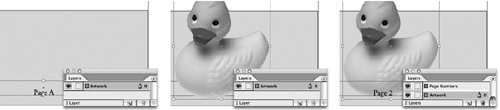 Guides, Text Wrap, and LayersInDesign provides superior controls for working with guides and text wrap when you're working in a layered document. Guides in InDesign are treated as objects, just like other "regular" page elements. They can be selected, moved, copied, and pasted. They can also be applied to different layers within your artwork. When selected like any other page object, guides show their layer selection color. In addition, you can show and lock guides on a layer using controls in the InDesign Layer Options dialog box (see Figure 12-3, above). For example, in a file with language versions, each on its own layer, you can use this feature to hide guides selectively by turning off the visibility for guides for the other language layers. In some cases, you may also want to control text wrapping on a layer-by-layer basis. If you are working with different language editions of a publication, for example, you may not want a text wrap from another language layer to affect the layout in the currently visible language. In that case, in the Layer Options dialog box, choose the option Suppress Text Wrap When Layer Is Hidden. Transparency Flattening and LayersCreating InDesign layers can also be useful when you're working with artwork that includes type and transparency objects in close proximity. Transparent objects must be flattened for printing, but often, you won't want to flatten type objects. Placing type on a higher plane in the stacking order can prevent production problems such as having some type outlines thicken (called "spreading") when adjacent to transparency objects. We describe how to use layers to eliminate unwanted spreading in "Best Practices for Handling Transparency" in Chapter 16, "Preflight and Printing." |
EAN: 2147483647
Pages: 192