Photoshop Layer Highlights
| The use of layers in Photoshop is the most complex of the Adobe Creative Suite applications. While some Illustrator and InDesign users never create new layers, it's just about impossible to create a Photoshop composition without using different kinds of layers. Layer TypesMost of the time when you're working in Photoshop, its layers contain pixels, as we describe in Chapter 4, "Pixels and Raster File Formats." Photoshop also allows you to create editable type and various kinds of vectors, with corresponding layers. Photoshop uses seven different types of layers, described in the following sections. Background LayerNormally, when you create a new file in Photoshop, you'll start with a Background layer containing a digitized image, or perhaps a color that provides an opaque background to your composition. The Background layer cannot be transparent. You cannot change the stacking order of the layer, its blending mode, or its opacity. If you want it to be transparent, you'll need to make it a regular pixel layer: Double-click it in the Layers palette (its name changes to Layer 0), rename it if desired, and click OK. Then select all or some of the pixels and delete them. Tip: Create a New Background Layer To make an existing layer into the Background layer, select the layer in the Layers palette and choose Layer > New > Background From Layer. Pixel LayersPixel layers are the bread and butter of working in Photoshop. That's what you'll get a transparent layer ready to contain whatever pixels you want to create on it whenever you choose Layer > New > Layer or New Layer from the Layers palette, or click the New Layer button. You can add pixels using all the methods we discuss in Chapter 4, "Pixels and Raster File Formats." Adjustment LayersAdjustment layers let you apply a tonal or color adjustment to all the layers below without permanently changing the pixel values of the image. Steve and Sandee usually use this method of making adjustments because it gives us the most flexibility. The advantage of using adjustment layers is that you can tweak them as much as you like, without losing any quality. To create an adjustment layer, choose Layer > New Adjustment Layer and select from one of twelve tonal or color adjustment commands. Alternatively, click the New Adjustment Layer button at the bottom of the Layers palette and choose an adjustment option. In the dialog box, set any of the options for that adjustment, and click OK (Figure 12-7). Figure 12-7. Double-click the adjustment layer thumbnail on the layer to change the layer's settings. Layer mask thumbnail limits area of adjustment.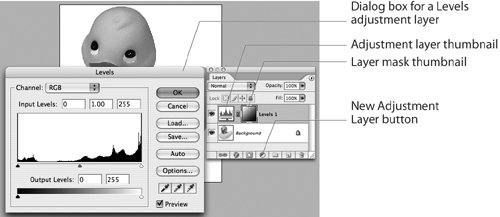 Once you've created an adjustment layer, the Layers palette will show two thumbnails for that layer. The left thumbnail on the layer indicates the kind of adjustment. To edit an adjustment layer, double-click the adjustment layer thumbnail and change the settings. The right thumbnail represents the layer mask (further discussed in "Masking Layers" below). You can use this layer mask to limit the effect of an adjustment to an area that you identified. You can edit the layer mask after it has been created to control the area of adjustment. Fill LayersFill layers work very much like adjustment layers, except they're used to add layers filled with a solid color, gradient, or pattern. Create them in a similar way: Choose Layer > New Fill Layer and select Solid Color, Gradient, or Pattern. Then select the options for the layer and click OK (Figure 12-8). To edit them, double-click the fill layer thumbnail; to adjust them, create a layer mask. Figure 12-8. Creating a fill layer also makes the layer editable.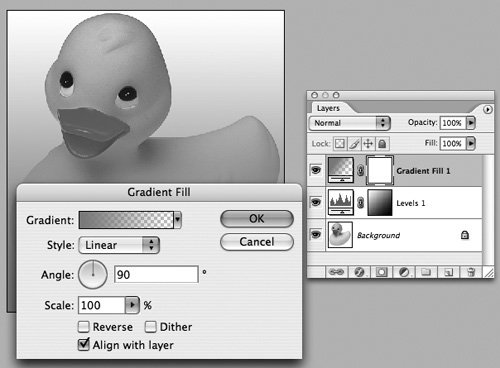 Type, Shape, and Smart Object LayersOther specialized Photoshop layers are discussed elsewhere in this book:
Grouping LayersIn a complex composition in Photoshop, it's easy to create dozens or even hundreds of layers. Photoshop makes it easy to group them into layer groups. A layer group is a set of layers that are contiguous and related organizationally. The folder icon represents a layer group on the Layers palette (Figure 12-9). Figure 12-9. Clicking the triangle next to a layer group (the folder icon) reveals its contents.
The concept of grouping is pretty easy to understand, but here are a few grouping basics:
Applying Layer Effects and StylesPhotoshop comes with a variety of special effects that you can apply to layers as layer styles. These include drop shadows, glows, bevels, overlays, and other editable effects. The effects are linked to the layer contents. Editing or moving the contents updates the effects to reflect the change. To apply a layer style, select a layer in the Layers palette, choose Layer > Layer Style, and choose an effect, such as Drop Shadow (Figure 12-10, top). (Or click the Add A Layer Style button at the bottom of the Layers palette.) The Layer Style dialog box lets you set options for the effect and preview it. To apply an additional effect to the same layer, check its name in the list on the left side of the dialog box and select options for that effect. Clicking OK displays the combined result of the selected effects. In the Layers palette, the names of the effects applied appear beneath the layer name (Figure 12-10, bottom). Clicking the triangle next to the layer styles icon (a cursive f) expands or collapses the list. Figure 12-10. Setting options for a layer effect in the Layer Styles dialog box (left); saved layer-style effects show up in the Layers palette (right).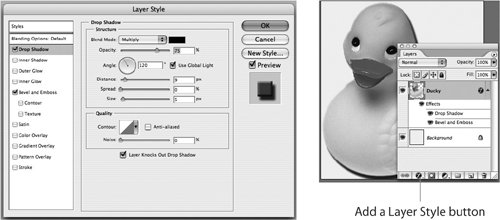 To hide an individual effect or all the layer effects applied to a layer, click the visibility (eye) icon next to the effects. To edit an effect, double-click the name of the effect to open the dialog box again. Masking LayersIn the Creative Suite applications, masks are used to show or hide parts of objects or layers. Masks in Photoshop reveal or hide parts of a layer. You can use masks to apply a filter, an effect, or an adjustment to only part of a layer, for example. (Illustrator and InDesign, by contrast, mask objects, not layers.) Photoshop provides three ways to mask layers: layer masks, vector masks, and clipping masks. Layer MasksSelections, masks, and channels are integrally related in Photoshop. When you use any of Photoshop's selection tools on the pixels in an image (using the Marquee or Magic Wand tool, for example), internally Photoshop sees this as a grayscale channel. These selections are soft-edged and can include partially-selected pixels. (For a more in-depth discussion of this important topic, we recommend Real World Adobe Photoshop CS2 from Peachpit Press.) Applying this selection as a mask to a layer, called a layer mask, hides or reveals part of a layer. The layer mask is a resolution-dependent grayscale channel, and you can modify it with painting tools, the Gradient tool, and so on. You can apply layer masks to any kind of pixel, adjustment, or fill layer. To create a layer mask, first select the layer you want to mask, choose Layer > Layer Mask, and then choose Reveal All or Hide All, depending on whether you want to initially show or hide the pixels in the layer. Alternatively, click the Add Layer Mask button on the Layers palette, which creates a mask that initially reveals all the pixels of the layer. In the Layers palette, the layer mask thumbnail represents the layer mask, as shown back in Figure 12-7. Clicking the layer mask thumbnail targets the pixels of the mask for editing. Clicking the layer thumbnail targets the pixels of the layer. Vector MasksA vector mask creates a sharp-edged shape on a layer and is useful anytime you want to add a design element with clean, defined edges. This kind of mask is also used to hide or reveal parts of a layer, but it's independent of the resolution of the file. We discuss vector masks in "The Hidden Vectors in Photoshop" in Chapter 5, "Getting to the Point of Vector Graphics." Tip: Combine Layer and Vector Masks You're not limited to just a layer mask or a vector mask. You can use both of them on a layer. The layer mask hides part of the layer using a soft edge, and the vector mask hides part of the layer with a hard edge. Clipping MasksA clipping mask is a mask created when the contents of one layer are used to mask the layer or layers above it. (In the sidebar "Traditional and Layer-Level Clipping Masks," we compare how Illustrator creates similar masks with objects.) The content of the underlying base layer clips (reveals) the content of the layers above it in the clipping mask (Figure 12-11). In the illustration, the shape of the duck clips the pattern layer above, and only the portion of the pattern within the duck is shown. The Ducky (base) layer is a simple pixel layer with transparency, and the boundary of the transparency on this layer becomes the clipping mask. Layers which are clipped are indented on the Layers palette as an indicator of their status. Figure 12-11. The transparency boundary of the Ducky layer clips the content of the Pattern layer in the clipping mask.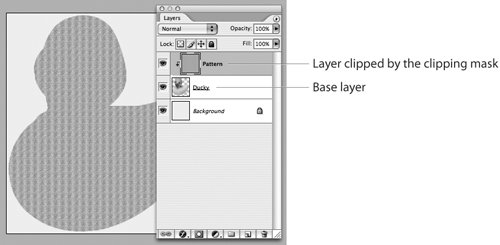 To create a clipping mask, arrange the layers so that the base layer is below the layers you want to mask. Then select the layer immediately above the base layer and choose Layer > Create Clipping Mask. You can add other layers to this clipping mask using the same command, but all layers must be contiguous. Tip: Don't Confuse Clipping Masks with Clipping Paths Clipping masks are not clipping paths. Clipping masks are applied in the Layers palette; clipping paths are applied in Photoshop's Paths palette.
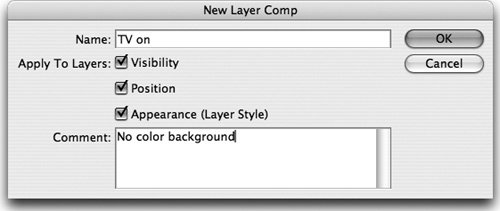
Figure 12-12. In an Illustrator layer-level clipping mask, all objects on a layer (left) are masked by the shape of the object that is the clipping path (right).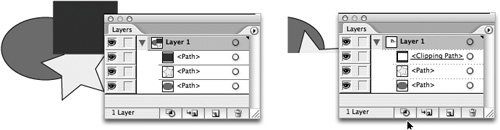 Layer CompsLayer comps are a handy way to save the appearance and visibility of the layers in a Photoshop document. With the layer comp feature, a designer can simply save variations of an image within the file as a layer comp. Without layer comps, a designer might need to save several versions of a file, each containing different variations of the layers selected. As we'll discuss in this section, layer comps can be exported as PDF files so that they can be sent to another person for review. They can also be turned on and off when the Photoshop file is placed in Illustrator or InDesign. Creating Layer CompsIt's very simple to create a layer comp for a Photoshop document. Start by setting the appearance for the layers in the document. This includes applying any adjustment layers, layer styles, blend modes, and opacity settings for the layers. You can also adjust the x/y (horizontal and vertical) positioning of the layers by moving them with the Move tool. Once you set the layer artwork the way you want it, open the Layer Comps palette, and click the Create New Layer Comp button at the bottom of the palette. Use the New Layer Comp dialog box to name the layer comp as well as set the options. Setting Layer Comp OptionsYou can choose what information is stored as part of the layer comp using the New Layer Comp dialog box (Figure 12-13). As expected, the Visibility option controls whether the layer's visibility setting is part of the comp; it also controls whether blend modes and opacity are saved as part of the layer comp. Figure 12-13. New Layer Comp dialog box with save options. The Position setting stores the x/y coordinates of the artwork on each layer. This stores the horizontal (x) and vertical (y) repositioning of layers as part of the comp. The Position option does not, however, store the z-level stacking order of layers within the Layers palette. This means that layer-level changes, such as dragging a layer to a new level or combining layers into a layer group, cannot be altered by switching to a previously saved layer comp. The Appearance (Layer Style) setting stores the settings for any layer style described in the previous section, "Applying Layer Effects and Styles." After setting these options, click OK to create the layer comp, which will now appear in the Layer Comps palette. Tip: Name Your Layer Comps and Add Comments As you work with layer comps, get in the habit of naming each layer comp with a name descriptive of the state of the file. Use the Comments field to add messages to remind you what each layer stands for. Previewing and Saving Layer CompsTo view a layer comp, you must first apply it in the document: Click the Apply Layer Comp icon next to a selected comp in the Layer Comp palette. To cycle through a view of all the layer comps in the document, use the Previous and Next buttons at the bottom of the palette. Figure 12-14 shows how the Layer Comp palette can alternatively display three different versions of the TV set artwork. Figure 12-14. Each variation comes from changing which layer comp is active. You can send layer comps to clients. Sandee's favorite feature is the ability to export the layer comps as individual pages in a PDF document. With this feature, she can quickly turn a set of layer comps into a PDF presentation that she can send to a client for review and approval. We describe how to do this in the "Scripting in CS2 Applications" section in Chapter 15, "Automating Your Work." In the section, "Changing Visibility for Layer and Layer Comps," we'll show you how you can turn layer comps on and off when placing your Photoshop image in Illustrator and InDesign. |

EAN: 2147483647
Pages: 192