Layer Essentials
| The Layers palette is the main tool for working with layers in Photoshop, Illustrator, and InDesign. It looks and works much the same between the three applications (Figure 12-1). The Layers palette and layers in these applications have common functions, but they also differ because of the contrasting requirements of layering pixels and objects. (For information on the general similarities between palettes in the CS2 applications, see "Using Common Interface Elements" in Chapter 7, "Managing and Customizing the Interface.") Figure 12-1. Layers palettes in Photoshop (left), Illustrator (middle), and InDesign (right).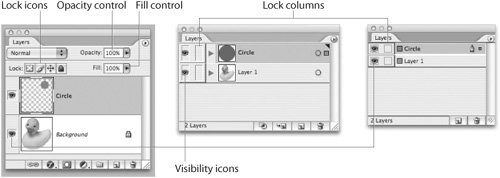 Common Layers Palette FeaturesAll three Layers palettes display layers in the file in a vertical stack that simulates the layer-stacking order in the document. Pixel and object layers that are higher in the Layers palette appear at the front of the document window; they can obscure layers that are lower (behind) in the stacking order. In Photoshop and Illustrator, you can control the appearance of the palette by choosing Palette Options from the palette menu. In Photoshop, this command controls the size of palette thumbnails and whether they display the layer bounds or the entire document (Figure 12-2, left). In Illustrator, this command controls thumbnail size and whether sublayers, groups, and objects are displayed (Figure 12-2, right). InDesign doesn't have such a command, but you can select Small Palette Rows from the palette menu to view more layers in the palette. Figure 12-2. Layers Palette Options in Photoshop controls thumbnail size (left). In Illustrator, it controls thumbnails for sublayers, groups, and objects (right).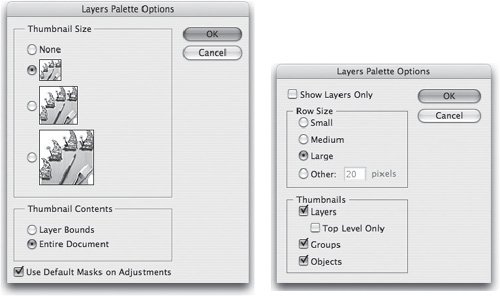 Toggling Visibility and Locking LayersIn the Photoshop, Illustrator, and InDesign Layers palettes, click the eye icon to toggle that layer's visibility. Tip: Toggle Visibility of One or All Layers In all CS2 applications, Option/Alt-click any visibility icon to toggle between showing only that layer and displaying all the layers in the file. To lock layers in Illustrator and InDesign, use the column to the right of the visibility column. Clicking displays a lock icon, indicating that the layer is locked; clicking a second time unlocks the layer. Photoshop has a more complex concept of layer locking: When a layer is selected, you can choose four icons at the top of the Layers palette to lock transparent pixels, image pixels, position, and all attributes (Figure 12-1). Adding, Duplicating, and Deleting LayersYou can add, duplicate, and delete layers in similar ways in Photoshop, Illustrator, and InDesign:
It's generally a good practice to give your layers meaningful names when you create them, rather than keeping the default names of Layer 1, Layer 2, and so on. To rename a layer, in Photoshop, double-click the layer name to highlight it and rename it; in Illustrator and InDesign, double-click the layer to open the Layer Options dialog box and rename the layer. Setting Layer OptionsThe CS2 applications let you set options for each layer including its name and color (Figure 12-3). In Photoshop, choose Layer Properties from the Layers palette menu. In Illustrator and InDesign, double-click a layer. (In Illustrator, you can also set options for sublayers, groups, and objects by double-clicking these elements.) The layer color in Photoshop appears only as a highlight color in the Layers palette. In Illustrator and InDesign, the layer color shows as a selection color in the document window, and as the color of the selection proxy in the Layers palette (which we discuss later in "Selecting and Moving Objects on Layers"). Other options in the Illustrator and InDesign dialog boxes are discussed in the following sections, "Illustrator Layer Highlights" and "InDesign Layer Highlights." Figure 12-3. Layer options in Photoshop (left), Illustrator (middle), and InDesign (right). Selecting LayersIllustrator and InDesign have always given you the ability to select multiple layers, but in the past, Photoshop has not. Photoshop CS2 presents a more "object-oriented" interface, allowing you to perform commands with more than one layer selected. In all three applications, to select multiple contiguous layers (layers which are next to each other), click the first layer and then Shift-click the last layer. To select noncontiguous layers, Command/Ctrl-click them in the Layers palette (Figure 12-4). In Photoshop, these new capabilities largely replace linking layers, used in previous versions. To link layers in Photoshop, you can still click the Link Layers button at the bottom of the Layers palette. Figure 12-4. Multiple Photoshop layers selected, with unavailable commands dimmed. Some activities in Photoshop, like painting or making tonal adjustments, work only on the active layer (the one whose name appears in the document window title bar). Other activities for example, moving, aligning, or transforming work with multiple layers. In Photoshop, you can also select layers in the document window when you have the Move tool selected. If the Auto-Select Layer option on the Options bar is selected, select visible layers by clicking, Shift-clicking, or Command/Ctrl-clicking them. Tip: Select Multiple Type Layers If you select multiple Type layers in Photoshop, you can apply text attributes from the Options bar or the Character or Paragraph palettes to all the layers at the same time. Selecting and Moving Objects on LayersBecause Illustrator and InDesign are object-oriented applications, you need to be able to select objects on a layer or move objects to a different layer. The selected object or objects appear in the Layers palette as a small square called a proxy (Figure 12-5). Use these shortcuts to select and move objects:
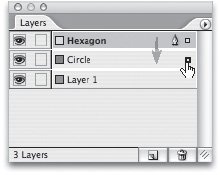
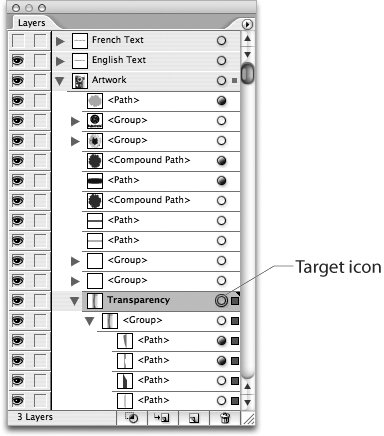
Figure 12-5. Dragging selection proxy in InDesign to move objects from layer to layer. Targeting LayersTargeting a layer selects it. Both Illustrator and InDesign use the concept of targeting to select a layer for example, as a way of specifying where an object will appear when drawn, placed, or pasted but they do it somewhat differently. Figure 12-5 shows targeting in InDesign: The highlighting and the Pen icon indicate that the Hexagon layer is targeted. Illustrator has two different ways to target layers in a sense, they are two different "levels" of targeting. Clicking the name of the layer or sublayer designates on which layer an object will appear when the object is drawn, placed, or pasted. Clicking a layer's target icon the circular icon to the right of the layer name targets a layer (or a sublayer, group, or object) means that transparency or effects will be applied to all objects on that layer. Figure 12-6. In Illustrator, click the circular target icon to select a layer or subcomponent (here, the Transparency sublayer and its component groups and objects). Tip: Copy Layers Intact To copy layers intact from the Illustrator or InDesign source document to another document, choose Paste Remembers Layers from the Layers palette menu. Otherwise, all the objects will be placed on the targeted layer and the layer structure will be lost. Moving and AligningAt any time you can change the stacking order of layers in Photoshop, Illustrator, and InDesign. To move a layer, select it, and then drag it up or down in the Layers palette until an insertion bar appears between layers. Release the mouse button to move the layer to that position. In Photoshop, when a layer is selected in the Layers palette, choose the Move tool to move all pixels on that layer. In Illustrator and InDesign, Option/Alt-click a layer to select all objects on the layer. Then use the Selection tool to move the objects. You can choose alignment or distribution options when two or more layers are selected in Photoshop, or when two or more objects are selected in Illustrator and InDesign. In Photoshop, click the alignment and distribution buttons on the Options bar. In Illustrator and InDesign, use the buttons in the Align palette. Setting Opacity and Blending ModesPhotoshop and Illustrator let you set opacity and blending modes for layers. In Photoshop, set these options at the top of the Layers palette (Figure 12-1, above). Illustrator requires more palettes to achieve the same goal. First, target the layer, and then set the layer's opacity and blending mode using the options in the Transparency palette. The transparency setting is then displayed in the Appearance palette. (For more on choosing transparency settings, see Chapter 11, "Transparency.) Merging and Flattening LayersPhotoshop, Illustrator, and InDesign give you options to merge the contents of two or more layers. In Photoshop, with one or more layers selected, choose the context-sensitive Merge Down, Merge Layers, or Merge Visible command from the Layers palette menu. In Illustrator or InDesign, choose the Merge Selected or Merge Layers command from the Layers palette menu. To combine all layers, use the Flatten Image command in the Layers palette menu in Photoshop, or the Flatten Artwork command in the Layers palette menu in Illustrator. |
EAN: 2147483647
Pages: 192