Working with Pixels and Raster Files
| While all of the Adobe Creative Suite applications work with pixels to some degree, there's no doubt that Photoshop is the pixel king (or queen). Although you can work with vectors in type, paths, and shape layers in Photoshop, most of its hundreds of tools and menu commands are dedicated to selecting and modifying pixels. Commands either work on all the pixels in an image or on those that you're selected. So most of this section will be devoted to Photoshop. You're working with a raster file, rather than editing actual pixels, most of the time when you work in Adobe Bridge, Illustrator, and InDesign. By raster file we mean the pixels that have been stored so they can be used in another application. However, when you work with a raster file, you affect the way it's displayed or printed, but the underlying pixels are left untouched. In this section, we talk about what each application can do when you're working with pixels (see Table 4-1).
Viewing and Managing Raster Image FilesPeople who work with images extensively spend a lot of time managing the raster image files they have scanned, captured with their camera, purchased, or otherwise created. Image files must be previewed, ranked, sorted, and cataloged. Files that come from digital cameras with obscure names like "IMG_0130.JPG" must be renamed. Meaningful metadata must be added to the file to store information like copyright data and keywords so the images can be found again when needed. Adobe Bridge gives users the functions they need to manage image files, incorporating and augmenting file-browser features:
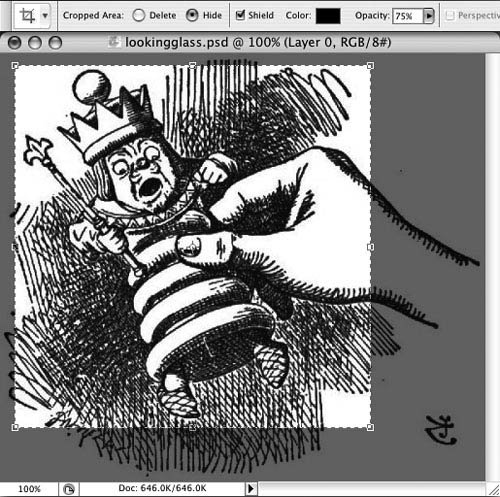
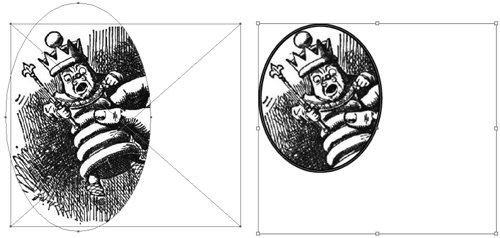
For more information on these features, see Chapter 3, "View from the Bridge." Photoshop can, of course, still work with files individually previewing them when opening, rotating, renaming, and so on but for productively working with large numbers of files, you should use Adobe Bridge. In the file-management category, InDesign and Illustrator are limited to previewing raster image files. (We talk about rotating pixels versus files in the "Rotating Pixels or Transforming Raster Files" section below.) InDesign has the ability to preview any Photoshop file that it can place. It can build previews of an image even if a thumbnail preview hasn't been saved with the file. Illustrator's abilities depend on the operating system setting you choose in the Open or Place dialog box. On the Macintosh, Steve sees previews because he likes to work in Mac OS X column view (see Figure 4-9). Sandee prefers list view, because that shows her files in chronological order, so she doesn't see previews. (Windows has similar settings.) But both of us prefer Adobe Bridge because it always shows previews, and you can drag images directly into either InDesign or Illustrator layouts. Figure 4-9. When you open or place an image, you may see a preview depending on your operating system settings. Mac OS X's column view is shown. Cropping Images and Masking Raster FilesIt's always a good principle to start large when you're capturing or creating an image. You can always crop down an image at a later stage in the layout. You can never be sure when you might need those extra pixels. But where do you do your cropping in Photoshop, or when you're making a layout in InDesign or Illustrator? You can, of course, do either but with a difference. When you're cropping in Photoshop, you're usually cropping away pixels. In InDesign or Illustrator, you're only hiding (or masking) the part of the picture you don't want to see. Cropping in PhotoshopAfter you drag out a cropping area with the Crop tool, you can get a very nice preview of the part of the image being cropped away (see Figure 4-10). You can then tweak your crop by dragging the corner or side handles before you press Return or Enter. Figure 4-10. Use the Crop tool in Photoshop to crop an image. If you're working on a non-background layer, you have the option to save pixels outside of the visible area of the crop. Another trick is that you can rotate the image while cropping: If you move your cursor outside of the cropping marquee, you'll see the double-arrow cursor that indicates you can rotate; just drag to rotate by hand. Tip: Save Data Outside the Crop What if you think you might need that data again? You can still save it! The key is that you have to make sure that you aren't on a Background layer (if necessary, double-click the layer to make it Layer 0, a non-background layer). When you drag out the cropping rectangle, click the Hide button beside Cropped Area. Cropping will only hide the cropped pixels, even if you save the file. If you need to retrieve the hidden pixels, re-crop the picture by dragging outside the image's visible rectangle. Masking Raster ImagesInDesign and Illustrator don't have cropping tools. Instead, they allow you to create a mask, which hides part of an image. In InDesign, for example, the simplest way to mask an image is to use the Selection tool, and drag in the corner handles to mask away the part of the image that you want to hide. Illustrator works a little differently: After placing an image file, you must create a new path to use for masking. But it doesn't necessarily have to be a rectangle: An ellipse, or any shape, will work. Place the masking path on top of the image, select both objects, and choose Object > Clipping Path > Make (Figure 4-11, left). Figure 4-11. Illustrator uses the Clipping Mask command to mask an image (left). InDesign can do a similar effect with the Paste Into command (right). InDesign can do that trick too, using the little-used Paste Into command (Figure 4-11, right). You can mask any image inside a path or frame. Create the frame (we used an ellipse). Then select the image, and cut it to the clipboard. Select the frame, and choose Edit > Paste Into. Then use the Direct Selection tool to click the masked image, and move it within the frame.
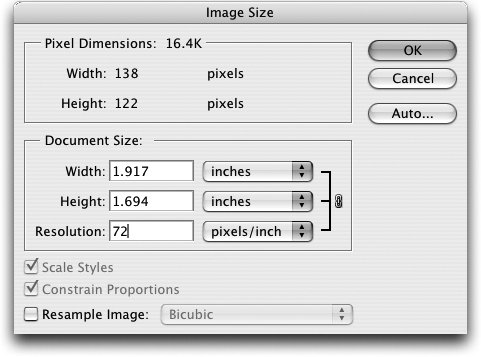
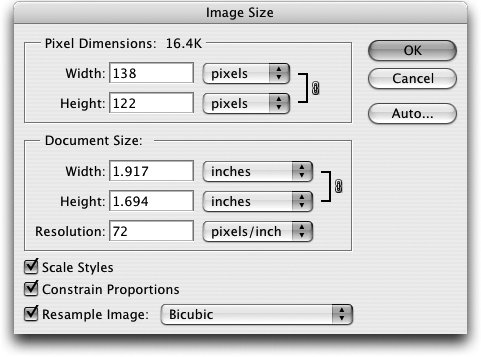
Scaling and ResamplingNow here's where our discussion of image resolution is going to come in handy: We're going to talk about the difference between scaling pixels and image files, and resampling pixels. Scaling Pixels or Raster FilesIn Photoshop, you scale pixels by choosing Image > Image Size. When you want to scale which does not change the pixel dimensions of the image you uncheck the Resample Image check box at the bottom of the dialog box (see Figure 4-12). Notice that when you do this the Pixel Dimensions section of the dialog box is now static. Entering a new Resolution value arranges the same pixels over a larger or smaller physical area. A higher resolution results in smaller document dimensions; a lower resolution results in larger document dimensions. But the pixels themselves are unchanged. Figure 4-12. Photoshop's Image Size dialog box has two functions: Here it is resizing an image because the Resample Image option is unchecked. The pixel dimensions don't change. You can't scale pixels in InDesign or Illustrator. Instead, after you place an image file, you can scale it as we talked about in the "Resolution" section above. You can do this with the Control or Transform palette, the Scale or Free Transform tool, or by dragging the corner bounding box handles in either application. When you scale the image size up or down using any of these methods, you are changing the effective resolution. Resampling PixelsResampling an image is a process that can only be done in the Suite in Photoshop, and it's done in the very same dialog box as when you scale an image. When you resample a bitmap, you change the pixel dimensions of the image. If you want to downsample an image, or reduce its resolution, start by checking the Resample Image check box (see Figure 4-13). Now notice that the Pixel Dimensions are not locked. If you enter a lower resolution, Photoshop removes pixels from the image, while maintaining the document's physical size. If you want to increase the resolution, this is usually called interpolation. Photoshop has to manufacture pixels where there were none before. This is a potentially more dangerous process, and it tends to produce images that are soft or blurry. It can't add detail to an image where it isn't present in the original. Figure 4-13. When Resample Image is selected in the Image Size dialog box, images can either be downsampled or interpolated, changing the pixel dimensions. Tip: Subsampling in InDesign While we implied that you couldn't resample in InDesign, that's not completely true. If you choose File > Print in InDesign, and select the Graphics panel, you can choose an option to send image data with optimized subsampling. This is useful when you want to print low-resolution proofs of high-resolution images to an inkjet or laser printer. InDesign samples down the images and sends only the amount of information necessary to the currently selected printer, speeding up printing. But it doesn't change the pixel data itself, only what's sent to the printer. Rotating Pixels or Transforming Raster FilesPhotoshop is the only CS2 application that can actually rotate pixels, even though you can flag files for rotation in Adobe Bridge. We cover that story in detail in the "Rotating Images" section of Chapter 3, "View from the Bridge." InDesign and Illustrator can't rotate pixels in a linked image file like Photoshop can; they can only transform the entire image file. You can rotate the linked image file using the Control or Transform palette, or with the Rotate or Free Transform tool, but it's the file that's transformed, not the pixels in the file. (If you were to open the image in Photoshop after rotating them in InDesign or Illustrator, the pixels would look unrotated.) If you embed the image pixels in InDesign or Illustrator, you can then transform the embedded pixel data. (We talk about linking and embedding graphics in the "Linked Files in InDesign and Illustrator" section in Chapter 9, "The Genius of Smart Objects".) Adjusting Pixel Tone and ColorAdjusting tone and color means changing the actual values of the pixel data. With a couple of exceptions that we'll mention below, we're now working in Photoshop territory. (This is not the same as color management, which we talk about in Chapter 10, "Colors and Color Management." Color management is concerned with how color changes when images are moved between different devices like scanners, monitors, and printers.) Here we're concerned with how image tones and colors are adjusted, either to remove perceived imperfections or to achieve a particular tone or color effect. With a grayscale image, tonal adjustment means shifting values of individual pixels between the 256 possible values in an 8-bit image (or more in a "high-bit" capture saved as a 16-bit image). With a color image, it means changing values in each of the grayscale "planes" that comprise the image red, green, and blue for an RGB image, or cyan, magenta, yellow, and black for a CMYK image. (With a black-and-white image in Bitmap mode in Photoshop, the only image adjustment available is Invert, and the only available tools are Brush, Eraser, Clone Stamp, and Pattern Stamp tools.) When you adjust tones and colors, it's important to realize that you're inevitably losing some information as you shift the values on each of these grayscale or color channels. In an 8-bit image, you have only 256 values to start with, so performing several successive corrections can reduce the number of tones in the image. This reduction creates what is called posterization (which will be visible on the Histogram palette in Photoshop as gaps see below). To get around the problem of posterization, either minimize your adjustments or use one of these strategies:
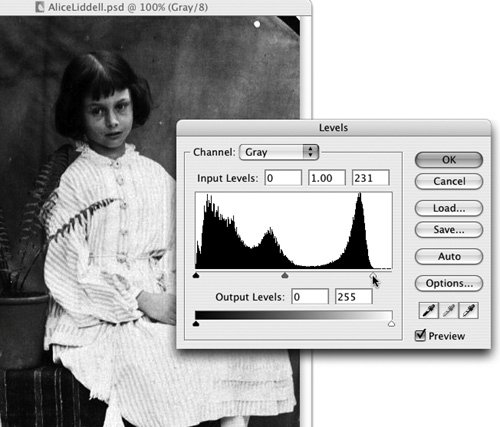
Adjusting Tones in PhotoshopAdjusting tones is important for taking a dull, flat image and turning it into one that grabs your attention. It can take a dark, murky picture and makes its detail visible. There are four primary tools for adjusting the tones of an image: the Histogram and Info palettes, and the Levels and Curves dialog boxes. Almost all of the commands for adjusting tone and color are found on the Adjustments submenu in the Image menu. The Histogram palette (Window > Histogram; see Figure 4-14) is a bar chart of the tonal range. It plots levels of tone along the horizontal axis, and the number of pixels at each level along the vertical axis. (Choose Expanded View from the palette menu to see additional information.) Figure 4-14. When adjusting tones in Photoshop, use the Histogram and Info palettes to see the effect of the changes you make.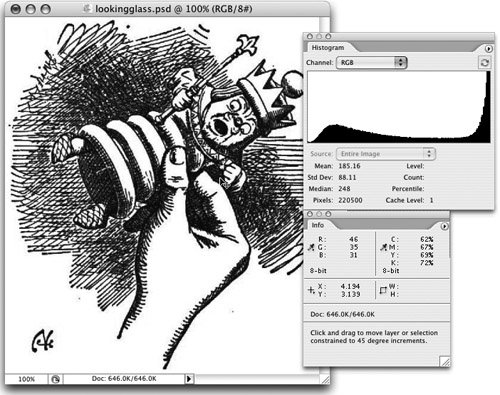 The Info palette (Window > Info; see Figure 4-14) uses the Eyedropper tool to measure the tones and colors in the image. It's an informational display which lets you see the effect of tonal and color adjustment presented in a Before/After format when you're using one of Photoshop's many adjustment tools. You can choose the color model(s) you want to display. Tip: Sample Size When you select the Eyedropper tool, the Options bar shows the Sample Size menu. Here you can choose the number of pixels used Point Sample (a single pixel), 3 x 3 Average, or 5 x 5 Average. The Levels dialog box (Image > Adjustments > Levels; see Figure 4-15) provides controls over tone which are both easy to learn and still very powerful. For the simplest adjustments, use the three Input Levels controls the three triangles immediately under the histogram. These let you control, from left to right, the black point (darkest part of the image), the gamma (midtone of the image), and the white point (lightest part of the image). Figure 4-15. We lightened the highlights of this image using the Levels dialog box. Here are some examples of how to use the Levels command:
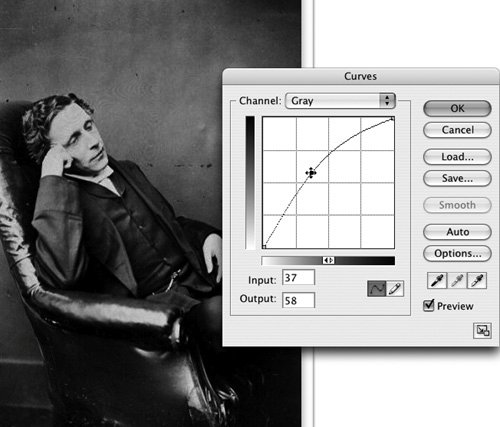
The Curves dialog box (Image > Adjustments> Curves; see Figure 4-16) displays a graph that plots the input level (existing pixel values) along the bottom, and output level (corrected values) up the side. When you first open the dialog box, the graph shows a 45° line, and as you make adjustments, the shape of the curve changes. Figure 4-16. We lightened the midtones of this image with the Curves dialog box. Here are some simple examples of how to use the Curves controls:
The Curves dialog box is more challenging to learn than the Levels command, but gives a Photoshop professional lots of control over tonal and color adjustments. We highly recommend Real World Adobe Photoshop CS2 from Peachpit Press to learn more about tonal and color adjustment tools in Photoshop. Adjusting Color in PhotoshopAdjusting color is a more complex topic than adjusting tone. If you're new to working with color, you might want to look at Chapter 10, "Colors and Color Management," first. Traditionally, those who work with color-correcting images tend to work in this order:
The primary tools in Photoshop for working with color are the same as for working with grayscale correction the Histogram and Info palettes and the Levels and Curves dialog boxes. However, Photoshop has developed a host of supplementary tools and commands for color adjustments. Here are some of the most important:
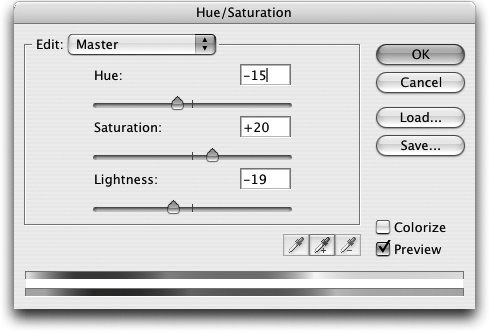
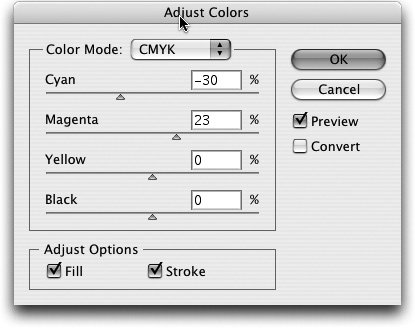
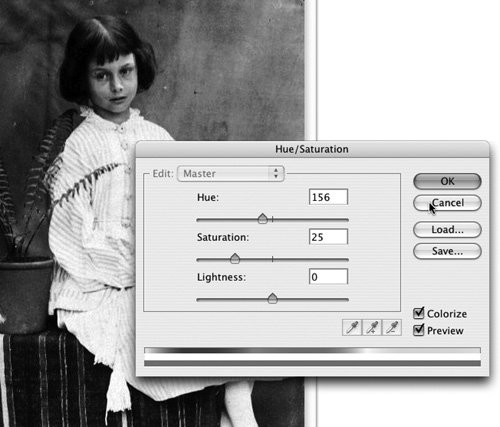
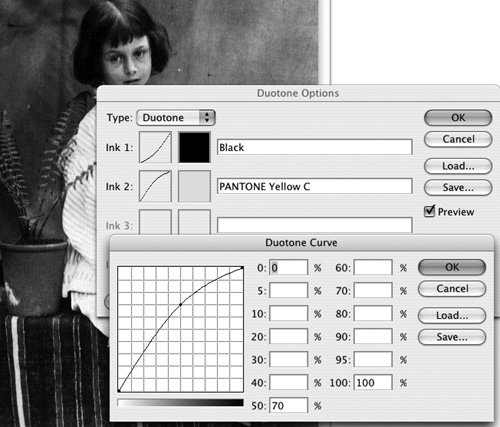
Using Color Filters in IllustratorSteve and Sandee almost always do tonal and color adjustments in Photoshop because it offers by far the most control over the process. However, Illustrator has a few color-adjustment commands in the Filter > Colors submenu. (What Photoshop calls "image adjustments," Illustrator calls "filters.") These filters adjust the color for both selected vector objects and embedded images. For example, you can use the Convert To Grayscale command to change selected objects into grayscale! One filter worth taking a look at is the Adjust Colors dialog box (Filter > Colors > Adjust Colors; see Figure 4-18). When you have selected vector objects and embedded images, you can adjust the color components of the selected objects. For example, when you're working in CMYK color space, CMYK mode lets you increase or decrease the cyan, magenta, yellow, and black percentages of all non-global process colors. If you check Convert, any global or spot colors will be adjusted as well. Figure 4-18. The Illustrator Adjust Colors dialog box lets you change the color of both vector and raster objects. Colorizing Pixels and Raster ImagesAdding color to a black-and-white or grayscale image is called colorizing. As with the other tasks in this section, there are two approaches. Photoshop changes the color of the actual pixels of an image. InDesign and Illustrator both have controls for colorizing grayscale and color image files. (With the latter approach, it appears that the pixels have changed in InDesign or Illustrator in the onscreen or printed artwork; instead, the change is applied to the raster file. After colorizing the pixels, if you were to open the file in Photoshop, the pixels themselves would still be black-and-white or grayscale.) Colorizing in PhotoshopWe've found two primary methods for adding color to grayscale images in Photoshop. When you want to create a quick colorizing effect, you can convert the image to RGB (Image > Mode > RGB Color). Then choose Image > Adjustments > Hue/Saturation, and, if you check the Colorize option, you can adjust the Hue, Saturation, and Lightness sliders to add color (Figure 4-19). Figure 4-19. Add color to a grayscale image by changing it to RGB and using the Colorize option in the Hue/Saturation dialog box.(See the color version on page C-3 of the Color Insert.) For more control, you can start with a grayscale image, and create a duotone image. If necessary, choose Image > Mode > Grayscale to convert the image to grayscale. Then choose Image > Mode > Duotone. The image will appear with one black channel in the Duotone Options dialog box. Click the color box beside Ink 2 to add a second color (or add additional colors for a tritone or quadtone). Then click the curve box beside each ink and drag the curve or add new control points in the Duotone Curve dialog box. Figure 4-20. You have more control over colorizing an image in Photoshop by creating a duotone.(See the color version on page C-3 of the Color Insert.) Colorizing in InDesign and IllustratorColorizing a black-and-white or grayscale image file is incredibly easy in InDesign or Illustrator. In InDesign, you can colorize either a grayscale or black-and-white image if it's in TIFF, JPEG, or PSD format, but it may not have any transparency. You can use process or spot colors. The key is to choose the right tool. You must click the image with the hollow-arrow Direct Selection tool. You can then use either the Swatches or Color palette to apply color, or use the tint slider to modify the color. For Illustrator CS2, colorizing a grayscale image is a new feature. (It has had the capability of colorizing black-and-white images for several versions.) You can colorize PSD, TIFF, JPEG, and even PDF black-and-white and grayscale images. Just click the image with the Selection tool and choose a color on the Control or Swatches palette (or drag and drop a color, if you like). While it is convenient to colorize images this way, the more sophisticated controls are found in the Duotone Options in Photoshop. Painting and RetouchingSometimes you want to change a raster image, either subtly such as removing small scratches or dust in the image or more radically such as changing the photography to look more like an oil painting or watercolor. This is definitely Photoshop's arena. It provides a mind-boggling array of tools for painting and retouching. Painting ToolsSandee and Steve aren't fine artists, so we can't tell you how to create artistic effects (many books do that). However, we can point you to some of Photoshop's more important painting tools because everyone will use them once in a while, even in a production environment.
Tip: Paint on Layer Masks When you're using the Brush tool to make corrections, paint onto a layer mask. This doesn't change the actual pixels of the layer until you've applied the layer mask. Until then, you can change your mind, and repaint. We discuss more about layer masks in the "Masking Layers" section in Chapter 12, "The Flexibilty of Layers."
Retouching ToolsWhen images are sampled with a scanner, the process usually transfers imperfections dust, scratches, specks, and spots. Almost every image requires at least a small amount of retouching. But as everyone knows, we can also use Photoshop to change reality to remove the power lines from an image that distract from the subject we're trying to show, for example. For these kinds of jobs, Photoshop provides retouching tools. First, there was the Clone Stamp tool (known as the Rubber Stamp tool in early Photoshop versions). The Clone Stamp tool makes a copy of pixels (called sampling) in one area of the image when you Option/Alt-click with the tool, and then paints with that copy elsewhere in the image when you drag the tool. However, this tool has its limitations when the tone or color of the source and the destination are different. But Photoshop CS2 has added some other new tools to make the retouching process even easier:
Applying Filters and Effects"Filters and effects" is really a hodge-podge category. The tools in the Photoshop Filter menu and the Illustrator Filter and Effects menus can perform many different kinds of operations: They can blur or sharpen pixels, add textures or noise, distort images, add artistic effects, or even mask away unwanted parts of an image. Photoshop FiltersIn addition to the filters we've already mentioned, here are a few of the most important ones:
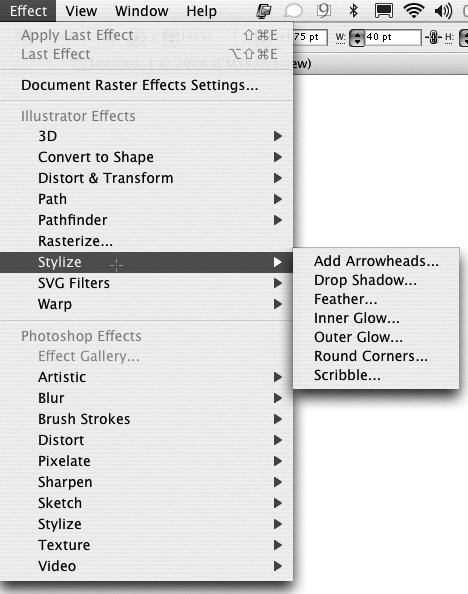
Illustrator's Raster Filters and EffectsIllustrator has filters and effects that can create pixels as well. They're found in the Filter and Effect menus (Figure 4-25). Many of the commands here can either be applied to Illustrator vector objects or to embedded raster objects (they can't be applied to linked images). For the difference between filters and effects, see the sidebar "Filters versus Effects." Figure 4-25. The Effect menu in Illustrator is divided between Illustrator Effects and Photoshop Effects. The Stylize commands (to create drop shadows, feathering, or glows) create raster objects. The Effect menu is divided into two parts: Most of the effects listed in the section headed Illustrator Effects keep vector objects as vector for example, those which change the shape of paths, or apply distortion effects. But the Drop Shadow, Feather, Rasterize, Inner Glow, and Outer Glow commands produce raster objects. In addition, 3D Extrude & Bevel and 3D Revolve produce raster objects when raster images or gradients are in mapped artwork. Effects in the Illustrator Effects section can be applied to either CMYK or RGB objects. The effects in the Photoshop Effects portion of the Effect menu can be applied only when you're in RGB color mode, with the exception of the Blur effects, the Pixelate effects, and the Unsharp Mask command. Illustrator CS2 now has an Effect Gallery for experimenting with these effects, just like in Photoshop. If you apply one of these artistic effects to a vector object, and then expand the appearance, you will also create an embedded raster object.
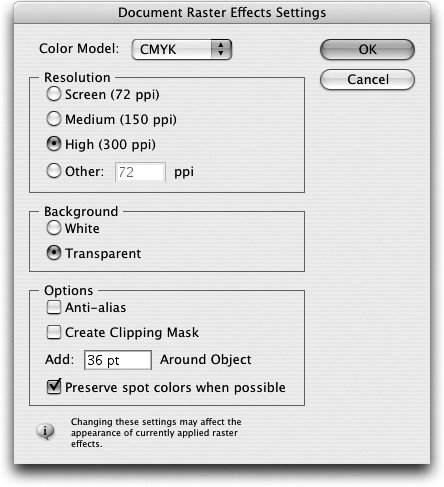
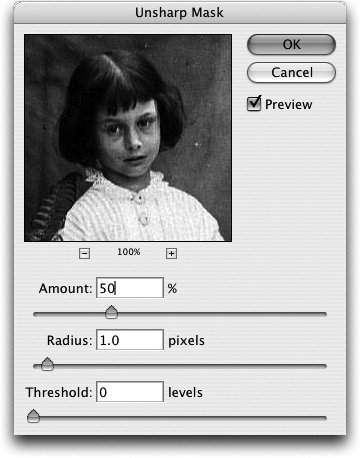
Setting Resolution for Illustrator Raster EffectsIf you're planning to print Illustrator artwork that contains raster effects, it's important to set a resolution that's appropriate for your printing process. The resolution of Illustrator raster effects is a document-wide setting found by choosing Effect > Document Raster Effects Settings. In the Document Raster Effects Settings dialog box (Figure 4-26), the resolution is set to screen resolution (72 ppi) by default for faster screen redraw. If you don't change that setting to something more appropriate for higher resolution and quality output, that's the way the effect will print! Figure 4-26. If you're printing Illustrator artwork that contains raster effects, it's important to choose the appropriate resolution in the Document Raster Effects Setting dialog box. One other difference between the Illustrator and Photoshop Effects is that the Illustrator effects like Feather, Inner Glow, Outer Glow, and Drop Shadow are measured in ruler units (such as points). Photoshop Effects the effects under the Blur submenu, for example are measured in pixels. If you change Illustrator's Document Raster Effects Settings, the strength of the effect will change. Effects under the Pixelate submenu are also resolution-dependent. So after changing the Document Raster Effects settings, re-examine your artwork carefully. Now in Illustrator CS2, you can apply spot colors to raster effects like drop shadows. These will print correctly as composites or separations, and will print as spot colors when placed in applications like InDesign. Sharpening ImagesWhether you create images for print, multimedia, or the web, you will probably need to sharpen them. Whenever you scan or capture an image with your camera, you always lose some sharpness when an image is digitized. It's just part of the process, and capturing more resolution won't help. Since our eyes are attuned to looking for the edges of things, viewers of your images will always notice a soft edge. The process of printing whether on an inkjet printer or a printing press also causes a loss of sharpness. The answer is to sharpen your images. Traditionally, the best place to do image sharpening is with Photoshop's Unsharp Mask filter (Filter > Sharpen > Unsharp Mask; Figure 4-27). The name is no doubt confusing to you! It derives from earlier photographic methods of sharpening. It has three controls: Amount controls the intensity of the sharpening. Radius sets the width of the effect that the sharpening filter puts around edges; it's dependent on image resolution. Threshold determines how different pixels are before the sharpening takes effect. This is a complex subject: Real World Adobe Photoshop CS2 devotes a whole chapter to it. Figure 4-27. The Unsharp Mask filter gives you three controls for sharpening. Photoshop CS2 provides a Smart Sharpen filter, which is drawing rave reviews from most graphics professionals who have worked with it (Figure 4-28). It has several advantages over the Unsharp Mask filter. It reduces some problems, like color halos, caused by sharpening. The filter provides a large preview, an easier interface, and the ability to have separate controls for sharpening in shadows and highlights. You can finally save your settings for reuse (they will be stored in the Settings menu within the dialog box). Figure 4-28. The Smart Sharpen filter provides large previews, an easier interface, and the option to save settings.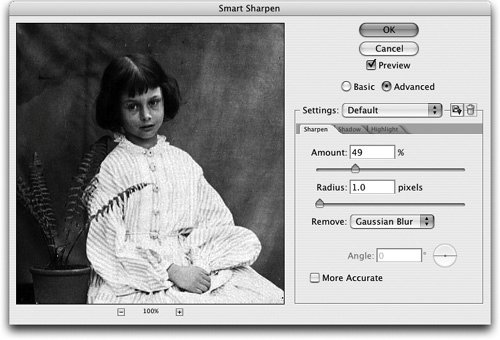 Just to be complete, we'll mention that Illustrator CS2 also has filters and effects for unsharp masking as well, found on submenus under the Filter and Effects menus. The controls work the same as in the Unsharp Mask filter in Photoshop, but only when you've embedded the image you're editing in an Illustrator document. Sandee and Steve prefer to do our image work in Photoshop, but the controls are there in Illustrator if you need them. |

EAN: 2147483647
Pages: 192