Pixel Essentials
| Many people get very confused when you start throwing around words like bit depth or resolution to describe how bitmapped graphics work. But in order to master pixels in the Adobe Creative Suite applications, you need to understand a few essentials. We'll try to keep it brief. There are three key interrelated concepts for you to grasp dimensions, resolution, and bit depth. DimensionsWhen you capture an image with a digital camera or scanner, or when you choose File > New in Photoshop, you're creating a grid of pixels of certain dimensions. The dimensions are the number of pixels in the horizontal (x) and vertical (y) directions. When you scan (often by choosing your scanner's software from the File > Import submenu in Photoshop), you choose settings that determine the pixel dimensions. The Import choices are particular to the scanner software you're using. With a digital camera, the fixed area array of the sensors captures a grid of pixels of defined dimensions. Camera resolutions are usually referred to by the number of megapixels (millions of pixels) they capture. When you create a new document in Photoshop, the Width and Height fields in New dialog box (Figure 4-3) define the pixel dimensions. When you increase the number of pixels in each dimension, you increase the file size proportionately. For example, if you start with a grid of 12 pixels x 12 pixels and increase the number of pixels on each side to 24, you quadruple the file size. ResolutionResolution is one of the most confusing and misused words in the language of computer graphics. Here's a simple definition: It's the number of squares of the grid in each unit of measurement, usually measured in inches or centimeters. For example, a low-resolution image used for screen display (like on the web) might have a resolution of 72 pixels per inch, while a high-resolution image used for commercial printing might have a resolution of 300 pixels per inch. What is important to realize is that the pixels are different sizes at the different resolutions. If you can fit 300 pixels in an inch, then they must be very tiny pixels; but if you can only fit 72 pixels in an inch, then they must be much larger pixels. What's confusing is that there can be several kinds of grids, which can refer to different kinds of things:
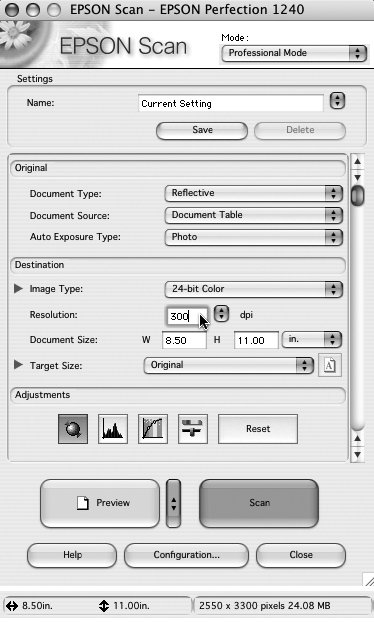
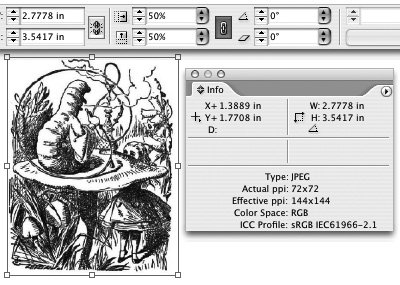
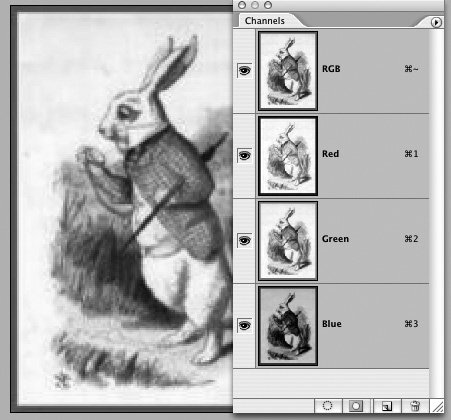
Sometimes the image resolution is determined when a file is created or a scan is captured. In the Photoshop New dialog box (Figure 4-3), notice that Resolution shows 72 pixels/inch. In Steve's Epson scanner, the resolution is also determined at the time of scanning in the Resolution field (see Figure 4-6). In the Epson software, the pixel dimensions and file size are shown at the bottom of the Preview window, but you could calculate them using the Resolution and Document Size fields. In the example shown, if you multiply the Resolution (300) by the Document Size width (8.5) and height (11) fields, you can get the image dimensions of 2550 pixels wide by 3300 pixels high. Figure 4-6. The Epson scanner software is used to define the Resolution and Document Size (left). With these settings, its Preview window displays the resulting pixel dimensions and file size (below). Some images are created without storing a resolution. For example, if you use a low-end consumer digital camera to capture a JPEG image and you place it directly into a layout, you may find that it comes in at a huge size! The reason is that the image has no defined resolution (this is not required by the JPEG format). So the page-layout program figures that the resolution is 72 pixels per inch instead of the 300 pixels per inch (ppi) that is more common. When an image comes in with the bigger pixels of 72 ppi, it takes up much more space (on your screen, not on your disk) than the smaller pixels of 300 ppi. However, some digital cameras now store the resolution and other information in the metadata (which we talk about in "Mastering Metadata" section of Chapter 3, "View from the Bridge"). InDesign CS2 is now smart enough to be able to read the metadata if it's present, and, if it finds no resolution data, can scale the image to some reasonable size. Effective ResolutionIf you take a 72-by-72-pixel image and scale it to 50% in InDesign or Illustrator, you are taking the same number of pixels and shrinking them to cover a smaller area. The image's effective resolution becomes higher 144 pixels per inch. If you scale the image up, so the pixels are made even bigger, then you reduce the effective resolution. Imagine that your image were transferred onto a piece of rubber. Now imagine you stretch the rubber image so that it becomes bigger. As the image becomes bigger, the quality of the art would deteriorate. That's what happens as you scale an image up in size. InDesign CS2 has a wonderful tool called the Info palette that tells you both the image resolution (which it calls Actual ppi) and the effective resolution (Effective ppi). Figure 4-7 shows the display of the Info palette and the Control palette (which shows the scaling) when an image is scaled smaller. Figure 4-7. An image with a resolution of 72 pixels by 72 pixels has been scaled to 50% (see the Control palette above). The InDesign CS2 Info palette shows the effective resolution is now 144 ppi. Bit DepthThe third essential concept is bit depth. This is the number of bits required to describe an image. Computers store data as bits of information. Since computers are binary, each bit is either on or off. With created or sampled black-and-white images, this means each pixel can be either black or white. These images are called 1-bit images, and they're referred to as Bitmap mode in Photoshop. With grayscale images, you can sample or create 256 shades of gray. This takes eight times as many bits to store as do black-and-white images (2 x 2 x 2 x 2 x 2 x 2 x 2 x 2 = 256), so these are sometimes called 8-bit images. Since scanners and digital cameras work with light, their primary colors are red, green, and blue. In order to capture a color image, they have to capture three grayscale images one for each color. In Photoshop, we see these as channels in the Channels palette (see Figure 4-8) each of which represents a grayscale channel for the three primary colors. This makes RGB color images 24-bit. The three channels are composited into the RGB image we see on the computer display. (For printing, the three RGB channels are converted to a four-channel CMYK image cyan, magenta, yellow, and black.) Figure 4-8. A color scan opened in Photoshop's Channels palette. The Red, Green, and Blue channel thumbnails preview the three grayscale images composited into the RGB image we see onscreen. "High-Bit" CapturingIn the early days of desktop scanning, most scanners only captured 8 bits of data per channel (in a grayscale image, for example). Scanner technology has advanced, and today even inexpensive consumer scanners capture at least 12 bits of data for a grayscale scan (or 36 bits for a color scan). Some scanners can even record as many as 48 bits per color sample. Many scanners that capture more than 24 bits per sample of color information automatically compress this to just 24 bits when saving the final scan file. This can be a very good thing, because these "high-bit" scans create large file sizes, and are slower to process. However, if you want to make major tonal or color corrections using Photoshop's powerful features, it's better to save this "high-bit" information. Photoshop supports 16 bits per channel in its images. Older versions of Photoshop provided only limited editing features with "high-bit" data, but each new version has added new ones. In Photoshop CS2, even more filters have been upgraded to 16-bit compatibility, including Liquify and Lens Blur. Calculating File SizeWhen you know the pixel dimensions of an image and its bit depth, you can then calculate its file size. This will help you ensure that you have the right amount of information for your particular workflow. Black-and-white images are the smallest. Grayscale images are eight times as large. Capturing pixels in color creates a file three times as large as grayscale. Tip: New Dialog Box Calculator When trying to figure out how big a capture to make, you can use the Photoshop New dialog box as a calculator (Figure 4-3). In the menus beside the Width and Height fields, choose pixels, and enter the dimension of an image. Choose Bitmap, Grayscale, or RGB Color in the Color Mode menu. (If you're doing a high-bit capture, change the menu to the right of Color Mode to 16 Bit.) Photoshop then calculates the image size and displays it on the right side of the dialog box. That covers just the basics. If you'd like to learn more about working with these concepts, as well as how to make the best use of your scanner, we highly recommend Real World Scanning and Halftoning, which goes into a lot more detail. |
EAN: 2147483647
Pages: 192