Deciding on the Themes
| The first step in the Theme/Doc requirements analysis process is to figure out what functionality relates to which theme. Once you've done that, you can look at the overlap between the themes and see whether making some themes aspects would be beneficial to the design. There are lots of ways you might parcel your requirements into a set of themes, and many approaches for refining and parceling requirements into features, concerns, or goals. Some of those approaches were described in Chapter 2, "The Object-Oriented Way." Theme/Doc views can also help with this task because they can give you, at a glance, a sense of which requirements have been assigned to a theme and which themes might not actually be effective. This section goes over how Theme/Doc views (specifically, the theme-relationship view) can help with assigning themes to requirements. Choosing Initial ThemesThe starting point for the Theme/Doc approach is finding a set of potential themes, or features, of your system. This is not the same as finding the eventual themes or concerns of your system. That comes later, and likely after much iteration. This initial step is to identify all the behavior described in your requirements that could potentially be a theme. To get a list of potential themes, you pick out key concerns described in your requirements. How you choose your initial themes likely depends on the kind of requirements you have. If your requirements have been translated into one or more use cases, you might start with each use case becoming a theme; or, if the use case covers a great deal of functionality, you might try starting with each action in the use case as a theme. If you have a set of formally specified and refined goals, as you would if you had applied a goal-oriented requirements engineering approach, then you might choose key terms from the goal or subgoal behaviors to represent themes. If you have a set of requirements like the one we have (See appendix "The Crystal Game" for the full list), which are quite informal and written in natural language, there is a spectrum of approaches you might apply. The two extremes of the spectrum are the "choose-carefully-up-front" approach, and the "start-with-everything" approach. In the first, you begin with some well-chosen themes, but may break them up later to form smaller ones as needed. In the second, you begin with a potentially huge set of themes, then reduce that set by grouping and removing themes from your list. Somewhere in the middle of the spectrum is the more moderate and likely useful way. It combines the two extreme approaches. We now go over each one in detail and look at the kinds of initial themes you can expect to identify with each one. Along the way, we use the example described in the appendix, "The Crystal Game." The Choose-Carefully-Up-Front ApproachWith this approach, you read through the set of requirements and identify key bits of functionality that are likely to become features in your implementation. This approach takes some time up front, since to choose well you must carefully assess what concerns your requirements describe. With this scheme, your main task is to split up themes that are too general or that have requirements that, when grouped, do not form a cohesive set of functionality. If we look at the Crystal Game example in the appendix, we may choose the following potential themes:
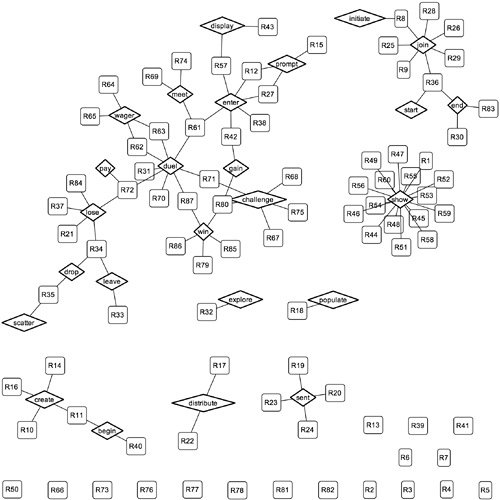
The Start-with-Everything ApproachIn this approach, you might choose all verbs, or action words, written in the requirements. This is a straightforward approach and can even be automated to some extent. There is a multitude of tools that identify nontrivial verbs in a textual document. A good place to look for those tools and the products that are built to work with them is Edinburgh Language Technology Group (LTG) at http://www.ltg.ed.ac.uk/. Automatic indexers can also identify all "important" terms in a document. This approach saves time during the first step of going through the documentation. However, with this approach, you will have lots of potential themes. You are working to eventually get to a set of well-chosen themes, which may or may not correspond well to a set of automatically chosen terms. This means that your main analysis job is to narrow down which of the terms are real themes and to group verbs to form bigger actual themes. If we looked for nontrivial verbs in the Crystal Game requirement, here is what we might come up with: accumulate ask assign carry challenge choose collect comes create decide depend display dissipate distribute drop duel encounter end enter equip expire explore find force give grant honor identify interfere join leave locate look lose mean meet obtain own permit pick placed played pose proceed prompt provide reach respect restore return reward run see select send set show split start take tap track wager win A Combination of the Two ApproachesIn reality, your approach will probably be a mixture of the two described above. You'll likely read through your requirements document and pick out anything that looks like a behavior, concern, or feature of some kind. This is a little more conservative an approach than just choosing any nontrivial term, and a little freer than picking only concepts that look highly promising. You may miss some smaller bits of behavior, or you may have broken features up a little too much, but that's fine; this is only a starting point. The next few steps of grouping and segmenting themes (described in the next several sections) will help you converge on a good set of themes regardless of whether you have chosen too many or too few initial ones. As a compromise, we use a set of themes that are not as high level as those in the choose-carefully category, but not as fine-grained as the list from the start-with-everything approach: begin challenge create display distribute drop duel end enter explore gain initiate join leave lose meet pay populate prompt scatter sent show start wager win Looking at the Theme-Relationships ViewNow that you have an initial set of themes, you can take a look at the theme-relationships view, also called the relationship view. Figure 4-7 shows the relationship view if we had started out with the choose-carefully set of themes. As you can see, each theme we listed is shown as a diamond. However, many requirements do not explicitly mention any of the themes we've chosen. You can tell this because there are lots of orphaned requirements in the viewthat is to say, they're floating on their own rather than having a link to one of the diamond-shaped theme nodes. The orphaned themes form a grid on the right hand side of Figure 4-7. As mentioned above, the main job with this starting set of themes is to visit each orphaned node to determine with which of the themes it rightly belongs. Figure 4-7. "Choose-carefully" initial theme-relationship view.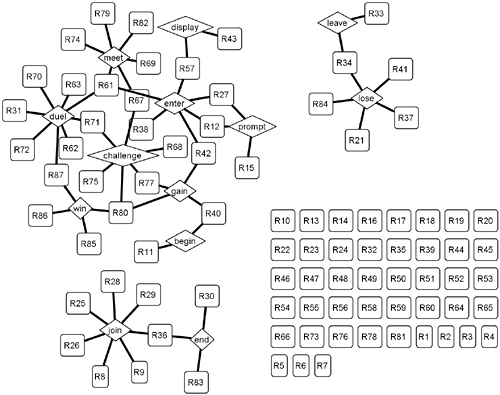 You can also see that some requirements are linked to more than one theme. These are called shared requirements. They represent functionality overlap between the themes, since in their text they mention the name of more than one theme. At a later stage (described in the section "Identify Aspect Themes"), a decision must be made about which theme actually owns that overlapped functionality. The start-with-everything initial relationship view (shown in Figure 4-8) is the other extreme from the choose-carefully view. Here, there are very few orphaned requirements and many shared requirements. Considering that there were only a handful of themes listed using the choose-carefully approach, it's unlikely that all of these would end up being themes. It's more likely that they would be merged into groups and that some would be discarded all together. Figure 4-8. "Start-with-everything" initial theme-relationship view.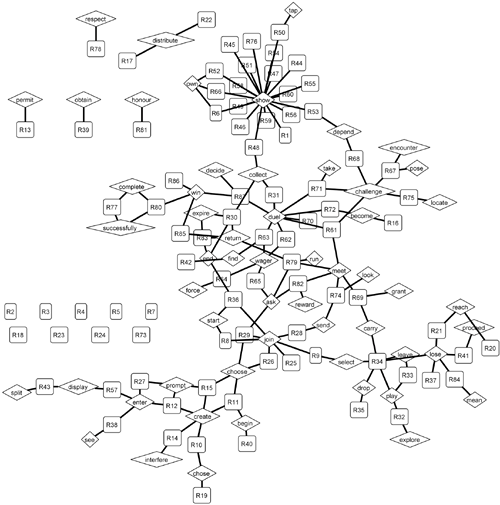 The relationship view for the compromise approach is shown in Figure 4-9. As given, it doesn't have the multitude of themes in the start-with-everything view and also has fewer orphaned requirements than the choose-carefully approach. For the rest of this chapter, we will use this set of themes as a basis for discussion. If we refer to one of the other views, we point that out explicitly. Figure 4-9. Compromise themes: initial relationship view.
You should also note that if you specify a theme that does not appear in the text (if there is no lexical match for the keyword), then it would not appear in any of the Theme/Doc views. These views are just representations of the text; they neither interpret it in any way nor do automatic synonym detection. Later (in the section "Unifying Synonym Themes"), we go over how to compensate for the lexical nature of the Theme/Doc view-generation. Dealing with Large Relationship ViewsIf the number of themes and requirements is very large, the relationship view is also very large: There is one node for each theme and one node for each requirement. One way to handle the size of the view is by grouping sets of themes. Grouping is quite straightforward. It involves selecting a theme to be the main theme of a group, and then specifying the other themes as subthemes of that main theme. Grouping collapses all the subthemes into the main theme. Later in the chapter, we talk about grouping themes to actually arrive at a better set of themes. But grouping can also be helpful for reducing complexity and clutter in large relationship views. If, for instance, you wanted to focus on just the requirements and themes related to join (shown in the top-right of Figure 4-9), you might collapse the big, connected group of themes (which includes meet, duel, challenge, pay, enter, etc.) into one big theme called play. Regenerating the view then produces a far less cluttered view. You can then remove the grouping later to see the themes as they originally were. You can also play with the options of the Theme/Doc view-generation tool to change the sizes of the theme and requirement nodes. For instance, you can enlarge some requirements (connected to certain themes) while making others smaller. This would help you if you were trying to focus on one portion of the view. Examples of partial view enlargements are presented later in this chapter. Operating on ThemesFigure 4-6 showed that there are four operations you can perform on themes. You can split them up if you feel they are too general, you can add new ones if you feel one is missing, you can delete a theme that seems unhelpful or irrelevant, or you can group themes that seem similar (combining them into one larger theme). We now go over when you might apply each of these operations. Split Themes If They Are Too GeneralRegardless of how you went about choosing your initial set of themes, you'll find that you have behaviors associated with a particular theme that do not belong together. It's important to remember that you want themes that are coherent and cohesive, which means that one theme should not try to fulfil many unrelated requirements. The enter theme consists of the following requirements:
As you can see, some of these requirements are about a player entering a location, whereas others are about a player entering information. The enter theme could be split into two more cohesive themes: one about entering a location and the other about entering information. To perform this split, you make two new themes: enter-location (consisting of R38, R42, R57, and R61) and enter-input (consisting of R12 and R27). You then choose to explicitly attach the requirements to the appropriate themes. Attaching explicitly links a requirement to a particular theme even though the theme is not mentioned in the requirement. Figure 4-10 shows that we have attached the four requirements for enter-location, but did not do so for enter-input. As you can see, enter-input is not attached to R12 naturally (since neither requirement contains the text "enter-input"), and so it appears isolated in Figure 4-10. In the next step we will use enter-input as an example of how we can link requirements to themes without explicitly attaching them. Figure 4-10. Results of theme operation: split.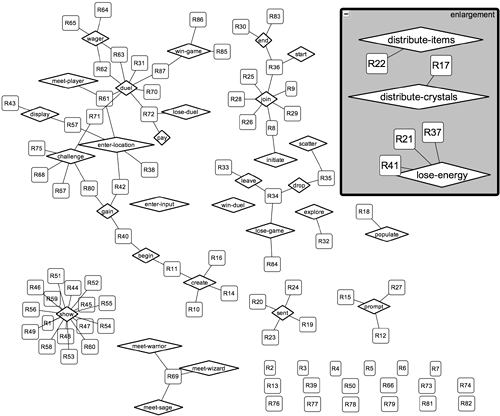 Another example of a theme to split is the distribute theme, which is initially made up of two requirements:
The first requirement is about distribution of crystals, and the second is about distribution of magical items. While this might seem fine now, it's possible that later in the design phases, you might decide these activities are better modeled separately; the functionality to accommodate crystal distribution is very different from the behavior for item distribution. Maybe the distribute theme is two themes masquerading as one. Once again, we make the new themes (distribute-crystals and distribute-items) and reattach the appropriate requirements with those themes. In Figure 4-9, you can see the result of splitting some of the themes. You can see that the distribute-crystals theme is on its own. Additionally, you might choose to split the lose theme into lose-duel, lose-energy (which essentially keeps track of energy levels of a player), and lose-game (which involves the final showdown of the game), since these are three very different concepts. Similarly, the win term is used in two senses, encompassing both winning of duels and winning of the game itself. Finally, the meet theme encompasses meeting characters and meeting players. You may choose to split these also. Figure 4-10 shows the following changes:
Group Similar ThemesIf you applied the start-with-everything approach, it is likely that you have many finely grained themes. Some of the names of these themes may have the same literal meaning, but since different words were used, they showed up separately in the relationship view. Others may not have the same literal meaning, but are synonymous in the sense that two events or behaviors always happen together. In either case, you don't want them to remain separate themes. Instead, you want to group them into one larger theme. We actually use two terms to refer to grouping of themes. One is straightforward grouping, in which subthemes are essentially encompassed by another theme. The relationship and crosscutting views display only the main theme of a group and redirect all requirements connections from subthemes to the main theme. Subthemes are not displayed. The subthemes are displayed in the individual view, however. The other kind of grouping is a special case called unifying, which is mainly used for handling synonyms. Unified themes are displayed only by their main term in all views. We look first at situations in which you might want to unify themes and then at situations where grouping might be appropriate. Unifying ThemesWhile the unify operation is mainly used for resolving synonyms, it is handy to use in any case where you would like to essentially "replace" references to one theme with references to another. First, let's consider some themes that have the same literal meaning. These are relatively easy to spot. Of course, you can't be sure just by looking at the terms themselves that they refer to the same concept. To be positive, you have to inspect the requirements that describe them to compare their meanings. One that stands out is the set of themes related to distributing crystals around the game location: populate, scatter, and distribute-crystals. The requirement attached to populate is R18: When the game environment is initially populated with crystals, a random number of random locations are populated with a random number of crystals up to 10. The scatter requirement is R35: Dropped crystals are rescattered throughout the game area. We saw R17 above: The new game randomly distributes crystals throughout the game area. All of these terms refer to the distribution of crystals, so we unify all these themes under the distribute-crystals heading. This unification results in the distribute-crystals theme found in Table 4-1. Notice that R18 and R35 do not mention distribute-crystals explicitly. Still, the unification means that R18 and R35 will be attached to the distribute-crystals theme.
Other themes we might think about unifying are the themes associated with game creation, such as start, create, and begin, and those associated with the user interface, such as display and show. Dealing with synonyms doesn't have to happen just on the theme level. For instance, a theme might not catch all the requirements it should because they use synonyms of your theme and not the theme name itself. For instance, when you look at the set of meet-character themes (meet-wizard, warrior, and sage), you can see that they are not connected to the challenge theme in any way. This seems odd, since characters pose challenges to players. It makes sense that these should have been linked in the requirements. Sure enough, when we inspect R67, it says, When a player encounters a character, the character poses a challenge to that player. Meet and encounter are synonyms, and R67 should relate to each of the meet-character themes. Since the meet theme has been split into the three meet-character themes and meet-player, we must attach R67 to the three meet-character themes in addition to unifying it with meet. Unified themes appear in all views only under their unified heading. When you look at Figure 4-11, you can see in the enlargement marked "unify" that R18 and R35 both point to the distribute-crystals theme . Essentially, what you have done by choosing to unify a set of themes is set up a dictionary of synonyms in which there is one dominant term for each collection of synonymous ones. When the Theme/Doc view is created, only the dominant term is used. Unifying (or grouping) themes can be used to attach a requirement to a theme implicitly. Recall that at the end of the split-theme operation enter-input was linked to no requirements. Here, we unify the word "tap" with enter-input and as a side effect, attach enter-input to R50 (the player can tap on the dots to see the options available). Figure 4-11. Results of theme operations: group, unify, delete.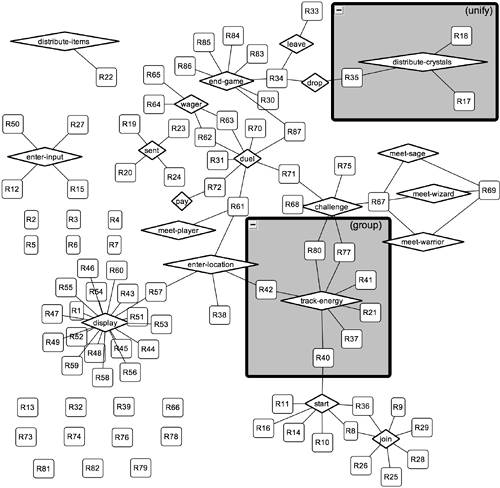 Figure 4-11 shows the following changes:
Grouping ThemesGrouping a set of themes collapses those themes together into one theme. The main theme of a group is the only theme displayed in the relationship and crosscutting views. The individual view ignores the grouping and displays all the subthemes. This operation is useful for grouping closely related behavior that you would like to design as one theme. You can also use groupings to capture a decision to essentially demote behavior from being its own theme to being a method. Grouping can also be used as a convenient way to collapse portions of the relationship and crosscutting views temporarily while focusing on other areas (see the section "Dealing with Large Relationship Views" for more information). Now, let's take a look at some themes that seem to describe closely related behavior. One such set is behavior related to energy. The gain and lose-energy themes capture two opposite but closely related concepts. You can imagine that these two themes would share a lot of underlying structure (all the energy-related state). The difference between them would be relatively small. These could be grouped quite naturally in a track-energy theme. In that case, you would create a new theme, track-energy, and designate gain and lose as its subthemes. If you reach design and decide that these two themes are better off separate, it is fine to backtrack and split them up again. Another set of behaviors you might want to group is the end-game functionality. There are currently two themes, win-game and lose-game, that deal with the end-game scenario. Finally, you might consider grouping all the user-interface-style themes into one. These are currently the display, enter-input, and prompt themes. They all deal with input to the game-play device. Once again, this grouping involves creation of an end-game theme and specification that the other themes are subthemes of end-game. Figure 4-11 shows the following changes:
Delete Unwanted ThemesAs you refine your themes, chances are that you will find some themes too trivial or too unrepresentative of the system's functionality to keep. The only really trivial theme that can be identified in Figure 4-9 is the explore theme. It has only one requirement, R32: Players explore the world by walking around the game-play area. While this theme is important from a user perspective, it is not useful in terms of its impact on the design. So, we omit the explore theme and deal with the now-orphaned R32 in the next section. Figure 4-11 shows the following change:
Operating on RequirementsFigure 4-6 depicts five operations that can be applied to requirements. Two of them are part of the process of deciding on the themes to include in your system: adding new requirements and resolving or refining requirements that can be made more concrete. A third, postponing requirements, spans both deciding on themes and determining theme responsibilities. We discuss situations in which you would apply these three operations and limit our discussion of postponement to how it's applied when deciding on your themes. The other two requirements operations (association and postponement of association) are discussed in the section "Deciding on Theme Responsibilities." More on the use of postpone in terms of determining theme responsibilities is also discussed in that section. Postponing RequirementsAt this point, we can postpone requirements that are not interesting from a design perspective (or until more information becomes available). Recall R32, which describes that players will roam around the game area. This feature is nice to have in a high-level requirements document just to give a sense of the overall system to the reader. It isn't, at this point, a useful requirement for moving forward to design. The best way to deal with this requirement is to postpone it and see if later in the development process more insight arises (or other requirements are introduced) to advise how to handle it. Postponing it changes its outline to dashed, which signals to us that it is a requirement that we are choosing not to deal with right away. Figure 4-12 shows the following change:
Figure 4-12. Results of operating on requirements.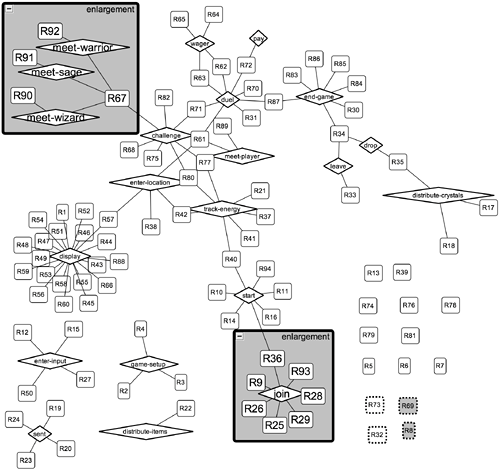 Adding RequirementsRequirements can be added either by introducing new requirements into your set or as a product of splitting up an existing requirement. Incorporating New RequirementsDepending on the kind of approach you use to develop your system, requirements may or may not crop up after you've already begun the analysis process. If they do, then you need to be able to add them to your existing set of requirements in order to see how they can be integrated with the rest of the system. Adding new requirements in Theme/Doc is straightforward; you simply add them to the set of requirements and then regenerate the relationship, crosscutting, and individual views as required. If the new requirements contain text that refers to pre-existing themes, the text will be automatically linked to those themes in the views. The new requirements may give rise to new themes, causing you to rethink the themes you already have or to change their groupings. How deeply you reassess your existing theme breakdown depends on how far into the development process you are. If you are at the beginning of your requirements elicitation process, then adding new requirements is no big deal. However, perhaps you have designed and implemented many of your themes already. If so, then new requirements can be included in a way similar to that described in the "Revisiting Evolution" section of Chapter 3, which involved the creation of new themes to handle the new requirements. Those themes instead of the themes they replaced were then composed together with the rest of the system. More on how to perform compositions is described in Chapter 6, "Theme Composition." If you're somewhere in the middle, you probably can add the requirements and see how they relate to the existing themes and make adjustments accordingly. It's of course impossible to predict how a hypothetical requirement will impact the functionality of a system, but the Theme/Doc views provide a starting point for assessing that impact. Splitting RequirementsSome requirements are added as a result of splitting up requirements already in the set. Splitting is sometimes appropriate for requirements that are not written concretely enough to link to any particular behavior. Take, for instance, requirement R73: Wizards are magical beings. It is, of course, up to you to decide how to deal with requirements that are this abstract. One possibility is to refine the requirement to try to make it more concrete and to perhaps split it into several requirements that get at its real intent. Perhaps this requirement refers to wizards interacting using terms specific to a magical being. Players can choose to be personified in the game as wizards. R73 tells us that the user interface display differs depending on a player's chosen persona. One interpretation of requirement R73 is that the user interface for a wizard-player should have magical-seeming terms and icons. Taking that interpretation, this requirement could be refined into Players that are wizards should have magical icons and terms displayed in their user interface. This requirement would automatically be linked to the display theme already in the list of themes. Or, requirement R73 might mean the language that wizard-NPCs use should be magical-seeming: When wizard characters meet players, they should speak to them using magical language. This requirement would automatically be linked to the meet-wizard theme. Since R73 would be diminished by altering it, you may choose to preserve it in its original state and add a new requirement that represents the refinement. You could then postpone it, as we discuss next. So, we add two new requirements: R88 (Players that are wizards should have magical icons and terms displayed in their user interface) and R89 (When wizard characters meet players, they should speak to them using magical language) to reflect the additional requirements that we want to incorporate. Figure 4-12 shows the following changes:
Attaching Requirements to ThemesWe saw examples of attaching requirements to themes earlier in the theme-operations section. We now discuss how attachment can be used from a requirement-operation perspective. In particular, we look at how it can be used to remedy orphaned requirements. As described earlier, orphaned requirements appear as requirement nodes that are not connected to a theme node in the relationships view because they do not specifically name any term that was included in the list of themes. Ultimately, we would like to completely rid ourselves of orphaned requirements, since they represent elements of behavior that are not covered by any system feature. Orphaned requirements might rightly belong to an existing theme or might motivate the addition of new themes. If neither case applies, you can also postpone decisions about orphaned requirements, as described earlier. R2 is orphaned in Figure 4-11. It reads Location is defined by four points, forming a rectangle, and is outdoors. We currently have no theme that defines the game-play area. We could attach this requirement to an existing theme, such as the start-game theme, if we felt it was appropriate. As described in the section "Split Themes If They Are Too General," attaching a requirement to a theme explicitly places a link between the two by automatically annotating the requirement with that theme name. However, since the spirit of the start-game theme is more about setting up the game itself than defining the game as a concept, this option might not suit our needs. Instead, we could introduce a new theme called game-setup, which would allow us to capture some of the static game-infrastructure requirements. Other requirements that fit well into that theme are those from the same section of the requirements document (R2R7), namely, R3: The game boundaries are defined by four points, and R4: Not all points within the game boundaries are inside game locations. We add the new theme and attach to it R2R4. Figure 4-12 shows the following change:
|
EAN: 2147483647
Pages: 109
