18.1 Configuring Microsoft Access for Use with JDBC
| If you have Microsoft Office, Microsoft Access and the required Open DataBase Connectivity (ODBC) driver are probably already installed on your machine. So, although we don't recommend Microsoft Access for a high-end production Web site, we think that Microsoft Access is excellent for learning and testing JDBC code. For instance, the examples in Chapter 17 connect to the preinstalled Northwind database of Microsoft Access. For a production site, you should use a more robust product like Oracle9i, DB2, Sybase, Microsoft SQL Server, or MySQL. To connect to a Microsoft Access database from the Java platform, you can use the JDBC-ODBC bridge, sun.jdbc.odbc.JdbcOdbcDriver , included with the JDK. The bridge permits JDBC to communicate with the database by using ODBC, without requiring a native-format driver. However, you will need to configure an ODBC Data Source Name (DSN) to map a name to a physical database. The URL to connect to a Microsoft Access database does not specify a host. Instead, the URL points to a DSN, for example, jdbc:odbc: dsn ., where dsn is the name of the database assigned through the ODBC DSN wizard. Note that the Sun driver, sun.jdbc.odbc.JdbcOdbcDriver , is not fully compliant with JDBC 2.0 and thus does not support all the advanced JDBC features introduced in JDBC 2.0. However, it is more than adequate for the capabilities discussed in this chapter. You can find JDBC 2.0 drivers for Microsoft Access at http://industry.java.sun.com/products/jdbc/drivers/. For your application to connect to a database on a server, ODBC Version 3.x needs to be installed on that server. Fortunately, ODBC is installed with many Microsoft products. If you don't have ODBC, you can easily install it separately on your system. ODBC is bundled with Microsoft Data Access Components (MDAC). See http://www.microsoft.com/data/download.htm for the correct MDAC version to install on your system. Configuring a System DSN through the ODBC Administration Tool requires four steps, which we outline here and describe in detail in the subsections following the outline.
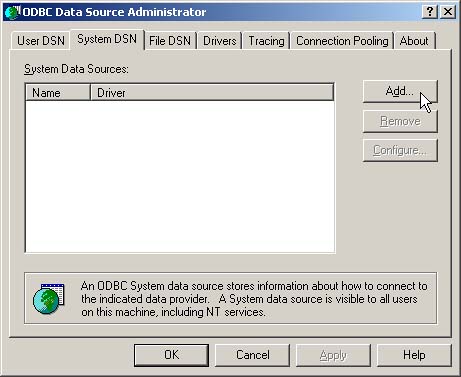
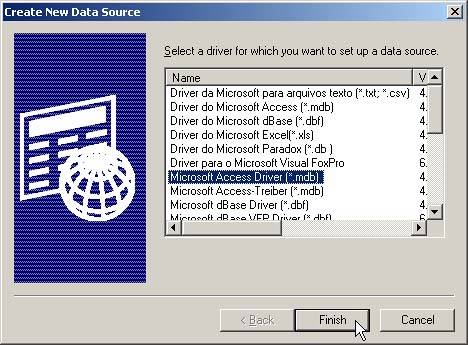
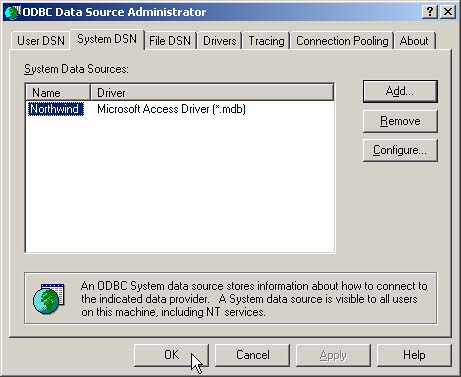
Select a System DSN from the ODBC Data Source AdministratorOn Windows 2000, you can configure the data sources (ODBC) by selecting Start, Settings, then Control Panel. Next, select Administrative Tools and then Data Sources. Lastly, select the System DSN tab, and select Add to create a new DSN. Other versions of Windows are similar; for instance, on Windows XP, the steps are identical except that you select the Control Panel directly from the Start menu. Figure 18-1 shows the System DSN tab in the ODBC Data Source Administrator window. Figure 18-1. First window displayed when you are configuring an ODBC data source. Select the System DSN tab and then click the Add button to create a new DSN. Select a Driver for the New System DSNIn the Create New Data Source window, Figure 18-2, choose the Microsoft Access Driver ( *.mdb ) and then select Finish. Figure 18-2. Second window presented when you are creating a System DSN. Before continuing the configuration, choose the driver for the data source by clicking Finish. Select a Data SourceIn the ODBC Microsoft Access Setup window, enter a data source name (with an optional description). The DSN will be the same name used in the JDBC URL, jdbc:odbc: dsn . For example, if you choose Test as the DSN, you would supply "jdbc:odbc:Test" as the first argument to DriverManager.getConnection . Next, click the Select button, as shown in Figure 18-3, to select the physical database file to bind to the data source name. After that step, click the OK button. Figure 18-3. Third window for setting up a System DSN to a Microsoft Access database. Specify the name of the data source (with an optional description) and then select the physical database file to bind to the source name. If you are using the Northwind sample database provided with Microsoft Access, the location of the database file is most likely C:\Program Files\Microsoft Office\Office\Samples\Northwind.mdb or something very similar, depending on the version of Microsoft Access you have installed. If the Northwind file is not available, you may need to install the sample database by opening Microsoft Access and selecting the Northwind Sample Database from the opened window. Alternatively, you can download the sample database from http://office.microsoft.com/downloads/2000/Nwind2K.aspx. Select OK to Accept the New DSNAt this point, the newly defined DSN should be listed in the System DSN tab, as shown in Figure 18-4. Finish the configuration by clicking the OK button. Figure 18-4. Fourth window presented after you have added a new system data source. Click OK to accept the change. |

EAN: 2147483647
Pages: 194