Chapter 2. Setting Up the Dreamweaver Workspace
| CONTENTS |
| |
|
- How Dreamweaver Thinks
- The New Dreamweaver Workspaces
- Touring the Dreamweaver Interface
- Getting Help
- Summary
A big part of what makes Dreamweaver so efficient and intuitive to work with, for web design newbies as well as seasoned professionals, is the flexible and streamlined workspace. If you've been using Dreamweaver for years, you already know this but you might be having a bit of culture shock wandering around the new, improved Dreamweaver MX interface. If you're new to Dreamweaver, it's all new and wonderful. Whoever you are, it's a good idea to take a few minutes to explore the environment, learn where things are, and see how you can set it up to suit your working style and level of expertise.
This chapter introduces the basic concepts of working with Dreamweaver, explores the new Dreamweaver MX interface (including the integrated workspace for Windows) and takes you on a guided tour through the major items you'll see therein, including docked panel groups, the document and site panels, the Insert bar, Property inspector and other miscellaneous windows. You'll also learn where to get help when you need it, using the Reference panel, the Help menu, and the new Answers panel.
How Dreamweaver Thinks
Dreamweaver was built on the premise that it would write code for you, but if you wanted to edit your code by hand, the program would not change it. This made Dreamweaver very different from the other WYSIWYG applications of the day. This means that, while working in Dreamweaver, you can develop a file in one of two ways: in a visual interface (Design view), or a coding interface (Code view). If you choose to work entirely in Design view, Dreamweaver creates all of your code for you and is completely in charge of creating valid, workable documents for browser display. If you choose to do any of your own coding either coding pages from scratch or editing the code that Dreamweaver has created you can also choose how Dreamweaver will treat your code. You can set Dreamweaver to fix invalid code automatically, to highlight invalid code but not touch it, or to leave you alone and let you code in peace. (This is in contrast to many other WYSIWYG editors that automatically "correct" what they perceive as invalid code, causing much gnashing of teeth among savvy HTML coders.)
Note
| | WYSIWYG means "What You See Is What You Get." Technically, Dreamweaver has never called itself a WYSIWYG editor as other editors like Page Mill, FrontPage, and GoLive have. (The acronym WYSIWYG doesn't appear once in the Dreamweaver documentation.) By providing a visual design interface, however, which attempts to render HTML code similarly to how a browser renders, Dreamweaver invites comparison to the WYSIWYG editors. |
At its most basic, a web page is a text file. This text file is read by the browser and displays the information therein according to the instructions in the HTML page. As an example, a basic tag in HTML is the <font> tag. A typical <font> tag looks like this:
<font face="Arial" size="2">This is the actual text. </font>
The browser reads this as "Use the Arial font and set the font size to 2 and display the text between the opening and closing tag." Then in the window, the browser displays the following:
This is the actual text.
What Dreamweaver does is write this code for you as you create the page. As you type in the actual text, Dreamweaver writes all the tags. The Dreamweaver Interface provides an intuitive, graphical way to write all the code required to display a web page. When it comes to, say, choosing the color of the text, you don't have to know the six-digit code for the particular color you want for your page background. All you have to do is select it in the color picker and Dreamweaver will fill in the code. Of course, if you happen to know that particular color code, you can enter it manually.
With Dreamweaver behaviors, which are combinations of HTML and JavaScript that enable you to do things that go beyond strict HTML, you can open a new browser window with a click, or easily create a pop-up menu navigation scheme.
| | With the advent of Dreamweaver MX, you can now create dynamic, database-driven web sites through this graphical interface. Dreamweaver will write the required functions for you, and through the application server, enable you to see this dynamic content within the Design window rather than just through the browser. Using dynamic data, it is possible to display a wide array of information and actually have to design only a couple of pages. (Chapter 26, "Introduction to Dynamic Dreamweaver," discusses dynamic sites.) |
Some developers like to write their code by hand. Because an HTML document is really a text document, this can be done in any text editor, such as Notepad or Simple Text. You can certainly use Dreamweaver to write the code and then use its other features, but letting Dreamweaver do the work for you is the whole idea of it. With the introduction of tag completion and code hints, writing by hand is even easier in Dreamweaver MX.
The New Dreamweaver Workspaces
| | Whether or not you're new to Dreamweaver, launching Dreamweaver MX for the first time and seeing the new interface will be a new experience for you. If you're working on Dreamweaver/Windows, you're seeing the new integrated interface that Macromedia is introducing with all of its MX software (Dreamweaver, Fireworks, Flash). If you're working on Dreamweaver/Mac, you're seeing the non-integrated but still brand-new Dreamweaver Macintosh interface (Aqua-fied, if you're on Mac OS X). No matter which platform you're on, you have new choices to make about how you want your workspace set up so you can do your best work. |
Note
| | In a panic after upgrading? Relax! Although the interface looks quite a bit different than in previous versions of Dreamweaver, only the layout has changed. All the same features are there, along with a few more. |
The Dreamweaver Workspace for Windows
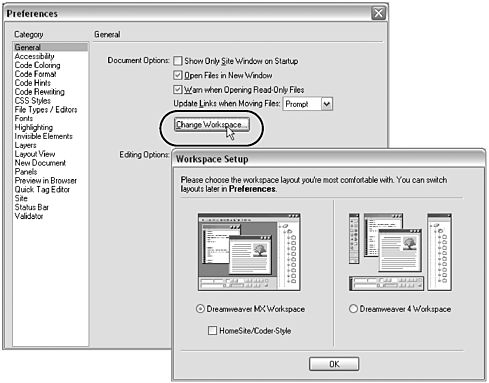
For Windows users, Dreamweaver MX presents a big change over previous versions of the program and offers you several different ways to set up your workspace. The first time you launch the program, you'll be looking at the new integrated workspace. To see your workspace options and choose between them, do this (see Figure 2.1):
Figure 2.1. Choosing a Dreamweaver workspace (Windows only).
-
Choose Edit > Preferences.
-
When the Preferences dialog box opens, go to the General category.
-
Click the Change Workspace button.
-
When the Change Workspace dialog box appears, you'll see that you have the choice of the Integrated Workspace (with or without HomeSite style) or the Classic Dreamweaver 4 Workspace. Make your choice and click OK.
-
Dreamweaver will alert you that you need to restart for any workspace change to take effect. Click OK to close the alert window, then OK again to close the Preferences dialog box.
-
Quit and relaunch Dreamweaver to see and start using your new workspace.
The following sections describe each of the workspace options, and why you might want to choose it.
The Integrated Workspace (Windows)
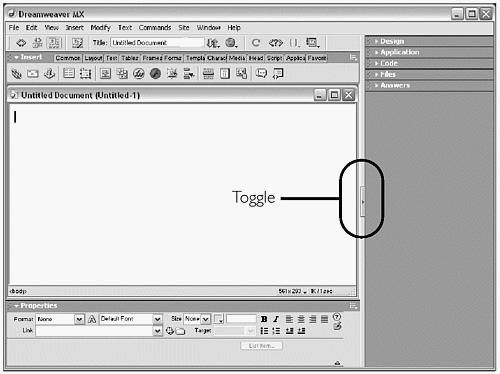
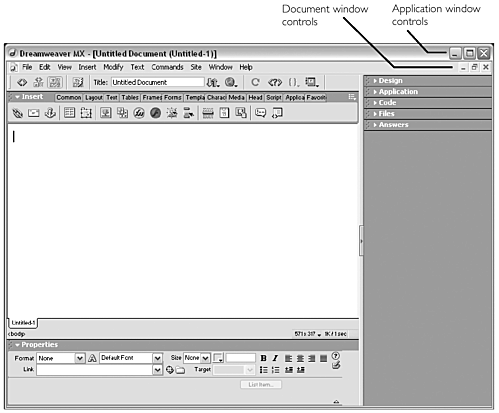
The Integrated Workspace for Windows is an exciting new development in all Macromedia MX programs (Dreamweaver, Fireworks, and Flash). Following the trend of many Windows applications, the entire interface is built into one large application window, which is then subdivided to hold different docked panels and windows. The main panel dock is on the right; on the left, the Insert bar and Property inspector frame the Document window (see Figure 2.2).
Figure 2.2. The integrated workspace for Dreamweaver MX (Windows).
Making Room
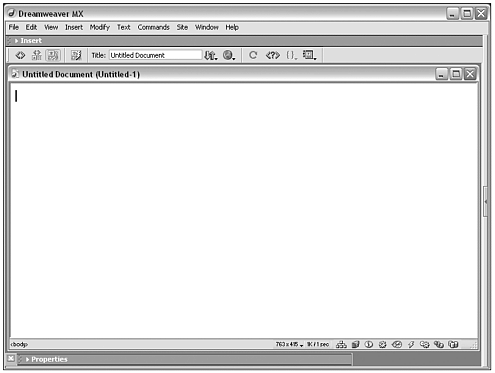
For horizontal spacing adjustments, the vertical bar separating the left and right segments of the window can be adjusted to give you more document room or more panel-viewing room. If you're on a smaller monitor, and are feeling a bit cramped in there with all of those window divisions taking up space, you also can click the triangle in that vertical bar to toggle the panels portion of the interface on and off as needed (see Figure 2.3). To get more space vertically around the Document window, you can collapse or expand the Insert bar and Property inspector by clicking on their expand/collapse triangles (see Figure 2.3).
Figure 2.3. Minimizing the Insert bar and Property inspector in the integrated workspace.
Creating Free-Standing Panels
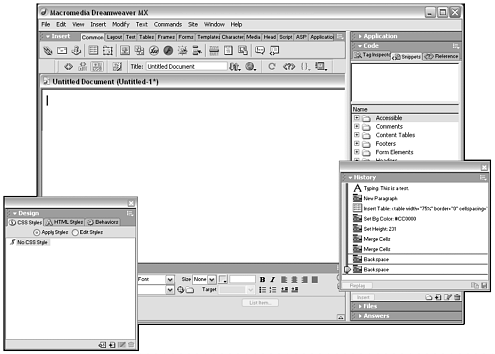
Docked panels and windows can be very efficient to work with because all parts of the interface are right there in front of you and nothing is ever hidden behind something else. If, however, you prefer to work with one or more of your panels as free-standing, you can undock any panel or panel group from the main application window. (See the section on "The Docked Panel Layout," later in this chapter for complete directions on working with docked panels.) A free-standing panel will never go behind the application window, but it might get hidden behind other free-standing panels. Free-standing panels can even be positioned outside the bounds of the application window (see Figure 2.4) a great help if your workstation includes side-by-side monitors.
Figure 2.4. The integrated workspace showing free-standing panels floating outside the application window.
Dealing with the Document Window
In the integrated workspace, the only window that isn't docked by default is the Document window. Instead, it floats as a free-standing window surrounded by docked panels. While you can't dock this window in the same way panels are docked, you can dock it by maximizing it (see Figure 2.5). A maximized Document window has no title bar and no status bar, but it does have a bottom tab (for switching between multiple open documents) and an information area at the bottom that contains the same information normally found in the status bar.
Figure 2.5. The integrated workspace with maximized (docked) Document window.
Panels on the Left: HomeSite/Coder-Style
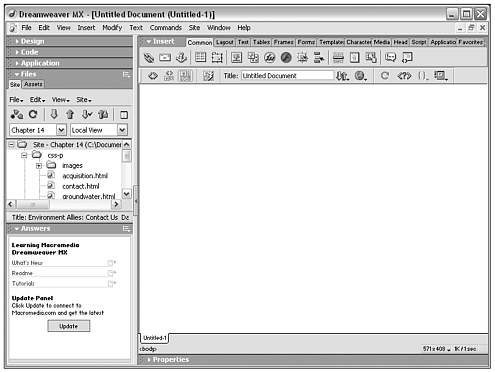
If you like the integrated workspace but it seems backward to you with panels on the right, you can put the panel dock on the left instead. Just open the Choose Workspace dialog box, as described earlier, and choose the Dreamwaver MX Workspace with the HomeSite/Coder-Style option enabled. (When you enable this option, the dialog box will show a preview image of the left-panel-sided workspace.) The next time you launch Dreamweaver, your workspace will be rearranged with panels on the left (see Figure 2.6).
Figure 2.6. The integrated workspace with panels on the left (HomeSite/Coder-Style).
The Classic Dreamweaver 4 Workspace (Windows)
Versions of Dreamweaver/Windows before MX presented an interface consisting of various free-standing windows and panels with no application window holding them together. This kind of interface which is familiar to Mac and UNIX users makes it simple to move between open programs on the computer, because you can see and access all programs from within any program. But for Windows users it was unfamiliar territory. It also meant that the program could not continue running unless either the Site panel or one Document window was open.
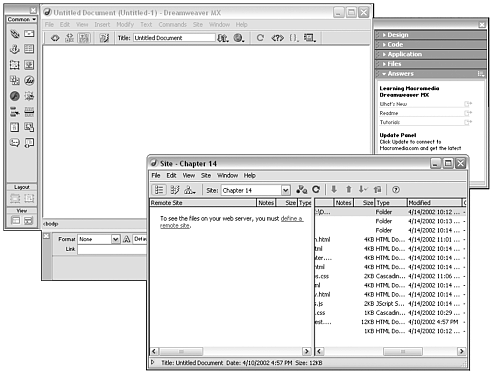
The glory of the new integrated workspace is that it does away with this multi-window interface in favor of one large application window, which is much more comfortable for most Windows users. However, if you're an old Dreamweaver pro who still likes the old interface, or if you're a cross-platform user who likes multi-window interfaces, you can still have this experience in Dreamweaver MX it's called the Dreamweaver 4 Workspace (see Figure 2.7), and it's all yours for the taking. The Document window, Property inspector, and Site panel are all free-standing. The horizontal Insert bar is free-standing and has been restored to its "classic" vertical appearance. The only modernization that has occurred is that the panels are docked into one main panel window.
Figure 2.7. The Classic Dreamweaver 4 workspace
Note
| | To give yourself a complete Dreamweaver 4 retrofit, you can undock the panels so they're all free-standing. (See the section on "The Docked Panel Layout" later in this chapter for details on doing this.) |
The Dreamweaver MX Interface (Macintosh)
There is no equivalent to the Windows integrated workspace for Dreamweaver/Mac, which means that Mac users don't have the overwhelming set of workspace choices that your Windows compatriots have. If you're upgrading from an earlier version of Dreamweaver, you also won't have nearly the interface shock as they will. Feeling left out? Don't take it personally! The whole reason for the new, integrated setup on Windows is that the old (Classic) interface with its multiple windows and lack of an application window was not very Windows-like. But it has always been Mac-like. And now, for those of you using OS X, it's also Aqua-fied, complete with anti-aliased text in dialog boxes and panels, translucent effects, and a Dreamweaver application menu (see Figure 2.8).
Figure 2.8. The aqua Dreamweaver/Mac interface for Mac OS X.
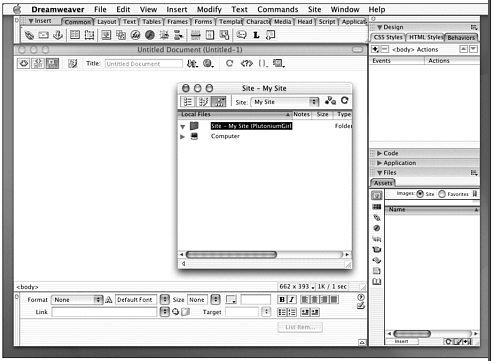
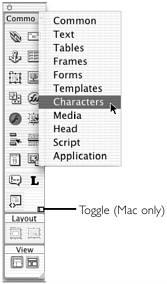
Though the Mac interface isn't integrated into one large application window, it does have docked panels one central floating window containing most of the Dreamweaver panels. Like the Dreamweaver/Windows integrated workspace, it also has a horizontal Insert bar in place of the vertical Objects panel found in previous versions of Dreamweaver though, if you don't like the new tabbed Insert bar, you can restore it to its old vertical appearance by clicking the horizontal/vertical toggle located in the panel's lower-right corner (see Figure 2.9).
Figure 2.9. Toggling the Insert bar to a vertical structure like the old Objects panel (Mac only).

Using the Vertical Insert BarThe purpose of the Insert bar is to help you insert objects into your documents; because there are a lot of kinds of objects available, the bar is divided into categories that appear as tabs. But when the Insert bar is in its vertical position (in Dreamweaver/Windows Classic Workspace or Dreamweaver/Mac regular workspace), it has no tabs! In vertical mode, the category appears as a title bar at the top of the panel. To switch between categories, click the title and choose from the pop-up menu of categories that appears (see Figure 2.10). Figure 2.10. Switching between categories of objects using the Insert bar in its vertical (Classic) mode. |
Touring the Dreamweaver Interface
Whichever Dreamweaver workspace you're using, and whichever platform and OS you're working on, the same major interface elements are present. The following sections present an overview of all the windows and toolbars and such that you're looking at as you're working in Dreamweaver. Use this section as a way to get the lay of the land if you're brand-new to the program, or as a refresher and introduction to new features if you're upgrading.
Standard Toolbar
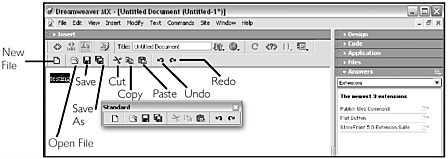
In their never-ending effort to provide the most graphic and efficient workspace for you, Macromedia has beefed up the toolbar presence in Dreamweaver MX. Following the trend in much software, the new Standard toolbar gives you easy access to frequently used commands from the File and Edit menus (see Figure 2.11). The Standard toolbar can be toggled on and off by choosing View > Toolbars > Standard. In Dreamweaver/Windows, the Standard toolbar can be undocked by dragging it into the center of the Document window; after it's undocked, redock it by double-clicking on its title bar.
Figure 2.11. The new Standard toolbar in its docked and undocked states.
Panels, Inspectors, and Windows
Panels provide access to almost all the components of Dreamweaver. Although you can usually do something in Dreamweaver in more than one way, panels give you a graphical interface to almost all program functions. Panels can be shown or hidden together, collected into panel groups, resized, and docked and undocked.
The Docked Panel Layout
![]()
Dreamweaver MX introduces cascading panels. Whether or not you're working in the integrated workspace, most of the program's panels appear docked together in a single unit either a free-standing panel window or a segment of the application window. Within the panel window, individual panels appear in groups; the groups are docked together in the panel window; and each group can be expanded or contracted to show or hide its contents. It's a very space-efficient setup that means you'll never again have to worry about, "Did I hide the Behaviors panel behind the CSS panel or did I close it, or where did it go?"
Panels and Panel Groups
To save space and reduce interface clutter, Dreamweaver collects panels into panel groups related by function. Within a group, the individual panels appear as tabbed layers click the panel's tab to bring it to the front of the group. Table 2.1 lists the Dreamweaver panels, which panel groups each belongs to, how that panel can be opened (or expanded), and whether the panel is normally part of the panel window.
| Panel Group | Panel Name | To Open (Expand) | Part of Default Panel Layout |
|---|---|---|---|
| Design | Behaviors | Window > Behaviors | Yes |
| CSS Styles | Window > CSS Styles | Yes | |
| HTML Styles | Window > HTML Styles | Yes | |
| Code | Tag Inspector | Window > Tag Inspector | Yes |
| Snippets | Window > Snippets | Yes | |
| Reference | Window > Reference | Yes | |
| Application | Databases | Window > Databases | Yes |
| Bindings | Window > Bindings | Yes | |
| Server Behaviors | Window > Server Behaviors | Yes | |
| Components | Window > Components | Yes | |
| Files | Site (integrated workspace only) | Window > Site | Yes |
| Assets | Window > Assets | Yes | |
| Answers | Answers | Window > Others > Answers | Yes |
| Advanced Layout | Frames | Window > Others> Frames | No |
| Layers | Windows > Others > Layers | No | |
| History | History | Window > Others > History | No |
Expanding, Contracting, Docking, and Undocking
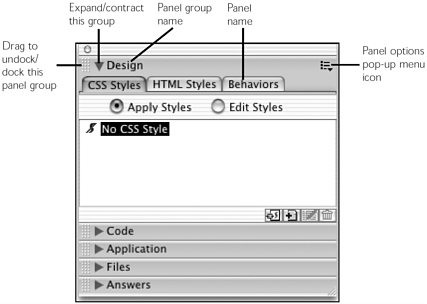
Working with a clump of cascading panel groups involves a lot of expanding and contracting and general adjusting. Because you can't possibly have all of the panel groups showing in the docked window at the same time (unless your monitor is four feet tall), you'll always be tinkering with your groups as you work. Figure 2.12 shows the panel window and its main options.
Figure 2.12. The docked panel window with cascading options highlighted.
-
To expand or contract a panel group, click the expand/contract arrow in the panel group's title bar. If necessary, the panel window will stretch out to accommodate expanded panels.
-
To adjust the relative height of two panel groups within the window, position the cursor between the two. The cursor will turn into a two-headed arrow. Drag up or down to resize.
-
To close a panel group (for example, remove it from the docked window entirely), access its options menu and choose Close Panel Group.
-
To expand a panel group and resize it to be as tall as possible, access its options menu and choose Maximize Panel Group.
-
To undock a panel group, press the grabber edge at the left edge of the panel's title bar and drag it out of the panel window.
-
To undock a specific panel, expand its group, click the panel's title tab, access its options menu, and choose Group With > New Panel Group.
-
To redock a panel, grab the panel's title tab and drag it back into a docked group.
-
To redock a panel, click the panel's title bar, access its options menu, and choose Group With, selecting the panel group with which to dock it.
-
To resize the panel window (when it's undocked), drag its lower-right corner.
The Horizontal Panels
Various Dreamweaver panels have horizontal layouts and dock in different ways than the others. These include the Insert bar, Property inspector, Timelines panel, Code inspector, Results window, and Sitespring panel. In the integrated workspace, they function much the same as other panels: they can be expanded or contracted, and can be docked with each other (along the top and/or bottom edge of the application window). In the other workspaces, they aren't dockable and don't function as cascading panels.
Note
| | Sitespring is a new Macromedia product geared toward project management and versioning. It integrates with Dreamweaver through the Sitespring panel. |
The Insert Bar
The Insert bar is one of the most often-used panels, containing all the objects that will insert code chunks into your document. It isn't part of the panel window. In the integrated workspace, by default it docks along the top edge of the application window above the Document window. The Insert bar is divided into tabs representing different categories of objects.
The Property Inspector
In the integrated workspace, the Property inspector docks along the bottom edge of the application window. In the non-integrated workspaces, the Property inspector is always free-standing but can be expanded or contracted using the triangle at its lower-right corner (see Figure 2.13).
Figure 2.13. Expanding and contracting the undocked Property inspector.

Docking Horizontal Panels
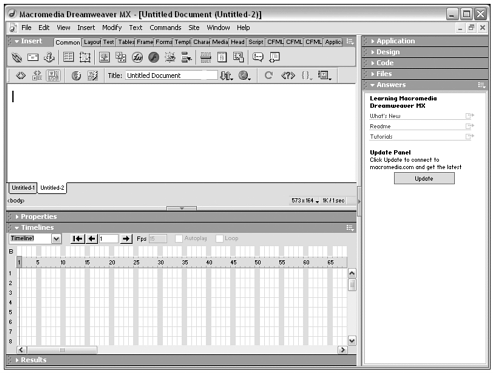
In the integrated workspace, if several horizontal panels are docked together, they start to behave like the vertical panel dock, complete with a movable divider line and toggle button for hiding and showing the docked panels. Figure 2.14 shows the integrated workspace with several of these horizontal panels docked. (Doesn't leave much room for the Document window!)
Figure 2.14. The integrated workspace showing various horizontal panels docked.
The Document Window
The Document window is where most of the action takes place in Dreamweaver. The Document window holds the current document that you're working on. When you open or create a new document, Dreamweaver shows it in a new Document window. If you have multiple documents open, you'll have multiple Document windows. You make your page edits here; you view your results here. Though some aspects of the Document window differ depending on the workspace you're using, every Document window includes a set of standard interface elements and a standard set of things that can be done with them.
Document Toolbar
The Document toolbar shows an icon view of frequently accessed options related to working with the Document window. As Figure 2.15 indicates, all of the buttons here relate to commands that also can be accessed from the menus but it's handier just clicking on them here! The Document toolbar can be toggled on and off by choosing View > Toolbars > Document.
Figure 2.15. The Document toolbar shown here as part of an undocked Document window.

Document Views
You can write code in a few different ways: You can choose to write the code manually; you can choose not to deal with the code at all; or you can watch Dreamweaver write the code as you work in the Design window. These options are set by the three Document window views. Each view is activated by one of the buttons in the Document toolbar.
Design View
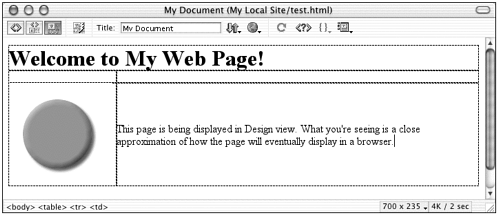
Design view enables you to see the page approximately as it will look in the browser (see Figure 2.16). The code is completely hidden from view. While in Design view, you can see the code a couple of other ways. One of those is the Code inspector, another panel that shows just the source code. The other is the Tag Inspector, which lists all the tags on the page and defines their structure. To activate Design view, click the Design View button in the Document toolbar.
Figure 2.16. The Document window showing a page in Design view.
Code View
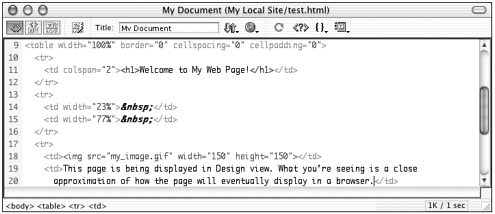
Code view shows only the raw HTML code (see Figure 2.17). When you open a new HTML document in Code view, you will see the basic framework of HTML code. Code view enables you to work as if you were working in a basic text editor. This view is for users who are very familiar with HTML and prefer to write the code directly. Some features and functions, such as adding behaviors, layers, and Layout mode, will not be available in Code view. To activate Code view, click the Code view button in the Document toolbar.
Figure 2.17. The Document window showing a page in Code view.
Code and Design View
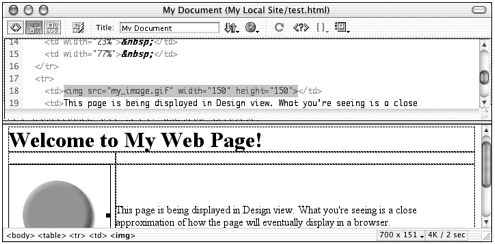
Code and Design view splits the Document window horizontally so that you can see the Design view and the Code view at the same time. Many people find this view to be the most convenient because it enables them to see exactly where they are in the code as they are designing. This view proves convenient when dealing with complex coding tasks such as selecting a particular row or column in an embedded table (see Figure 2.18).
Figure 2.18. The Document window showing a page in Code and Design view.
Note that, even though both views are visible, one or the other will always have focus. (That is, Dreamweaver will consider it the active view.) To give a particular portion of the Document window focus, click in that half of the window, or use Ctrl+` (Windows) or Cmd+` (Mac) to toggle focus between the two windows.
Note
| | Keep in mind that many of Dreamweaver's menus and panels are context-dependent. Different options will appear, or different commands will be grayed out, depending on what view is active. This is true when working in Code view or Design view. For instance, additional options are available in the Insert bar when working in Code view because those options are useful only when working on source code. |
Live Data View
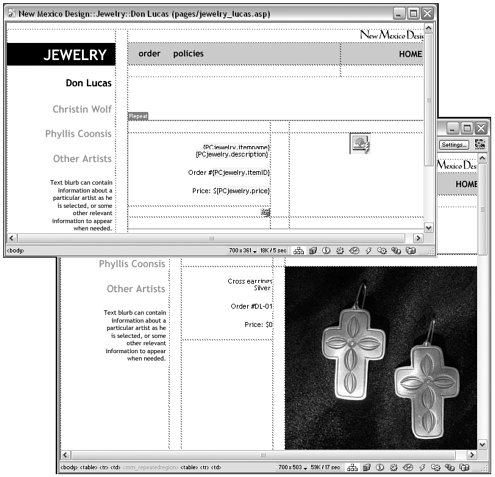
| | If you use Dreamweaver to create data-driven web sites, Design view normally displays your pages with placeholders marking where the server will eventually insert information from a database. For instance, an online catalog page viewed in Dreamweaver will display placeholders for each catalog item's names, prices, and descriptions. Engaging Live Data view will make Dreamweaver replace these placeholders with actual information from a database, giving you a much better preview of what your page will eventually look like online (see Figure 2.19). |
Figure 2.19. A dynamic document viewed with Live Data off (top) and on (bottom).
The Status Bar
Located at the bottom of the Document window (or directly below a docked Document window), the status bar provides a lot of information about your page and allows you to access your code and panels with a quick click (see Figure 2.20).
Figure 2.20. The status bar shown here at the bottom of an undocked Document window.
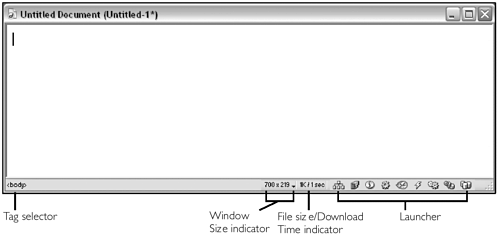
Window Size
The Window Size indicator tells you, in pixels, the current width and height of the "live" area of the Document Window. (The live area is the part of the window where there's actually content, as opposed to toolbars and status bars and other so-called "chrome" elements.) This can be important information if you're trying to design your pages to fit within common browser window sizes (and who isn't?).
The Window Size indicator only reports the size of the Design view portion of the window. If the Document window is displaying Code view, the Window Size indicator disappears. If the Document window is displaying Code and Design view, the indicator shows the size of the Design view portion of the window.
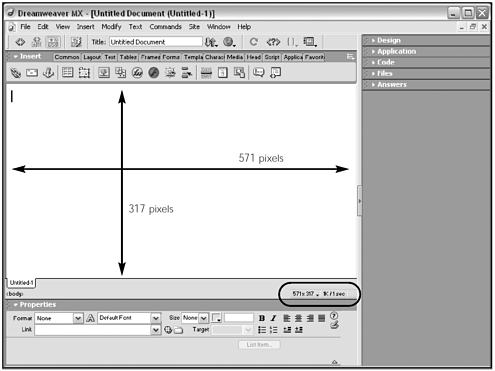
If you're working in the integrated workspace (Windows only), and have your Document window docked (maximized), the Window Size indicator shows the size of the visible portion of the window (for example, from the bottom edge of the Insert bar to the bottom of the Document window, and from the left edge of the application window to the vertical divider that begins the panel dock). Figure 2.21 shows this happening.
Figure 2.21. Determining the window size for a docked Document window in the integrated workspace (Windows).
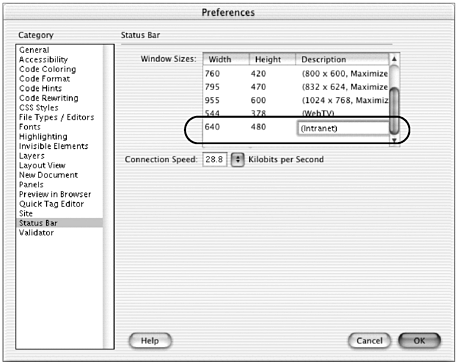
The Window Size indicator also includes a pop-up menu that quickly resizes the Document window to any of several default sizes that match the window sizes of browsers at common monitor resolutions. Choose from this pop-up menu to quickly check how your page contents will fit into some common window sizes. You're not limited to the default window sizes Dreamweaver has provided, either. If, for instance, you're designing for an intranet and you know that your target audience will all have their browser windows set to 600x300, you can add that set of dimensions to the pop-up menu. Just do this:
-
From the Window Size indicator pop-up menu, choose Edit Sizes. This opens the Status Bar category of the Dreamweaver Preferences dialog box (see Figure 2.22).
Figure 2.22. Adding a default window size to the Window Size indicator pop-up menu.
-
In the Preferences dialog box, edit the list of window sizes as you like.
-
To change any of the existing sizes, just select one of the dimensions shown and enter a new number.
-
To add a new size, click in the area below the existing entries to activate it, and type in a new dimension. Your new entry can have width, height, or both.
-
-
When you're done, click OK to close the Preferences dialog box. From now on, your new entry appears in the Window Size indicator pop-up menu.
Document Size/Download Time Indicator
The Document Size/Download Time indicator displays two related pieces of information: the file size for the current document and all of its embedded media, and the estimated time that this material will take to download. Unless you have a corner on the market of extremely patient visitors, this is crucial information to have at your fingertips as you're creating your pages. The file size indicator (on the left) calculates the size of your current HTML file itself as well as the sizes of any images, Flash movies, or other files that will need to download before your page can display in a browser, rounded off to the nearest kilobyte (K). The estimated download time calculates how long that much content will take to download over a specific connection speed, rounded to the nearest second. For instance, if your page consists of a 1K HTML document and a 27K image, at a connection speed of 28.8 it will take approximately 1 second to download. The display for this setup would look like this: 27K/1 sec.
The default connection speed for calculating download time is 28.8 kbps, or kilobits per second (the speed of a fairly old modem, or a new modem at peak traffic times). You can change this speed to suit whatever connection speeds you think your target audience will have. For instance, if you're producing an online film festival for high-end users who are all going to have some sort of broadband access, you'll want to set your connection speed at several hundred kbps. To adjust the connection speed, do this:
-
Choose Edit > Preferences and go to the Status Bar category.
Tip

If you're in a hurry, you can get quickly to the right set of preferences by clicking the Window Size indicator to access its pop-up menu and choosing Edit Sizes to open the Preferences dialog box. This takes you directly to the Status Bar preferences.
-
In the Connection Speed text input field, enter whatever value you think represents an average download speed for your target audience.
-
When you're done, click OK to close the dialog box. The status bar will now display its download time based on document size and this new connection speed.
Note
| | What are some standard speeds? Telephone modems can connect at up to 56K (kbps). ISDN connections can range from 56 112K. Cable and DSL connections range from 112K 1M (a thousand kilobits per second). Don't forget that when determining your ideal connection speed, individual connections can be much slower than the average. |
The Launcher
The Launcher is a set of buttons that let you quickly open and close various Dreamweaver panels (or expand and contract them, if they're docked). Clicking the icon for a panel in the Launcher has the same effect as going to the Window menu and choosing the panel's name. If the panel is closed, clicking the icon opens (expands) it; if the panel is open (expanded), clicking the Launcher icon closes (contracts) it.
By default, the Launcher is not showing in the Document window status bar. To enable the Launcher, and to determine which panels will be represented in it, do this:
-
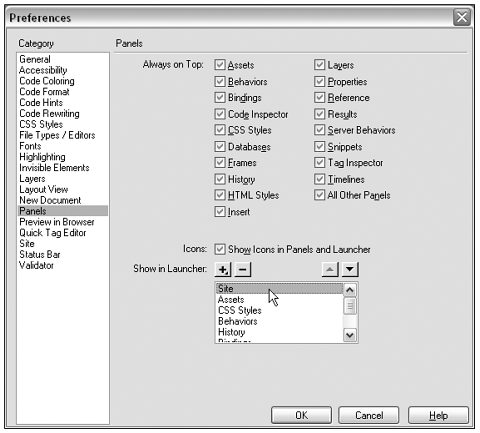
Choose Edit > Preferences and go to the Panels category (see Figure 2.23).
Figure 2.23. Enabling and configuring the Launcher.
-
Enable the Launcher by selecting the Show Icons in Panels and Launcher option. The list of panels at the bottom of the dialog box show which panels will be represented in the Launcher, and in which order.
-
To remove a panel from the list, select it and click the minus (-) button.
-
To add a panel to the list, click the plus (+) button and choose an item from the pop-up list that appears. (Only items not already in the list will be accessible from this menu.)
-
To rearrange the order of items in the list, use the up/down triangle buttons.
-
The Site Panel
Just as the Document window is the center of the document-editing universe, the Site panel is the main interface for site building. The Site panel is an odd duck in the Dreamweaver interface, not quite a panel but not quite any other kind of window.
Note
| | The Site panel is discussed more in depth in Chapter 22, "Local Site Management," and Chapter 23, "Site Publishing and Maintenance." |
In the integrated workspace, the Site panel is docked in the Files panel group and behaves as a docked panel (see Figure 2.24). In other workspaces, it is a fully independent floating window, similar to the Document window (see Figure 2.25).
Figure 2.24. The Site panel as it appears in the integrated workspace (Windows).
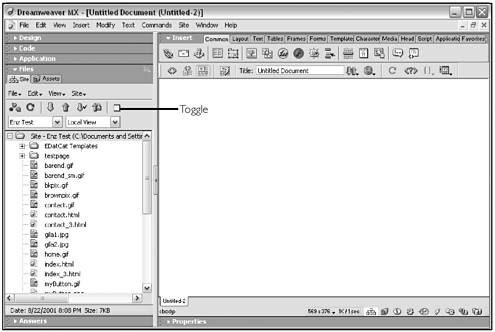
Figure 2.25. The Site panel as a free-standing window.
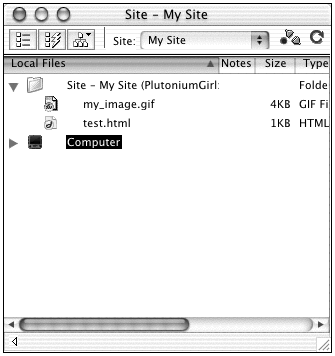
In all workspaces, the Site panel includes a Site toolbar along its top, containing tools for performing common site-related tasks.
The fully expanded Site panel has two side-by-side panes that can hold a variety of content. In its contracted form, it shows only the right-side pane. When it's being used as a free-standing window, use the little triangle button in the lower-left corner to expand/contract it. When it's being used as part of the integrated workspace, the Site panel appears in the panel dock in its contracted form, with an expand/contract icon in its upper-right corner.
Getting Help
There are many places to get help if you are having difficulties with your pages or Dreamweaver itself. Between the Dreamweaver Help, the Reference panel, the Answers panel, and the Dreamweaver Support Center at the Macromedia web site, the answer is most likely within reach. This section explains your Help options.
Contextual Assistance: the Reference Panel
Do you have piles of reference books surrounding you as you work? If so, the Reference panel is ready to be your best friend (see Figure 2.26). This panel contains the complete text from several web reference guides, including O'Reilly's HTML Reference, CSS Reference, JavaScript Reference, and Sitespring Project Site Tag Reference, Wrox ASP 3.0 Reference, JSP Reference; Macromedia CFML Reference, and the UsableNet Accessibility Reference.
Figure 2.26. The Reference panel, showing contextual help for HTML.
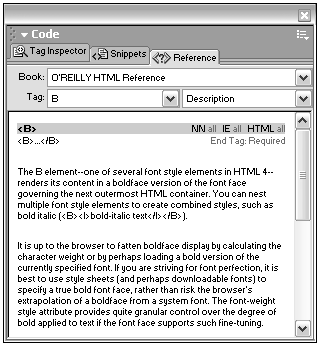
You can use the Reference panel on its own to look up information or use it in tandem with the Document window to get contextual help information. To look up contextual help on whatever tag or script you're currently working on, do this:
-
Click inside the element you want to reference.
-
In the Document toolbar, click the question mark icon.
-
The Reference panel will open, showing a description and sample syntax for the selected item.
Searchable, Indexed Assistance: Online Help
Dreamweaver MX has Dreamweaver Help that covers the basic usage of every element of the program. Dreamweaver Help is a valuable resource for any questions concerning the properties of Dreamweaver.
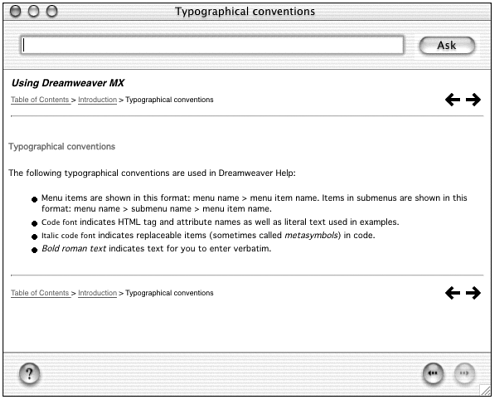
To access Dreamweaver Help, choose Help > Using Dreamweaver. This launches your operating system's Help application with Dreamweaver Help showing. Figures 2.27 and 2.28 show Dreamweaver Help for Windows and Macintosh.
Figure 2.27. The Dreamweaver/Windows Help.
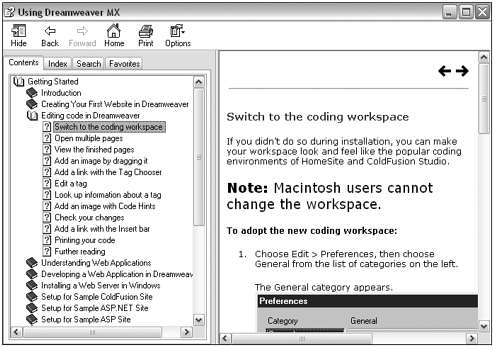
Figure 2.28. The Dreamweaver/Mac Help.
Note
| | If you are upgrading from previous versions of Dreamweaver, you'll notice that the Dreamweaver Help no longer uses HTML and the default browser to display Dreamweaver Help. This has advantages and disadvantages. The OS help applications offer more built-in functionality but might be less familiar to you than navigating a browser interface and are missing some lovely browser features. The Mac OS Dreamweaver Help, for instance, comes complete with teeny tiny text and pages that can't be printed. |
Community Assistance: the Answers Panel
| | New to Dreamweaver MX, the Answers panel (see Figure 2.29) contains all sorts of tips, tutorials, tech notes, and other help for using Dreamweaver. If you're connected to the Internet as you work, this panel connects you directly to the Dreamweaver Support Center so you get the latest and greatest information at your fingertips. |
Figure 2.29. The Answers panel, a new dynamic Dreamweaver Help connected to the Macromedia web site.
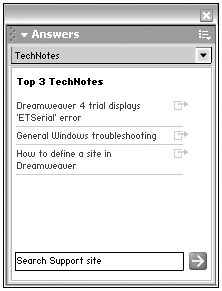
To access the Answers panel, choose Window > Answers (or expand the Answers panel group, if it's showing in your panel window).
To choose whether Answers panel information displays in a Dreamweaver Help window or in your browser, choose Settings from the panel's topics menu and choose the appropriate radio button.
To get information from the Answers panel, choose a main topic from the topics popup menu (Get Started, Extending, and so on). The panel will then display the latest information available on this topic from the Dreamweaver Support Center. Click on a topic to learn all about it!
Note
| | To use the Answers panel properly, you must have an open Internet connection. |
Summary
Dreamweaver has an intuitive, highly customizable interface that puts almost every object and function within easy reach. Most options can be reached with one or two clicks. There is almost always more than one way to insert an object or change a property within the Dreamweaver interface. Spend some time getting used to the interface and try the different ways of performing common tasks. The more familiar you are with the interface and the options available to you, the better you can take full advantage of Dreamweaver functionality.
| CONTENTS |
EAN: 2147483647
Pages: 49
- The Second Wave ERP Market: An Australian Viewpoint
- Data Mining for Business Process Reengineering
- Intrinsic and Contextual Data Quality: The Effect of Media and Personal Involvement
- Healthcare Information: From Administrative to Practice Databases
- Relevance and Micro-Relevance for the Professional as Determinants of IT-Diffusion and IT-Use in Healthcare
