5.1. Security Internet Explorer has long been one of the most insecure parts of Windows, but with Windows Vista, Microsoft finally turned its attention to plugging many of those security holes. New to Vista are a phishing filter that can cut down on Internet scams, and Protected Mode, in which Internet Explorer is segregated from the rest of the operating system. Vista also includes previous security features such as cookie handling, and a Pop-Up Blocker tool as well. As you'll see in this section, there is no single location in Internet Explorer that lets you handle security, so you'll have to try the various locations listed here. This chapter covers security-related features found directly inside Internet Explorer. In addition to what's here, Vista has other Internet-related security and privacy tools, such as Windows Defender, Parental Controls, and the Windows Firewall. Turn to Chapter 8 for details about these and other security features. Add-On Manager See what ActiveX controls and add-ons are running in Internet Explorer, and disable or enable them. To open Internet Explorer  Tools Manage Add-ons Tools Manage Add-ons Description Internet Explorer allows a variety of add-ons and ActiveX controls to run inside it. Many of these are required for the basic operation of the browser, but many others add extra functions, such as the Google Toolbar, which lets you search Google from directly within Internet Explorer. Unfortunately, spyware and other malware may also run as add-ons. In addition, sometimes add-ons conflict with one another. The Add-On Manager lets you take control of your add-ons and disable or delete any that are dangerous. It lets you view all of the ActiveX controls and add-ons running in Internet Explorer, and disable or delete ones you don't want to run, as well as enable ones you do want to run if they've been disabled for some reason. Select Tools Manage Add-ons Enable or Disable Add-ons, and the screen shown in Figure 5-16 appears. Figure 5-16. The Add-On Manager, with a list of add-ons currently running in Internet Explorer 
You'll see a list of all the add-ons currently running in Internet Explorer. Included are the name, publisher, status (enabled or disabled), type (for example, a toolbar, ActiveX control, Browser Helper Object, and so on), and actual filename of the add-on. To disable an add-on, highlight it, select Disable, and click OK. To enable one that has been disabled, highlight it, select Enable, and click OK. The changes may not take effect until you restart Internet Explorer. You can do this for ActiveX controls as well as add-ons. To delete an ActiveX control, highlight it and click the Delete ActiveX button. The changes might not take effect until you disable Internet Explorer. (You can't delete add-ons in this way, only disable them. To delete an add-on, go to Control Panel Programs Uninstall a Program.) You can display more than just the add-ons currently running in Internet Explorer. From the Show drop-down list, you can make these choices:
Add-ons that have been used by Internet Explorer As the name implies, this displays the add-ons that Internet Explorer has used in the current session. (Note: this won't list the add-ons that Internet Explorer must run for its basic operations.)
Add-ons currently loaded in Internet Explorer This displays add-ons currently being used by Internet Explorer. (Note: this won't list the add-ons that Internet Explorer must run for its basic operations.)
Add-ons that run without requiring permission These are add-ons that Internet Explorer has determined are safe. They typically are required for the basic operation of Internet Explorer.
Downloaded ActiveX Controls (32-bit) These are ActiveX controls that you have downloaded from the Internet. Although the Add-On Manager lets you disable add-ons and ActiveX controls, there's one thing it doesn't dotell you which are likely to be safe, and which aren't. So how can you know which to disable? Your best bet is to type the filename into Google. From there, you'll be able to easily determine whether it's safe or not. Notes Browser Helper Objects (BHOs) are a specific kind of Internet Explorer add-on that can be useful, but also very dangerous. Many pieces of malware install themselves as BHOs. So when you see anything listed as a BHO, make sure to do a Google search to find out whether it's malware. When you choose Internet Explorer  Tools Manage Add-ons, you can also choose Find More Add-ons. That, however, does not actually lead you to a page with true add-ons. Instead, youre sent to a site co-run by Microsoft and http://www.cnet.com that has shareware and freeware, but most are not true add-ons. A true add-on runs inside Internet Explorer, but many of the programs on the site run by themselves, outside of Internet Explorer. Tools Manage Add-ons, you can also choose Find More Add-ons. That, however, does not actually lead you to a page with true add-ons. Instead, youre sent to a site co-run by Microsoft and http://www.cnet.com that has shareware and freeware, but most are not true add-ons. A true add-on runs inside Internet Explorer, but many of the programs on the site run by themselves, outside of Internet Explorer.
See also "Windows Defender," in Chapter 8 |
Delete Browsing History Clean out traces of your Internet use, including browsing history, cookies, temporary files, passwords, and forms data. To open Internet Explorer Tools Delete Browsing History Description When you browse the Web, sites that you visit can potentially gather a surprising amount of your personal information because of the browsing traces you carry with you. Similarly, intruders can also potentially view these browsing traces as well. These traces include a history of sites you've visited, cookies, files from the Internet temporarily stored on your PC, passwords, and information you've typed into web forms. You can delete any and all of this information using the Delete Browsing History dialog box, shown in Figure 5-17. Figure 5-17. The Delete Browsing History dialog box, where you can delete traces of your Internet activities 
The dialog box offers the following options:
Delete files This deletes all the temporary files that Internet Explorer stores on your hard disk to speed up browsing, including graphics files, multimedia files, and web pages. Note that deleting these files may temporarily slow down browsing to sites that you've already visited.
Delete cookies This deletes all the cookies on your hard disk. Keep in mind that cookies can automatically log you into web sites and customize sites for you, so if you delete them, you will lose those abilities. (For information on how to handle cookies and protect your privacy, see "Internet Options Privacy Tab," later in this chapter.)
Delete history This deletes the list of the web sites that you've recently visited.
Delete forms This deletes information you've typed into web forms, such as your address, name, phone number, and so on.
Delete passwords This deletes all the passwords you've typed in order to get into web sites.
Delete all This deletes files, cookies, history, forms, and passwords. Notes When you delete all of your files, cookies, history, forms, and passwords, your Favorites and subscribed feeds are not affected and will not be deleted.
See also "Internet Options Privacy Tab" |
Internet Options Privacy Tab Lets you take control over your privacy by controlling the way you manage cookies. To open Internet Explorer Tools Panel Internet Options Privacy Command Prompt or Search Box Description This tab lets you control how Internet Explorer handles cookies, small text files that web sites put on your hard disk to personalize the site for you or to track and record your activities on the site. As a means of site customization, they're a great way of helping you get the most out of the Web. They can also carry information about login names and passwords, which is a timesaver because you won't have to log in to each site every time you visit. If you delete all your cookies, you won't automatically get your Amazon wish list the next time you visit that site. But cookies are controversial, because they can also be used to track your online activities and identify you. Information about you, based on what cookies gather, can be put in a database, and profiles of you and your surfing habits can be created. Internet Explorer, via the Internet Options Privacy tab, lets you restrict how web sites place and use cookies on your PC. Before understanding how to use the tab, you need to understand three cookie-related terms:
First-party cookie A cookie created by the site you're currently visiting. Sites often use these cookies to let you log on automaticallywithout having to type in your username and passwordand customize how you use the site. Typically, these kinds of cookies are not invasive.
Third-party cookie A cookie created by a site other than the one you're currently visiting. Frequently, advertisers or advertising networks use third-party cookies. Some people (including me) consider these kinds of cookies invasive.
Compact privacy statement A publicly posted policy that describes the details of how cookies are used on a sitefor example, detailing the purpose of cookies, how they're used, their source, and how long they will stay on your PC. (Some cookies are automatically deleted when you leave a web site, and others stay valid until a specified date.) To protect your privacy, you also need to know the difference between implicit consent and explicit consent. Explicit consent means you have specifically told a site it can use personally identifiable information about you. It's the same as opting in. Implicit consent means you haven't specifically told a site not to use personally identifiable information. It's the same as not having opted out, or not specifically requesting to be taken off a list. Internet Explorer lets you customize how it handles cookies. You can choose from six levels of privacy settings, from Accept All Cookies to Block All Cookies. Some sites won't function well or at all at the higher privacy settings, particularly if you choose to reject all cookies. By default, Internet Explorer chooses a Medium setting. On the tab shown in Figure 5-18, move the slider to your desired level of privacy. Figure 5-18. Customizing cookie settings in Internet Explorer 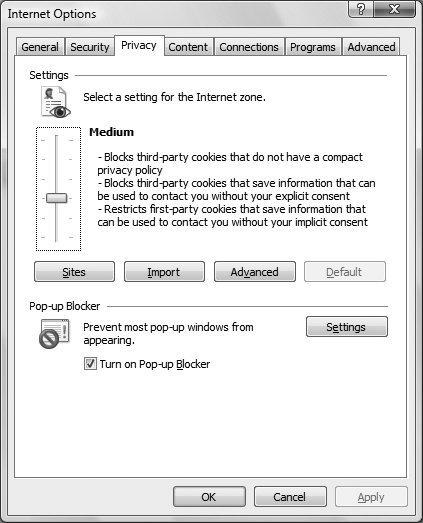
Table 5-3 shows how each setting affects Internet Explorer's cookie handling. Table 5-3. Internet Explorer's privacy settings and your privacySetting | How the setting affects your privacy |
|---|
Block All Cookies | Blocks all cookies, without exception. Does not allow web sites to read existing cookies. | High | Blocks cookies from all web sites that don't have a compact privacy policy. Blocks all cookies that use personally identifiable information without your explicit consent. | Medium High | Blocks third-party cookies from sites that don't have a compact privacy policy. Blocks third-party cookies that use personally identifiable information without your explicit consent. Blocks first-party cookies that use personally identifiable information without your implicit consent. | Medium (Default) | Blocks third-party cookies from sites that don't have a compact privacy policy. Blocks third-party cookies that use personally identifiable information without your implicit consent. Accepts first-party cookies that use personally identifiable information without your implicit consent, but deletes them when you close Internet Explorer. | Low | Blocks third-party cookies from sites that don't have a compact privacy policy. Accepts third-party cookies that use personally identifiable information without your implicit consent, but deletes them when you close Internet Explorer. | Accept All Cookies | Accepts all cookies, without exception. Allows web sites to read existing cookies. |
You're not locked into Internet Explorer's preset levels of cookie handling. You can customize how it handles cookies so that you can, for example, accept or reject cookies from individual sites, or accept or reject all first-party and third-party cookies. To accept or reject all cookies from a specific site, click the Sites button on the Privacy tab. The Per Site Privacy Actions dialog box appears. Type in the name of the site you want to accept or block cookies from, and click either Block or Allow. To customize how you handle first- and third-party cookies, click the Advanced button on the Privacy tab. Check the "Override automatic cookie handling" box. You can accept or reject all first- or third-party cookies, or choose to be prompted whether to accept them. You can also decide to always allow session cookies, or cookies that last only as long as you're on a specific web site and are deleted once you leave the site. Notes Note that the Privacy tab also controls Pop-Up Blocker settings. For details, see "Pop-Up Blocker," later in this chapter. If your cookies are accidentally deleted, you won't be able to automatically log in to web sites, and your customized settings at many sites will be lost. As a safety precaution, you can back up your cookies and then restore them. To export or back up cookies from Internet Explorer, first press the Alt key to make the menus appear. Then choose File Import and Export. The Import/Export Wizard will launch. Choose Export Cookies and follow the directions. A single text file containing all your cookies will be created in your Documents folder, though you can choose a different location for them. To import cookies, launch the Import/Export Wizard, choose Import Cookies, and browse to the location where the cookie file has been stored. C:\Users\username\AppData\Roaming\Microsoft\Windows\Cookies. Open the folder in Windows Explorer, and you'll see a list of individual cookies in this format: your name@abcnews.com[1].txt. As a general rule, the name of the web site or ad network will be after the @, but not alwayssometimes it will merely be a number. Open the file as you would any other text file (in Notepad, WordPad, or another text editor). Usually, there will be a list of numbers and letters inside, though you might find other useful information in therefor example, your username and password for the web site. If you don't want the cookie on your hard disk, simply delete it as you would any other text file. You can check whether the web site you've visited in your current session has placed any cookies on your hard disk. Press Page Web Page Privacy Policy. Youll see a list of the sites you've visited, and whether any have placed a cookie on your disk.
See also "Delete Browsing History" |
Internet Options Security Tab Controls overall Internet Explorer security settings. To open Internet Explorer Tools Panel Internet Options Security Command Prompt or Search Box Description In the real world, it's usually obvious which are the seedier, more dangerous parts of town, and most people know what streets to avoid after dark. But that isn't always true on the Web. An attractive, respectable home page may disguise a site that wants to do you harm. To help protect you, Internet Explorer uses different security zones for web sites, depending on whether it believes they can be trusted. It applies a different level of security to each of the zones, as follows: Internet (medium security) Local intranet (medium-low security) Trusted sites (medium security) Restricted sites (high security)
Each zone has a specific security setting associated with it that determines how Explorer handles web pages in that zonefor example, whether it allows file downloads or runs certain types of web programs, such as Java applets and ActiveX controls. What Is Protected Mode? Protected Mode is a new Vista feature designed to protect your PC against Internet-borne attacks. For all zones except for Trusted sites, Internet Explorer runs in Protected Mode as a default. Protected Mode shields your filesystem and Registry from the actions taken by Internet Explorer or any add-ons to Internet Explorer. It works in concert with User Account Control (UAC) and only allows Internet Explorer to run at a privilege level for surfing the Web, and not much more. In that way, even if a piece of malware managed to break through all of Internet Explorer's security features, it couldn't do harm to your PC because Protected Mode in essence locks it in a safe box. To find out whether you're in Protected Mode, look at the bottom righthand side of your Internet Explorer window. If you are in Protected Mode, it will read "Protected Mode: On." |
If you're not happy with the security levels Microsoft has set for each zone, you can overrule those settings using the Internet Options Security tab, shown in Figure 5-19. Figure 5-19. The Internet Options Security tab, which lets you control Internet Explorer's security settings for browsing the Web 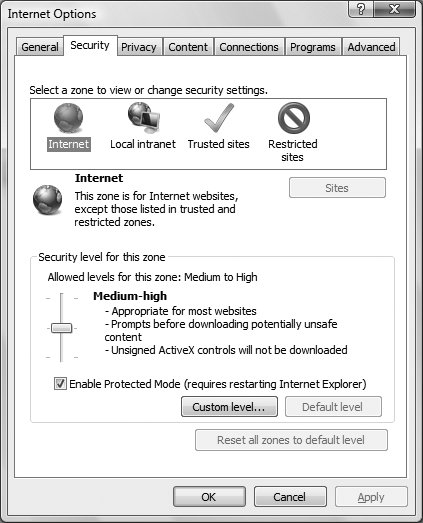
For instance, if you don't want Explorer to treat the Internet zone with medium security, but rather a more trusting medium-low security, you can make that change using the Internet Options Security Tab. Depending on the zone whose level you want to change, you do things slightly differently. For Local intranet and Trusted sites, click the zone and then drag the slider to the security setting you want that zone to have, then click OK. For Internet and Restricted Sites, click the zone and select Custom Level, and the Security Settings dialog box appears. From the "Reset to" drop-down box at the bottom of the screen, select the security level you want to apply to that zone and click OK. Table 5-4 tells you how each setting affects security. Table 5-4. Internet Explorer's security settingsSecurity level setting | How the setting affects security |
|---|
High | Disables most features including ActiveX controls, Java and Java applets, and downloads. | Medium | Pops up a box when an ActiveX control tries to run, and asks whether you want to run it. Prompts you before running signed ActiveX controls; disables unsigned ActiveX controls and certain other ActiveX controls; enables downloads and Java applets; and prompts you before downloading potentially unsafe content. (Note: unsigned ActiveX controls are those that have not been digitally "signed" by a site, so you can't absolutely know who created those controls.) | Medium-Low | Most settings are the same as Medium, except that it will allow some active content to run without first popping up messages asking whether you want to run it. | Low | Runs all active content such as ActiveX controls; has the minimum number of safeguards and prompts so that you won't be prompted whether you want to run an ActiveX control, for example. |
You can also further customize the security setting for any zone by picking and choosing from a variety of security options, rather than relying on the High, Medium, Medium-Low, and Low levels. Click any zone and then select Custom Level. The Security Settings dialog box appears. Pick and choose your options, such as whether a site should be allowed to install desktop items, how to handle ActiveX controls, and so on. Then click OK. You don't have to rely on Microsoft's judgment about which web sites belong in which zonesyou can classify them yourself. For example, if you know and trust a web site, you can put it in the Trusted Sites zone. To assign a web site to a particular zone, select a zone, click Sites, and from the dialog box that appears, click Advanced. In the next dialog box that appears, type in the site URL and click Add. To remove sites from the zone, highlight them and click Remove. Notes See also "Internet Options Privacy Tab" and "Delete Browsing History" |
Phishing Filter Protect yourself against online scams and spoofs. To open Internet Explorer Tools Phishing Filter Description One of the greatest dangers you face online is a so-called "phishing" attack, in which you're sent an email that appears to be from a bank, financial institution, eBay, or other web site that has personal, financial information about you. You're told to click a link to go to a web site and log in to your account. The link sends you to what appears to be a legitimate site but is instead a scam. When you enter your password and login information, the scammer steals it and can empty your bank account. It can be hard to distinguish real sites from phishing sites, because phishing sites duplicate the exact look and feel of the real thing. Internet Explorer's phishing filter, though, protects you from attacks. With Internet Explorer's phishing filter, when you try to visit what Microsoft deems a phishing site, Internet Explorer stops you in your tracks with a page warning you that you are about to head to a "reported phishing website." You then have the choice of closing the web site or ignoring the Microsoft recommendation and visiting it. If the filter instead detects only a suspected phishing site, you're let through, but a yellow button appears next to the Address Bar that labels the site a "Suspicious website," as shown in Figure 5-20. You can then decide whether to stay at the site or head away. Figure 5-20. A "Suspicious website" 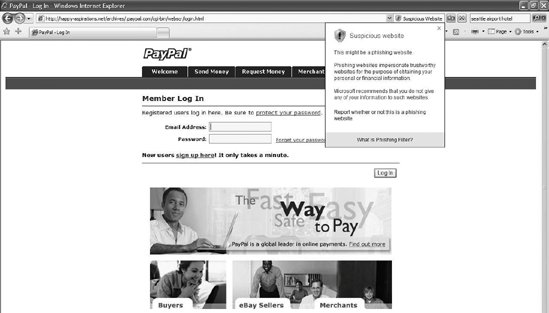
Internet Explorer uses three methods to determine whether a site is legitimate or a phishing site. As a first line of defense, Microsoft compiles a database of known phishing sites, and Internet Explorer compares sites you visit against that database. The database is compiled from several data providers, including Cyota, Internet Identity, and MarkMonitor, as well as from direct user feedback. The information in that database is stored locally on your computer; whenever you visit a site, Internet Explorer looks at that local database to see whether the site you're visiting is a phishing site. Second, Internet Explorer uses heuristics that compare characteristics of the site you're visiting against common phishing web site characteristics to decide whether the site is legitimate. The heuristics tool is particularly important, because you may stumble across a phishing site before it is included in the database of known culprits. Finally, Internet Explorer sends addresses of some of the sites you visit to Microsoft, which checks them against a frequently updated list of reported phishing web sites. The phishing filter isn't particularly customizable, but you can change several of its options. To do so, in Internet Explorer, choose Tools Phishing Filter. These are your choices from the menu that appears:
Check this Website This sends the URL of the site you're currently visiting to Microsoft, which then checks the site's validity and reports back to you whether it is suspicious, a known phishing site, or a legitimate site. Figure 5-21 shows the alert you receive when the site is legitimate. Figure 5-21. A legitimate site 
Turn Off/On Automatic Website Checking This turns off the feature that sends some web site addresses to Microsoft to check its most recent database and determine whether the site is legitimate. If you turn off this feature, the phishing filter will still work; it will use your local database, and heuristics. But it won't send web site addresses to Microsoft for checking. Users who believe that Microsoft may invade their privacy may want to turn off automatic checking, although Microsoft says that the information is not saved or tracked personally.
Report this Website If you're visiting a site that you believe to be a phishing site, choose this option. A new browser window will open. To report a site, check the box next to "I think this is a phishing website," choose the language used by the site, and click Submit.
Phishing Filter Settings This is a somewhat confusing way to change your phishing filter settings. When you select this option, the Advanced Internet Options dialog box opens, which has dozens of Internet Explorer settings covering virtually every aspect of the browser, from accessibility to general browsing, security, printing, multimedia settings, and more. You won't see the phishing filter settings. To get to them, scroll toward the bottom of the dialog box. Near the bottom, you'll find the phishing filter settings. Choose "Disable Phishing Filter" to turn it off entirely; choose "Turn off automatic website checking" to stop sending addresses to Microsoft to check; and choose "Turn on automatic website checking" to send addresses to Microsoft to check. These last two options accomplish the same thing that the Turn Off/On Automatic Website Checking menu does. Notes When you use automatic web site checking, the phishing filter sends more than just the address of the web site you're visiting. It also sends other information, including your computer's IP address, browser type, and phishing filter version number. To make sure that information can't be intercepted by anyone except Microsoft, the information is encrypted using SSL. Any information that might be associated with the web site address you're currently visitingsuch as search terms you've used, information you've entered into forms, or cookiesis not sent. A web site that is flagged as suspicious has some of the characteristics typical of phishing web sites, and it is neither on the list of legitimate web sites that is stored on your computer nor on the online list of reported phishing web sites. The web site might actually be legitimate, but you should not submit any personal or financial information to it unless you are certain that the site is trustworthy.
See also "Windows Defender," in Chapter 8, and "Pop-Up Blocker," discussed next |
Pop-Up Blocker Blocks pop-up windows. To open Internet Explorer Tools Pop-Up Blocker Description Small windows that pop up on the Web with messages or ads are one of the most annoying things about being online. But pop ups are more than merely annoyingthey can be dangerous as well. Pop-up ads are one of the most common ways that spyware infects people's PCs. Click a pop up, and software may silently install on your PC without your knowledge. Or the pop up may purport to serve a legitimate purposeperhaps asking you to participate in a surveybut in fact, when you click, spyware will be installed. Internet Explorer includes a pop-up blocker that blocks most pop ups and makes browsing safer and more enjoyable. When you visit a web site and a pop up is blocked, you'll get the message shown in Figure 5-22 in Internet Explorer's Information Bar. Figure 5-22. The Information Bar alerting you that a pop up has been blocked 
Click the Information Bar, and a menu will appear that lets you manage pop ups from the site: Click Temporarily Allows Pop-ups to allow pop ups from the site for just this browsing session. Click Always Allow Pop-ups from This Site to always allow pop ups. Click Settings, and a menu appears to let you further configure the Pop-Up Blocker. From the menu, select Turn Off Pop-Up Blocker to turn off the Pop-Up Blocker. Unselect Show Information Bar for Pop-ups if you do not want the Information Bar to appear when a pop up is blocked. Select More Settings, and a screen appears that lets you always allow or block pop ups from a specific site, as detailed later in this section.
In addition, when a pop up is blocked, the screen in Figure 5-23 will appear over Internet Explorer. If you do not want to see the screen every time a pop up is blocked, click "Don't show this message again" and then click OK. You'll still get the yellow Information Bar. Figure 5-23. An annoying alert that's worth turning off 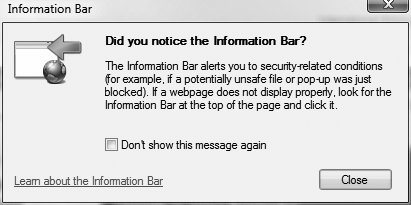
You don't have to wait until you get a pop up if you want to configure the Pop-Up Blocker. In Internet Explorer, select Tools Pop-Up Blocker, and a menu appears with two choices: Turn Off Pop-Up Blocker, and Pop-Up Blocker Settings. Click Turn Off Pop-Up Blocker, and pop ups will no longer be blocked. Click Pop-Up Blocker Settings, and a screen appears that lets you configure the Pop-Up Blocker in several different ways. Here are your options:
Exceptions This top part of the screen lets you allow pop ups from specific sites. Use this when the feature of a site requires the use of pop ups. To allow a pop up from a specific site, type the site URL into the "Address of website to allow" box and click Add. It will be added to your list of Allowed sites. To remove a site from the list, highlight it and click Remove. To remove all sites, click Remove All.
Notifications and Filter Level This middle portion of the screen controls whether and how you're notified in case of pop ups, and how aggressively the filter blocks them. Check the box next to "Play a sound when a pop-up is blocked," to hear a small "pop" sound every time a pop up is blocked. Check the box next to "Show Information Bar when a pop-up is blocked" to display the Information Bar notification that a pop up was blocked.
Filter Level This final portion of the screen is a drop-down list that lets you determine how aggressively pop ups should be blocked. The High level blocks all pop ups, even if Internet Explorer determines that the pop up is needed for the site to run properly. The Medium level (which is the default level) blocks most pop ups but allows those required for the proper running of a site. The Low level allows all pop ups for sites that Internet Explorer determines to be safe. Notes The Pop-Up Blocker, in its default level, allows some pop ups to be displayed. There are several reasons this may happen. If you have spyware on your PC, pop ups may appear because the Pop-Up Blocker isn't designed to block spyware pop ups. Additionally, the blocker will allow some pop ups with "active content"for example, ActiveX controls and browser add-ons that include features that are integral to the proper functioning of a web site, or that add a feature to a web site. In addition, the blocker will not block pop ups from web sites in your Local intranet or Trusted sites content zones. To block pop ups from these sites, you'll have to remove them from the zones. When you browse the Web and a pop up makes it through the Pop-Up Blocker (for example, if it contains active content), the pop up appears in its own small, separate window. If you want, though, you can have pop ups appear in their own tabs. To do that, select Tools Internet Options, click the General tab, and then, under the Tabs section, click Settings. In the Tabbed Browsing Settings dialog box, click "Always open pop-ups in a new tab," and then click OK.
See also "Windows Defender," in Chapter 8, and "Internet Options Security Tab," earlier in this chapter |
|