| Windows Mail, the mail reader built into Windows Vista, is the successor to Outlook Express, which was built into previous versions of Windows. There have been some cosmetic and feature changes between Outlook Express and Windows Mail, but to a great extent, the basic operations of the mail program have remained the same. Microsoft may have named the mail client Windows Mail because of the confusion between Outlook and Outlook Express. Outlook, shipped with Microsoft Office, is a more full-featured mail reader and includes a built-in calendar, task list, and other tools, so it's possible that Microsoft renamed Outlook Express to better differentiate the two programs. This is somewhat ironic, because Microsoft decided to name the email program Outlook Express in the first place to imply that it was a "lite" version of Outlook, even though there was really no relationship between the programs. Even though Outlook offers more features, Windows Mail is a powerful email program. It includes spam filtering, good searching features, the capability to create rules to automatically handle incoming mail, and more. Although Windows Mail is much like Outlook Express, there have been a number of changes, deletions, and additions to the program:
New toolbar A new toolbar has been added, just below the menu, that gives access to Windows Mail's most commonly used features, such as creating, replying to, and forwarding mail; sending mail; printing mail; deleting mail; and searching.
Junk email filtering Windows Mail includes what Microsoft calls SmartScreen technology to filter out spam; Outlook Express didn't include built-in junk mail filtering.
Quick search In the upper-right corner of the main screen in Windows Mail is a Search box, much like the one in Internet Explorer, that lets you do a quick search through all of your messages.
Windows Mail communities Windows Mail lets you rate the usefulness of newsgroup postings and view the ratings that others give to postings.
Elimination of identities Outlook Express allowed for the creation of multiple identities, a feature that let more than one person use Outlook Express on the same PC with their own accounts, settings, and mail. Windows Mail eliminates identities. In Windows Vista, you'll have to create separate user accounts to accomplish the same thing. If you install Windows Vista over a previous version of Windows that had Outlook Express with multiple identities, Windows Mail will automatically launch a wizard to guide you through the process of importing previous email identities into your current user account. The wizard will launch every time you start Windows Mail until you import or delete all the identities. Here is an alphabetical reference of entries in this chapter: Columns | New Message | Watch Conversation | Find | Newsgroups | Windows Contacts | Internet Accounts | Read Options | Windows Mail | Junk E-mail | Signatures | Windows Mail Options | Message Rules | Stationery | Windows Mail Security |
Windows Mail: \Program Files\Windows Mail\WinMail.exe An Internet email client and newsgroup reader. To open Start  All Programs Windows Mail All Programs Windows Mail Double-click the Windows Mail icon on the Desktop, if it's been enabled. Command Prompt winmail Description Windows Mail (see Figure 6-1) uses a familiar Explorer-like tree interface to manage the folders into which email and newsgroup messages are organized. Highlight any folder name to display its messages; the currently highlighted message is then shown in the preview pane. Double-click the message to open it in a new window for easier reading and other options. Figure 6-1. Windows Mail, the email application that comes with Windows 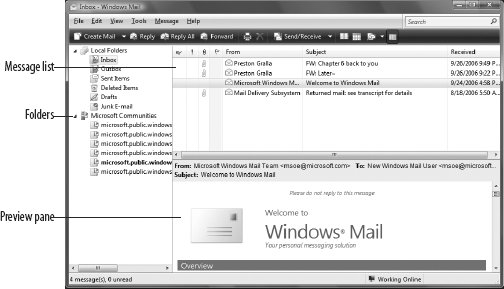
Newly received messages are stored in the Inbox folder. Files queued to be sent are stored in the Outbox folder, and are then moved to the Sent Items folder when they have been sent. The Deleted Items folder is like the Recycle Bin because it stores deleted messages until it is emptied manually. The Drafts folder stores messages as they're being composed. To add a new folder, select Local Folders in the tree and go to File New Folder. You can move messages from folder to folder by dragging and dropping them. The first time you open Windows Mail, a wizard walks you through setting up your first account. An account in Windows Mail is not actually an email account, but rather an entry in Tools Accounts that connects to an existing email account. Windows Mail uses either the Post Office Protocol 3 (POP3) or the Internet Message Access Protocol 4 (IMAP4) Internet mail protocol to receive mail, and the Simple Mail Transfer Protocol (SMTP) to send mail. Nearly all Internet service providers (ISPs) and many online services (such as AOL and MSN) use POP3 and SMTP for mail transfer. In addition to mail accounts, you can set up Directory Service accounts, which allow you to look up contact information using any of several online global contact lists. Windows Mail also functions as a newsreader for participating in Internet newsgroups; you'll need to add a News Account to Windows Mail before you can read any newsgroups (contact your ISP for details). Note, though, that it includes a built-in setup for participating in newsgroups on Microsoft's public NNTP server. Click on Microsoft Communities and it will walk you through the process of setting up access. Windows Mail hot keys Many people like using the mouse, but those who are more keyboard-oriented are always looking for fast ways to access Windows Mail features. That's where hot key combinations come in; rather than having to mouse around, you can press a simple key combination. Table 6-1 lists Windows Mail hot keys. Table 6-1. Windows Mail keyboard shortcutsKey combination | Action |
|---|
In Main window, View Message window, and Send Message window | F1 | Open Help. | Ctrl-A | Select all messages or all text within a single message. | In Main window and View Message window | Ctrl-M | Send and receive email. | Ctrl-N | Open or post a new message. | Ctrl-Shift-B | Open Contacts. | Delete or Ctrl-D | Delete an email message. | Ctrl-R | Reply to the message author. | Ctrl-Shift-R or Ctrl-G (newsgroups only) | Reply to all. | Ctrl-F | Forward a message. | Ctrl-Shift-F | Find a message. | Ctrl-P | Print the selected message. | Ctrl-> | Go to the next message in the list. | Ctrl-< | Go to the preceding message in the list. | Alt-Enter | View the selected message's properties. | Ctrl-U | Go to the next unread email message. | Ctrl-Shift-U | Go to the next unread newsgroup conversation. | In Main window | Ctrl-O or Enter | Open a selected message. | Ctrl-Enter or Ctrl-Q | Mark a message as read. | Tab | Move among the message list, Folders list (if on), and Preview pane. | Ctrl-W | Go to a newsgroup. | Left arrow or plus sign (+) | Expand a newsgroup conversation (show all responses). | Right arrow or minus sign (-) | Collapse a newsgroup conversation (hide responses). | Ctrl-Shift-A | Mark all newsgroup messages as read. | Ctrl-J | Go to the next unread newsgroup or folder. | Ctrl-Shift-M | Download newsgroup messages for offline reading. | Ctrl-I | Go to your Inbox. | Ctrl-Y | Go to a folder. | F5 | Refresh newsgroup messages and headers. | In Message window: viewing or sending | Esc | Close a message. | F3 or Ctrl-Shift-F | Find text. | In Message window: sending only | F7 | Check spelling. | Ctrl-Shift-S | Insert a signature. | Ctrl-Enter or Alt-S | Send a message or post it to a newsgroup. | Ctrl-Tab | Switch among the Edit, Source, and Preview tabs when working in Source Edit view. |
Notes Alternatives to Windows Mail include the popular Eudora Email (http://www.eudora.com) by QUALCOMM, and web-based email services such as Hotmail (http://www.hotmail.com) by Microsoft, Gmail (http://www.gmail.com) from Google, and PINE for those die-hard Unix users. Another alternative is the excellent Mozilla Thunderbird (http://www.mozilla.org/products/thunderbird), which offers plenty of customizability in the form of third-party plug-ins. Because it is an integrated component of Windows, Windows Mail may become the target of virus and Trojan horse attacks, in the same way that its predecessor, Outlook Express, was and that Outlook still is. A number of viruses exploited the vulnerabilities in Outlook Express to replicate themselves, sending a virus-infested attachment to everyone in your Contacts. Sadly, this isn't going to stop anytime soon. Given the dominance of Windows Mail and Outlook Express (and that of its big sister, Outlook), it's always going to be the virus writer's favorite target. On the bright side, though, Windows Mail has been made "leaner" than Outlook and Outlook Express, so it may present less of a target to malware authors. If you want to use Windows Mail Express when you're not connected to the Internet, go to File  Work Offline. If you are using a dial-up connection, you may even want to further reduce online time by configuring Windows Mail to hang up after sending and receiving messages. To do this, go to Tools Options Connection tab and turn on the "Hang up after sending and receiving option. If autodial is enabled, Windows Mail will reconnect automatically when you go to Tools Send and Receive. Work Offline. If you are using a dial-up connection, you may even want to further reduce online time by configuring Windows Mail to hang up after sending and receiving messages. To do this, go to Tools Options Connection tab and turn on the "Hang up after sending and receiving option. If autodial is enabled, Windows Mail will reconnect automatically when you go to Tools Send and Receive. File Attachment in the message composition window, or just drag the file from your Desktop or Explorer into the body of the message. If Windows Mail is your default email program, you can also send a file as an email attachment by right-clicking it and selecting Send To Mail Recipient. This opens a new, blank message with the file attachment included.
|
Columns Changes the display of columns in the Message List. To open View Columns Right-click the top of any column in the message list and choose Columns. Description The message list in Windows Mail displays information about each message in columns. By default, those columns are labeled From, Subject, Received, Flag, Attachment, and Priority. But there are other columns you can display as well. To add columns to or remove columns from the display, choose View Columns, and Figure 6-2 appears. Figure 6-2. Adding and removing columns from the message list 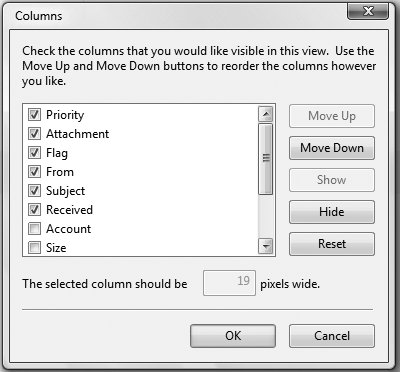
Check the box next to any columns you want displayed; uncheck the box next to those you don't want displayed. In addition to the default columns, you can display these: Size (shows the size of the message) Sent (shows whether a message was sent) To (shows the recipient of a message) Watch/Ignore (shows whether a message is being watched or ignored)
To change the order of columns, highlight an entry and click Move Up or Move Down. When you move a column "up," it will be moved to the left in the message list; moving it "down" moves it to the right. You can also change the width of any column by highlighting it and typing the new width (in pixels) in the box near the bottom of the screen. Notes By default, messages are displayed in descending order by date (the newest messages are on top). To change that to ascending order, click the Received column. To switch it back, click the Received column again. To sort by any column other than the Received column, right-click the top of the column and choose either Ascending or Descending, depending on the order in which you want them displayed.
See also "Watch Conversation" |
Find Search for messages, people, and text. To open Edit Find Click the Find icon on the toolbar. Description One of the biggest problem that many people have with email is finding messages that they've sent or received. Windows Mail's Find feature does a very good job of helping you find messages. Find lets you perform three different kinds of searches: for messages, for people, and for text within a message. To choose among the three, click the down arrow next to the Find icon and select what you're looking for. (If you click the icon itself, you'll launch a search for messages.) Similarly, when you select Edit Find, youll have the choice of which Find feature to use. When you choose to search for messages, the screen shown in Figure 6-3 appears. You'll be able to specify which folder to search; whether to search the From:, To:, Subject:, or message text field; whether the message has an attachment or has been flagged; and a date range to search within. Figure 6-3. The Find Message feature, which gives you multiple options for searching for messages 
When you do a search, the results show in a pane beneath the Find Message screen. When you search for people, a screen appears that lets you search by name, email address, street address, phone number, and freeform text. If you're in a corporation that uses Active Directory, you can search for people in your corporation by choosing Active Directory from the Look In drop-down list. Similarly, if your corporation subscribes to the Verisign Internet Directory Service, you can search for people outside your business. Choose Verisign Internet Directory Service from the Look In drop-down list. To search for text within a message, highlight the message and choose the "Text in this message" option. Notes The hot key combination for doing a searchCtrl-Shift-Fmay confuse you because it's context-sensitive. If you're reading a message in a separate window (double-click on a message in the message list to open a separate window), that hot key launches a dialog box for finding text inside your message. If you're in the main Windows Mail screen instead, it will launch a dialog box for finding messages. Windows Mail also has a Quick Search feature, the search bar in the upper-righthand corner of the screen. It does an immediate text-only search of messages in the current folder, so you won't be able to search by date, specific fields, attachments and flags, and so on. If you're looking for more robust search features than those that are built into Windows Mail, use the Search feature in Windows, which offers more searching flexibility and searches through emails and documents simultaneously. It also allows you to save searches so that you don't need to reformulate them after you've run them once.
See also "Search" and "Indexing Options," both in Chapter 4 |
Internet Accounts Sets up, customizes, and manages email accounts, newsgroup subscriptions, and Internet Directories. To open Tools Accounts Description To send or receive email, you need to set up an account in Windows Mail. The first time you open Windows Mail, a wizard walks you through setting up your first account. An account in Windows Mail works with an existing email account that you have with a mail provider, such as your ISP, employer, or school. Windows Mail uses either the POP3 or the IMAP4 Internet mail protocol to receive mail, and SMTP to send mail. Nearly all ISPs use POP3 and SMTP for mail transfer. Before setting up an account in Windows Mail, you'll need to get the POP3, IMAP4, or SMTP settings from your mail provider. The wizard will ask you for those settings, as well as your username and password, in order to set up your account. Make sure that you get all the details of the settingsnot only the address itself (such as smtp.comcast.net or pop.isp.net), but also whether the servers require authentication. The Internet Accounts dialog box, shown in Figure 6-4, lists all of your email accounts; lets you add, edit, or remove existing accounts; and lets you set up newsgroup accounts and Internet Directory Servers (LDAP) as well. (An Internet Directory Server makes it easy to find people's email addresses.) To add a new account, click Add and follow the wizard. It's the same wizard you'll encounter the first time you start Windows Mail. Unfortunately, the only way to set up a new account entry is to use the cumbersome wizard. Figure 6-4. The Internet Accounts dialog box, which puts all of your email, newsgroups, and Internet Directory accounts into one location 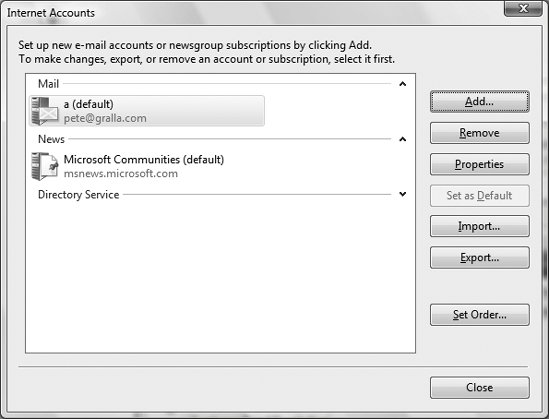
If you have more than one mail account, you can choose the default by highlighting it and clicking Set as Default. Thereafter, that account will be used as your return address when sending outgoing email (unless you change it on a per-message basis). The Set Order button, which lets you choose the search order when looking up contacts in your Directory Services, may be a little confusing at first. Because only an entry is shown, there's nothing to rearrange; to include more entries in Set Order, double-click each entry and turn on the "Include this account when receiving mail or synchronizing" option on the General tab.  | Most problems encountered when sending or receiving email are caused by improper settings in the Internet Accounts screen. |
|
Not uncommonly, when you're setting up a new account, there will be problems with it. Perhaps you mistyped the POP3 server address, or you didn't realize that your server required authentication. And sometimes your ISP may change a server address. Perhaps you've changed your username and password. And for some accounts, you may need to set some of the more advanced options, such as whether to automatically check mail from this account, whether to leave copies of your mail on the server, or whether to use a different email address when replying to messages sent to this account. To change information about any account, you'll need to use the Properties window to enter information. To get to the Properties window, highlight an account and select Properties, or double-click the account. The screen shown in Figure 6-5 appears. Figure 6-5. The Properties window, which lets you change options for each of your accounts 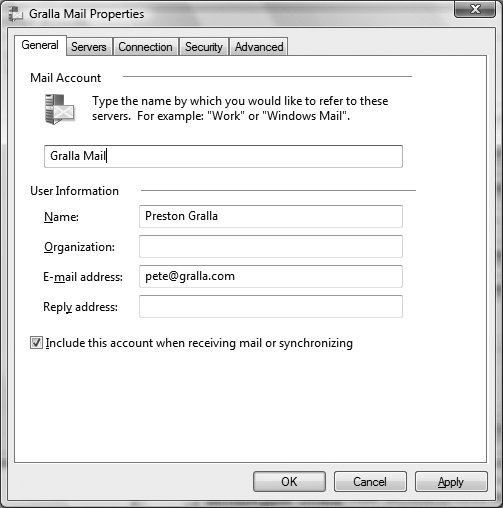
Following is what each tab does:
General This tab includes basic information about the account, including the account name, user information, and email address. Note that the tab allows you to have a separate email address for sending and receiving. So you can send with the email address for the account, but when someone replies to the mail, it can go to a separate address. If you want both addresses to be the same, leave the Reply address blank, and all replies will go to the account's sending email address. This tab also lets you decide whether the account should always be included when you send and receive mail. To ensure that it does, check the box next to "Include this account when receiving mail or synchronizing."
Servers This contains information your POP3, IMAP (both are used for receiving mail), and SMTP (used for sending mail) servers. More often than not, if you have trouble setting up an account, here's where your problems will lie. Make sure that you type in the exact server address given to you by your ISP (or, if you are connecting to your email at work or at school, your system administrator). Also, you have to know whether you need Secure Password Authentication for incoming mail, or username and password authentication for outgoing mail.
Connection In most cases, you'll never have to use this tab. You'll need it only if the mail account for some reason requires that you connect to it only via a specific dial-up or other Internet connection. If it does, check the box next to "Always connect to this account using" and then select the account from the drop-down list.
Security If you want to digitally sign messages with this account, here's where you enter the information.
Advanced Here's where you enter detailed information about each server, including port numbers, whether the servers require secure SSL connections, whether you need to account for server timeouts, and whether to leave copies of messages on the server even after you've downloaded or sent them. If you are connecting to an SMTP server at work or school, you may need to use a different port number for outgoing mail. This is because many ISPs block outgoing access on port 25 to all but their own SMTP servers (this is a security measure to reduce the likelihood that home computers will be used as spam-spewing zombies). Port 587 is often a working alternative, but consult with your system administrator for details.
IMAP Use this tab to specify the root folder of your IMAP server, as well as which IMAP folders to use for sent items, drafts, deleted items, and junk mail. Notes Some free web-based email providers let you use an email client such as Windows Mail to send and receive mail. As of this writing, Gmail does, MSN Hotmail doesn't, and Yahoo! doesbut only if you pay $19.99 a year for Yahoo! Mail Plus. Problems encountered when sending or receiving email are caused by improper settings in this window. If you want to use Gmail with Windows Mail, read the Gmail Help document about it, because it requires a very specific setup. If you use a mail provider other than your own ISP, you may run into problems sending mail. Let's say, for example, that you own the domain yournamehere.com and your ISP is bigisp.net. You want to use mail servers of yournamehere.com so that your email address is your last name, like this: yourname@yournamehere.com. But when you use the yournamehere.com SMTP server, mail refuses to send. If your mail provider can't offer access on an alternate port (see "Advanced," earlier in this section), you'll need to use yournamehere.com for your account, but the bigisp.net SMTP servers. You'll set up all that on the Server Properties screen. Even this, though, may run you into trouble if your ISP doesn't want to relay on behalf of yournamehere.com, or if recipients (or their email programs) conclude that your email is forged because the sending domain and relay domain don't match. If you access the same account from two different computers, you may want to set up one computer to download messages, but not delete them from the server. Set up your other system to delete messages after downloading them. This way, one system always has a complete set of messages. Do this by using Tools Accounts any account Properties Advanced tab Leave a copy of messages on server. If you use IMAP for your email, all of your message folders reside on the server, so you wont need to use this feature (Windows Mail will download copies of messages only in order to index them and make them available offline). If you have multiple accounts set up and do not want one included when you click Send and Receive, go to Tools Accounts any account Properties General tab and deselect "Include this account when receiving mail or synchronizing." For IMAP accounts, you can also set sync settings on a per-folder basis. To get to these settings, click on the top-level folder for your IMAP account, and the sync settings will take over the righthand pane where youll be able to choose from Don't Synchronize, All Messages, New Messages Only, and Headers Only. If you have more than one account set up in Windows Mail, only one account can be the default at any time. Although you can choose a From account each time you compose outgoing mail, the default account is the one that is used if you don't make a choice. Unfortunately, there's no way to set up a Message Rule to change the default account used when responding to incoming messages; for that, you'll need a more full-featured email program such as Eudora.
See also "Message Rules" |
Junk E-mail Filters out spam and junk email from your inbox. To open Tools Junk E-mail Options Description To use email is to be bedeviled by spam. Offers to get rich quick, enlarge certain body parts, buy authentic Rolex watches for $4.99 . . . these, and more, come in an unending stream, 24 hours a day. Spam is more than a nuisance; it can be dangerous as well. Many scams are launched via email, including the notorious Nigerian scam, also called the 419 scam, in which you are apparently enlisted in a scheme to get millions of dollarsexcept that it's your bank account that is emptied. Phishing attacks, in which you are lured to a site posing as a financial site such as your bank, are launched via email as well. To help get spam under control, Windows Mail includes a way to block and filter junk mail. By default, this spam control is turned on. Windows Mail's junk mail filter examines all incoming mail, and if it suspects that it is junk mail, it automatically forwards it to the Junk E-mail folder. From there you can examine the mail and delete any you don't want. If the filter makes a mistake, you can move the mail to your inbox and tell Windows Mail not to consider mail from that sender as junk in the future. You can also add email addresses manually to a Blocked Senders list, and the filter will always consider mail from them as spam. Plus, you can add email addresses manually to a Safe Senders list and the filter will never consider mail from them as spam. | As a way to protect you from malicious spam, when mail is in the Junk E-mail folder the links in the mail won't work. But what if the filter has made a mistake and you need to click a link on mail in the folder? Simply move the mail out to another folder, and the links will work; they won't function only when they're in the Junk E-mail folder. If you want the filter to recognize in the future that the sender isn't sending spam, mark the message as not junk. |
|
There are a number of ways you can customize how the junk mail filter works, as well as make it more effective. To get to them, use the Junk E-mail Options dialog box, shown in Figure 6-6. Figure 6-6. Customizing Junk E-mail Options 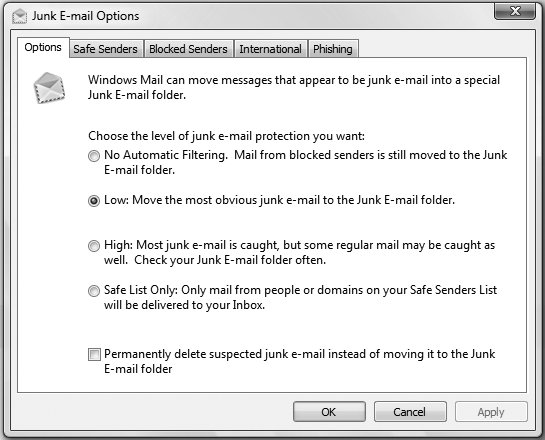
Following are details about the use of each tab:
Options This lets you choose how aggressively you want the filter to handle spam; it lets you choose your level of protection:
No Automatic Filtering This will not automatically check for spam, although it will move mail to your Junk E-mail folder from anyone on your Blocked Senders list.
Low This is the default level. It catches only the most obvious spam. It will let spam through, but it also usually won't incorrectly move legitimate mail to your Junk E-mail folder.
High This more aggressive level will catch more spam than Low, but it will also sometimes move legitimate mail to your Junk E-mail folder.
Safe List Only This will consider all mail as spam, unless it is from someone on your Safe Senders list. This tab also gives you the option of having Windows Mail automatically delete spam instead of moving it to the Junk E-mail folder. This is a dangerous option to choose. The junk mail filter is not perfect, and at times it will consider some legitimate mail as junk. So if you choose this option, you may delete important mail without ever seeing it.
Safe Senders This lets you add and remove addresses and domains to your Safe Senders list. To add an address or domain, click the Add button, type in the address or domain, and click OK. Type in the person's entire email address, like this: friend@myfriend.com. To add an entire domain, don't include the www. So type it in like this: myfriend.com. To remove an address or domain from the list, highlight it and click Remove. By default, anyone in Windows Contacts is automatically on your Safe Senders list. If you don't want that to be the case, uncheck the box next to "Also trust e-mail from my Windows Contacts." And if you would like to automatically add people to the list when you send them an email, check the box next to "Automatically add people I e-mail to the Safe Senders List."
Blocked Senders This lets you add and remove addresses and domains to your Blocked Senders list. To add an address or domain, click the Add button, type in the address or domain, and click OK. Type in the person's entire email address, like this: friend@myenemy.com. To add an entire domain, don't include the www. So type it in like this: myenemy.com. To remove an address or domain from the list, highlight it and click Remove.
International You may notice that whenever you receive email from certain international domains (such as .ru for Russia), the mail is almost always spam. If that is the case, you can filter out mail from an entire country's domain. To do that, click Blocked Top-Level Domain List, select a country or countries from the list that appears, and click OK. Similarly, you may notice that when you receive email in a foreign language with foreign characters, that mail is almost always spam. To filter out email with foreign character sets, click Blocked Encoding List, select the language or languages from the list that appears, and click OK.
Phishing The junk mail filter also checks whether incoming mail is likely to be a phishing attempt. But it handles potential phishing attacks in a confusing manner. If it believes an email to be a phishing attack, it doesn't move the mail to the Junk E-mail folder, but it does deactivate the links in the mail. The Phishing tab lets you change that behavior. If you want the filter to deactivate the links and move the suspicious mail to the Junk E-mail folder, check the box next to "Move phishing E-mail to the Junk Mail folder." If you want to turn off antiphishing checking entirely, uncheck the box next to "Protect my inbox from messages with potential phishing links." | If the junk mail filter doesn't block a phishing attempt, Internet Explorer will still use its phishing filter to help ensure that you don't fall prey to a phishing attack. |
|
There's another way to work with the junk mail filteron a message-by-message basisand you'll most likely work with it that way rather than using the dialog box. Select any email and then select Junk E-mail. A menu appears that allows you to add the mail sender or domain to the Safe Senders list or Blocked Senders list, unblock the mail, or mark the mail as not junk. When you mark the mail as not junk, it is moved to your inbox, but the sender isn't added to your Safe Senders list, so the next time he sends you an email, it will be considered junk. If you want all subsequent email from him to be considered legitimate, you should instead choose Add Sender to Safe Senders List. Notes If you don't think that the Windows Mail filter is doing an adequate job of fighting spam, you can buy any of a number of antispam programs that purport to do a better job. Companies such as Symantec and Cloudmark sell antispam software. You may be flooded with spam, but more spam than you actually see is being sent to you. Your mail provider has spam filters as well, and it filters out much spam before you ever even see it. But because spam has become such a problem, some of these filters are overly aggressive and filter out legitimate mail. That means that you may be sent legitimate mail that you never receive. If someone tells you he's sent you mail, and you've never received it, contact your mail provider, give the provider the email address of the person, and ask that spam from him not be filtered. Your mail provider may or may not do this; some are notorious for not responding to requests. Microsoft continues to update its Junk Mail filter with new addresses of known spammers. They will be delivered via Windows Update.
See also "Phishing Filter," in Chapter 5, and "Windows Defender" and "Windows Update," in Chapter 8 |
Message Rules Create rules to take action on incoming mail, such as routing it to a specific folder or automatically responding to it. To open Tools Message Rules Description You can set up Windows to automatically handle incoming mail in a number of ways. For example, you can set up rules instructing Windows Mail to store all email retrieved from your business account in a certain folder, all email retrieved from your personal account in a different folder, and all junk mail (spam) in the trash. Furthermore, you can have Windows Mail automatically respond to certain messages and mark some messages as urgent and others as potentially annoying. Go to Tools Message Rules Mail to view the mail rules currently in effect. If you havent yet set up any rules, you would be prompted to do so now; otherwise, click New to create a new rule (see Figure 6-7). Figure 6-7. Setting up your email message rules 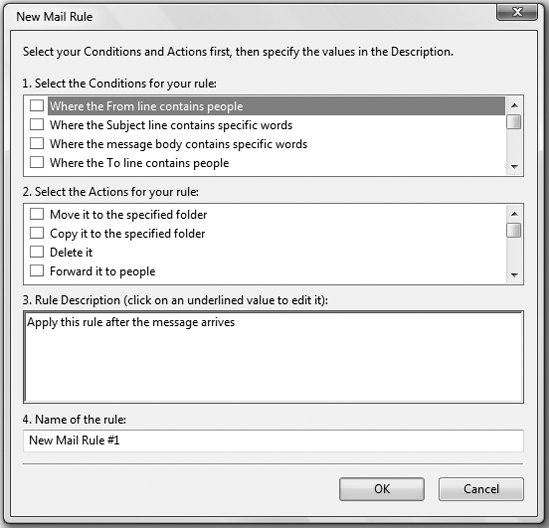
Each rule is set up as follows:
Select the Conditions for your rule Choose one or more conditions that, when met, will instruct Windows Mail to take the desired action. For example, to create a rule that applies to all email from Grandma, place a checkmark next to "Where the From line contains people."
Select the Actions for your rule After you've chosen one or more conditions, these options allow you to decide what to do with messages that meet those conditions. For example, you may want to place all of Grandma's email in a certain folder, in which case you would place a checkmark next to "Move it to the specified folder." On the other hand, if Grandma drives you nuts, you may want to place a checkmark next to "Delete it."
Rule Description The third box displays a summary of the conditions and actions you've chosen, and allows you to input the specifics. For example, if you've chosen to move all of Grandma's email into a certain folder, the phrase "contains people" will be underlined and hyperlinked, as will the word "specified." Before you can complete this rule, you must click each of these links; in the case of "contains people," you would type Grandma's email address. Likewise, in the case of "specified," you would select the path of the folder in which to store Grandma's email.
Name of the rule Finally, choose a label for the rule; although the name makes no difference, it will allow you to easily identify and differentiate the rules. Don't expect to get all your rules right the first time. After creating a new rule, scrutinize its performance as new mail is retrieved. You can also create new rules on the fly, using some of the context-based tools in Windows Mail. Start by opening a message, and then go to Message Create Rule from Message. Here, the familiar rule dialog box is shown, but some fields have been filled in with information from the selected message. Notes Don't try to use Message Rules to block spam; instead, it's a much better idea to use Windows Mail's Junk E-mail features. See "Junk E-mail," earlier in this chapter. You can use Message Rules to act on newsgroup messages as well as email. Choose Tools Message Rules News, and follow the same steps as you would to create rules for mail. You will be able to take different actions on newsgroup messages than you can on email messages. For example, with newsgroup messages, you can flag messages, mark them as read, highlight them with color, and delete them.
See also "Junk E-mail" |
New Message Create a new email message in Windows Mail. To open File New Mail Message Click the Create Mail icon. Press Ctrl-N. Description When you create a new mail message, as shown in Figure 6-8, you use several sets of menus, toolbars, and icons. Addressing the message is simple: type an email address into the To: and Cc: fields, or click the Contacts icon and select a contact. Then type a subject into the Subject line, type in your message, and send the message by clicking the Send icon. (You can also select File Send, or press Alt-S.) Figure 6-8. Creating a new message with Windows Mail 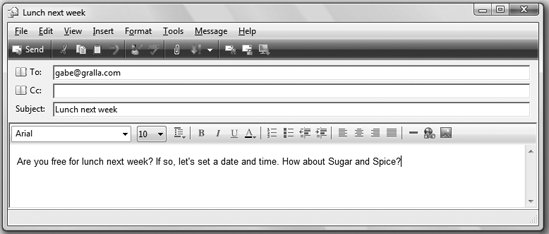
The top menu bar and the toolbar beneath it are somewhat redundant because they offer similar functionsfor example, you can copy text by clicking the Copy icon on the toolbar, or instead choose Edit Copy from the toolbar. But many functions are available only from the menu bar, and a few functions are available only from the toolbar. The toolbar has on it what Microsoft believes are the most common tasks youll want to accomplish. The ribbon bar just above the box where you type the text of your message lets you format your text by changing the font, size, and so on. It works exactly like similar features in word processors.
The menu bar Following are the main purposes for the menu bar:
File This menu lets you create, send, copy, delete, and save messages, as well as perform related tasks. In addition, it lets you save a message as a template for stationery (see "Stationery," later in this chapter, for details.)
Edit This familiar menu, like most Edit menus throughout Windows Vista and in Windows applications, lets you cut, copy, and paste text, as well as perform similar tasks. It also lets you search for messages across all folders, and search for text within a message. In addition, it lets you remove hyperlinks in a message. Normally, when you type text, such as www.oreilly.com, Windows Mail will automatically turn it into a hyperlink. Choosing the Remove Hyperlink option from the Edit menu will remove any selected hyperlinks.
Insert This lets you insert an attachment, picture, horizontal line, business card, signature, hyperlink, and text from a file.
Format This lets you format the text of your message; choose a background picture, color, or sound; choose to send as plain text or HTML; and apply stationery.
Tools This lets you check the spelling in your email, request a "read" or "secure" receipt, check whether the names of recipients are found in Windows Contacts, encrypt a message, and digitally sign a message. It also can launch Windows Contacts and Windows Calendar.
Message This lets you create another message, create one using a specific kind of stationery, and set delivery priority for your message (low, medium, or high). The toolbar The toolbar lets you perform common tasks on your outgoing email messages by clicking the appropriate icon. Most of these tasks are self-explanatory, such as sending the message; cutting, copying, and pasting text; inserting an attachment; setting message priority; and so on. However, several icons let you perform less common tasks, and they are not always self-explanatory:
Check names  Click this icon, and Windows Mail checks the addresses you've typed into the To: and Cc: fields, looks for incorrect syntax, and if it finds any, looks to see whether there are any near matches in Windows Contacts. You can then choose the correct name from Windows Contacts. Click this icon, and Windows Mail checks the addresses you've typed into the To: and Cc: fields, looks for incorrect syntax, and if it finds any, looks to see whether there are any near matches in Windows Contacts. You can then choose the correct name from Windows Contacts.
Digitally sign message  This allows you to "sign" the message using a digital signature that will guarantee to the reader of the message that you are who you say you are. To use this feature, you'll have to first install a digital certificate, also called a Digital ID. Some corporations give their employees Digital IDs, and in that case, Windows Mail may already be set up to use one. If your company does provide a Digital ID, but for some reason it hasn't been set up yet, you can install it yourself. First, find out where the ID is located. Then in Windows Mail, select Tools Options Security. Under Secure Mail, click Digital IDs. Click Import, and then follow the instructions to import your Digital ID. This allows you to "sign" the message using a digital signature that will guarantee to the reader of the message that you are who you say you are. To use this feature, you'll have to first install a digital certificate, also called a Digital ID. Some corporations give their employees Digital IDs, and in that case, Windows Mail may already be set up to use one. If your company does provide a Digital ID, but for some reason it hasn't been set up yet, you can install it yourself. First, find out where the ID is located. Then in Windows Mail, select Tools Options Security. Under Secure Mail, click Digital IDs. Click Import, and then follow the instructions to import your Digital ID.
Encrypt message  This allows you to encrypt the message so that only the recipient can read it. To use this feature, you'll have to first install each recipient's digital certificate. This allows you to encrypt the message so that only the recipient can read it. To use this feature, you'll have to first install each recipient's digital certificate.
Notes You can also create a new newsgroup message, by choosing File New News Message. When you do this, most of your options for creating messages will be the same, but there will be a few differences. For example, there will be no ribbon bar for formatting text. Instead, you will see options for choosing the type of newsgroup post you want it to be: comment, question, or suggestion. Options Send Mail Sending Format), you wont see the ribbon bar for formatting text. Beware when sending pictures in your email, because some servers have a limit on message sizessometimes as small as 1 MB per message. You can, however, have Vista shrink the size of pictures before you send them, using the Windows Photo Gallery. You'll have to open the picture in the Windows Photo Gallery first, resize it using the built-in tools, and then use a built-in Windows Photo Gallery feature for sending the picture via email. See "Windows Photo Gallery," in Chapter 12, for details.
See also "Windows Photo Gallery," in Chapter 12 |
Newsgroups Participate in discussion groups. To open Tools Newsgroups Ctrl-W Click the newsgroup icon in the toolbar. Description Newsgroups are world-spanning discussion groups that cover every topic imaginable. They predate the World Wide Web, and even though community sites on the Web such as MySpace have become exceedingly popular, millions of people all over the world still participate in newsgroups. Before you can participate in newsgroups, you first need to set up an account. For details on how to do it, see "Internet Accounts," earlier in this chapter. For server information you'll need in order to set up an account, check with your ISP. By default, Windows Mail comes with an account already set up for Microsoft support newsgroups. Newsgroups open up in the main Windows Mail screen, as shown in Figure 6-9. Each newsgroup server appears as a separate server; beneath that server are newsgroups to which you have subscribed (more on that a little later). You read posts in the same way as you do mail; information about each postsuch as the subject, sender, and so onappears in the message list, and the content of the post appears in the preview pane. Figure 6-9. Reading newsgroups in Windows Mail 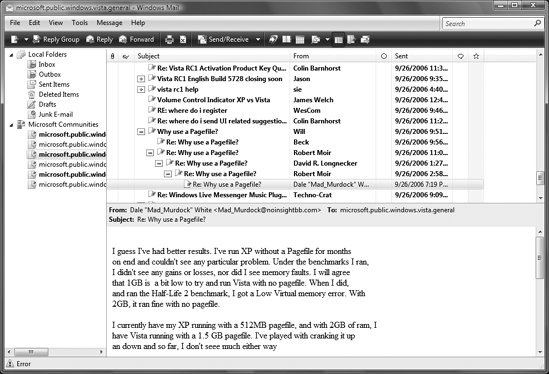
To a great extent, you use Windows Mail in much the same way for reading newsgroups as you do for sending and receiving mail. However, there are a number of differences:
Subscribe to newsgroups When you choose Tools Newsgroups or press Ctrl-W, youll be sent to the Newsgroups Subscriptions screen (shown in Figure 6-10), which lists all of your newsgroup servers on the left. Click any, and you'll see the list of newsgroups in which you can participate in the All tab. To read any newsgroup, double-click it, or highlight it and click the "Go to" button. You can subscribe to newsgroups in which you want to participate regularly. That way, the newsgroups will always show up in your folders in the main Windows Mail screen for quick access. To subscribe to groups, highlight them (you can highlight multiple ones at the same time using the familiar Windows Shift-click or Ctrl-click selection method), and then click Subscribe. The groups will now show up in your folders, as well as on the Subscribed tab in the Newsgroups Subscriptions screen. To unsubscribe to a newsgroup, highlight it in the Subscribed tab and click the Unsubscribe button. You can unsubscribe to multiple newsgroups at the same time, in the same way that you can subscribe to them. Figure 6-10. The Newsgroups Subscriptions screen 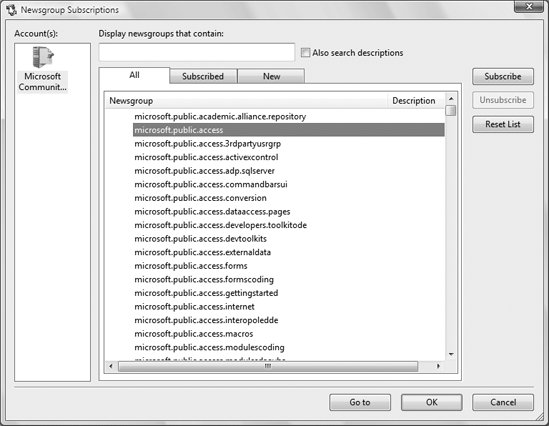
Search There are many thousands of newsgroups, and it can be difficult to scroll through them all to find the ones you're interested in. At the top of the Newsgroups Subscriptions screen is a search box that helps you search for newsgroups in which you'd like to participate. The search can work in one of two ways: it can either search only the names of newsgroups (such as microsoft.public.br.vfp), or it can search the names and descriptions of newsgroups. Newsgroup names aren't always particularly descriptive, so it's a good idea to search names and descriptions. By default, it searches only by names, because it first needs to download the descriptions of the newsgroups from the server if you want to search by description as well. To search through descriptions, check the box next to "Also search descriptions." If you haven't yet downloaded the descriptions, you'll be prompted to do so before you search.
Communities As a way to help you better know if other people's newsgroup posts are useful, Windows Mail uses Microsoft Communities, which lets participants rate the usefulness of other people's newsgroup posts. The rating of each post then shows up in the Rating column, which is denoted by a star at the top. Only users who are signed into Microsoft Communities can rate or see the ratings. (You can rate them on the Web as well. The communities are available online via a web-based mail reader at http://www.microsoft.com/communities/newsgroups/en-us/default.aspx.) To rate any post you're reading, select a rating from the Rate drop-down list in the Rate this Post section. If you haven't yet logged in using Windows Live or Windows Passport, you'll be prompted to enter that Live login information. (If you don't have a Windows Live login, you'll have to create one first.) You can then rate the post as either useful or not useful.
Downloaded messages Many newsgroups have tens of thousands of posts, and it could take an extremely long time to download all of the posts of every newsgroup in which you want to participate. So Windows Mail downloads only the headers of the most recent 300 messages to your PC. When you click any message, the message itself is then downloaded to your PC, where you read it. If you want to see more headers than just the most recent ones, select Tools Get Next 300 Headers. Notes Newsgroups can contain objectionable and pornographic material, including pictures and videos as well as messages, so be forewarned before participating in any you don't know about. Not all newsgroup servers allow access to all newsgroups. The servers for the Microsoft support newsgroups, for example, have only newsgroups for Microsoft support. So your ISP may not give you access to all newsgroups. There are a number of free newsgroup servers you can use; search for "free newsgroup server" or conduct another similar search on Google or Live Search to find them. A popular one is freenews.netfront.net. The site http://freeusenetnews.com has a list of many free ones. Some web sites let you read newsgroups directly from the Web, without having to use a client such as Windows Mail. The best-known one is Google Groups at http://groups.google.com, and Microsoft makes its public newsgroups available at http://www.microsoft.com/communities/newsgroups/default.mspx. It can be annoying to wade through the thousands of messages that can exist in a single newsgroup. Custom views work like Rules (discussed earlier) and let you weed out some of the extraneous messages. For example, you can hide messages that are written by certain users (in Usenet parlance, this is referred to as a "bozo filter"), contain certain words in the subject, are over a certain length, or are over a certain age. Go to View Current View Customize Current View to set your preferences. ROT13 near the beginning of the message. ROT13 scrambles messages by replacing every character in the message with one that appears 13 characters later in the alphabet. You can unscramble a message by first opening it, and then choosing Message Unscramble (ROT13).
See also "Internet Accounts" |
Read Options Set options for displaying and reading message in Windows Mail. To open Tools Options Read tab Description This dialog box, shown in Figure 6-11, lets you change how Windows Mail displays messages, and how you read them. Figure 6-11. Changing your options for reading mail using the Read Options dialog box 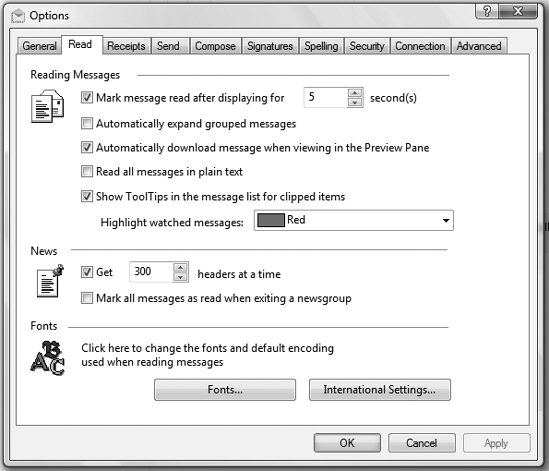
The box has three sections:
Reading Messages This section customizes basic mail reading and display. Some of the options here are self-explanatory, such as how long it takes for a message to be marked as read after you highlight it (the default is five seconds) and whether to automatically expand grouped messages (the default is no). Perhaps the most important option in this section is "Read all messages in plain text." If you select this, all formatting will be stripped from your HTML email, and it will most likely be very difficult to read. By default, this option is turned off. This section also lets you choose the color for watched messages. The most baffling option in this section is "Show ToolTips in the message list for clipped items," which is turned on by default. When the subject line of a message is too long to be displayed in the subject column, the subject line appears "clipped"that is, three dots ( . . . ) appear at the end. With this option turned on, when you hover the mouse pointer over the subject line, the entire subject line will appear in a tool tip.
News This section lets you change how many newsgroup headers should be downloaded from individual newsgroups when you view any. The default is 300. The section also lets you mark all messages as being read (when they're read, they change from boldface to plain text) when you exit a newsgroup. The default is not to mark them as read when you exit.
Fonts This lets you change the font and default encoding for reading messages. It lets you change the language, as well as the specific font, size, and so on. Notes For maximum safety, choose the "Read all messages in plain text" option, because it will turn off HTML, which can prove to be dangerous. On the other hand, then you won't be able to view graphics, fonts, and so on. And some messages that are composed in HTML may be unreadable as plain text.
See also "Watch Conversation" and "Newsgroups" |
Signatures Automatically include text or HTML at the bottom of all of your outgoing messages. To open Tools Options Signatures Description You may want to have text or HTML appended to the bottom of all your outgoing messagesfor example, your contact information, or a pithy quote that sums up your views about life, love, and whether the Red Sox will ever win the World Series again. The Signatures dialog box, shown in Figure 6-12, lets you create and assign signatures to your different accounts. To create a new signature, click New, type in a distinctive name for it, and then type the text into the Edit Signature section. If you already have a signature in a text file, click File in the Edit Signature section, browse to the file, and click OK. If you want to use an HTML signature, first create it as an HTML file, then browse to it and click OK. Figure 6-12. Creating your signatures 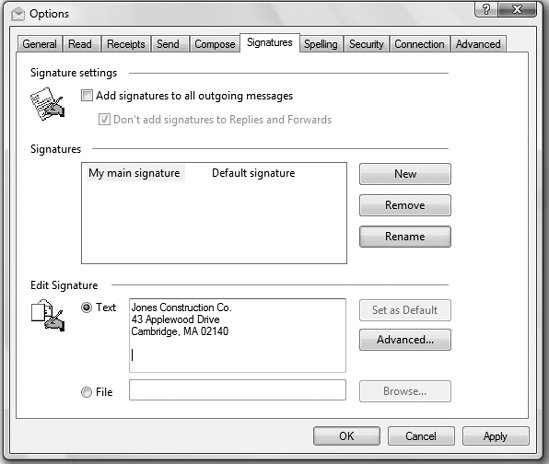
Windows Mail lets you use different signatures for different accounts. To do it, highlight the signature you want to assign to an account, click Advanced in the Edit Signature section, choose the account, and click OK. Notes You can use plain-text characters (called ASCII characters) to create pictures for your signatures. Plenty of web sites include art that you can save to a text file and then use to create a signature. In Google, search for "ASCII art" or "ASCII signature." A signature is different from stationery. Stationery is background colors, graphics, and multimedia that you use as a background for outgoing messages; a signature is text or HTML appended to the bottom of outgoing messages.
See also "Stationery" |
Stationery Use backgrounds colors and graphics for your email. To open Tools Options Compose tab Description Stationery imposes a visual style on your message, including colors and even images. Stationery files are just .html files (web pages), stored by default in \Program Files\Common Files\Microsoft Shared\Stationery. They can be edited with any web page editor or plain-text editor. To create new stationery or to use one of the supplied templates, first go to Tools Options Compose tab. To create new stationery, click Create New, and follow the wizard's instructions. To use existing stationery, check the box next to either Mail or News, depending on your purpose for creating stationery. Unfortunately, you can't set default stationery for each account separately (something Eudora lets you do), so whatever stationery you choose will be used for all of your email or newsgroup accounts. However, you can choose stationery on a per-message basis by going to Format Apply Stationery in the message composition window (see Figure 6-13). Figure 6-13. Choosing and creating stationery 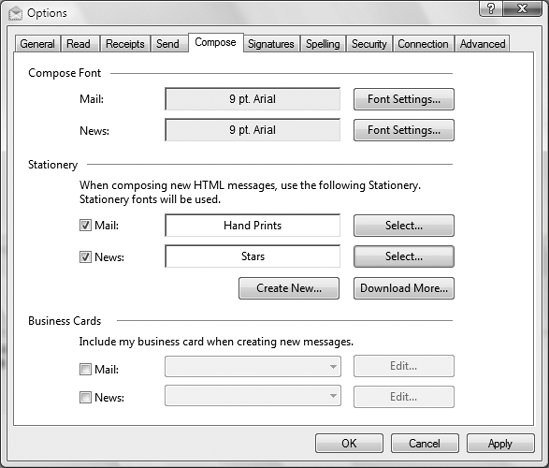
Notes To download more stationery, click Download More in the Stationery section of the Compose tab. You'll be brought to a web page in your web browser. Click "Download more stationery here." You can edit Windows Mail's presupplied stationery. Select stationery as you normally would, and in the Select Stationery window, highlight the stationery you want to edit. Click Edit, and the stationery will open in Word, where you can edit the HTML stationery file. But Word is not a particularly good HTML editor. A better bet is to launch your favorite HTML editor, go to \Program Files\Common Files\Microsoft Shared\Stationery, and edit stationery there.
See also "Signatures" |
Watch Conversation Keep track of discussions and message threads in email and newsgroups. To open Highlight or open the mail or newsgroup post you want to watch, and choose Message Watch Conversation. To ignore a conversation, highlight or open the mail or newsgroup post you want to watch, and choose Message Ignore Conversation. Description A conversation is a continuous series of email or newsgroup messages, often called a thread. For example, if you were to write an email with the subject "Propane Elaine," it might spark a series of messages between you and the recipient, all of which would have the subject "Re: Propane Elaine." This thread of messages is called a conversation in Outlook Express, and there are tools included for dealing with it. You can "watch" a conversation that is of interest to you by highlighting a message and going to Message Watch Conversation. Likewise, you can "ignore a conversation by going to Message Ignore Conversation. Either of these will place an icon in the Watch/Ignore column: eyeglasses or a red circle with a line through it, respectively. Click the icon to toggle among Watch, Ignore, and nothing. The first time you choose to watch or ignore a conversation, you'll get a message asking whether you want to turn on a new column in the message list. If you turn on the column, the Watch/Ignore column appears on the far-left side of the message list, denoted at the top by a small pair of eyeglasses. An eyeglasses symbol appears in that column next to every message in every conversation you watch. In addition, the messages you are watching appear in color. When you choose instead to ignore a conversation, the messages in the conversations you've chosen to ignore appear grayed out, and a "no" symbol (a circle with a diagonal line through it) appears in the Watch/Ignore column. For the most part, this is merely a decorative setting; it doesn't affect the way Windows Mail handles these messages. However, you can choose to highlight watched conversations and hide ignored conversations, as follows. Customize the color of messages in watched conversations by going to Tools Options Read tab Highlight watched messages. To hide all messages in a conversation marked as Ignored, go to View Current View Hide Read or Ignored Messages. Then, go to View Current View Customize Current View, remove the checkmark next to "Where the message has been read," and click the links in the bottom screen so that the description reads: "Where the message is ignored, Hide the message." (For more details about creating rules, see "Message Rules," earlier in this chapter.) Finally, if you select View Current View Group Messages by Conversation, messages in conversations will be grouped in expandable branches, like the folders in Explorer. Notes Beware of watching too many conversations, because that defeats the purpose of this feature. If you watch many conversations, all of your mail will appear in color, and all will have the eyeglasses next to them in the Watch/Ignore list, so there will be no way to differentiate important conversations from unimportant ones.
See also "Columns" |
Windows Contacts Keep track of people's names, email addresses, phone numbers, and other personal information. To open Tools Windows Contacts Ctrl-Shift-C (works only when you are in Windows Mail) Start All Programs Windows Contacts Description Windows Contacts replaces the old Windows Address Book, but it serves the same function. Rather than being in a familiar, Address Book-style format, it looks and works much like any other folder, as shown in Figure 6-14so much so that it includes the familiar toolbar across the top. Figure 6-14. Windows Contacts, which replaces the old Windows Address Book 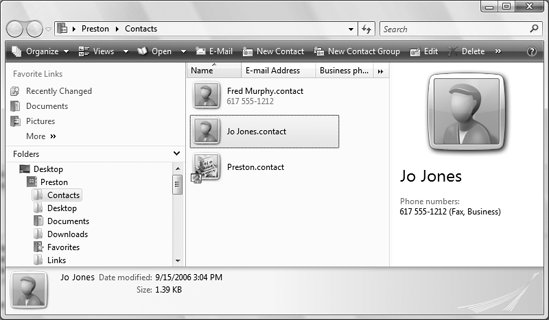
Windows Contacts works in a straightforward way, like any other similar address book. Click New Contact to add a new contact, then fill out as much information as you can on the various tabs, including names, email addresses, phone numbers, street addresses, web site addresses, and personal information such as a contact's spouse, children, gender, birthday, and anniversary. You can add a picture as well. If you frequently send out email to a group of people, you'll find the Contact Group feature useful. Click the New Contact Group icon on the toolbar, type in a name for the group, click the Select Members button, and then add contacts to the group. Send an email to the group name, and it will be delivered to every contact in the group. Sharing contacts Previous to Windows Vista, a common way for people to share contact information was to send a vCard via email. The vCard is a contact in a format that could be directly imported into Outlook Express, the Windows Address Book, or Outlook, and it would show up as a contact. Windows Vista and Windows Mail still support vCards, but they have a preferred, different method for sharing contacts. If you want to share your information with someone else who uses Windows Vista, you attach your contact information to an email message. Attach the contact as you would any other file. You'll find your contacts in C:\Users\username\Contacts. All your contacts will be listed, followed by a .contact extension, such as Preston.Gralla.contact. You can share any contact in this way, not just your own information. If the person uses Vista and is on the same network as you are, open Windows Contacts, right-click the contact you want to share, click Share, and follow the instructions. To share contact information with someone who doesn't use Vista, right-click the contact and click Send Contact (vCard), and a vCard will be automatically created and attached to a new mail message. Send the message as you would any other message. When you receive a message with a vCard attached, double-click the vCard and the contact will be added to Windows Contacts. Notes Windows Contacts uses an XML-based file format in which every contact is actually a separate .contact file. Microsoft also has built APIs for it so that in theory, it should be much easier to integrate it with other applications. You can import contacts from, or export them to, another contact program. Click either the Import or the Export button, and follow the simple wizards. If you upgrade to Windows Vista from Windows XP, the contacts from your Windows Address Book will be automatically converted to contacts in Windows Contacts. If you don't upgrade, or if you used a different program than the Windows Address Book, you can import contacts into Windows Contacts. In the program that has the contacts you want to import, export the contacts as a comma-separated value (.csv) file or a Windows Address Book (.wab) file. Copy it to a disk, or directly to the Vista PC where you will import the contacts. Then in Windows Contacts, click the Import button, choose the file format that you'll be importing, browse to the location that has the file, and import it. Similarly, you can export contacts from Windows Contacts by clicking the Export button and following the directions. By default, every person to whom you send a reply is added to Windows Contacts. To change this behavior, use the Tools Options Send tab.
|
Windows Mail Options The central location for setting all major Windows Mail options and preferences. To open Tools Options Description The most important Windows Mail options are available from this multitabbed dialog box. It should be the first place you look when you want to change an option or a preference. Following are the tabs and what you need to know about each:
General This tab, shown in Figure 6-15, covers several basic operations of Windows Mail. The General section of the tab is more for newsgroups than email, and it lets you set whether you want to be notified when new newsgroups are available on the newsgroup server to which you connect. The tab also lets you use a new feature introduced with Windows Mail: Microsoft Communities, which lets you rate and view ratings of the usefulness of other people's newsgroup posts. Check the box next to "Use newsgroup message rating features" if you want to participate. Figure 6-15. The General tab, which governs overall mail features, such as how frequently to check for messages 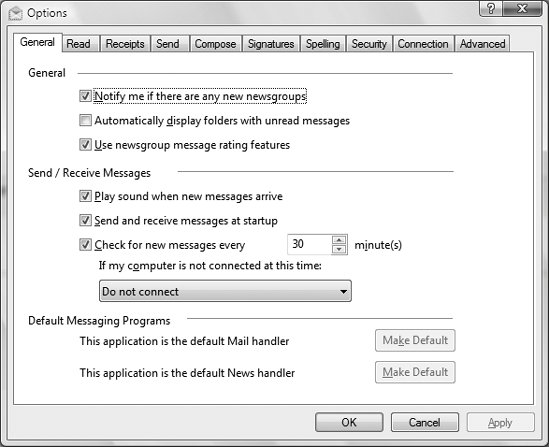
Read This tab controls all your options for reading mail and newsgroup messages. For example, it lets you determine what colors you want "watched" messages to be displayed in, and whether to read all messages in plain text rather than HTML. It also lets you change the font of messages. For more details about these options, see "Read Options."
Receipts This tab lets you control options related to requests that a receipt be sent to you when someone reads a message you send. It also governs how Windows Mail handles return receipt requests that are attached to incoming mail messages. Check the box next to "Request a read receipt for all sent messages" if you want all mail to be sent with a return receipt.  | Just because you request that a receipt be sent to you when someone reads your mail is no guarantee that you'll actually get the receipt. The recipient is notified that you want a receipt, but can block that receipt from being sent. |
|
In the Returning Read Receipts section, you control how Windows Mail handles mail sent to you with return receipts. You can have Windows Mail never send back a return receipt, always send back a return receipt, or notify you when one is requested so you can choose on a case-by-case basis. The tab also lets you control how Secure Receipts should be handled. A Secure Receipt is like a normal Read Receipt, except that it covers mail sent with Digital IDs, which verify the identity of the sender of the mail. Click the Secure Receipts button, and you'll be able to request that you be sent secure receipts for all messages you send. You can also control how you want to handle when people send you mail with secure receipts requestedalways send them, never send them, or notify and let you decide on a case-by-case basis.
Send This tab controls options that are applied when you send messages. The Sending section includes these important global settings. By default, all are enabled; to disable any, uncheck the box next to it and click OK:
Save copy of sent messages in the Sent Items folder This is a straightforward setting; it keeps copies of all of your sent messages.
Send messages immediately If you select this, as soon as you finish the message and send it, it is immediately sent. If you uncheck the box, the message will be sent only when you choose to send and receive all messages.
Automatically put people I reply to in my Contacts list Select this, and every person to whom you respond automatically goes into your Contacts list; otherwise, you'll have to add them manually.
Automatically complete e-mail addresses when composing With this selected, as you type in the Address: or Cc: lines, Windows Mail will look through your Contacts and history of people with whom you've corresponded, and suggest addresses if it finds a match. Highlight any you want to use and press Enter.
Include message in reply Select this, and the previous message will be inserted into the message. At the top of the inserted previous message will be "----- Original Message -----", followed by addressing information and the text of the message, with each line preceded by a > and a space.
Reply to messages using the format in which they were sent With this option, when you're sent a text message, your reply will be in text; if you're sent an HTML message, the reply will be in HTML. Otherwise, the reply will be in the global setting you've chosen for all mailwhich you choose from the Mail Sending Format section of the Send tab. The tab also includes options for choosing your mail- and newsgroup-sending formats. You can choose text or HTML, as well as encoding or MIME settings for messages.
Compose This lets you choose the font you want to use for new messages, both for mail and for newsgroups. In addition, it lets you choose background stationery. For details, see "Stationery," earlier in this chapter. You can also choose to send an electronic business card containing your contact information with each message.
Signatures This lets you create a signature to append to the bottom of your messages. You can create multiple signatures and use different ones for different accounts. For details about how to create signatures, see "Signatures," earlier in this chapter.
Spelling If you want a spellchecker to check each message before you send it, check the box next to "Always check spelling before sending." (By default, it's turned off.) The rest of the tab lets you choose spellchecking options, including whether to ignore words in all uppercase, whether to ignore words with numbers in them, whether to ignore Internet addresses, and whether it should check the original text in messages you reply to or forward. You can also choose the language you want to use (your choices are English, French, German, and Spanish).
Security This tab lets you choose from a variety of security options, such as blocking certain attachments from being opened, using Digital IDs, and encrypting messages. For details, see "Windows Mail Security," later in this chapter.
Connection This is a largely useless tab. By default, Windows Mail shares Internet connection information with Internet Explorer, so you don't need to do any connection setup here. If you click the Change button, though, you'll be sent to the Connections dialog box, which will let you change your connection for Internet Explorer and Windows Mail. In addition, this tab will be of use to people who use dial-up (or cellular data) rather than broadband connections. If you use a dial-up connection, you can have the connection automatically hang up after sending and receiving, and be alerted before Windows Mail switches from one of your dial-up connections to another.
Advanced Go here for some fairly esoteric settings. If you send out a business card with your messages, you can choose to send it in the vCard format or the Windows Contact format. Those who use IMAP servers can choose whether to use the server's Deleted Items folder. For message threads, you can choose to automatically mark message threads you start as Watched. When you reply to or forward messages, you can choose whether your reply should be at the top or bottom of the original message, and whether your signature should be inserted at the bottom of the reply. Click the Maintenance button for choosing how to handle deleted messages (for example, whether to empty messages from the Deleted Items folder when you exit). It also lets you choose how frequently your database of messages should be compacted, which will save disk space, and it lets you change the location of your message store. Notes Be careful when using the Receipts tab to have all mail automatically sent with the return receipt option. Many people do not like receiving mail that is sent with return receipts, and feel that it is an invasion of their privacy. In addition, if you choose to have all mail sent using return receipts, your mailbox will quickly become overrun with the receipts.
See also "Read Options," "Stationery," "Signatures," "Windows Mail Security," and "Watch Conversation" |
Windows Mail Security Protects your PC against email-borne threats. To open Tools Options Security Description Email has become one of the primary ways that PCs are attacked, and Windows Mail's Security Options tab, shown in Figure 6-16, lets you customize how you protect yourself. Figure 6-16. Windows Mail's Security Options tab, which lets you customize how to protect yourself when handling mail 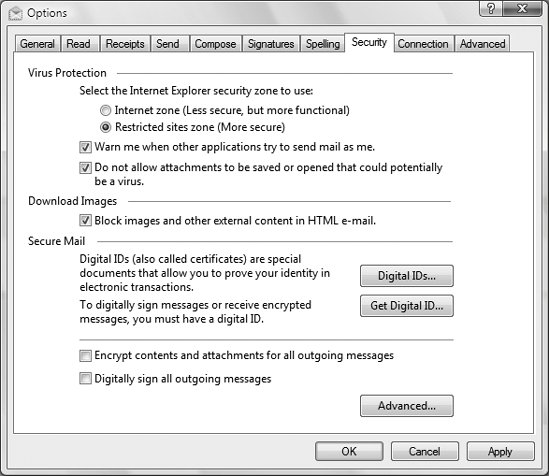
Here are each of the tab's sections, and what they do:
Virus Protection This lets you customize Windows Mail's antivirus, antiworm, and antispyware protection. Windows Mail shares Internet Explorer's security settings. (See "Internet Options Security Tab," in Chapter 5.) By default, Windows Mail uses the Restricted sites zone, which offers the highest level of security and disables most features that could harm your computer, including turning off ActiveX controls, Java and Java applets, and downloads. You can, if you choose, override this and tell Windows Mail to use the Internet zone so that it will run that kind of active content, but unless there are specific reasons why you might want to do that, it's best to leave the default. By default, Windows Mail will also notify you if another application on your PC tries to send mail with your identity. This is to protect against Trojans and other malware from using your PC as a spam or phishing engine; some malware in essence hijacks your PC and uses it to send out that kind of mail in the background, without your knowledge. If you want, you can turn off this notification by unchecking the box next to "Warn me when other applications try to send mail as me." But unless you have a specific reason for turning this off, don't do it. The final option in the Virus Protection section is a bit more problematic. By default, Windows Mail will not allow you to save or open a wide variety of attachments that could potentially harbor malware or harm your PC. So, for example, .exe files are blocked, as are .vb(VBScript) files, because both can be dangerous. But it also blocks Microsoft Access project files (.adp), Microsoft Visual FoxPro programs (.prg), and other files you might want to be able to receive via mail. To allow Windows Mail to receive and open blocked files, uncheck the box next to "Do not allow attachments to be saved or opened that could potentially be a virus." Keep in mind that if you do this, you are opening your PC to potential dangers. | The attachment setting is an all-or-nothing propositionyou can't allow some attachments through but block others. However, if you know that you are going to receive a blocked attachment that you want to be able to open, you can uncheck the box, receive the mail, and then afterward, check the box again so that future attachments are blocked. There is a workaround, however. Ask the sender to put the file into a .zip file, and send the .zip file as an attachment. Windows Mail considers .zip files as safe, so it allows them through. |
|
Download Images Images in HTML email can harbor a variety of dangers. Notably, they can contain "web bugs" that can, in essence, be used to detect whether you read the message. In addition, if you click on images, they may lead to malware downloads or send you to dangerous sites. HTML mail can contain other content, such as streaming media, that can be dangerous as well. By default, Windows Mail blocks images and external content. If you feel that you can safely view and use that kind of content, uncheck the box in this section.
Secure Mail This lets you find and install Digital IDs, digital certificates that can be used to guarantee to recipients that you are who you say you are. If your business has given you a Digital ID, Windows Mail may already be set up to use one. If your company does provide a Digital ID, but for some reason it hasn't been set up yet, you can install it yourself. First, find out where the ID is located. Then click Digital IDs in this tab. Click Import, and then follow the instructions to import your Digital ID. The tab also lets you automatically encrypt, and digitally sign, all outgoing messages with the Digital ID. Notes If a Trojan or other malware has been installed on a PC without the owner's knowledge, and it is used to send out spam or phishing attacks, that PC is commonly called a zombie or a bot. Malware writers can command vast fleets of tens of thousands of zombies, which they rent out to spammers and phishers. In fact, security researchers say that many spam and phishing attacks are sent via these zombies.
See also "Internet Options Security Tab," in Chapter 5 |
|