| Here are details on the new features included with Domino 6. Roaming The roaming user feature allows users to have their own up-to-date information available on any PC. The information is stored on the server and replicated to each workstation accessed by the user. For example, users may have a system at work and one at home or may access PCs in multiple work locations. By using the roaming feature, users can have their information readily available wherever they are. This feature would be implemented by the Domino administrator. The Roaming User features work in the following manner: When registering or designating a roaming user, the user's personal information is created and stored in a separate personal directory on the user's mail server. When the user connects from a workstation, the following information is replicated to the current workstation and replicated back to the server when work is complete: Replication and Client Performance Enhancements in Notes 6 The Notes 6 replication architecture is much more efficient than in previous versions of Notes. The following enhancements to the replication process result in greater user efficiency: -
Multitasking and Memory Usage -
Streaming Replication -
Incremental view building -
Documents replicated in ascending size -
User can specify limits for document and attachment sizes -
Client/Server Interactions -
Network compression -
Multitasking and memory usage . Replication is one of many features that are "multitasked," which means users can perform other tasks while the Notes client is busy replicating in the background. Activities such as polling for new mail, detaching files, replicating, printing, monitoring alarms, subscription processing, running background agents , replacing designs, and copying databases take advantage of the new Notes 6 multitasking abilities . Another key improvement in the client is better overall use of memory and less use of graphical objects in the client itself. -
Streaming replication . Streaming replication involves a single server request, which then pulls in all the data (Notes documents and their attachments) into the database. This feature dramatically reduces replication time and works in all Domino 6 client/server scenarios. Streaming replication also means that when using the Notes client you no longer have to wait until the replication is over before seeing replicated documents in folders. They appear individually, as soon as they are pulled into the system, and you can begin to work on them before the database has finished replicating. In addition, documents are replicated in ascending size order. -
Dynamic build of folders and views . Streaming replication also means that when using the Notes client you no longer have to wait until the replication is over before seeing replicated documents in folders. They appear individually, as soon as they are placed in the local replica, and you can begin to work on them before the database has finished replicating. This is also referred to as incremental view building. -
Documents replicated by size . In Notes 6, documents are replicated in ascending size order. This means a user can abort a long replication and still get smaller documents replicated. -
Document and attachment limits . While previous versions of Notes allowed the user the option of receiving truncated documents (summary information and 40kb of rich text), Notes 6 allows users to replicate partial documents and define the size limit for documents and attachments. This is defined on the "Basics" tab of the Replication Settings dialog. -
Client/server interactions are also more efficient in Notes/Domino 6 . For example, an advantage of the new streaming feature is that because attachments are also streamed, Open and Save operations are more efficient. Client/server interactions are also dramatically improved by less frequent unread table exchanges, as there is a significant reduction in the number of bytes exchanged between client and server. Another performance enhancement is the use of incremental view reading, used to update design information and, in selected cases, user views. For example, when you move a document from one folder to another, the server is requested to provide just the incremental change it will take to fill the screen with the new view. -
Network compression . Notes/Domino 6 network compression reduces the number of bytes sent during transactions by up to 50 percent . Connections across heavily loaded links such as WANs and XPCs will see the most benefit. To use network compression, it must be enabled on both the client and the server. Additionally, Notes/Domino 6 incorporation of "network" streaming also reduces the overhead of large transfers. Advantages of Using Domino 6 for Cluster Replication This section discusses the advantages of using Domino 6 for cluster replication, and these advantages were a major factor used by IBM to encourage the customer to use Domino 6 from the beginning as they were starting the migration process from distributed NT servers to centralized Domino servers on the iSeries platform with cluster replication across the wide area network for 15,000 mail users. The customer did need some encouragement to start their project on the iSeries with the Domino 6.0 version (following the usual reluctance to use the X.0 version of any product). Replication Notes/Domino 6 Utilizes Streaming Replication Streaming replication involves a single server request, which then pulls in all the data (Notes documents and their attachments) into the database. This feature dramatically reduces replication time and works in all Domino 6 client/server scenarios. To use streaming replication, both parties involved in the replication must be running Notes/Domino 6. Streaming replication is PULL only. This feature uses a single streamed RPC to read a number of documents and attachments. This is an improvement over the nonstreaming method of requesting and acknowledging one database note at a time. Streaming replication saves time and consumes less CPU and network activity to replicate the same number of documents. Network latency is reduced, especially on slower links. Documents are also replicated in ascending size order (smallest first). This allows the client to abort a long replication but still receive some documents (for example, mail). Partial replication is also supported, allowing an aborted replication to be reinitiated and to continue where it left off. Views in folders are also updated incrementally while a replication is in progress (as opposed to the end of replication). This allows users to begin responding to initial documents (for example, mail messages) while larger documents continue downloading. End-user benefits of streaming replication include shorter replication times, ability to start viewing and working on documents before replication is completed, and replication of smallest documents first. If replication is cancelled, the target system still has documents (especially smaller ones), which were replicated before the replication session ended. Incrementally updated folders means you no longer have to wait until the replication is over before seeing replicated documents in folders. Advantages for IT departments (e.g., server to server replication) include faster replication, partial replication, potentially less network traffic due to single streamed RPC, and reduction of ACK (TCP/IP) responses. Lotus found that databases with 10,000 and 25,000 documents replicated 15 percent faster with streaming replication on. A database with 50,000 documents replicated 60 percent faster with streaming replication on. Network Compression Notes/Domino 6 network compression reduces the number of bytes sent during transactions by up to 50 percent. Network compression is an important performance feature offered in Notes/Domino 6. When you enable network compression, data is automatically compressed before it is sent over the network. This improves network performance, especially over slower line speeds. With network compression enabled on both the sending and the receiving computers, the Notes client and/or Domino server attempts to compress any data, (for example mail or replicated documents) before transmitting it over the network. Network compression works with mail routing, replication, or any other data sent via NRPC. This includes design elements in new or updated replica databases. Notes/Domino 6 network compression offers a number of immediate benefits. For example, by reducing the amount of data being transmitted, you can improve the performance of your routing and replicating hub servers, especially if they're currently laboring under heavy workloads. Also you can enable it by default, so all your users with Notes 6 clients can take advantage of this functionality without having to select it themselves . Because network compression is a standard, out-of-the-box feature, it doesn't require any additional code, which helps simplify administration. CPU and memory resources used on the system increases by a small amount. But in many environments where it is very expensive or even not an option to upgrade the existing network infrastructure, this is a welcome trade-off. Lotus also enhanced attachment compression in Domino 6. Attachment compression can now take advantage of the LZ1 algorithm (the same algorithm used in network compression). In R5, attachment compression used the Huffman algorithm. To use LZ1 compression in Domino 6, you must enable it in the Database Properties box. (By default, databases still use the Huffman algorithm to maintain backward compatibility.) The LZ1 attachment compression typically reduces attachment file size anywhere from 5 to 40 percent over Huffman attachment compression. The percent reduction in size depends on the type and complexity of the file attachment. Domino 6 with Quota Mail and Cluster Replication Here is information on how Domino 6 handles quota mail and cluster replication. The basic response is that Domino 6 is much more flexible in this area. -
Domino R5 would not replicate databases over quota (true for both scheduled replication and cluster replication). On the other hand, the R5 router would essentially ignore the quota and route mail even if the mail database were over quota. -
The Domino 6 default is to replicate databases over quota (i.e., ignore quotas for both scheduled replication and cluster replication). The default for the router remains the same (ignore quota). However, Domino 6 allows an INI setting to override the default and essentially go back to the R5 procedure of honoring quotas for both scheduled replication and cluster replication. Domino 6 Policy-Based System Administration In previous Domino/Notes releases, creating and managing a standard environment for all your users usually involved maintaining a set of written corporate policies. (An example of a policy might be a specific security configuration you want every Notes user to follow, covering things such as minimum password length and certificate expiration dates.) You would then use these policies to guide you as you entered settings for users throughout your site. If you were anything less than 100 percent familiar with every single setting, sooner or later you'd probably end up making some small, but crucial data entry error, one requiring hours or possibly days to correct. Perhaps you might identify with the plight of the administrator registering 1,000 users with the wrong Internet address format, resulting in hours spent editing each Person document containing the offending information. Those of you who know your way around LotusScript (or are on friendly terms with someone who does) might be able to create an agent to distribute at least some of this policy information corporate-wide. But wouldn't it be great if right out of the box, Domino gave you an automated way of enforcing such standards accurately and easily? If you think so, you're in luck. Domino 6 helps you solve the problem of applying and managing standard corporate policies by providing a new technology called policy-based system administration. This feature gives you a way to centrally define, organize, and manage user settings throughout your organization. All information required for policy-based system administration is stored in your Domino Directory, giving you a single place to control administration activity, from user setup to mail archiving. This article introduces policy-based system administration. We explain all its major features and components , how they work, and what you can do with them. And we'll provide examples of how policy-based system administration can make your job as a Domino administrator easier. For more information on policy-based system administration and all other Domino 6 administration features, see the Documentation Library. What Is Policy-Based System Administration? In broad functional terms, policy-based system administration is exactly what its name implies ”a way for you as a Domino administrator to manage and apply corporate policies for your employees . These corporate policies define the way Domino enforces user settings, which ensures that your established corporate standards and practices control how your technology works (and not the other way around). In Domino 6, you enforce corporate policies through individual Policy documents and Settings documents in the Domino Directory. To create a policy, you use a Policy document to specify which Settings documents to include. A Policy document (see Figure B-1 as an example) defines a set of corporate information you want to apply to your users. It does this by specifying which Settings documents to include in the policy. Each Settings document contains detailed information applicable to a specific area of Domino administration, for example archiving or security. This information defines user settings for that area. Figure B-1. Example of a policy document. 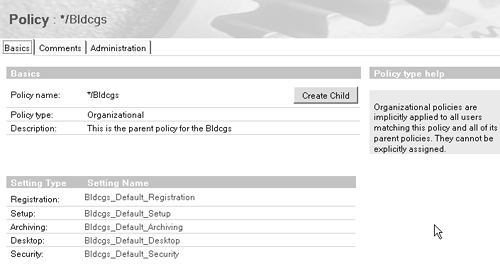
You can consider policy-based system administration as a way to create and apply rules within your user community. The Settings documents contain the rules; the Policy document organizes these rules. So when you create a Policy document, you have a single place to list these rules. You can then apply the rules to establish and enforce administrative standards by distributing them throughout your organization. And to change an existing policy, all you need to do is edit the Policy document and/or one or more Settings documents. No more running around to each user's computer, making the same change over and over ”you can now do this all centrally. You can use policy-based system administration to manage five major areas of Domino administration ”archiving, desktop, setup, registration, and security ”as indicated in Table B-1. Table B-1. Five Major Areas of Domino Administration | Policy Area | Major Features | Description | | Archiving | Server-to-server archiving Server-to-local archiving Folder-based archiving | Archive settings control mail file archiving. These settings determine whether or not to allow archiving, and if you do allow archiving, whether to allow Notes users to set their own private archiving criteria. | | Desktop | Welcome page Deployment Bookmarks management Client upgrades | Desktop settings control the user's desktop environment. They are applied to a user's client configuration during authentication whenever a change to the policy occurs. | | Setup | Browser Proxy Applet security Preferences | Setup settings help configure a new Notes client. They are used only once during the initial Notes client setup to populate the user's Location document and bookmarks. | | Registration | Mail template Password length/quality Internet address format Certificate expiration | Registration settings predefine the User Registration options, if your policies are in place before you register users. | | Security | Password expiration ECL management Password length | Security settings establish the administration ECLs and define password management options, including synchronization of Internet and Notes passwords. |
Creating a Policy Document To create a Policy document, you must have at least Author access to the Domino Directory, and you must be assigned to the PolicyCreator role. Then, from the Domino Administrator -
Click the People & Groups tab and open the Policies view.
-
Click Add Policy .
-
In the Basics section, enter a name for the policy. If you are creating an explicit policy, enter a unique name. If you are creating an organizational policy, enter a name in one of the following formats: -
For Organizations: */<organization> -
For Organizational Units: */<organizational unit>/<organization> -
For hosted organizations: */<hosted organization> -
For hosted organizations to indicate all hosted organizations in the Domino Directory: * -
Choose Explicit or Organizational as the policy type. Choose Explicit to create a policy that you assign to specific users and groups. Choose Organizational to create a policy to assign to all users in an Organization or Organizational Unit (OU). (See the Organizational and Explicit Policies section for more information.)
-
Optionally, enter a short description of the policy.
-
To create a child Policy document at this time, click Create Child. This creates a new Policy document that includes the name of the parent policy. You can save this new child Policy document and return to it at a later time. When you close this document you return to the parent Policy document.
-
In the Setting Type section, select the Settings documents (registration, setup, archiving, desktop, and security) you want to apply to this policy. These can be existing Settings documents you created earlier, or you can create new Settings documents on-the-fly by clicking New and completing the Settings document form.
-
Save and close the new Policy document.
Creating a Settings Document To create Settings documents, you must have at least Editor access to the Domino Directory, and you must be assigned to the PolicyCreator role. You can create Settings documents when you create a Policy document, or you can create Settings documents by opening the Domino Administrator and following these steps: -
Select the People & Groups tab and open the Settings view.
-
Click Add Settings .
-
Select the type of Settings document you want to create (registration, setup, archiving, desktop, or security).
-
Complete the fields appropriate to the settings type and then save and close the document.
Organizational and Explicit Policies You can assign policies to individuals within your company two different ways, organizationally and explicitly. Organizational policies apply settings to users or groups based on your organizational structure. An organizational policy affects all users in a naming hierarchy (*/Bldcgs, */Sales/Bldcgs, and so on) and can apply to either an Organization or Organizational Unit (OU). Organizational policies distribute settings to the broadest group of users, when the settings follow organizational lines. For example, to apply settings to all users in Sales/Bldcgs, create an organizational policy named */Sales/Bldcgs. Any user registered using the Sales/Bldcgs certifier automatically receives the settings in this organizational policy. Organizational policies can be considered wildcards and are usually the most effective method to distribute and maintain settings that apply to all users in a specific Organization or OU. Explicit policies assign settings to people and groups across different organizations. An explicit policy is assigned in the Person document and applies to a group of users when an Organization or OU does not exist to define the group. Explicit policies are most appropriate for environments without an organizational hierarchy or when you need to assign common settings to a group that spans multiple organizations. For example, suppose your company includes contractors as temporary employees working in many different OUs. You want your contractors to inherit some settings from the applicable organizational policy such as */Sales/Bldcgs, but you also want certain settings to apply only to contractors. For instance, you can set their certificates to expire after six months. To do this, you can create an explicit policy called /Contractors that applies only to them. (You can assign explicit policies with the Assign Policy tool.) When deciding which type of policies to use, consider the following suggestions: -
Use organizational policies to apply settings to groups in accordance with your existing naming hierarchy. -
Use explicit policies when groups to whom you want to apply settings don't match your Organization or OU structure. -
Above all, feel free to use both types of policies within your company ”indeed, we expect this will be common practice. NOTE Both explicit and organizational policies can be configured as exception policies. An exception policy explicitly exempts a specific individual or group from one or more of your standard policy settings. For example, your executives may need to bypass certain settings. Exception policies are powerful because they override all other settings (including enforced settings) that may apply to the exempted persons. But in practice, you should be careful not to overuse exception policies. Too many exemptions might decentralize the administration of these settings and therefore could defeat the entire philosophy of policy-based system administration.
Once created, organizational policies are automatically assigned to users ”based on the certifier. Explicit policies, on the other hand, must be assigned manually. You can assign explicit policies during user registration, in the Person document, or by using the Assign Policy tool. It's best to create organizational policies prior to user registration; the best time to assign explicit policies is during user registration. If you don't create your policies before you register users, you can't apply registration policy settings. Applying policies at registration time also ensures that setup policy settings are available when the registered users perform Notes client setup. Because organizational and explicit policies are hierarchical, inheritance and enforcement automatically fit into a parent-child relationship. This model gives you the ability to define corporate-wide standards inherited by Organizational Units while allowing for the occasional exception. Just imagine, you can have an archiving policy in which your end users have no control, some control, or complete control of where and how their mail files are archived. What Makes Up a Policy? If you are familiar with other aspects of Notes and Domino administration, administering policies should be relatively painless. All policy information is stored on the server in the public Domino Directory. That last sentence may spark a few questions, such as, "If policies reside in the public Domino Directory, how are they enforced when my users aren't connected?" Good question ”with an interesting answer. When a user authenticates with the home mail server, a process called dynamic configuration runs locally and caches all policy information for that user. This ensures that while the user is disconnected, all policies are still enforced. This also means users who remain disconnected for an extended period will not receive any changes to policies until they reconnect and authenticate with their home servers. As stated previously, a policy consists of a collection of Settings documents, organized within one high-level Policy document containing a single set of fields filled with the appropriate settings. Let's look at this through a simple diagram as shown in Figure B-2. Figure B-2. Policy document. 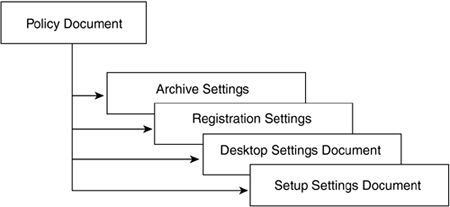
In the illustration given in Figure B-2, the top-level Policy document represents the policy you want to enforce in your organization. The subordinate Settings documents (for archive, registration, desktop, and setup) contain the settings information that apply to this policy. You can think of these Setting documents as buckets of information containing settings that in previous releases had to be entered through many different places within the Domino and Notes user interface. The Policy document dips into these buckets to derive the settings needed to apply to the appropriate users and groups. Knowing the relationship between Policy documents and Settings documents is crucial to understanding two important features of policy-based administration: policy hierarchies and effective policies. Policy Hierarchies Let's forget about Domino 6 and policy-based system administration for a moment and consider a typical large corporation. This company has rules that apply to all employees and rules that apply to some departments and not others. Some workgroups within those departments have their own rules, with some members exempt. And there are rules for particular types of employees, for example, contractors and managers. This may sound complex, but policy-based system administration can make sense of it all through policy hierarchies. Parent and Child Policies You construct a policy hierarchy by establishing parent-child relationships between policies. When you create a Policy document, you also can create one or more child documents for it. The original policy is then considered the child policy's parent. Through the parent-child relationship, you create a hierarchy of policies to apply across your entire corporation. In such a hierarchy, Policy documents build the relationship, and Settings documents determine the value of the fields based on their position in the hierarchy. Using either inheritance or enforcement at the field level, you can refine settings for the requirements of individual Organizational Units while maintaining control of certain standards that must be enforced across the company. For example, if you want all users to use the same Internet mail name format, set that value in the Registration Settings document for the top-level parent policy. After you do this, you don't have to change or reenter it in subsequent child policies. You instead just instruct the child policy to inherit this value from its parent. However, if your organization includes a group of international users for whom this setting is a problem, you can create an explicit policy that applies only to this group. The combination of explicit and organizational policies together provide the control and the flexibility you need. Inherited and Enforced Policy Settings A major feature of a hierarchical policy structure is the ability to inherit and enforce settings. Inherited settings are derived from another Setting document. Enforced settings are set in a parent Setting document and are automatically inherited by all child documents. This setting cannot be overridden in any child document. This lets you enter a setting in a single place and then populate it throughout your corporate structure ”while still allowing other settings to be set within each Organizational Unit. Note, however, that exception policies overrride enforced settings. This is another reason you should use exception policies sparingly. Policies inherit and enforce all settings at the field level. Two checkboxes are provided for each field that can be inherited or enforced. The following screen (see Figure B-3) shows how each field in the Archive Settings document can either inherit its value from its parent or enforce a setting to all of its children. Figure B-3. Fields in the Archive Settings document. 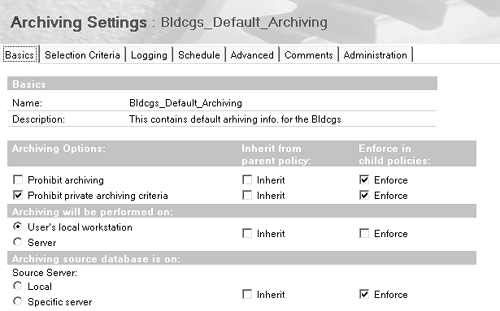
Effective Policies In a hierarchical policy structure, settings that apply to a particular group or user may not be from a single Policy document. Instead, policy information may be derived from multiple documents, based on inherited and enforced settings (or even exception policies if they're used). This derived set comprises the user's effective policy. The effective policy consists of policy settings dynamically calculated at the time of execution. The field values in an effective policy may originate from many different Settings documents. Each hierarchical level can have an associated policy, so users may have a combination of policy settings that include the values set at their OU level and those inherited from a parent policy. The resolution of these settings, stepping up through the organizational hierarchy, creates the effective policy for each user. In the end, it's the user's effective policy that determines which settings apply. So even though the effective policy doesn't actually exist in the same sense a Policy document does, it's nevertheless among the most crucial concepts you need to fully understand how policy-based administration works. Because the effective policy settings are derived at execution time, it may not always be obvious what effect changing a value of a policy setting will produce. The Policy Synopsis report shows the policy from which each of the effective settings is derived. This helps you better understand the settings of individual policies, Setting documents, and effective policies ”and how they relate and affect each other. Tools for Policy-Based System Administration With every new technology, however beneficial, there's usually at least some additional level of complexity. While extremely flexible by nature, policies can also be somewhat unfamiliar territory to the uninitiated. And let's face it, with the way many large, global companies are structured today (national, international, local, remote, IT, HR, and so on) a well-defined policy structure can be more than a little complex to create and maintain. To help make sense of all this, Domino 6 provides three useful tools for effective policy-based system administration: Assign Policy, View Policy, and Policy Synopsis. Assign Policy The Assign Policy tool gives you the ability to assign explicit policies. With this tool, you can assign an explicit policy to a user or group, or you can change the explicit policy assignment. The Assign Policy tool lets you make changes to multiple users or groups, by associating an explicit policy with a person or group. When you change the explicit policy for a user or group, Assign Policy gives you the option of viewing how the change impacts the effective policy for that user or group. For example, let's suppose your company has a group in the Domino Directory called Executives. Imagine the group contains high-level managers and VPs from different organizations and OUs within the company. Your corporate policy states that all executives must follow a strict mail archiving policy. Here's an example of a few of the people in the Executives group: Sandy Beech/Sales/Bldcgs Lee Smith/Bldcgs Fran Jones/Development/Bldcgs In this example, each person has a different organizational policy for archiving their mail, as shown in Table B-2. Table B-2. Organizational Mail Policy Example | User | Organizational Mail Policy | | Sandy Beech | * */Acme */Sales/Bldcgs | | Lee Smith | * */Acme | | Fran Jones | * */Acme */Development/Bldcgs |
So you create a new explicit policy called /Executive and make it an exception policy. You then use the Assign Policy tool to assign the policy to each member in the Executive group: -
From the Domino Administrator, click the People & Groups tab.
-
Open the People view and select the users to whom you want to assign policies or open the Groups view and select the groups to which you want to assign policies.
-
From the Tools pane, click People or Groups (depending on your selection in the previous step), and then select Assign Policy.
-
Complete the Assign Policy Options dialog box appropriately, as indicated in Figure B-4. Figure B-4. Assign Policy Options dialog box. 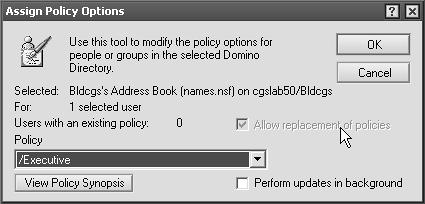 -
Optionally, click the View Policy Synopsis button to see the new effective policy for the group or users to which you are assigning this policy.
-
In the Choose Organizational Policy dialog box, select the organizational policy you want to combine with the explicit policy to create the new effective policy.
After the Assign Policy tool populates the explicit policy field in each Person document in the Domino Directory, the inheritance tree for these users now looks like the structure shown in Table B-3. Table B-3. Inheritance Tree for Users | User | Organizational Mail Policy | | Sandy Beech | * */Acme */Sales/Bldcgs /Executives | | Lee Smith | * */Bldcgs /Executives | | Fran Jones | * */Bldcgs */Development/Bldcgs /Executives |
View Policy The View Policy tool lets you view your policy hierarchy and the relationships between policies and policy Settings documents. You can also view the effective policy for a selected user or group. The View Policy tool has two views, which you access from the Configuration tab of the Domino Administrator. The By Hierarchy view shows the hierarchy of policies, and the settings associated with each one in the hierarchy. Use this view to display all policies, see details of a policy, or see which policies are assigned to a particular user or group. Figure B-5 shows an example of the By Hierarchy view. Figure B-5. "By Hierarchy" view using the View Policy tool. 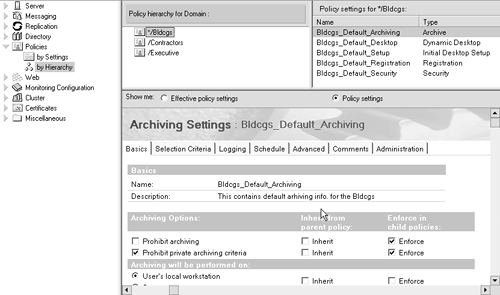
The By Settings view shows policy Settings documents for each administrative area and the Policy documents that use each Settings document. Use this view to see where each setting is used and how a change to the setting affects other policies. Figure B-6 shows an example of the By Settings view. Figure B-6. "By Settings" view using the View Policy tool. 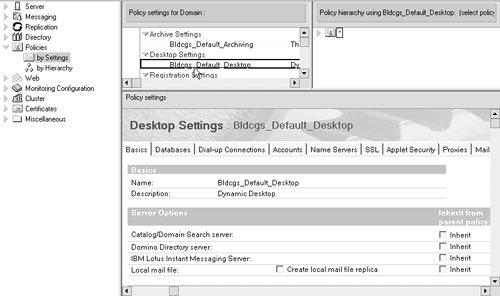
Policy Synopsis With all this talk about effective policies with inherited and enforced settings, you may be asking yourself, "How can I keep track of where setting information is coming from, so I can be sure the right people receive the right settings?" We've anticipated this concern. Domino 6 includes a tool called Policy Synopsis that helps you figure out which settings fields come from which level in the hierarchy. The Policy Synopsis tool determines the effective policy governing a selected individual and then creates a report that lists the policies and settings that apply to that user. Reports appear in a database called Policy Synopsis Results (polcysyn.nsf). You can create two types of reports, "Summary" and "Detailed." Summary reports display the policy hierarchy, listing both the organizational and explicit Policy documents used to derive the effective policy settings for the specified user. Detailed reports include everything in the Summary, plus actual settings in the effective policy. To use the Policy Synopsis tool: -
From the Domino Administrator, click the People & Groups tab.
-
Select the People view.
-
From the Tools pane, select Policy Synopsis .
-
Complete the Policy Synopsis dialog box.
-
Click Results Database to define the server location and file name of the Policy Synopsis Results database.
-
Click OK . When the Results database opens, double-click the report to read it.
Let's take a look at what a section from a sample Policy Synopsis for a person might look like. Examples of Using Policies Here are a few simple examples of policy-based system administration tasks that might have been difficult and/or tedious to perform in previous releases. By no means do these examples represent everything you can do with policy-based system administration ”we're just whetting your appetite. Creating a Corporate Policy Imagine you're the Domino administrator for a corporation referred to as Bldcgs. Policy-based system administration greatly simplifies one of your major headaches ”ensuring that all your employees are set up the right way, without having to rely on each user to select the exact options and preferences appropriate for them. So the first thing you do is create an organizational Policy document called for example */Bldcgs. This organizational policy applies to all users in your company unless you specifically choose otherwise . The */Bldcgs Policy document serves as a container for the Setting documents that control registration, setup, archiving, user desktops, and security. See Figure B-7 for an example. Figure B-7. Example of a Corporate Policy document. 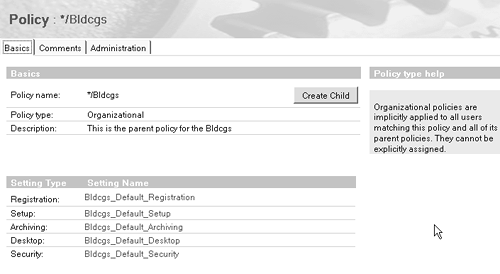
Registration Settings Bldcgs Corporation has numerous company policies. Among other things, to ensure customers can easily send email to your employees, all users must have the same Internet mail address format. Employees are to use Lotus Notes as their default mail system. And you want to enforce a standard password quality and certificate expiration date across the corporation. To do this, create a Registration Settings document (let's call it Bldcgs_Default_Registration) and enter all this information into it. You select the mail template to use and specify that certificates expire after 24 months. You can then choose Bldcgs_Default_Registration as the Registration Settings document for */Bldcgs. This means that by default, the information in Bldcgs_Default_Registration applies to all Bldcgs employees at registration time. See Figure B-8 for an example. Figure B-8. Example of Registration Settings. 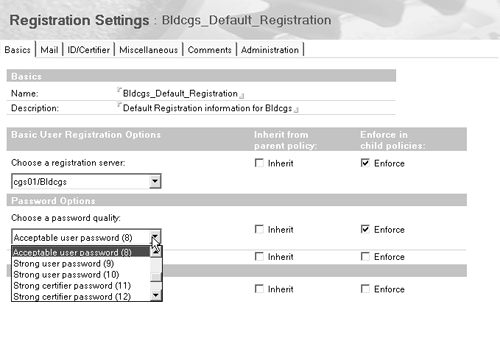
But as with most companies, Bldcgs has exceptions to every rule. For example, your on-the-go , multinational Sales force needs its own mail template. Further, Sales members are roaming users and require a different Internet mail address format. No problem ”just create an organizational policy for your Sales OU called */Sales/Bldcgs. Then create a Registration Settings document called, for instance, Sales_Registration and enter the registration information appropriate to the Sales group. These settings will apply whenever you register a user with the Sales/Bldcgs certifier. See Figure B-9 as an example. Figure B-9. Example of special Registration Settings. 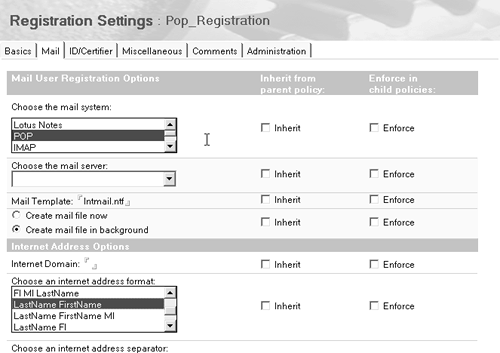
So far so good. But here's a twist: Bldcgs corporate policy calls for certificates for all contractors to expire after six months, not 24; however, these contractors are spread throughout your OUs. You can't create an organizational policy that covers all contractors. Instead, create an explicit policy, which you can name /Contractors (see Figure B-10). Figure B-10. Example of Explicity Policy for contractors. 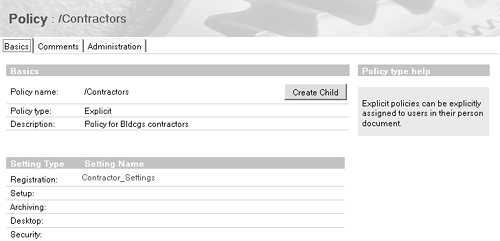
Then create a new Registration Settings document for the /Contractors policy called, for example, Contractor_Settings. Enter the six-month certificate expiration setting and any other information that applies to your contractors (see Figure B-11). Figure B-11. Registration Settings for contractors. 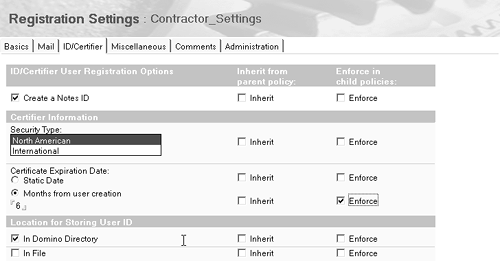
To have these settings applied to contractors at registration time, open the contractor's Person document and type /Contractors in the Assigned Policy field. Setup and Desktop Configuration Now that you've gotten registration settings squared away, you can turn your attention to user setup, including enforcing a standard desktop for all your users. For example, you need to control user and location preferences, which up to now have been in the hands of each individual user ”with sometimes unpredictable results. You also want the same initial set of databases and bookmarks for each user along with the same Welcome page. Perhaps most importantly, each user must have the same initial ECL settings for security. Based on these examples, it is clear that policies make all this much easier to implement than in previous releases. No more trusting your users to select all the right preferences. No more days spent visiting one user at a time to verify that everything's set up correctly. Instead, just create Setup and Desktop settings documents for your */Bldcgs policy, and fill in this information. These settings will then apply to all users in your corporation. And as mentioned, you can handle exceptions to these rules using organizational and/or explicit Policy documents. See Figure B-12 for an example. Figure B-12. Example of Setup Settings document. 
Centrally Managing Mail File Archiving Then there's the issue of mail archiving ”the problem that prompted us to develop policy-based system administration in the first place. As Bldcgs's administrator, you've been struggling to deal with these mail file archiving issues: -
Lack of available space on your mail server -
Need for a central archive server -
Archiving must run off-hours -
Users aren't allowed to set their own archive settings -
Your Notes environment includes clients from different releases To make your life easier, you create an Archive Settings document for the */Bldcgs policy. This lets you do the following: -
Centrally manage archive settings, with users prohibited from changing or creating their own -
Enable server-based archiving from a mail server to a designated archive server -
Designate a Domino 6 server as the archive server so policies can be enforced in a mixed environment -
Schedule archiving to occur during off hours for everybody We've deliberately kept these examples simple. For instance, we haven't talked about parent-child policies, exceptions policies, or inherit/enforce. However, we have shown how policies can greatly simplify setting up users, even when certain groups need exceptions to the corporate rules. Policy-Based System Administration: Making Your Job Easier Policy-based system administration exemplifies the Lotus commitment to lowering total cost of ownership with centrally managed ways to set and enforce corporate-wide policies in an efficient and time-saving manner. This not only puts you more firmly in control of your environment, but also gives you a flexible way to manage a user down to the field level. |