Camera Tracking
|
| < Day Day Up > |
|
From the third lesson, you might realize that camera tracking of the spaceship can be performed using the LookAt controller. The task becomes a little bit complicated because the camera should initially show a panorama of space. This can be achieved by initially directing the camera at an invisible object and then using animation weights to turn and track the spaceship.
-
Create a Dummy object on the grid plane (e.g., in the Top view) and rename it Camera-Target1 (Fig. 5.6, a).
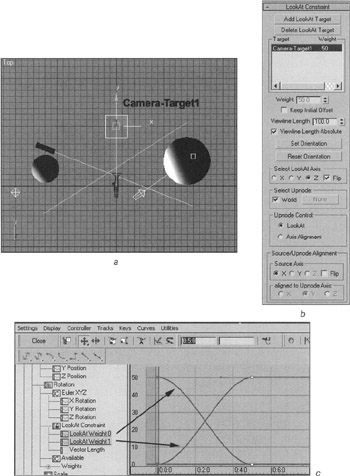
Figure 5.6: Animation settings for camera tracking -
Select the camera and assign the LookAt Constraint to it:
-
Main menu à Animation à Constraints à LookAt Constraint
-
Drag to the Camera-Target1 and click the left mouse button.
-
-
Set the controller so that the camera really faces the Camera-Target1 (Fig. 5.6, b). We will not try to explain all of these parameters, as it is the result that really matters.
-
Add the StarShip-Base as another target by pressing the Add LookAt Target button and clicking the left mouse button on the object.

Play the animation. As you can see, the camera tracks a point somewhere in between the objects.
Further editing is similar to animating an object along a path. Using the weights and curve editor, make the camera track only the StarShip-Base starting with the fifth second (Fig. 5.6, c). To do this, you will have to Add Keys and adjust the curves. The Tangents are basically the same as Handles at the vertices of Bezier splines.
-
Close the curve editor.
Now, animate the motion of the StarShip-Base starting from the fifth second.
-
Select the StarShip-Base.
-
Open the time scale context menu by clicking with the right mouse button. Show the Selection Range:
-
Time scale context menu à Configure à Show Selection Range
-
-
Select all the keys in the window, and drag the left square to the 0:5:0 frame (5 seconds) (Fig. 5.7). Notice that the spaces between the keys are scaled uniformly, which is exactly what we need.

Figure 5.7: Editing the start of an object's motion
There is one more trick to perform. To accentuate the speed of the spaceship and the vastness of space, we should alter its size so that it is very small both at the start and at the end, then increase it to actual size as it approaches the camera. This is easy to do. Scale the object down to 1 percent by all coordinates (Uniform Scale) at the start of the motion. Use the Auto Key button to switch on the animation and go to the frame containing the closest approach. Scale the spaceship back to its original size and then reduce it again in the last frame. Finally, move the key that was automatically set to frame zero to the frame containing the start of the motion.
You can find our result in ![]() lesson05-03.max.
lesson05-03.max.
|
| < Day Day Up > |
|
EAN: N/A
Pages: 136