| Excel includes its own clip art gallery that you can access via the Clip Art task pane. This task pane provides the tools you need to search the clip art gallery by keyword or browse the gallery's collection by category. To search the gallery for an image and insert the desired image, follow these steps: -
Display the area on the worksheet or chart where you want the image inserted. -
Open the Insert menu, point to Picture , and click Clip Art . The first time you choose to insert clip art, the Add Clips to Gallery dialog box appears, explaining that you can import images from your hard disk into the gallery now or later. -
If asked whether you want to add clips to the gallery, click Later so you can move on. The Insert Clip Art task pane appears. -
Click in the Search For text box, type a brief description of the desired image (for instance, "teacher"), and click Search . As shown in Figure 9.1, the Clip Art task pane displays thumbnail versions of all the images that match your search instructions. Figure 9.1. The Clip Art task pane helps you track down images in the vast clip art gallery. 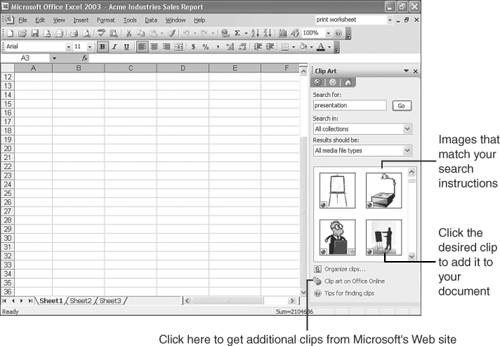 -
Scroll down the list of thumbnails and click the desired image. Excel inserts the image. (The Picture toolbar appears next to the image. See "Touching Up Images with the Picture Toolbar," later in this chapter, for instructions on how to use it.) Note  | The initial Microsoft Excel or Microsoft Office installation typically installs only a limited number of clip art images. To expand the collection, you may need to insert the Office or Excel Media CD and install additional media on your computer. See "Installing Optional Components," in Chapter 12, "Customizing Excel," for instructions. |
Browsing Through the Clip Art Galleries To browse through the clip art collection and other media files, rather than search for a particular image, click the Organize Clips link near the bottom of the Clip Art task pane. The Microsoft Clip Organizer appears, as shown in Figure 9.2; this Windows Explorerlike window lists the folders in which the various media files are stored. Figure 9.2. Use the Microsoft Clip Organizer to browse through the clip art collection. 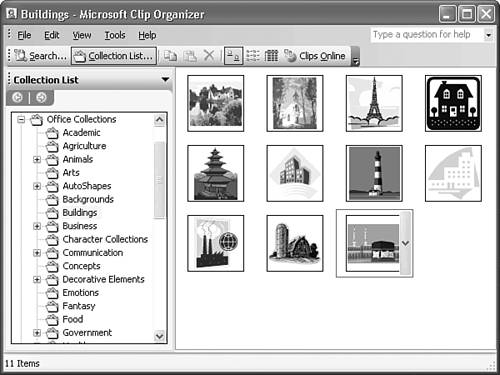 To expand a folder and view the subfolders it contains, click the plus sign next to the folder. If you click the plus sign next to the Office Collections folder, for instance, the list expands to show a subfolder for each clip art categoryAcademic, Business, Food, Government, and so on. Click a subfolder to view its contents in the pane on the rightthe clip art images stored in the folder. Note | | When you first enter your search instructions, you can make your search more selective. Open the Search In drop-down list, and check the boxes next to only those folders in which you want to search. Open the Results Should Be drop-down list, and place a check mark next to the types of media files you want: Clip Art , Photographs , Movies , or Sounds . |
To insert an image from the Clip Organizer, you copy and paste the image. Move the mouse pointer over the desired image to display a drop-down list bar to the right of the image, as shown in Figure 9.3. Click the drop-down list bar and click Copy . Move to the area of the worksheet or chart where you want the image pasted, and then open the Edit menu and click Paste (or press Ctrl+V or click the Paste button in the Standard toolbar). This inserts the image on your worksheet or chart. Figure 9.3. Copy the image from the Clip Organizer, and then paste it in place. 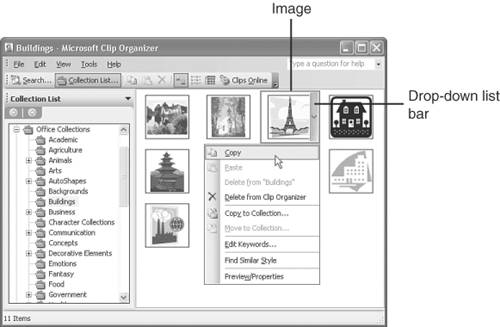 Inserting Other Pictures Excel's clip art gallery is not the only source of graphic images. You can purchase separate libraries of clip art, obtain digitized photos using a digital camera, draw your own images, obtain images someone else has created and sent to you, or copy images from the Web. Digitized images are stored in a variety of file formats . For digitized images, the file format is computer code that a program uses to render a particular image onscreen and in print. Not all programs can translate all file formats, but Excel supports numerous common and uncommon graphic file formats, including WMF (Windows Meta File), TIFF (Tagged Image File Format), GIF (Graphics Interchange Format), PCX (PC Paintbrush), and BMP (Bitmapped), to name a few. Note | | You can tell a particular file's format by looking at its filename extensionthe three characters tacked on to the end of a filename, after the period. Excel's clip art images, for instance, are stored as WMF files, or Windows Meta Files. Your computer may be set up to hide filename extensions, but if you right-click a file or thumbnail and click Properties or Preview/Properties , you can see the complete filename, including its extension. |
Though you can obtain images from numerous sources, the process for inserting an image in Excel is always the same: -
Change to the worksheet or display the graph on which you want the picture inserted. -
Open the Insert menu, point to Picture , and click From File . -
The Insert Picture dialog box appears, as shown in Figure 9.4. This dialog box initially displays the contents of the My Pictures folder on your computer. Figure 9.4. Use the Insert Picture dialog box to select an image file. 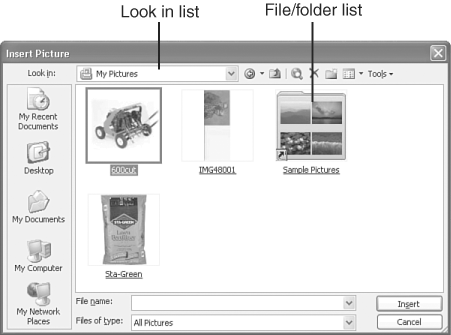 -
If the picture you want is stored on a different disk drive or in a folder other than My Pictures, open the Look In list and click the drive or folder where the picture is stored. -
If necessary, in the file/folder list (the big area that shows the contents of the currently selected disk drive or folder), double-click the folder where the picture is stored. You might need to double-click your way through one or more subfolders to display the contents of the folder where the picture is stored. -
If necessary, scroll down the file/folder list to bring the desired picture into view. -
To insert the picture, double-click its name, or click it and click the Insert button. Excel inserts the picture on the current worksheet. Tip  | Store all your images in the My Pictures folder or a subfolder of it to make them more easily accessible. |
 |