Using Windows Script Host to Modify the Registry
|
|
In Chapter 10 we already touched on the problem of using Windows Script Host (WSH) and even provided a small code excerpt, which illustrated its usage. Introduced with Windows 2000, WSH is capable of creating simple, but flexible and powerful scripts to automate network administration. Because WSH is language-independent, you're free to select any scripting language you prefer: Visual Basic Scripting Edition (VBScript), JScript, or Perl. WSH also supports COM, allowing you to enjoy the advantages of new technologies such as Windows Management Instrumentation (WMI).
Now, the time has come to consider this topic in more detail. Of course, it is impossible to provide a detailed description of WSH, WMI, or scripting languages, such as VBScript or JScript, within a single chapter (after all, each of these topics deserves a separate book, and quite a comprehensive one, since I have encountered volumes of JScript and Perl that comprised more than 1,500 pages). Therefore, if you want a detailed language reference, simply buy one of those books at your local bookstore.
However, we will consider registry-related topics, and, in particular, the RegRead, Regwrite, and RegDelete methods provided by WSH. We will also consider their practical usage and provide several simple, but useful scripts.
Basic Information on Microsoft Windows Script Host
WSH is a language-independent scripting host for Windows Script-compatible scripting engines. It brings simple, powerful, and flexible scripting to the Windows 32-bit platform, allowing you to run scripts from both the Windows desktop and the command prompt.
Windows Script Host is ideal for non-interactive scripting needs such as logon scripting, administrative scripting, and machine automation.
The Benefits of Windows Script Host
WSH offers the following benefits:
-
Two ways to run scripts, WScript.exe and CScript.exe. WScript.exe provides a Windows-based properties page for setting script properties; CScript.exe provides command-line switches for setting script properties.
-
Support for multiple files. You can call multiple scripting engines and perform multiple jobs from a single Windows Script (WSF) file.
-
Low memory requirements.
-
Mapping of script extensions to programmatic identifiers (ProglDs). When you start a script from the Windows desktop or the command prompt, the script host reads and passes the specified script file contents to the registered script engine. Instead of using the HTML SCRIPT tag to identify the script, the host uses file extensions; for example, VBS for Microsoft Visual Basic® Scripting Edition (VBScript) files, and JS for Microsoft JScript® files. Using extensions means you no longer need to be familiar with the ProgID for a given script engine. Windows Script Host handles this for you by maintaining a mapping of script extensions to ProglDs, launching the appropriate engine for a given script.
Windows XP includes the latest version of Windows Script Host - version 5.6.0 (Fig. 15.1). Versions of Windows Script Host implemented by Microsoft operating systems are listed in Table 15.1.
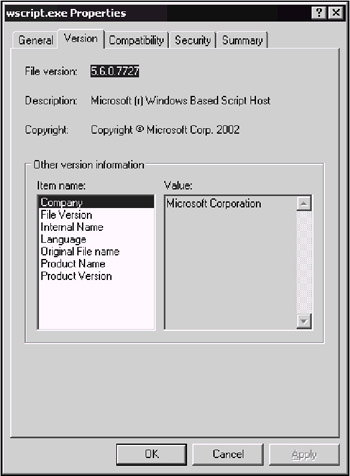
Figure 15.1: Windows XP and Windows Server 2003 include the latest version of Windows Script Host - version 5.6.0
| Host Application | 1.0 | 2.0 | 5.1 | 5.6 |
|---|---|---|---|---|
| | ||||
| Microsoft Windows 98 | x | |||
| Microsoft Windows ME | x | |||
| Microsoft Windows NT 4 Option Pack | x | |||
| Microsoft Windows 2000 | x | |||
| Microsoft Windows XP | x | |||
| Microsoft Windows Server 2003 | x | |||
In comparison to previous versions, this one provides the following enhancements in functionality.
-
Argument-handling has been improved - handling and documenting command line arguments is simpler. The process of integrating your scripts with other command line scripts has been simplified, and it is easier to create scripts that can supply the user with help information. Refer to the following table for information on the WSH language features that connect you to this new functionality.
-
You can run scripts remotely - you can load scripts onto several remote computer systems, and start them all running simultaneously. While a remote script is running, you can check on its progress, and after it has finished, you can ensure that it has run correctly, or find out what caused it to terminate prematurely. There is a new dispatch object used to create remote WSH objects - the controller object. In addition, there is a new object that represents an instance of a running script - the Remote WSH object.
-
When you start new processes, you can treat them as objects - you determine the status of spawned processes, and access their standard I/O streams.
-
You can access the current working directory - you can determine/modify the active process' current working directory.
-
Security issues unique to scripts have been addressed - Windows Script Host, a powerful, flexible tool for automating Windows, can at the same time be dangerous if used improperly or with malicious intentions. Windows Script Host 5.6, included with Windows XP and Windows Server 2003, implements a new security model, which enables users to verify the authenticity of a script before running it. Script developers can sign their scripts to prevent unauthorized modifications. Administrators can enforce strict policies that determine which users have privileges to run scripts locally or remotely.
| Note | Windows provides a standard mechanism for signing code via signcode.exe. Unfortunately, signcode.exe doesn't ship with Windows, but rather with the Windows SDK. The most useful and interesting article on this important topic can be downloaded from http://msdn.microsoft.com/library/defaultasp?url=/library/en-us/dnclinic/html/scripting10082001.asp |
Windows Script Host Object Model
As everything in modern Microsoft operating systems, WSH is object-oriented. The Windows Script Host object model consists of 14 objects. The root object is the WScript object.
The Windows Script Host object model provides a logical, systematic way to perform many administrative tasks. The set of COM interfaces it provides can be placed into two main categories:
-
Script Execution and Troubleshooting. This set of interfaces allows scripts to perform basic manipulation of the Windows Script Host, output messages to the screen, and perform basic COM functions such as Createobject and GetObject.
-
Helper Functions. Helper functions are properties and methods for performing actions such as mapping network drives, connecting to printers, retrieving and modifying environment variables, and manipulating registry keys. Administrators can also use the Windows Script Host helper functions to create simple logon scripts.
| Note | For purposes of accessing the registry, the most important object is Wshshell, which will be discussed in the next section. |
WshShell Object
Provides access to the native Windows shell. The WshShell object is a child object of the WScript object - you must use the WScript method CreateScript to create a WshShell object (i.e., WScript.CreateObject('WScript.Shell')). You create a WshShell object whenever you want to run a program locally, manipulate the contents of the registry, create a shortcut, or access a system folder. The WshShell object provides the Environment collection. This collection allows you to handle environmental variables (such as WINDIR, PATH, or PROMPT).
RegRead Method
The RegRead method returns the value of a key or value name from the registry. This method uses the following syntax:
Object.RegRead(strName)
where:
Object - WshShell object
strName - string value indicating the key or value-name whose value you want
The RegRead method can return the values of the following data types: REG_SZ, REG_DWORD, REG_BINARY, REG_EXPAND_SZ, and REG_MULTI_SZ.
You can specify a key name by ending strName with a final backslash. Do not include a final backslash to specify a value name. A value entry has three parts: its name, its data type, and its value. When you specify a key name (as opposed to a value name), RegRead returns the default value. To read a key's default value, specify the name of the key itself. Fully qualified key names and value names begin with a root key. You must use abbreviated versions of root key names with the RegReadmethod. The five possible root keys are listed in Table 15.2.
| Root Key Name | Abbreviation |
|---|---|
| | |
| HKEY_CURRENT_USER | HKCU |
| HKEY_LOCAL_MACHINE | HKLM |
| HKEY_CLASSES_ROOT | HKCR |
| HKEY_USERS | HKEY_USERS |
| HKEY_CURRENT_CONFIG | HKEY_CURRENT_CONFIG |
RegWrite Method
The RegWrite Method creates a new key, adds another value to an existing key (and assigns it a value), or changes the value of an existing value name. This method uses the following syntax:
Object.RegWrite(strName, anyValue [,strType])
where:
Object - WshShell object
strName - string value indicating the key name, value name, or value you want to create, add, or change
anyValue - the name of the new key you want to create, the name of the value you want to add to an existing key, or the new value you want to assign to an existing value name
strType - optional: string value indicating the value's data type
Specify a key name by ending strName with a final backslash. Do not include a final backslash to specify a value name. The RegWrite method automatically converts the parameter anyValue to either a string or an integer. The value of strType determines its data type (either a string or an integer). The options for strType are listed in Table 15.3.
| Converted to | strType |
|---|---|
| | |
| string | REG_SZ |
| string | REG_EXPAND_SZ |
| integer | REG_DWORD |
| string | REG_BINARY |
| Note | The REG_MULTI_SZ type is not supported for the RegWrite method. |
Fully qualified key names and value names are prefixed with a root key. You must use abbreviated versions of root key names (if one exists) with the RegWrite method. Abbreviated names of the registry root keys used by the RegWrite method are the same as those for the RegRead method.
RegDelete Method
The RegDelete method is used to delete a registry key or one of its values from the registry. This method uses the following syntax:
Object.RegDelete (strName)
where:
Object - WshShell object
strName - string value indicating the name of the registry key or key value you want to delete
Specify a key-name by ending strName with a final backslash; leave it off to specify a value name. Fully qualified key names and value names are prefixed with a root key. You must use abbreviated versions of root key names (if one exists) with the RegDelete method. There are five possible root keys you can use; they are the same as those for the RegRead and RegWrite methods.
JScript Example
A simple example written in JavaScript (JScript in Microsoft's implementation), illustrating the usage of these methods is provided in Listing 15.1. This code creates a registry key HKEY_CURRENT_USER\Software\MyCoolSoftware, sets its Default value (REG_BINARY data type) to 1, then creates another REG_SZ value entry under this key and assigns it the "This is a test!" string value.
Listing 15.1: JScript Example Illustrating Registry Access
// The simplest example illustrating registry access using JScript // Use this module at your own risk // Setting variables var vbOKCancel = 1; var vblnformation = 64; var vbCancel = 2; var result; // Creating wshShell object var WshShell = WScript.CreateObject ("WScript.Shell"); { // prompting the user result = WshShell.Popup ("Do you want to create a new registry setting?", 0, "Registry Access using JScript", vbOKCancel + vblnformation); if (result != vbCancel) { WshShell.RegWrite ("HKCU\\Software\\MyCoolsoftware\\", 1, "REG_BINARY"); WshShell.RegWrite ("HKCU\\Software\\MyCoolSoftware\\MySuperProgram", "This is a test!", "REG_SZ"); var bKey = WshShell.RegRead ("HKCU\\Software\\MyCoolSoftware\\"); WScript.Echo (WshShell.RegRead ("HKCU\\Software\\MyCoolSoftware\\ MySuperProgram")); } //prompting the user result = WshShell.Popup("Do you want to delete newly created settings?", 0, "Registry Access using JScript", vbOKCancel + vblnformation); if (result != vbCancel) { WshShell.RegDelete ("HKCU\\Software\\MyCoolSoftware\\MySuperProgram"); WshShell.RegDelete ("HKCU\\Software\\MyCoolSoftware\\"); } } To test this script, enter the code provided in this listing using any text editor (for example, Notepad.exe), and save the file with the JS filename extension. If you double-click this file, WSH server will start and execute the script. Notice that this script prompts the user to confirm adding new registry entries (Fig. 15.2), displays the contents of the newly created registry entry (Fig. 15.3) and then asks the user if the newly created registry key and value entry contained within it should be deleted (Fig. 15.4).
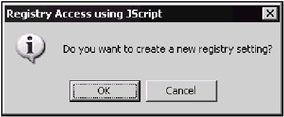
Figure 15.2: The dialog prompting the user to confirm creating of a new registry setting
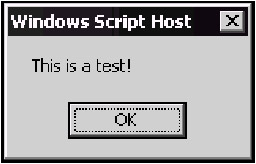
Figure 15.3: Displaying the contents of the newly created registry entry
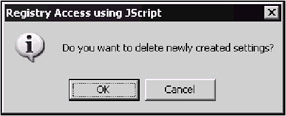
Figure 15.4: The dialog prompting the user to confirm deletion of the newly created registry setting(s)
These dialog boxes allow the user to check modifications introduced to the registry at each step, using, for example, Registry Editor (Fig. 15.5).
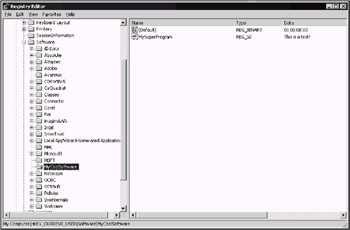
Figure 15.5: You can use Registry Editor to check modifications introduced to the registry at each step of the script
VBScript Examples
If you prefer VBScript, you can also use the above-described methods for accessing the registry (notice the difference in the syntax of JScript and VBScript).
Enabling and Disabling Changes to the Start Menu
A small example is provided below, developed using VBScript, which, in contrast to the previous one, does something useful - it enables or disables changes to the Start Menu.
In the previous chapter, we discussed the values that control the Start menu. One such value is the NoChangeStartMenu under HKEY_CURRENT_USER\SOFTWARE\Microsoft\Windows\CurrentVersion\Policies\Explorer. When this value is set to 1, one cannot make changes, and when this value is set to 0, changes are allowed. Our small VBScript example first displays the dialog prompting the user to choose whether he or she needs to lock the Start menu (Fig. 15.6). To manage the Start menu via the system registry, the script creates the NoChangeStartMenu value, and sets it to 1 if the user chooses to lock the Start menu. If the user clicks No, the NoChangeStartMenu value will be set to 0. Next, the script reads the NoChangeStartMenu value from the registry, displays the current Start menu status, and prompts the user to change it if desired (Fig. 15.7).
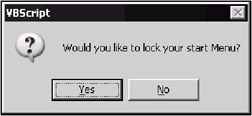
Figure 15.6: Prompt for the user to lock Start menu
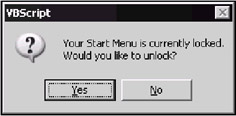
Figure 15.7: Prompt for the user to unlock Start menu
The source code for this example is provided in Listing 15.2.
Listing 15.2: Source Code for the VBScript Example that Enables or Disables Changes to the Start Menu
Option Explicit Dim WSHShell, RegKey, NoChangeStartMenu, Result Set WSHShell = CreateObject ("WScript.Shell") RegKey = "HKCU\Software\Microsoft\Windows\CurrentVersion\Policies\Explorer\" Result = MsgBox("Would you like to lock your start Menu?", 36) If Result = 6 Then 'clicked yes WSHShell.RegWrite regkey & "NoChangeStartMenu", 1 Else WSHShell.RegWrite regkey & "NoChangeStartMenu", 0 End If NoChangeStartMenu = WSHShell.RegRead (regkey & "NoChangeStartMenu") If NoChangeStartMenu = 1 Then 'Start Menu is locked Result = MsgBox("Your Start Menu is currently locked." & _ vbNewLine & "Would you like to unlock?", 36) If Result = 6 Then 'clicked yes WSHShell.RegWrite regkey & "NoChangeStartMenu", 0 End If Else 'Start menu can be changed Result = MsgBox("You can change Start menu." & _ vbNewLine & "Would you like to prohibit changes", 36) If Result = 6 Then 'clicked yes WSHShell.RegWrite regkey & "NoChangeStartMenu", 1 End If End If ' End code
Managing System Restore on Windows XP Clients
The example presented in this section illustrates how you can use Windows Management Instrumentation to automate your work with the System Restore feature on client workstations running Windows XP.
Before we proceed any further, let us provide a brief description of WMI scripting capabilities utilization. WMI scripting is a library of automation interfaces. COM-compliant scripting languages use these automation interfaces to access WMI infrastructure. All WMI automation objects, methods and properties are implemented by the Wbemdisp.dll file.
| Note | To run WMI, you must have administrator privileges. |
To access WMI through WMI scripting library, you need to perform three basic steps, which are common to most WMI scripts:
-
Connect to the Windows Management service.
-
Retrieve instances of WMI managed objects.
-
Call a method or access a managed object's property.
| Note | To learn more about powerful WMI scripting capabilities, see the Microsoft Windows 2000 Professional Resource Kit or Microsoft Windows 2000 Server Resource Kit, where you can find more than 50 WMI-based scripts, enabling you to manage everything on the target computer, from boot configuration to user accounts. |
Enabling and Disabling System Restore on Windows XP Clients
The example in Listing 15.3 automates the task of enabling or disabling System Restore on the specified drive. When it is begun, this code creates WshShell object, then requests user input, prompting the user if it is required to enable or disable System Restore (Fig. 15.8). To proceed further, the user must enter an appropriate text string (enable or disable) into the text field at the bottom of this dialog and click OK.
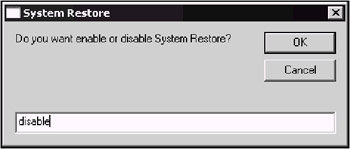
Figure 15.8: Dialog box prompting the user to specify whether System Restore must be enabled or disabled
Next, the script prompts the user to specify the drive on which it is necessary to take the specified action (Fig. 15.9). Specify the drive using the following format: <drive_letter>:\, for example, C:\.
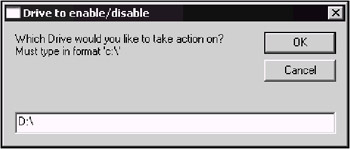
Figure 15.9: Dialog box prompting the user to specify the drive on which the specified action must be taken
The script runs and performs the specified action on the specified drive. After it is done, it displays a message box, informing the user of the result (Fig. 15.10). To make sure that the specified action was performed successfully, start the System applet in the Control Panel, go to the System Restore tab, and check if System Restore is actually turned off for the specified drive (Fig. 15.11).
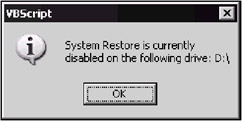
Figure 15.10: The message box informing the user of the result of the operation
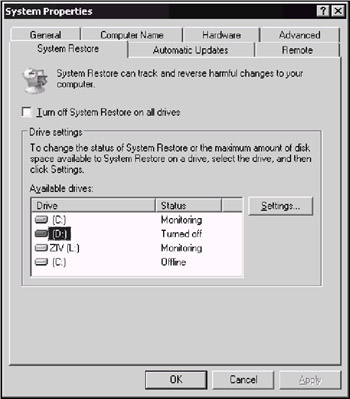
Figure 15.11: Use the System Restore Ul to check if System Restore is actually turned off for the drive you have specified when running the script
Now let us consider the code that implements this series of actions (Listing 15.3).
As was already mentioned, to use WMI scripting the code must connect to the Windows Management service, retrieve instances of the WMI-managed objects, and then call a method or access a managed object's property. In the example presented below, we connect to WMI using the WMI's moniker named winmgmts and SystemRestore class.
| Note | A moniker is a standard COM mechanism for binding to a COM object. Detailed information on the WMI moniker syntax can be found at the following address: http://msdn.microsoft.com/library/psdk/wmisdk/scintro_6tpv.htm. |
Listing 15.3: VBScript Code for Enabling/Disabling System Restore on the Specified Drive
' Begin code for enabling or disabling System Restore Option Explicit Dim WSHShell, onoff, drive, SRP, eSRP, Result 'Creating WSHShell object Set WSHShell = CreateObject("WScript.Shell") 'Requesting user input onoff = inputbox ("Do you want to enable or disable System Restore?", "System Restore") Drive = inputbox ("Which Drive would you like to take action on? Must type in format 'c:\", "Drive to enable/disable") 'using WMI moniker and SystemRestore class to access WMI set SRP = GetObject("winmgmts:\\.\root\default:SystemRestore") If onoff = "enable" then eSRP = SRP.enable(dive) Result = MsgBox("System Restore is currenly" & _ vbNewLine & "enabled on the following drive:" & Drive, 64) end if If onoff = "disable" then eSRP = SRP.disable(drive) Result = MsgBox("System Restore is currenly" & _ vbNewLine & "disabled on the following drive:" & Drive, 64) end if ` End code
Automatically Creating Restore Points on Windows XP Clients
What else can we do with WMI and System Restore? Well, let us try to create a restore point automatically. Now, since we have already created several scripts, this is an easy task. Let us decide what our script must do. First, it must ask the user whether he or she wants to create a new restore point (Fig. 15.12).
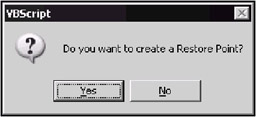
Figure 15.12: Dialog prompting the user to create a restore point
Next, if the user clicks Yes, we must provide the user with the capability to enter the resource point description (Fig. 15.13).
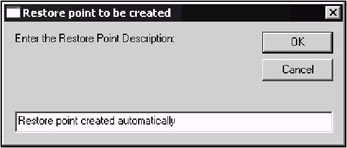
Figure 15.13: The dialog prompting the user to provide a description for the restore point to be created
After the user provides a restore point description, we use WMI moniker and SystemRestore class to access WMI, and then create a new restore point using the description provided by the user. A very simple code performing these tasks is provided in Listing 15.4.
Listing 15.4: Automatic Creation of the Restore Point
Option Explicit Dim WSHShell, SRP, CSRP, description, Result Set WSHShell = CreateObject("WScript.Shell") Result = MsgBox("Do you want to create a Restore Point?", 36) If Result = 6 Then 'clicked yes description = inputbox ("Enter the Restore Point Description:", "Restore point to be created") 'use WMI moniker and SystemRestore class set SRP = getobject("winmgmts:\\.\root\default:Systemrestore") CSRP = SRP.createrestorepoint (description, 0, 100) end if ' End code After running this script, start System Restore and check if the restore point was actually created. The screenshot shown in Fig. 15.14 shows four test restore points, which I created automatically in the process of testing this script.
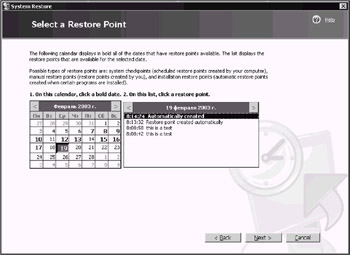
Figure 15.14: The System Restore window displaying automatically created restore points
Now, after carefully testing the script and making sure that it works, let us consider what practical use we can make of it. For example, wouldn't it be nice if after each successful logon, users (especially those who experiment with the registry) were prompted to create a restore point? As you remember, Windows XP is successfully loaded only after at least one user logs on to the system, and at that point the Clone control set is copied to the LastKnownGood configuration. Well, in my opinion, it makes sense if you also create a restore point at that time, just to be on the safe side. This small script can serve this purpose if you assign it as a logon script.
To do so, just copy the script file to the %SystemRoot%\System32\GroupPolicy\User\Scripts\Logon directory (for standalone computers or in a workgroup environment) or to the \\Domain_controller\Sysvol\<domain_or_OU>\Policies\<GUID>\USER\Scripts\Logon directory (for domain environment), then start the Group Policy Object editor, and expand the console tree as shown in Fig. 15.15 (User Configuration | Windows Settings | Scripts). Double-click the Logon policy to open the Logon Properties window (Fig. 15.16), click the Add button and add our script to the list of available logon scripts.
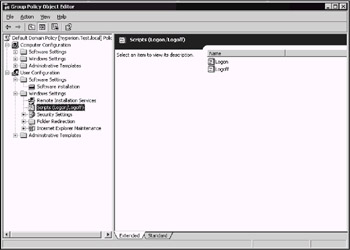
Figure 15.15: The Group Policy Object Editor window
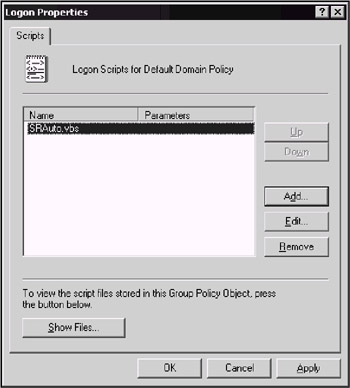
Figure 15.16: The Logon Properties window
Now, each time the user logs on to the local computer, he or she will be prompted to create a restore point.
|
|