7.2 User-Defined Forms
7.2 User -Defined Forms
Overview
The purpose of user-defined forms is to make the operation of custom Excel applications as clear and simple as possible. Forms can be used for the input of parameters of a calculation, for setting various options, for selecting elements of lists, for selecting various program components , and so on. Excel's predefined dialogs (forms) show most vividly the enormous application spectrum of forms.
The subject of user-defined forms is rather extensive , for which reason it has been divided into several parts . This section provides an introduction on using user-defined forms. With the help of a simple example it introduces the essential principles for defining and managing forms.
The following sections then go into some particular topics in greater detail. First we describe how to use the forms editor. Then we provide an overview of controls that can be used in forms. Following that, we demonstrate that individual form elements can also be placed directly in worksheets (that is, without a form) and discuss the various advantages and drawbacks of such a process. Finally, we introduce programming techniques for managing forms, for example, using forms whose structure can be changed dynamically.
In all the sections you will find numerous examples for using forms. These examples are to be found in the file Userform.xls . Further examples, closer approximations to what you might see in real life, appear in the following chapters, where forms are placed in the framework of " genuine " application examples.
Changes with Respect to Excel 5/7
Beginning with Excel 97 forms have been completely reconceptualized. Their development no longer takes place in an Excel dialog sheet but in a UserForm object of the VBA development environment.
The UserForm object is one of the many objects in the so-called MS Forms library. This library also contains an object for every control. The unusual feature of the MS Forms library is that it can be used not only in Excel, but in other Office components (such as Word), in Internet Explorer, and in Visual Basic.
In contrast to other changes, the old Excel 5/7 dialogs are still completely supported. Not only can old dialogs be used in most cases without any changes (there are only a few compatibility problems, such as in the association of a Range object to a listbox). Additionally, the dialog editor is still available for editing existing dialogs.
In this book all of the examples using forms have been transposed to the new MS Forms library, and this chapter also treats exclusively the new UserForm forms. There are several reasons for this:
-
MS Forms make possible more precise management of the controls in a form (more properties, more events).
-
It is possible to maintain more sheets in a form (such as the form ToolsOptions).
-
In addition to the controls provided with Office, external ActiveX controls can also be used. Such controls can provide a particular functionality for special applications. With Visual Basic 6 (thus not with VBA, but with the free-standing programming language) you can even program new ActiveX controls yourself that are then usable in Excel.
-
Finally, it is uncertain how long dialogs based on Excel 5/7 will continue to be supported.
Of course, in comparison to Excel 5/7 there are some drawbacks as well.
-
MS Forms cannot be ornamented with characters , text boxes, or other Office objects. In this connection there are fewer visual formatting options than existed with the dialogs of Excel 5/7.
-
The use of MS Forms controls frequently leads to problems if the keyboard focus remains in the control. With buttons , that can be avoided with TakeFocusOnClick=False , but with other controls the focus must be firmly placed via program code into a particular cell before further instructions can be executed.
Tips for Upgrading
If you already have experience with dialogs in Excel 5/7, here you will find some some tips for upgrading. (An automatic conversion of preexisting Excel 5/7 dialogs into MS Forms is not possible! It is also impossible to mix controls in a form. You will have to decide between the old and new formats.)
-
Any procedure can be linked to controls in Excel 5/7 dialogs. With MS Forms, on the other hand, the event procedure is predetermined by the conjunction of element name and event name .
-
Event procedures associated to forms are automatically linked to their own form module. They can no longer be placed in an arbitrary module. (This sounds like a restriction, but in reality it has the effect of making large projects more readable.)
-
The button option Close no longer exists (nor an equivalent property). If in response to a button click you wish to terminate the form, in the event procedure you must call Unload Me or Hide . ( Unload removes the form with all its variables from memory, while Hide only hides it. At first sight the result appears in both cases the same; however, with Hide the form's settings remain and are available in the case of a future Show . With Unload , however, the uninitialized form is shown anew. In this case less RAM is taken up.)
-
Forms are objects. Calling one therefore occurs with dialogname.Show instead of as previously with Dialogs("dialogname").Show . The access to the control has also been simplified: dialogname.controlname without brackets. In the form event procedure the shorthand controlname is even allowed, since the form module is a class module and within it the form is the default object. Thus the repeated naming of ActiveDialog has become unnecessary.
-
The method Show for invoking the form no longer returns a result. In general, however, you should know whether the form was ended with OK or Cancel. For this you should define a variable in the form module as Public . To this variable you give values in the Button event procedures (for example, 0 if the dialog was ended with Cancel, “1 if it was ended with OK). Then the variable can be evaluated in VBA code.
-
The MS Forms library is not automatically activated with Excel 5/7 files. When the first UserForm form is inserted there a query automatically appears. However, you can also activate the Microsoft Forms Object Library directly with ToolsReferences.
-
The operation of the new form editor does not give the impression of having achieved full maturity. The response to a double click is seldom the one that you would expect; the continually appearing and disappearing toolbox is irritating ; the broad border around the selected control makes exact positioning difficult, and so on.
Introductory Example
To create a new form, shift into the development environment with Alt+F11 and there insert a blank form with INSERTUSERFORM. When the form window is active, so is the "Toolbox" window with its controls. From this window you can select individual controls and add them to the form with the mouse. For the form in Figure 7-6 two buttons, a label box, and a text box were added.

Figure 7-6: The creation of our first form
Controls are thus components of forms. They provide labels for the form and they accept input. Input can take the form of simply clicking with the mouse (on a button, for example), the input of text (in a text box), shifting an element (in the scroll bar), or the selection from a list (listbox). Controls are also called form elements or form fields.
The texts in controls can be edited directly in the form. To do this, click twice slowly on the control (not so fast that the action is evaluated as a double click). The first click activates the control; the second reveals the input (I-beam) cursor.
Naming Controls
Upon insertion into the form a control is automatically given a name (such as CommandButton1, CommandButton2). Since these names are also used in event procedures and in other parts of the program code, it is a good idea at this point to select names with greater mnemonic value. To do this, open the property window with F4 and edit the character string in the field "Name." A popular naming technique is to use the first three letters to describe the type of control, such as btn for buttons and txt for text boxes. The remaining letters describe the purpose of the control. One then arrives at names like txtName and btnOK .
The form as a whole has a name, and this, too, can be changed when the form is selected (and not a particular control). Again, it is recommended that you select a meaningful name. For our example form the name dlgIntro was chosen . The title of the form is independent of its internal name and is set with the Caption property.
| Tip | Once you start developing program code, you should not change the names of controls. If you do make such changes, you will have to make the corresponding changes throughout the program code (with find and replace). |
Testing the Form
Once the first control has been added you can test the form: Simply press F5 . The form appears as an independent window (see 7-7). (At the same time Excel is activated.) The form is functional; that is, you can input text to the text box, click the buttons, and so on. However, there is no response to the clicking, because there are as yet no associated event procedures. To close the form, click on the close box in the upper right corner of the window.
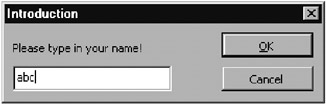
Figure 7-7: The first test
You can also launch the form with program code: For this apply the Show method to the new form object that you have made by creating the form. You must give the form name as object name.
dlgIntro.Show
Properties of Controls
Controls are equipped with countless properties, which are set in the properties window. In addition to the elementary properties Name (the internal name of the object) and Caption (the title), you there are properties for controlling the appearance and functionality of the control.
OK and Cancel Buttons
Almost every form is equipped with OK and Cancel buttons. To ensure that the form behaves like other forms to which you are accustomed, you should set the property Default to True for the OK Button. For the Cancel button you should set the property Cancel to True . With this you achieve that the buttons can be selected not only with the mouse, but also with Return and Esc, respectively.
Event Procedures
In order to make the form usable, at least two event procedures are required: When either button is clicked the form must be made invisible with Hide . Moreover, there must be saved in a global variable how the form was terminated (with OK or with Cancel). In most correct applications, there is also a validation control within the event procedure to test whether inputs were admissible .
The most convenient way to proceed is to double click on the control, which brings you into a module window for input of an event procedure. At the same time, a code template is created for the most important event associated to this control. If you wish to write a procedure for another event, simply select another event in the right listbox of the code window and then delete the empty template for the standard procedure.
The purpose of the globally declared variable result is to make it possible after a dialog has been called to determine with which button the dialog was ended. Access to the variable is accomplished in the dialog dlgIntro.result (in general, via dialogname.variablenname ). Thus globally declared variables represent a simple and practical way of exchanging data between a dialog and the procedure that calls the dialog.' File Userform.xls, UserForm "dlgIntro"
Public result As Boolean Private Sub btnOK_Click() result = True Hide End Sub Private Sub btnCancel_Click() result = False Hide End Sub
| Note | If you close the form with Unload Me instead of with Hide, then not only is the form released from memory, but all variables defined in the associated module (in this example, result) are lost. |
Invoking and Evaluating Forms
A form can be called from any procedure. In the file Userform.xls it is an event procedure associated to a button in sheet 1. (Information on using controls directly in worksheets, as opposed to forms, can be found later in this chapter.) The invocation is accomplished with Show . The program execution in btnIntro_Click is interrupted until the form is closed. Then it is tested with dlgIntro.result as to whether the form was ended with Cancel or OK. In the latter case the character string in the text box is accessed with dlgIntro.txtName . (This is a shorthand for dlgIntro.txtName.Text . As you may have guessed, Text is the default property for text boxes and thus does not have to be written out.)
' file Userform.xls, Class module "mainmenu" Private Sub btnIntro_Click() dlgIntro.Show If dlgIntro.result = False Then MsgBox "Cancel" Else MsgBox "Input: " & dlgIntro.txtName End If End Sub
| Note | New in Excel 2000 is the possibility to give the optional parameter vbModeless with Show.With this you achieve that the form is shown with the property set to modeless. This means that the user can continue working in Excel without having first to exit the form. A possible application would be a form displaying a help text. Show vbModeless should not be used in forms with the RefEdit control (form box). In Excel 2000 this can lead to massive difficulties. |
EAN: 2147483647
Pages: 134