7.3 The Form Editor
7.3 The Form Editor
A first introduction to working with the form editor ”which is an integral part of the VBA development environment ”has been given already in the previous section. In this section you will find additional information to help you in the efficient development of intelligent forms.
Setting Properties
Most of the time spent in the form editor is lost in setting countless properties. You can save some time by working on several controls at once. Select the controls by clicking with Shift or Ctrl, or draw a frame around all the elements you want to work on by drag-clicking. Then you can set all the properties common to the selected controls in the properties window.
Changing the Size and Position of Controls
Controls can be clicked on with the mouse and dragged to a new position. In positioning the tool it will snap to the grid displayed in the form. The size of this grid can be set with TOOLSOPTIONSGENERAL. (There the grid alignment can be turned off as well.)
The form editor offers a host of commands by which several controls can be aligned. These commands are invoked via the FORMAT menu. (The most important of these are also available in the pop-up menu.) With them you can, for instance, align several controls along their top, bottom, left, or right borders, or make them the same height or width.
Copying Tools
If you are going to use several controls of the same type, you can first insert a single control of that type, set its properties, and then with the Ctrl key held down drag-click with the mouse. With this the control is copied to the new position and automatically acquires in the process a new name ; all other properties are transferred intact from the first control to the second. (In contrast to Visual Basic 5, it is not possible in UserForm forms to give several controls the same name and manage them as a single control box.)
Setting the Access Key
In most Excel forms you can direct the input focus into a particular control with ALT+LETTER. In user -defined forms you have to input the required letter in the Accelerator property of the control. The letter will automatically appear, underlined , in the associated caption text (if that letter appears in the caption).
Setting the Activation Sequence
The tab order is the order in which the focus shifts from one control to the next. The user can press the Tab key to move the input focus to the next control, or Shift+Tab to move to the previous one. The tab order should be set up in such a way that the individual controls are run through in a logical order (spatially or functionally). At the head of the tab order should stand the first input box. At the end should be the buttons for exiting the form.
The tab order initially corresponds to the sequence in which the controls were placed in the form. However, it can later be changed with the property TabIndex . This property has the value 0 for the first control in the tab order, 1 for the next, and so on. Instead of changing these values directly it is more convenient to set the tab order with its associated form (see Figure 7-8), invoked by ViewTab Order. In this form you select one or more elements (Ctrl click to select nonadjacent elements) and then move them up or down in the hierarchy.
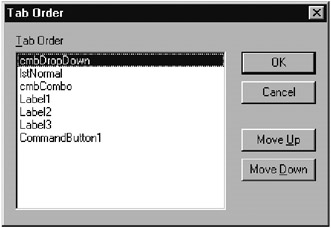
Figure 7-8: The form for setting the tab order
If you wish to remove certain controls from the tab order, you simply set their TabStop property to False .
The input focus can not only be changed by the user using Tab or by clicking on individual elements, but also via program code using the method SetFocus:
formname.controlname.SetFocus
Visual Appearance of Forms
You have a number of possibilities for setting the visual appearance of your forms:
-
You can change the color of the controls ( BackColor , ForeColor ).
-
You can group several controls by setting them on an Image box and emphasize this box by means of another color or a frame.
-
You can store a bit-mapped file in most controls. (But please consider the memory requirements for this!) If several controls overlap, you can move them forward or backward with FORMATORDER.
In contrast to Excel 5/7 it is no longer possible to use the numerous drawing elements in Excel to adorn your forms.
Additional Controls (ActiveX Controls)
Fifteen MS Forms controls are displayed in the toolbox window. If you are working with Office Developer or have installed other programs in addition to Office, then you have a host of additional controls at your command. Namely, in MS Forms forms you can use all ActiveX controls that have been installed on your computer.
A list of controls at your disposal can be obtained by the pop-up menu command Additional Controls, which you can invoke from the toolbox window.
To use these controls you must click on them in the form pictured in Figure 7-9. The controls will then be displayed in the toolbox, just like that for the MS Forms controls. At the same time, the associated object library is activated, so that you can manage the controls like MS Forms elements by means of methods and properties. If there are entries in the on-line help for a particular ActiveX control, this can be beamed up through the help feature of the object browser.
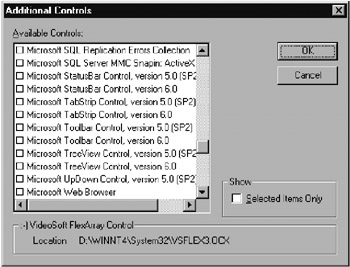
Figure 7-9: List of additional controls installed on the author's computer
If you use very many additional controls, you can divide the toolbox window into several pages. The necessary command for this can be found in the pop-up menu that pops up when you click on the sheet tab (labeled "Controls") in the toolbox window.
| Note | Although the associated object library is automatically activated when a control is selected, when you remove the control again, the library reference remains. You should deactivate the reference explicitly with ToolsReferences . |
| Note | If you wish to pass your Excel application on to someone else, take care that you use only those controls that you are certain are available on your client's computer. Only if you are working with Office Developer can you include additional controls together with a setup program (and this, of course, only to the extent permitted by your license). |
Building New Controls
Just as you can move controls from the toolbox window into the form window, there is the converse possibility of moving controls in the opposite direction. Indeed, you can even move several controls together (as a group) into the toolbox window. These controls will be represented in the toolbox window by a new symbol. You can then bring up the pop-up menu for this symbol, in which you can edit the symbol and give the control a new name.
The next time you create a form you can add this new entry into your form as if it were an ordinary control. In this way you save the trouble of repeatedly setting the same properties. For example, you could define a group consisting of an OK button and a CANCEL button: This group is needed in almost every form.
| Note | The toolbox window accepts only the controls with their properties, and not program code. If you wish to save program code as well, you can export entire forms. For example, you could export the framework of a form consisting of an OK button and a Cancel button together with the required program code, and in this way accelerate even more the creation of new forms. If you own Visual Basic 6 and are an experienced programmer, you can program "truly" new controls yourself, that is, independent of the limits associated with the MS Forms library. |
EAN: 2147483647
Pages: 134