SnapshotTransactional Replication Setup
|
|
Snapshot/Transactional Replication Setup
After you have the servers configured for their various roles, you're ready to create a publication. Snapshot replication and transactional replication share most of the same configuration screens. To create a publication, use the Create Publication Wizard. To access the wizard, right-click on the Publications group in the database that is enabled for publishing, and select New Publication. In the wizard's welcome screen, select Show Advanced Options In This Wizard. This allows you to use some of the more advanced SQL Server 2000 replication features.
The next screen asks which database you'd like to publish from. Since you launched the wizard while connected to the database, it already has the proper database selected. Choose the type of replication you'd like to perform. For this example, I'm choosing transactional publication. Keep in mind that if you have SQL Server Personal Edition, transaction replication is grayed out because it's not licensed to create this type of publication.
You are then presented with the option to allow the subscriber to update the publisher. You can do this with either of two methods: immediate or queued updating. Immediate updating allows subscribers to update the publisher with a two-phase commit using Microsoft Distributed Transaction Coordinator (MS DTC). Queued updates queue transactions, and send them on a batch basis. This is perfect for salespeople with laptops, or servers whose connectivity is not constant.
| Tip | Only enable updateable subscriptions if you need them. They are more resource intensive on the subscribers. I prefer to use merge replication rather than transactional replication to achieve updateable subscribers. |
In the next screen, you can opt to transform data as it's being sent to the subscribers. This feature is new to SQL Server 2000 and can be used to accomplish the following:
-
Convert a decimal data type to an int. data type
-
Filter data and send custom subscriptions to each subscriber, whether vertically or horizontally partitioned
-
String manipulation, such as concatenating the fields that store first and last name
| Note | This capability is not supported on ODBC providers. It is only supported on SQL Server and OLE DB providers. Once you finish configuring the publication, you can use the Transform Published Data Wizard to attach a DTS package to the publication. |
In the next screen, choose the types of subscribers you want to enable. If you need to publish to a Microsoft SQL Server 6.5 server, you must select the Heterogeneous Data Source option. The reason there's a separate SQL Server 7.0 option is that SQL Server 7.0 databases do not have some of the replication options that SQL Server 2000 offers.
| Caution | Only select the heterogeneous data option if you absolutely need it. If this is not selected, SQL Server can use the optimal data load method of creating load in native SQL Server format. |
In the next screen, select the objects you'd like to replicate (see Figure 12-8). The objects that are available to you will depend on what type of replication you've chosen and where you're sending the data. For transactional replication, you can choose tables, but for snapshot replication to another SQL Server 2000 server you choose to replicate tables, stored procedures, and views.
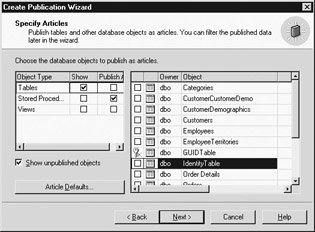
Figure 12-8: Selecting objects to publish
To add tables to the publication, simply check the box in the first column next to the table name. By default, stored procedures and views are not shown and you must click the box next in the Show column to see them.
After you select the object, you can go to the Article Properties screen by clicking the (…) button in the last column. You will rarely have to change the article's default properties. If you don't have to change any properties, you won't have to go to this screen.
Another restriction exists when you want an updateable subscriber. Each table must have a primary key so conflicts can be resolved. Tables that don't have primary keys will appear as a key with an X through it. This will prevent you from adding the table through the wizard.
| Tip | You can specify the defaults for any article by clicking the Article Defaults button. This prevents you from constantly having to customize the properties screen for each article in the publication. |
In the General tab, assign a name to each article. By default, the article's name is the object name (such as the name of the table). You can also specify what the object's name and owner will be once it is sent to the subscriber.
In the Commands tab, you can access some of the article's more advanced options. You only see the Commands tab if you're doing transactional replication and if you're not using DTS to transform your data inside the publication. The options in this tab (shown in Figure 12-9) allow you to replace the standard INSERT, UPDATE, and DELETE statements with more efficient stored procedures. These stored procedures are used by default, but this tab gives you the option to customize which stored procedures are called. I've never seen a reason to edit this screen and I recommend you use the native stored procedures.
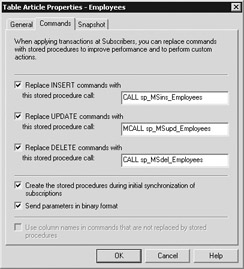
Figure 12-9: Commands tab in the Table Article Properties screen
The Snapshot tab (shown in Figure 12-10) is extremely important and has the most customized settings in the article. In this tab, you can specify that if a table with the same name exists on the subscriber, it will be dropped, kept, purged, or selectively purged. This will occur when you resynchronize the publication or if you're using snapshot replication. If you select Keep The Existing Table Unchanged, you risk Primary Key constraint errors. By default, the table will be completely dropped and then re-created. Generally, this option is fine for your article. If you select the third option, data that matches the filter you apply later will be selectively purged. This is useful when you have multiple publishers sending data into the same subscriber and need to refresh only the data that it owns.
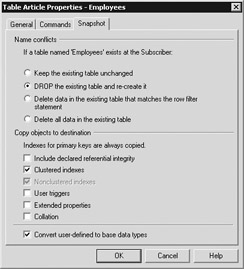
Figure 12-10: Snapshot tab in the Table Article Properties screen
You can also opt to transfer the article's other information. For example, you can specify the transfer of the table's collation, referential integrity, triggers, extended properties, and indexes. You can also convert the user-defined data types to their base data type counterparts. This ensures that your data will work if the subscriber doesn't have the user-defined data type.
| Note | In most cases, the trigger or referential integrity's logic will have already been applied against your data before it's sent to the subscriber. One of the reasons you'd want those items transferred also, though, is if you plan to let your subscribers update their own data. In those cases, you'd want the trigger's logic to be reapplied. |
Click OK to go back to the wizard. On the next screen, if the article you're trying to transfer has a column with the identity property on it, you receive the following warning that the wizard wants to remove the identity columns on the subscribers:
Because this publication does not allow updateable subscriptions, when IDENTITY columns are transferred to the Subscriber, the IDENTITY property will not be transferred. (For example, a column defined as INT IDENTITY at the Publisher will be defined as INT at the Subscriber.)
You may want to keep the identity columns on the subscribers. If you want to work around this, perform the following steps:
-
Manually create the table on the subscriber and add the column with the identity column with the NOT FOR REPLICATION option enabled.
-
In the Article Properties screen select the Delete All Data In The Existing Table option. Otherwise, the table will be dropped each time the publication resynchronizes.
If you are allowing your subscribers to update the publisher, you receive the following warning that the wizard is going to add an extra column in the tables that don't have a uniqueidentifier column. This column is used to resolve conflicts.
SQL Server requires that all articles in a publication allowing updateable subscriptions contain a uniqueidentifier column named 'MSrepl_tran_version' used for tracking changes to the replicated data. SQL Server will add such a column to published tables that do not have one.
| Caution | When you add this column in merge replication or in updateable subscribers, some of your INSERT statements may fail if they were not explicitly naming each column. Your database will also grow on the subscriber and publisher. |
The next screen asks you to name the publication, and enter a description. Do not use any special characters (like ? or %) when naming the publication.
A summary screen appears that allows you to select the default configuration or customize the rest of the publication. If you accept the default configuration, the wizard configures the publication for the following actions:
-
Will not filter the data in the publication
-
Will not allow anonymous subscribers
-
Sets a given schedule for the replication to occur based on the type of replication you've specified
If these options are fine, click Next and the publication is created.
If these options don't suit you, select Customize and click Next. Then specify if and how you'd like the publication to be filtered. You can filter horizontally and vertically. If you filter horizontally, you can apply a WHERE clause on the given article. If you want to filter vertically, you can transfer selective columns.
| Tip | You can use vertical filtering to avoid transferring image, text, and ntext columns, which can slow down your publication. |
Check the filtering mechanisms you'd like to deploy and then proceed. To filter vertically, check the columns you'd like to transfer. You must transfer the table's primary key. To filter horizontally, you must specify a filter by double-clicking on the article name in the Filter Table Rows screen. You can also build a query, as shown in Figure 12-11. The wizard provides the core logic, and all you have to do is append your own logic to it.
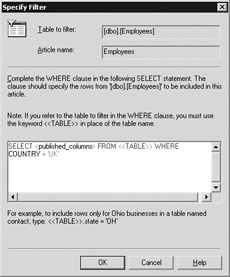
Figure 12-11: Applying filters to a publication
You must then decide if you'd like to allow anonymous subscriptions. Anonymous subscriptions allow any authorized server to subscribe to your publication. If you select No here, you will have to explicitly approve each subscriber. Selecting Yes lowers your administration overhead on the publisher but causes a security risk.
The next screen allows you to specify a time when the snapshot agent creates the necessary files to transfer to the subscribers. The default setting is once a day. To set a customized schedule, click the Change button and apply your changes.
After you click Finish, the initial publication is created. If you want to configure something at a later point, you can right-click the publication name and select Properties under Replication | Publications in Enterprise Manager. You can then access even more advanced replication settings and see the status of the various agents (discussed in the next section).
| Tip | You can have multiple publications for any given database. This allows you to create a subset of your data and transfer only the data that each subscriber needs. As you create additional publications, the wizard will allow you to use the other publications as templates for further publications. |
|
|