Deployment Utility
In SSIS, you can create a deployment utility that will help a user install your project of packages and any dependencies such as configuration files. This deployment utility is similar to creating a program like InstallShield, and is perfect for times when you want to pass a set of packages to a customer or a production DBA who may not know how to install SSIS packages the manual way. When you create a deployment utility, all the files that are necessary to install the project are copied into a centralized directory, and a .SSISDeploymentManifest file is created for the installer to run, which opens the Package Installation Wizard.
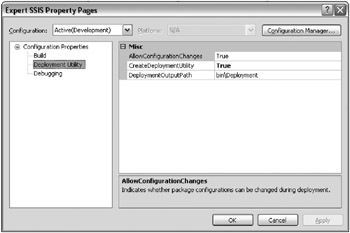
To create a deployment utility, simply right-click the project in BIDS and select Properties. In the Property Pages dialog box, go to the Deployment Utility page and change the CreateDeploymentUtility to True, as shown in Figure 8-19. This is set to False by default. The AllowConfigurationChanges property is a useful setting as well, and when set to True, will prompt the installer to see if he or she would like to change any settings that may be exposed via a configuration file at installation time. The DeploymentOutputPath property shows you where the deployment utility will be outputted to underneath the project folder.

Figure 8-19: Changing the CreateDeploymentUtiliity to True
Next, under the Build menu, select Build <Project Name>, where <Project Name> represents your project’s name. This will open each package and build the package. If there are any errors in the package, then you will see them at this point. As it builds the project, each package is outputted into the \bin\deployment directory under your project’s folder.
The Package Installation Wizard
Now that you have created a deployment .SSISDeploymentManifest file, you’re now ready to send the entire contents of the \bin\deployment folder to the installation person. The installation person would then need to copy the contents of the folder to the server he or she wants to deploy to, and double-click the .SSISDeploymentManifest file. The installer could also run it remotely, but it is preferred to run it on the same server as the target deployment server to simplify the installation.
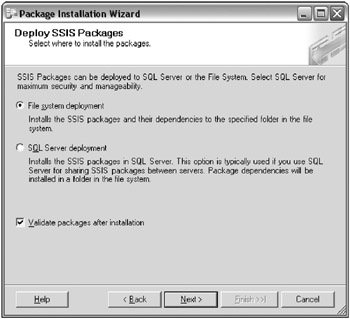
After skipping over the introduction screen, you are asked where you want to deploy the packages, as shown in Figure 8-20. You can either choose a File system deployment or a SQL Server deployment. A File system deployment just copies the files to a directory on the server. A SQL Server deployment stores the packages in the MSDB database on the target server. Chapter 9 discusses the pros and cons to each option. You can also have the wizard validate each package after you install the package. This ensures that the package that was delivered to you is valid on your machine, including the data sources and configurations.

Figure 8-20: Prompt to where you want to deploy the packages
If you’re following this example, select SQL Server Deployment and click Next. The next screen prompts you for which SQL Server 2005 machine you want to deploy the packages. You cannot deploy SSIS packages to SQL Server 2000. If you had selected a File System Deployment, the next screen prompts you for the file path to which you want the packages to be deployed. The last option in the SQL Server Deployment screen is to specify if you want to rely on SQL Server for protecting the package by encrypting the package. This is the preferred option, and will automatically change the ProtectionLevel package property to ServerStorage as it installs each package. Chapter 9 provides more information about the ProtectionLevel property.
Even though you have selected a SQL Server Deployment, there may still be files that must be deployed, such as configuration files and readme files. The next screen prompts you for where you’d like to put these files. Generally, they’ll go under a folder named after the project under the C:\Program Files\ Microsoft SQL Server\90\DTS\Packages\ path.
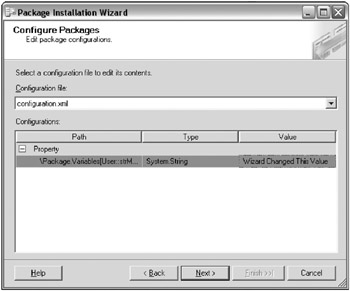
After you click Next, the packages will be installed in the package store on the server. After the packages are installed, if the developer selected True to the AllowConfigurationChanges in BIDS (shown in Figure 8-19), then you will receive an additional screen giving you (as an installer) a chance to edit the values in the configuration file at deployment time. This can be seen in Figure 8-21, and you can pull down the drop-down box to see multiple configuration files. Unfortunately, it does not show which specific packages these files are tied to.

Figure 8-21: Chance to edit the values in the configuration file at deployment time
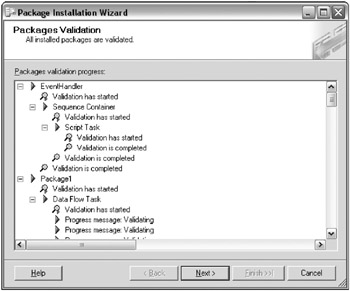
The only other additional screen you would see is a pop-up dialog box if there were a user password on any package. After the packages have been deployed, they are validated, as shown in Figure 8-22. If there were a problem, you would see it in the Packages Validation screen, and you could redeploy after the problem was corrected. The last screen is a summary screen to complete the wizard.

Figure 8-22: Validated packages
There are other ways to deploy packages, examined in Chapter 9, but this is a great way to deploy packages in bulk. If you want to deploy a package in Management Studio, as you’ll see in Chapter 9, you have to do it one package at a time. The file system, however, is much easier. With this method of storage, you can just copy the files into a specific directory and they’ll be seen from Management Studio.
The main thing to remember about the deployment utility is that when it is used, every package and dependency is deployed. You may not want to deploy this many packages at once all the time. The .SSISDeploymentManifest file can be edited in a text editor to remove any extra files you do not want to migrate. Some developers find it useful to create a project in the same project solution that contains a subset of the packages that they want to deploy if this is too aggressive for them.
If you did want to edit the .SSISDeploymentManifest XML file before sending the folder to a client, you could just remove one of the <Package> lines, as shown in the following XML example. You can also see, in the header of the XML file, who created the deployment tool for you, and when. This information will be useful for tracking down who to ask questions later if the project doesn’t install appropriately. If you do not want to deploy a configuration file with the wizard, you can remove or comment out the <ConfigurationFile> line to prevent the configuration file from overwriting the older one that may already be on the server file.
<?xml version="1.0" ?> - <DTSDeploymentManifest GeneratedBy="BRIANKNIGHT\bknight" GeneratedFromProjectName="Expert SSIS" GeneratedDate="2006-12-15T23:39:54.7343750-05:00" AllowConfigurationChanges="true"> <Package>EventHandler.dtsx</Package> <Package>Package1.dtsx</Package> <Package>Restartability.dtsx</Package> <Package>ConfigFiles.dtsx</Package> <!--Package>Chapter1.dtsx</Package--> <Package>RawFile.dtsx</Package> <Package>DBSnapshots.dtsx</Package> <Package>Logging.dtsx</Package> <Package>FileWatcher.dtsx</Package> <Package>ConfigRepository.dtsx</Package> <ConfigurationFile>configuration.xml</ConfigurationFile> </DTSDeploymentManifest>
A final deployment technique is simply to copy the packages over by using a command such as XCOPY. This is often used for .NET application deployments and is a simple solution that your developers will understand. As you’ll learn in Chapter 9, if you deploy to the file system, there is no record in SQL Server that contains metadata about packages in the file system. Because of this, the packages can simply be copied into a directory, and the package store will be aware of them. More on the package store and the benefit of the file system deployment technique is discussed in Chapter 9.
EAN: 2147483647
Pages: 111