Package Configuration
Now that you have your set of packages complete, the challenge is trying to migrate them to your testing environment or to production without having to manually configure it for that environment. For example, your production server may not have the same directory to load extract files from, or the same user name to use to connect to the database. Configuration files help you make the migrations seamless and the configuration automated to reduce your risk of errors. In this section and the next, you’ll see two different methods for configuration. One is to create a configuration repository and the other is to create your own repository, which mimics configuration files, but gives you more flexibility.
SSIS Package Configurations
The SSIS Package Configuration option enables you to write any SSIS property for the package, connection, container, variable, or any task into an XML file or a table, for example, and then read the setting at runtime. You could deploy the configuration file to multiple servers and point the setting inside the file to a new SQL Server database on the second server, and when the package runs, it will shift its connection to the new database automatically. Configuration files will also come in handy later when you deploy the packages to production using the deployment utility. Because they’re just XML files, you can compare them with your favorite comparison tool such as VSS to determine what settings are different between the environments.
Let’s do a quick example to show you the strengths and weaknesses of package configurations. This example creates a simple Script Task that will pop up a message with the configuration value instead of its normal, hard-coded value. Then you’ll create multiple configuration files and see which configuration file wins.
First, create a new package called ConfigFiles.dtsx. Drag a new Script Task onto the Control Flow tab in the newly created package and name the task Popup Value. Next, create a new string variable called strMessage that is scoped to the package and not the Script Task. Seed a default value of Hard Coded Value for the string variable. Double-click the Script Task to configure it, and in the Script page, type strMessage for the ReadOnlyVariables property. Click Design Script to add your code to the task. The code you’re going to add will pop up the value from the strMessage variable by using the following code:
Public Sub Main() ' ' Add your code here ' MsgBox(Dts.Variables("strMessage").Value) Dts.TaskResult = Dts.Results.Success End Sub If you execute the package at this point, you should see the pop-up dialog box that states, “Hard Coded Value.” If you see that value, you’re now ready to set this variable from a configuration file instead. Select Package Configurations from the SSIS menu, or right-click it in the control flow. This opens the Package Configurations Organizer where you will create and arrange the priority of your package configurations. Click Enable Package Configurations to enable this feature.
To add your first package configuration, click Add. This will take you to the Package Configuration Wizard. You can set your package configuration to use an XML file, SQL Server table, environment variable, or registry setting, or to read a variable from a parent package. Most people choose to use XML files or a SQL Server table. In this example, though, use an XML file and type c:\expertssis\configuration.xml for the Configuration File name property. The default extension for the configuration XML files is .dtsConfig, but use an XML extension so that it is easily registered to most XML editors.
You can even make the path and file name of the XML file dynamic by reading it from an environment variable. Otherwise, the file must be in the C:\ExpertSSIS folder on each server that you want to deploy the package to, which may not be allowed in your production environment. You can also change this later during deployment, but that will be discussed in a moment in the section, “Deployment Utility.”
Click Next to go to the Properties to Export screen in the wizard. If the c:\expertssis\configuration .xml file had already existed on your server, you would be prompted as to whether you want to reuse the existing file or overwrite the file (shown in Figure 8-7). If you had chosen to reuse an existing file, the next screen would be the final summary screen. This option is fantastic if you want to have all of your packages in your project reuse the same configuration file.

Figure 8-7: Prompt as to whether you want to reuse the existing file or overwrite the file
Back in the Properties to Export screen, you can check any property that you want to have read and populated from the configuration file. In this case, drill down to Variables ![]() strMessage
strMessage Properties and finally check the Value option (as shown in Figure 8-8). Click Next to proceed to the next screen.
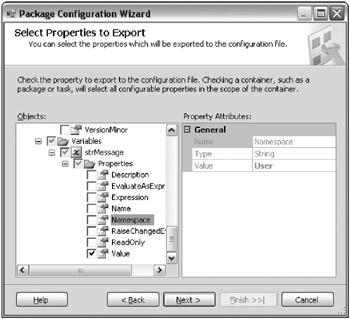
Figure 8-8: Checking the Value option
You are then taken to the summary screen where you should name the configuration Variable File. Click Finish, which takes you back to the Package Configuration Organizer. Click Close to exit the organizer and execute the package. You’ll notice that the pop-up dialog box should still have the same old message. Note that the configuration file was created after you closed the wizard.
Open the configuration.xml file in your favorite XML editor or Notepad and replace the old variable value of Hard Coded Value with a new value of Config File Changed Value, as shown in the following code. The other pieces of the configuration file contain lots of metadata about who created the configuration file and from what package.
<?xml version="1.0" ?> - <DTSConfiguration> - <DTSConfigurationHeading> <DTSConfigurationFileInfo GeneratedBy="BRIANKNIGHT\bknight" GeneratedFromPackageName="ConfigFiles" GeneratedFromPackageBOLD">{437BD1AA-6A94-4CCB- 89B8-781BADB81686}" GeneratedDate="12/10/2006 7:24:25 PM" /> </DTSConfigurationHeading> - <Configuration ConfiguredType="Property" Path="\Package.Variables[User::strMessage].Properties[Value]" ValueType="String"> <ConfiguredValue>Config File Changed value</ConfiguredValue> </Configuration> </DTSConfiguration> When you execute the package again, notice that this time the message has changed. You can also create multiple configuration files. For example, you may want a configuration file that contains your corporate logging database for all of your packages to use, and then another configuration file for the individual package. As you add more package configurations, they stack onto each other in the Configuration Organizer screen. At runtime, if there is a conflict between two configurations, the lowest configuration displayed in the Package Configurations Organizer will win.
To demonstrate this, create one additional configuration. This time, when asked for the configuration type, select SQL Server. For the Connection property, select New and point the connection to the AdventureWorks database, which will create a connection manager. Lastly, click New for the Configuration Table property. The table can be called whatever you’d like, as long as you have the four core fields. Name the table ctrlConfigurations, as shown in the following script:
CREATE TABLE [dbo].[ctrlConfigurations] ( ConfigurationFilter NVARCHAR(255) NOT NULL, ConfiguredValue NVARCHAR(255) NULL, PackagePath NVARCHAR(255) NOT NULL, ConfiguredValueType NVARCHAR(20) NOT NULL )
Type Development for the Configuration filter. When the package reads from the ctrlConfigurations table, it will read all the properties where the ConfigurationFilter column is equal to Development, as shown in Figure 8-9. Typically, you’d want to have this filter set to either the package name or group of packages with which you want to share the same configuration settings.
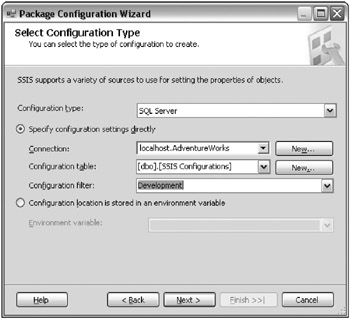
Figure 8-9: Setting the Development configuration filter
Select the same strMessage variable value as in the previous configuration file. Finally, go to the next screen and name this configuration SQL Server Config. You should now have two package configurations, as shown in Figure 8-10. Set the variable’s value by going to the ctrlConfigurations table in the AdventureWorks database and setting the ConfiguredValue column to SQL Server Config Value. When you execute the package, notice that now the value that pops up is SQL Server Config Value. This is because there were two configuration packages that set the same variable, but the one at the bottom will set the value last (see Figure 8-10).
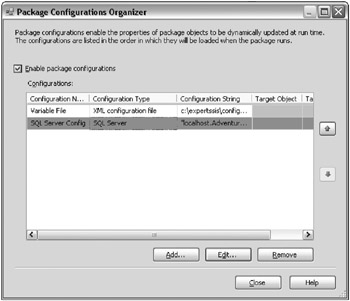
Figure 8-10: Two package configurations
Package configurations make it easy to migrate a package from environment to environment. For the most part, it’s going to be easier to store your configurations in the SQL Server, since you can write some sort of front end to modify the settings, and you can create reports to view the settings. The main problem with package configurations is that data is not encrypted, so you should not store anything that should be secure inside package configurations (such as passwords). It is important to migrate your configuration files with the package.
There are a few methodologies you can employ when you use configuration files. One is to group all the like configuration properties together into files, or with filters, if you choose to store the settings in a table. The other (which many developers prefer) is to store each property in its own file, or with its own filter. If you choose the latter option, you’ll incur higher maintenance in creating your package, since you may have to create dozens of files. However, it does allow you to cherry-pick which settings you’d like and reuse the settings repeatedly.
Configuration Repository
As mentioned, the preferred method is to use tables to store the bulk of your configurations. You may have to use, in reality, a mix of XML files and tables, but that will be addressed in a moment. The major weakness with storing data in package configurations is that the data is unencrypted, which is mandatory in some cases. The schema is also very rigid and may not fit your needs.
This is why you may sometimes find it useful to create your own configuration repository and build a user interface around it. Let’s start with a more flexible schema. In the schema shown in Figure 8-11, the model you would normally use has been simplified to three basic tables. The goal here is to build an example that you can add to and customize to your environment. This complete example can be downloaded at www.wiley.com.
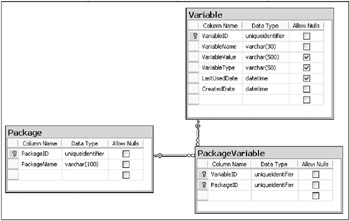
Figure 8-11: Example schema
In this configuration repository, the goal is to build a repository of variables that could be used by multiple packages. To accomplish this, a Variable table has been created to hold each variable, its value, and type. Also stored in this table is when the variable was last used, so you can later clean up older variables that are no longer active. The Package table holds which packages can eventually access the variables, and the packages are granted access to the variable in the PackageVariable table.
You may be wondering why uniqueidentifier columns (which store GUIDs) have been used. Even though they will be slightly slower in performance in comparison to an identity column, they will allow you flexibility when you want to migrate from environment to environment.
For example, when you migrate these variables from development to production, you don’t have to worry about reseeding identity columns or regenerating new VariableID values. Values such as VariableID are artificially generated by using the newid() function, but other ones such as the PackageID column use the PackageID in the actual package. While on the topic of GUIDs, as an aside, there’s a bit of an unexpected surprise in the package when you go to use the PackageID. The PackageID system variable in SSIS is actually a string value and not a uniqueidentifier.
The solution provides you with some stored procedures to begin, but there are some gaps. For example, you will have to create stored procedures to insert, update, and delete variables. These were not completely provided to allow you the flexibility of encrypting the values going into the database if you want.
Getting Started
To begin, create a new database called SSISOps and run Chapter8_SSISOps.sql to create the necessary schema and stored procedures. This database would eventually exist in each environment and, as you migrate a package from environment to environment, the package would read the environment’s repository and set the variables appropriately. The repository only sets variables in this example, and you’ll need to create expressions on other properties that you want to set to tie them to the variable.
Next, create a new package called ConfigRepository.dtsx in BIDS. Drag over a new Sequence container and rename it to Configure Package. Create two new string variables that are scoped to the new container called tmpVariableName and tmpVariableValue. Create one additional object variable objTmpVariableList scoped to the container as well. At this point, there should be no variable scoped to the package level, and two string variables and an object variable. The final step of the package setup is to create a new connection manager that points to the newly created SSISOps database.
Let’s walk through the stored procedures. In the Chapter8_SSISOps.sql file on the Wiley web site, you’ll find a very simple stored procedure to populate the Package table. The stored procedure only requires the PackageID and name as mandatory parameters, and the code looks like the following:
CREATE PROC AddPackage @PackageID uniqueidentifier, @PackageName varchar(100) as INSERT INTO Package (PackageID, PackageName) Values(@PackageID, @PackageName)
The other simple stored procedure populates the variable table. This stored procedure requires that you have a @VariableName input parameter that is an exact match to the one in the package that you’d like to use the parameter. This variable name is case-sensitive. The @VariableValue parameter stores the actual value for the parameter. The @VariableType parameter stores the data type of the variable. It’s not really used in this example, but will be useful metadata for later usage. The valid data types are String, Integer, DateTime, and Numeric.
CREATE PROC AddVariable @VariableName varchar(30), @VariableValue varchar(500), @VariableType varchar(50) as INSERT INTO [dbo].[Variable] ([VariableName] ,[VariableValue] ,[VariableType] ) VALUES (@VariableName ,@VariableValue ,@VariableType )
After the variable is created, you must allow the package to use the variable. You do this by populating the PackageVariable table using the ScopeVariable stored procedure. This stored procedure uses both the PackageID and VariableID columns to grant access to the variable. This is most certainly not a secure system, but it can easily be built onto to add additional security.
CREATE PROC ScopeVariable @VariableID uniqueidentifier, @PackageID uniqueidentifier as INSERT INTO [dbo].[PackageVariable] [VariableID], [PackageID]) VALUES (@VariableID, @PackageID)
The last step is to load the tables with some sample data so that the example package works. Inside the script file you downloaded, you’ll see a section of code commented out that you can execute to do this if you’d like, or you can add real variables. Note the variables that you add to the tables, though, if you choose to venture off the path of the canned example values.
You’ll want to create two variables in the database for this example: one variable called strMessage and another called strBadMessage. The following code, which shows you the sequence, should do the trick, but your IDs will not match and must be altered. This is the code that you will find commented out of the Chapter8_SSISOps.sql file:
AddVariable @VariableName='strMessage', @VariableValue='From the SSISOpsDB', @VariableType='string' go AddVariable @VariableName='strBadMessage', @VariableValue='From the SSISOpsDB', @VariableType='string' go AddPackage @PackageID ='{}', -- Change this ID to your package's ID @PackageName= 'Config Repository' go -- Capture the GUIDS from the Variable table to run this ScopeVariable @PackageID = '{}', --This should be the same package ID used above @VariableID = '' --Run this procedure twice, once for each GUID from the Variable table go
Reading the Variables
The most important stored procedure is the GetVariables stored procedure, which reads all the variables that are stored in the repository that the package has access to. The only parameter needed for this stored procedure is the @PackageID, which is the string PackageID from the package. This stored procedure will be the one called from the packages that are using the repository. Notice that when the variables are read, the row is also updated, so you can track the metadata of when the variable was last used, and eventually remove old variables.
CREATE PROC GetVariables @PackageID varchar(38) as SELECT PackageVariable.PackageID, Variable.VariableName, Variable.VariableValue, Variable.VariableType, Variable.LastUsedDate FROM PackageVariable INNER JOIN Variable ON PackageVariable.VariableID = Variable.VariableID WHERE (PackageVariable.PackageID =@PackageID) UPDATE Variable SET LastUsedDate = Getdate() WHERE VariableID in ( SELECT Variable.VariableID FROM PackageVariable INNER JOIN Variable ON PackageVariable.VariableID = Variable.VariableID WHERE (PackageVariable.PackageID =@PackageID) ) GO
With the stored procedures and schema now complete, expand the package to use the repository. First, drag an Execute SQL Task onto the control flow and into the Sequence container. Configure the task to use the SSISOps database and set the SQLStatement property to the following query:
EXEC GetVariables @PackageID = ?.
The question mark in this query represents the input parameter that you will configure the task to pass. Before leaving the screen to do that, you must first set the ResultSet property to Full result set, as shown in Figure 8-12. This outputs the results of the GetVariables stored procedure to an object variable.
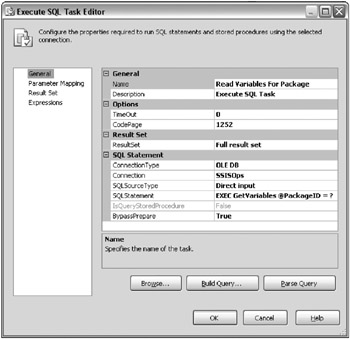
Figure 8-12: Setting the ResultSet property to Full result set
In the Parameter Mappings page, you will specify the input variables (represented as the previously mentioned question mark). Select System::PackageID from the Variable Name column and Input for the Direction column. For the Data Type column, select VARCHAR, even though the data looks like it should be a GUID. Lastly, set the Parameter Name property to 0 and the Parameter Size property to 38. The final result should look like Figure 8-13.

Figure 8-13: Setting the Parameter Mappings
The last item to configure in this task is in the Result Set page. The result sets are zero-based, ordinal, like the parameters. Because of this, the Result Name should be set to 0 and the object variable you want to output to is User::objTmpVariableList, as shown in Figure 8-14. This variable should have been created in the earlier setup steps. Click OK to save the task.
![]()
Figure 8-14: Setting the Result Set
The Execute SQL Task that you just created retrieves all the variables that are stored in your SSISOps table and stores them in a list inside the User::objTmpVariableList variable. You’re now ready to loop through those results and set the variables in your package to what is in the database. You’ll do this through a ForEach Loop container. Drag it into the Sequence container and below the Execute SQL Task you created earlier. Connect a precedence constraint between the Execute SQL Task and the newly created ForEach Loop container. Name the container Loop Through Variables.
In the Collection page (shown in Figure 8-15), change the Enumerator to Foreach ADO Enumerator and set the source variable to User::objTmpVariableList. This will read the User::objTmpVariableList variable and loop through the results list that you have stored in it during the Execute SQL Task.
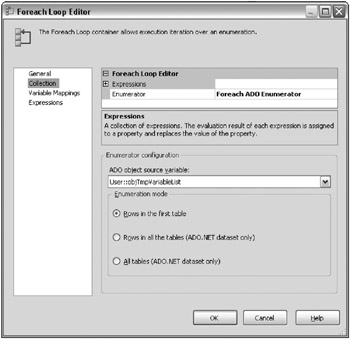
Figure 8-15: Collection page
The last step to configure this container is to specify where you want each column to be output to. This, too, is zero-based, ordinal, meaning that the first column has an index of 0, the second column has an index of 1, and so on. You can specify this mapping in the Variable Mappings page. Set User::tmpVariableName to an index of 1, User::tmpVariableType to an index of 3, and User::tmpVariableValue to an index of 2, as shown in Figure 8-16. The last output, which would have had an index of 0, is PackageID and it will not be used at this time.

Figure 8-16: Specifying the container to use for output
Setting the Variables
You have now loaded your variables into an object variable and have a loop to perform some sort of action on each variable you pull from the database. The action you’re going to perform is to read from the set of temp variables you set in the previous step, and then set the final variables using a Script Task.
Start by dragging the Script Task into the loop and naming it Set Variables. In the Script page of the task (shown in Figure 8-17), set the ReadOnlyVariables to tmpVariableType, tmpVariableName, tmpVariableValue. By doing this, the variables get locked in the designer, which simplifies the code later. It would be a better practice to use the VariableDispenser object throughout the script code to refer to the variables, but for this small of a function, using this method is fine.
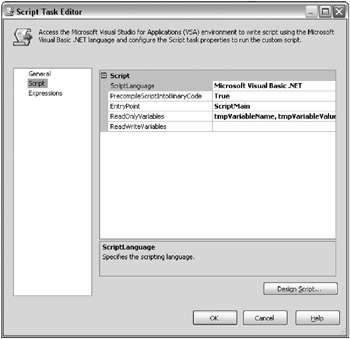
Figure 8-17: Setting ReadOnlyVariables of the script
Click Design Script to begin writing the script. The script is broken into two subroutines. The first one actually does the heavy lifting in the script and sets the variable. Here the VariableDispenser object is used, since you can’t predict the variable’s name that you want to lock. Prior to locking the variable, you want to ensure that the variable actually exists in the package by using the Containers method. This will ensure that someone hasn’t mistyped a variable in the Variables table of the SSISOps database. If you don’t have this line of code, and the variable is in the table but not in the package, the script will fail. With the line of code, if the variable doesn’t exist in the package, it is ignored. This may not be the behavior you want to see. To set the variable, you must first lock the variable by using the LockForWrite method, then you set it. Also note that the Try…Catch code that wraps the inner code is only a stub for more advanced code that you could write to catch errors. Add whatever logic you want to handle this situation.
Private Sub SetVariable(ByVal varName As String, ByVal varValue As Object) Try Dim vars As Variables If Dts.VariableDispenser.Contains(varName) = True Then Dts.VariableDispenser.LockOneForWrite(varName, vars) Try vars(varName).Value = varValue Catch ex As Exception Throw ex Finally vars.Unlock() End Try End If Catch ex As Exception Throw ex End Try End Sub
The last subroutine calls the variable setting and just does some of the light setup work.
Public Sub Main() Dim vars As Variables Dim strVariableName As String Dim strVariableValue As String strVariableName = Dts.Variables("tmpVariableName").Value.ToString strVariableValue = Dts.Variables("tmpVariableValue").Value.ToString SetVariable(strVariableName, strVariableValue) Dts.TaskResult = Dts.Results.Success End Sub The final solution should look like Figure 8-18. The great thing about wrapping it into a single Sequence container is that it can be minimalized, so it doesn’t have visual impact, and you can create event handlers on the container. This container would need to be the first item in your package in order for the configuration to work, and then any item that you’d like to make dynamic would use the variables to set the properties with expressions.
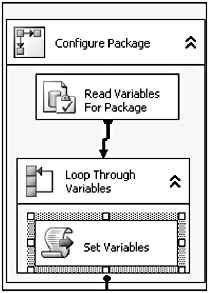
Figure 8-18: Final solution
Areas to Grow the Solution
This solution is surely not turnkey, but it does start you in your pursuit of a seamless configuration of your packages. The first area to improve this solution is to encrypt the VariableValue column in the Variable table. This can be done with the native encryption functions that are out-of-the box in SQL Server 2005. After this, you can rest assured that only SSIS and other approved applications can see the values for the variables.
You may also decide to add a task prior to the variable retrieval to add the package to the Package table if it doesn’t yet exist. This can be done through an Execute SQL Task calling a new stored procedure that checks to see if the PackageID is already in the table and, if it is not, creates the row. This may help with usability for your users.
Another thing that may be useful is to expand the model to where the Script Task sets the final connection property as shown in Chapter 2. Tying a variable to the property with an expression may be more work than people are willing to give for the configuration of a package. A final rule of thumb is that if you plan on using a Script Task more than a few times, it’s a wise idea at that point to create a custom task to perform all the script’s functionality. The same could hold true here where you could replace both containers and everything inside of them with a single task.
EAN: 2147483647
Pages: 111