How MIDI Models Performances
MIDI data is simply a series of number values, from 0 to 255, that allow control events to be universally understood by different hardware and software. When you press a key on a keyboard connected to your computer, the keyboard transmits a series of numbers to the computer that represent which key you played and how hard you hit it. (See the sidebar "Behind the Scenes: Anatomy of a MIDI Message" for details.) It's then up to your computer softwarean electric piano plug-in, for instanceto decide what (if anything) to do with that numeric data.
It may be hard to believe that simple messages with 256 values can describe musical performances. However, by combining different messages for different eventsa specific message type for notes, another for turning a certain kind of knob, and so onMIDI is versatile enough for a surprisingly wide range of musical uses. Also, because the message structure is so simple, it's easy to understand MIDI messages and manipulate them fluidly. Most MIDI users seldom bother with the numbers. Except in a few specific situations, the numerical data is hidden from you to make your life easier. The essentials are described later in this chapter.
MIDI Specification and Implementation
Interpreting MIDI is a little like interpreting HTML on Web pages: Everything is supposed to work the same way everywhere, but your mileage may vary. Some elements are fixed (notes and pitch-bend usually work in a standard way), whereas others are more flexible. The MIDI Specification itself is published by the MIDI Manufacturers Association. When people say "MIDI," they're usually referring to the MIDI 1.0 Specification. Manufacturers use the technical documentation of this specification to insure that their MIDI hardware and software will work with other MIDI products in an error-free manner.
|
Hardware usually comes with a MIDI Implementation Chart (check the back of the manual) that shows how the instrument sends and responds to different MIDI messages. Unfortunately these charts are not easy to read. Software sometimes comes with an implementation chart, but not always. If you can't find information in the manual, you'll have to resort to trial-and-error to troubleshoot MIDI problems.
Notes, Pitch, and Velocity
The MIDI message you'll use most often are, naturally, notes. Note messages include three elements:
-
Note-on or note-off on a channel (116)
-
Note number (0127), which is often used by a MIDI receiver to determine what pitch to play
-
Velocity (1127), or how hard the note is hit. (For technical reasons, a note-on message with a velocity of 0 is interpreted as a note-off.)
The most common form of velocity is attack velocity , the velocity with which the note is hit, though some keyboards also send release velocity, indicating how quickly you let go of a note. Release velocity is not often used, since there's no such equivalent on an acoustic piano, but it can add expressivity. Keyboards whose sensors don't detect release velocity always send a release velocity value of 64.
Note-on and note-off
MIDI was developed for use with keyboards, so you'll have an easier time understanding it if you're a keyboardist, or can think like a keyboardist. When you play a keyboard, you press down on a key to make sound, and then release the key to end the sound. Accordingly, MIDI notes are divided into two events ( Figure 8.16 ):
-
Note-on: Starts a note (press a key, and the sound begins).
-
Note-off: Turns off a note (let go of the key, and the sound stops).
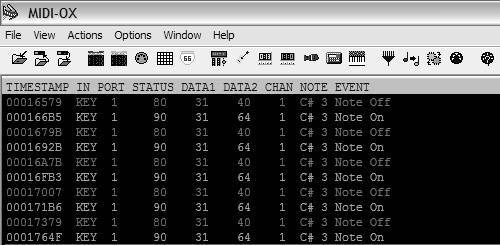
Figure 8.16. Two notes played on a keyboard produce four MIDI messages: each note has a note-on and note-off message (A), accompanied by a channel number (B), note number (C), and velocity (how hard the note was played) (D). (Shown in Subtlesoft MIDI Monitor)

A key is pressed, producing a note number and attack velocity value.
A key is released, producing a note number and a release velocity value.
| | Note-off versus a "zeroed" note-on: Sending a note-on with velocity 0 is equivalent to sending a note-off, so some devices use this message instead of a true note-off. Usually the distinction is invisible to the user . |
Both note-on and note-off are accompanied by a note number value (so the receiving MIDI device knows which note to play) and velocity amount (generated by a sensor that determines how hard you hit the key).
|
Duration and "stuck notes"
MIDI has no way to represent the duration of notes: an instrument simply begins making sound when it receives a note-on message and then ends the sound shortly after it receives a corresponding note-off. This may sound limiting, but it uses a lot less data. Imagine for a moment that you're a MIDI device. If you couldn't just say, "I've pressed G" and then, somewhat later, "I've let go of G" by using note-on and note-off messages, you'd have to say something like, "I've pressed G, and now I'm still pressing G, and now I'm really still pressing G, still pressing G . . ." and so on; you'd need a lot more than just two simple messages.
If an instrument fails to receive a note-off message, it will keep producing sound indefinitely (or until the sound naturally decays, or possibly until the instrument is shut off). This phenomenon is called a stuck note . There are a variety of reasons why a MIDI device might fail to send note-off. Playback of a MIDI sequence might be stopped after a note-on has been sent but before the corresponding note-off has been sent. Most sequencers handle this situation automatically. But if the sequencer rudely crashes between the note-on and the note-off, a receiving hardware synth will get a stuck note. Most MIDI hardware and software includes an "all notes off" or panic button so you can recover from stuck notes. The panic command turns off all notes on all devices on all channels.
The MIDI hold pedal (also called a sustain or damper pedal) can also be a source of stuck notes, if for some reason a synth has received a hold pedal on message but no hold pedal off message. This can happen, for instance, if the pedal is pressed as it is connected. Try toggling your hold pedal if notes are sticking .
Note number
MIDI defines 128 note numbers, from 0 to 127; note 60 defaults to Middle C on the keyboard. Note numbers are assigned to half-steps on the keyboard, so B is 59, C  is 61, D is 62, and so on, though your software will probably display notes using musical note names instead of numbers. (Middle C is often shown as C3. Octave numbering isnt standardized in MIDI, though, so some equipment refers to Middle C as C4 instead.)
| | Don't panic! Memorizing control change (CC) numbers isn't always necessary, but here's a really important one to have handy. To stop stuck notes, send a CC 123 (all notes off) or a CC 120 (all sound off, which also turns off the hold pedal). (See the section "Adding Expressivity.") |
Velocity
MIDI velocity data indicates how hard a key has been struck. A velocity-sensitive device senses the speed with which a key travels downward when you strike it and sends a number from 0127 as the attack velocity. (Some instruments also respond to the speed with which you release the notethe release velocity.)
The most obvious application of velocity is to make a sound louder when you hit a key harder. But since both the loudness and the timbre often change on real instruments as you strike them with more force, velocity may make other adjustments to the sound as well. A virtual piano plug-in, for instance, might provide samples of a real piano played at different dynamics, and trigger the appropriate recorded sample based on the incoming MIDI velocity for a more realistic sound. The nature and amount of velocity response is determined by the receiving instrument, not by the MIDI message itself.
Velocity does have one major limitation, and it comes back to the fact that MIDI models keyboard performance. On wind and string instruments, you can adjust the loudness of a note while playing it: a string player can adjust the pressure of the bow in the middle of a note, for instance. Not so on a piano: the dynamic level of the note is determined by the beginning of the note; the player can't affect the sound after that. Since MIDI note messages use only attack and release velocity, MIDI instruments tend to behave more like the piano. To add expressivity in the middle of the note, you'll need a separate message. (See "Adding Expressivity," p. 293.)
Hands-on: Try playing a keyboard
| |
We'll use SampleTank2 FREE with Ableton Live, both of which are included on the DVD, so we can set up a software instrument and try playing it. (You can use SampleTank Free with any host you have, not just Ableton Live; see the installation instructions on the DVD for details.) First, let's try setting up a keyboard and playing around a bit to see how MIDI works in practiceand to make sure we're getting sound.
-
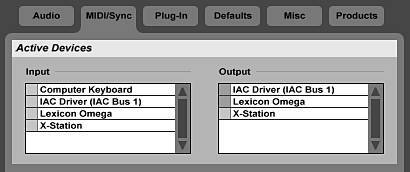
Verify your MIDI settings: To make sure you can receive and send MIDI in Live, check Preferences > MIDI/Sync > Active Devices. You'll see inputs and outputs listed by port; double-check that each input and output you want to use is lit green by clicking the square next to the port. (Notice that you won't see individual devices connected to those ports. So if you have a Kurzweil keyboard connected to the MIDI, which is connected to an M-Audio interface, you'll select the M-Audio interface to send MIDI to the keyboard, not the keyboard itself.) If you don't have a MIDI device available for input and you want to test your setup, select the Computer Keyboard item to use your QWERTY keyboard.
-
Add a MIDI instrument: MIDI instruments in Live work just like effects inserts : drag them from the Device Browser to a MIDI track to use them. (If you don't have a free MIDI track, create one by selecting Insert > Insert MIDI Track.) You can use one of the built-in instruments in the Live Device Browser, but here let's try SampleTank2 FREE: drag it to your MIDI track. Then enable input by arming session recording on that track: click the arm button (for MIDI, it looks like a 5-pin MIDI port). Try playing your MIDI input or computer keyboard. You should see the MIDI track meters move as you play, and a small indicator in the upper right corner of the screen (MIDI input indicator) should light up.

-
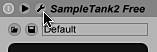
Edit SampleTank's settings: Even though you see the MIDI indicators light up, you won't hear any sound because you haven't yet loaded a program or patch. To see SampleTank's full interface, click the Edit Plug-in Panel button on the Device title bar. (It's the icon that looks like a wrench.)
-
Load a program: In SampleTank's Browser, you should see all the preloaded SampleTank2 Free patches included on the DVD. (If not, check the DVD installation instructions and troubleshooting advice.) Double-click the 73 EPiano for an electric piano sound reminiscent of a classic, early '70s Rhodes. The program is automatically loaded into the active part/channel (channel 1). For an acoustic piano, try double-clicking HQ Free Piano mk II.

|
Adding Expressivity
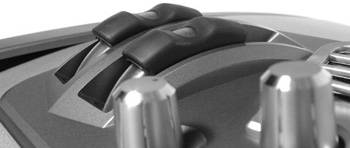
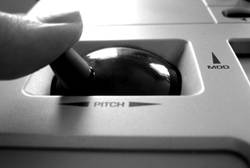
Specifying which note a synth or other electronic instrument should play (with MIDI note number) and how hard to play it (with MIDI velocity) are a start, but to make a MIDI instrument expressive, you'll want some additional control. MIDI provides other kinds of controls, some of which have fixed definitions and produce standard types of musical effects, whereas others can be assigned more flexibly. You can add these effects to your sequencing software by drawing them in with a pencil tool or other editing features, or by using physical hardware during performance. To use these controls as you play, you'll need both a hardware controller capable of sending the appropriate message and an instrument (hardware or software) capable of receiving the message and responding to it. For instance, to control vibrato, you might use an expression pedal attached to a keyboard in conjunction with a software plug-in in which vibrato amount is assigned to the expression pedal. Your MIDI setup for keyboard playing should ideally include at least a pitch wheel and modulation wheel ("mod wheel") at the left end of your MIDI keyboard, and a pedal or two plugged into jacks at the rear of the keyboard. (Non-keyboard MIDI instruments may send similar data using other physical controls.) Even with just these few controls you can make your performances more expressive ( Figure 8.17 ).
Figure 8.17. To start adding more expression to your performance than a keyboard alone can provide, explore the uses of the pitch wheel (which sends pitch-bend data) and "mod" wheel (control change 1, modulation), as shown here on the Alesis Fusion. (Photo courtesy Alesis, Inc.)
Although pitch-bend, control change, and aftertouch are often called "continuous controllers," there's really nothing continuous about the MIDI data. Your hardware will generate a series of discrete numbers quickly enough and close enough together that the result will sound continuous to your ear as the receiving instrument gradually changes the pitch or another attribute of the sound.
Pitch-bend
Pitch-bend data allows you to move the pitch of notes smoothly up or down while they're sounding. Pitch-bend is usually controlled by a pitch wheel or some type of stick controller. In the neutral, centered position of the wheel or stick, pitch is unchanged. As you push the wheel or stick (pitch wheels most often move toward and away from the player, whereas pitch sticks move left and right), the pitch changes gradually within a specified range (typically a couple of semitones). This effect is called "bending," by analogy with the way guitarists bend their strings to pull the pitch of the string upward.
| | Coarse versus fine: A coarse setting is a more significant change of value, whereas the fine setting is a more detailed fraction of the same value. For example, in monetary dollars and cents , the dollar would be the "coarse"amount and the cent would be the "fine" amount. In MIDI, coarse and fine refer to amounts of values like pitch-bend. |
Pitch-bend has a full data range of 016,383, not 0127 (see the sidebar "This One Goes to Eleven: Beyond 128"). Since this range offers more precision than is usually needed, however, some software simply refers to the 0127 "coarse" range for convenience.
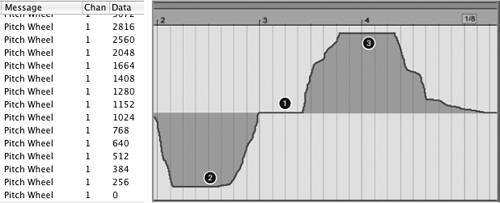
Some music software displays pitch-bend data using the values 0127, with a center value of 64, meaning "no change in pitch." More often you'll see it displayed from 63 to +64, with 0 as the center value. If your software displays the full data range (016,383), it will probably show a full downward bend as 8191 and a full upward bend as 8192, again with 0 as the center value ( Figure 8.18 ).
Figure 8.18. Pitch-bend data is a specialized MIDI message. As you turn the wheel, you generate a series of MIDI values like the data shown on the left. With the wheel centered, the pitch is unchanged (1). Turning the wheel all the way down (2) bends the pitch downward, and turning it up (3) bends the pitch upward.
Aftertouch
Some keyboards are capable of sensing how hard the player presses down on a key after it reaches the bottom of its travel. This pressure during the middle of a note is called aftertouch (other terms that mean the same thing are key pressure and channel pressure ). On a keyboard, you generate aftertouch data by pushing down on the note after you've played it. Aftertouch is often used to add vibrato or open a synthesizer's filter for a brighter sound.
| | Which type of aftertouch? Affects individual notes: Polyphonic aftertouch (also known as key pressure or polyphonic key pressure) Affects a whole channel: Channel aftertouch (also known as channel pressure or "mono" aftertouch/pressure) |
There are two types of aftertouch: channel pressure and polyphonic pressure. When a keyboard is equipped to sense and transmit channel pressure, there is only one sensor, which runs horizontally under the keys from one end of the keyboard to the other. When a keyboard is equipped to sense and transmit poly pressure, each key has its own pressure sensor, and transmits pressure data in a format that also includes key number as part of the MIDI message. Poly pressure sensors are more expensive to build, so poly pressure is not found on nearly as many keyboards. To find out whether your software or hardware instrument will respond to poly pressure (or for that matter to channel pressure), you'll have to consult the manual.
With polyphonic aftertouch, you can press down harder with one finger while holding a chord to add vibrato to that one note.
Control change messages
MIDI provides additional controls via control change (CC) data. Control change messages are numbered (you guessed it) from 0127. Some of the controller numbers are assigned to particular tasks. A piano-style hold pedal, for instance, always transmits CC 64, whereas a modulation wheel usually transmits CC 1. CC 7 is used for master volume. Other CC numbers are left open in the MIDI spec; some MIDI devices ignore them, while others use them for different purposes ( Table 8.1 ).
Table 8.1. Important MIDI CC Messages
| Name | Control Change (CC) # | Function |
|---|---|---|
| Modulation | 1 | Commonly assigned to the keyboard's mod wheel, but the nature of the sound changes produced by the modulation is not defined. The mod wheel is often used to add vibrato, change the speed of a Leslie rotary speaker simulator in an organ sound, or add a phaser effect to an electric piano ( Figure 8.19 ). |
| Breath | 2 | Seldom used with actual breath controllers, which are not common; sometimes transmitted by a joystick or a third wheel in the left-hand controller section of a keyboard. As with modulation, the nature of the sound changes produced by breath controller data is left up to the designers of the synthesizer and its sound programs. |
| Volume | 7 | Controls the overall loudness of the musical part assigned to a channel. Unlike velocity, which controls one note at a time and can be mapped to different timbral qualities as well as note loudness, volume data controls the loudness of an entire channel all at onceit's essentially a volume knob for that instrument (in the case of a monotimbral instrument) or for a multitimbral part (in a multitimbral instrument). 0 is silent; 127 is the maximum. |
| Pan | 10 | Left/right pan for a channel. A CC 10 message with a value of 0 pans the sound hard left, 64 pans it to the center, and 127 pans it hard right. |
| Expression | 11 | Used for dynamic expression within a part by controlling a percentage of the volume setting. (In other words, setting volume with CC 7 is akin to moving a mixer fader, whereas expression data would be used for crescendos and decrescendos on a note or chord while it is being played.) |
| Hold pedal | 64 | Also known as the sustain or damper pedal, the hold pedal acts (more or less) the way it does on the piano: hold it down and notes continue to sound even after their keys are released. You'll find the other two piano pedals defined in MIDI, too: the sustenuto pedal is controller 66 and the soft pedal is controller 67. Not all instruments respond to 66 and 67, but most respond to 64. |
| | Control change or continuous controller? Control change or CC messages in general are sometimes called continuous controllers, but this is a misleading term for two reasons. First, MIDI works only in whole numbers. You can't send a CC message with a value of 5.5 or 19.327. As a result, the "continuous" range of the data is actually stepped. Second, the CC message group includes on/off switches as well. The term "control change" or simply "controller" is preferred. |
Since there are so many controllers available, you'll use some to add color to your musical performances, while others remain available for controlling other elements, like effects settings, synthesis parameters, mixer faders , or anything else you want to assign. With a hundred or more choices per device, you have a lot of flexibility.
Some controllers, like the hold pedal, act simply as on/off switches: Press the pedal and the CC 64 data value goes to 127; lift your foot and the CC 64 value drops back to 0. Other controllers are called continuous controllers because they can take advantage of the full range of values between 0 and 127. This is true of faders and knobs ( Figure 8.19 ).
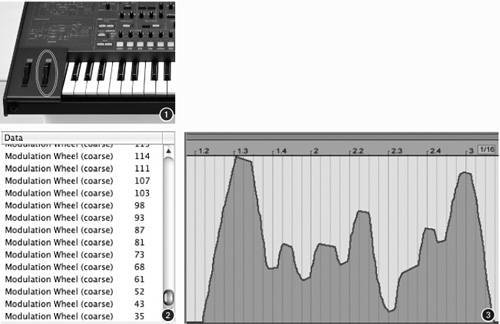
Figure 8.19. The modulation wheel is a typical controller, capable of generating a stream of control change messages. As you turn the mod wheel on a Korg MS2000 keyboard (1), you generate a series of numbers from 0 (down) to 127 (up) (2), which will appear in your sequencer as a modulation contour (3). The modulation data can be assigned to a synthesis parameter like vibrato amount. (Photo courtesy Korg USA)
|
| | For more information on the MIDI specification, see (among a number of sites): www.midi.org http://users.chariot.net.au/~gmarts/midi.htm www.borg.com/~jglatt/tutr/miditutr.htm |
A complete version of the MIDI 1.0 Specification is available for sale at www.midi.org.
Hands-on: Realistic-sounding reeds with mod, pitch-bend, and range
| |
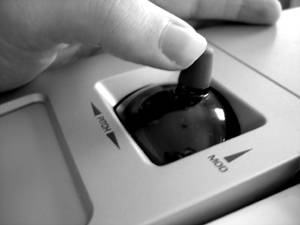
The keyboard instruments in the previous hands-on example ("Try playing a keyboard," p. 291) didn't allow you to use the modulation or pitch wheels, with good reason. When was the last time you heard a piano that could bend pitch? With an instrument like a saxophone , though, your playing will sound unrealistic if it lacks elements like vibrato and pitch-bend; it'll sound too much like it was played with a keyboard instead of the real instrument. (Photos are of the Novation X-Station, which, like many keyboards, combines pitch and mod on a single X/Y joystick. Although the physical hardware is different, the MIDI messages function exactly as on other instruments.)
To try adding some expressivity using MIDI controls, load the Alto Sax patch in SampleTank2 FREE. (Double-click Alto Sax in the Browser.)
-
Modulation: Play a sustained notesounds a little lifeless, right? Now, gradually add a little bit of vibrato by moving the modulation wheel on your controller keyboard. Real reed instruments vary the amount of vibrato over time, so use different amounts of modulation for a more authentically organic, expressive sound. You'll find vibrato sounds more musical if you add it to some notes and not others, or add vibrato just to the end of a note. For some inspiration, listen to your favorite sax recordings and also think about how singers use vibrato. (Many sax players claim their instrument is closest to a human voice.)
-
Pitch-bend: Sax players can easily perform short "scoops" up to a note or down from a note by relaxing their jaw as they play, a technique more common in jazz than in classical playing. To create a scoop up in MIDI, shift the pitch-bend wheel just below center (or to the left of center, depending on the orientation of your pitch-bend hardware), play a note, and then release the pitch wheel. Since it's spring-loaded, it will return to center pitch on its own. For a fast scoop, let go of the pitch wheel as you hit the note. With practice, and some attention paid to recordings by real sax players, you can make this sound realistic. Scoops down use the same technique in reverse: play a note at pitch, then scoop down at the end by moving the pitch wheel just before you release the note. (To make sure the release portion of the note doesn't scoop up again, hold the pitch wheel in place while the note decays to silence.)
-
Range: An essential way to make a virtual instrument sound realistic is to play it in the same range as the real instrument. The alto sax sounds most natural when played in the range from F below the treble clef to the F two octaves above (F2F4).

This general advice isn't just for replicating acoustic instruments. If you've created a synthetic instrument or analog sound, think about what makes it musical. In effect, you've invented a new instrument, so it'll sound more musical if it behaves as though it were a physical instrument.
Programs and Banks
When an instrument receives a program change message, it switches to a different sound program, choosing the program from among those stored in its internal memory. (Note that some very good software synthesizers, such as those in Propellerhead Reason, don't respond to program change messages.) Like everything else in MIDI, program change messages are assigned a number between 0 and 127. Program changes can be transmitted directly from the front panel of most keyboards, which is useful in live performance. They can also be stored in a sequencer track to ensure that the instrument being played by that track makes the correct sound each time the sequence is played. Program changes are often inserted at the beginning of every MIDI track in a song for precisely this reason.
Program change messages are just numbers, however, with no particular meaning. Program 12 in one synth might be a flute sound, whereas program 12 in another synth might be a distorted electric guitar. As a result, if you create a track in a MIDI sequencer and add a program change to the track, you're likely to run into problems if you should later decide to send that track to a different MIDI instrument for playback. More than likely, the sound of the new instrument will be incorrect.
The General MIDI (GM) format, found on many hardware synths and a handful of specialized software synths, is a way of dealing with this problem. If an instrument has the GM logo on its panel (or can be switched to a GM mode), then the result of sending it a program change message with a given value becomes predictable. Program 7, for instance, will always be a harpsichord, and program 36 will always be a fretless bass. Although this is genuinely useful, General MIDI is designed more for consumer music applications such as playing prerecorded arrangements of popular tunes on a home keyboard than for serious musicians . With the explosion in the variety of software and hardware available and a wide variety of instrument libraries, you'll find most instruments use their own patch numbering scheme.
Sound programs are organized into banks, so that instruments can include more than 128 sounds and so that patches can be organized into useful categories. (You might find an instrument bank and a percussion bank, for instance.)
To change programs, you'll use the program change message and select a patch (program) number from 0 to 127. At the time when MIDI was first developed (the early 1980s), nobody imagined that synthesizers would ever have enough memory to store hundreds of sound programs or that musicians would have a need for so many programs. So the number of possible program change messages is limited. To switch from one bank of sounds to another, the bank select message must be used. Bank select was grafted onto (or spliced into) the control change message area. A CC 0 message gives the coarse (MSB) value for the bank, and a CC 32 message provides the fine (LSB) value. Thus, up to 16,384 banks of 128 sounds each can be chosen via MIDI, which ought to be enough to make anybody happy. Unfortunately, various instruments respond to CC 0 and CC 32 messages in different ways. You may need to experiment and read the synth's manual in order to select the desired program. To get to, let's say, sound bank H, one synth might use a CC 0 value of 7, while another uses a CC 0 value of 0 followed by a CC 32 of 7.
To change from a patch in the current bank to a patch in another bank, you'll need to send two messages: first send a bank select message, then send a program change. (You have to send the messages in that order, because an instrument waits to change to the new bank until it receives the next program change number. So even if you're changing from bank 1, patch 1 to bank 2, patch 1, on most instruments you'll need to send a bank select followed by a program change.)
| | Program numbers: 127 or 128? Confusingly, some manufacturers number MIDI messages 1128 instead of 0127. |
System Messages
MIDI also uses system messages. These messages apply to the entire music system that's interconnected using MIDI, not just to individual instruments. The three types of system messages are system-realtime, system-common, and system-exclusive.
The most important system-realtime messages are used for synchronization among devices (sequencers, for example) that engage in real-time recording or playback. In this category are clock messages (sent 24 times for each quarter-note), start, stop, and continue. You can even use MIDI sync data to synchronize sequencers running on two or more computers by connecting them with MIDI cables. (See Chapter 12 for details.)
System-common messages include song select and song position pointer (again, for use with sequencers) and a few other kinds of messages. But the best known and yet most mysterious of MIDI's system messages is system-exclusive, also known as sys-ex or SysEx.
SysEx
System-exclusive messages are designed to address specific hardware devices. These messages are a "back door" through which each manufacturer can create whatever MIDI features a particular instrument may need. The beginning of a SysEx message specifies that the data is intended for a specific model built by a specific manufacturer. All of the other MIDI gear in the system should ignore a SysEx message that's not addressed to them. What SysEx is used for is entirely dependent on the equipment's manufacturer.
One advantage of SysEx messages is that they aren't limited to a specific length, because they simply use a "stop" (also called EOX, or "end-of-exclusive") message to indicate that the message has concluded. Since SysEx can involve a lot of data, it's usually used for initializing a device, downloading an updated operating system from the computer to a piece of hardware, or sending other large chunks of information. Data is "dumped" to a device via a SysEx in a single large chunk, rather than by sending values for individual parameters during a performance as with MIDI data messages like notes and controllers. That said, some manufacturers use SysEx messages instead of data messages for real-time controls, and specialized SysEx data called MIDI Machine Control and Show Control (see sidebar) allow for real-time commands not possible in the channel message area of MIDI.
MIDI Time Code and MIDI clock
Timing information is essential to synchronizing playback systems such as sequencers when they're running on different computers or hardware instruments. When synchronization is used, one device or piece of software is designated the master clock source ( Figure 8.20 ), and any other hardware or software should follow the clock signals coming from the master. (In common parlance, the other devices are called slaves.) MIDI provides two methods of synchronization: MIDI clock and MIDI Time Code (MTC).
Figure 8.20. MIDI sync settings in Ableton Live let you synchronize the tempo and start/stop times of multiple devices.

|
MIDI clock is the simpler of the two types. It's sent as a regular, repeating message, 24 times for each quarter-note of the master clock source; thus, it acts like a virtual metronome. Receiving devices count the clock messages being received. After 24 clocks, they should reach the next beat. If the tempo of the master slows down or speeds up, any slaves that are synced using MIDI clock should also slow down or speed up at the same rate. MIDI clock provides tempo-dependent synchronization.
When playback starts not at the beginning of the song but somewhere in the middle, the master should also send out a message called song position pointer (SPP), which tells the slave devices where to start playback. The slave will advance its transport to the point indicated by the song position pointer and then wait for a start message to begin playback.
You can use MIDI clock to synchronize applications running on multiple computers. Since sequencers are capable of syncing tempo and song position via MIDI clock, all you have to do is connect the computers via MIDI, choose one program as the master clock source, make sure it's sending sync information to the correct MIDI output, switch the other program into external clock mode, and make sure it's receiving its sync signal from the appropriate MIDI input. You don't have to be using MIDI in any other way for this technique to be useful: tempo-synced audio effects, for example, will automatically synchronize, making this solution perfect for collaboration or performance. (See Chapter 13 for more on real-time performance.)
For clock synchronization that is not tempo-dependent but is based on actual minutes, seconds, and film/video frames, you'll use the MTC. MTC uses standard SMPTE (Society of Motion Picture and Television Engineers) time references, in hours, minutes, seconds, and frames , and it's configurable to different frame rates for different media (film, video, etc.) (See Chapter 12 for more information on working with film and video.) Even if you're not using film or video, MTC can be useful for handling time in nonmusical increments .