| Mail preferences determine how your mail workswho can read your mail, whether mail should be encrypted automatically, whether all your outgoing mail is signed by you, and so on. Complete the following steps to set your mail preferences: 1. | Open your mail database.
| 2. | Click the Tools button on the Action bar and choose Preferences. The Preferences dialog box appears (see Figure 8.1). When the Mail tab is selected, the following five subtabs appear: Basics, Letterhead, Signature, Follow Up, and Message Marking.
Figure 8.1. The Preferences dialog box is divided into three sectionsMail, Calendar & To Do, and Access & Delegationwhich display as tabs on the first row of the Preferences box. 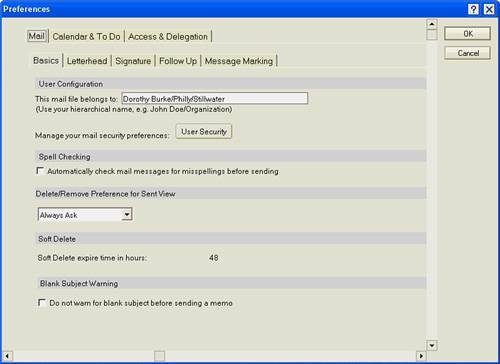
| 3. | Click the Basics tab. The This Mail File Belongs To field automatically displays your full Notes name. (If it displays a name other than yours, tell your Notes administrator or help desk immediately.) Other options on this tab include:
To have Notes automatically check the spelling of your mail messages, enable Automatically Check Mail Messages for Misspellings Before Sending. When you try to delete a message from the Sent view in your mail, you need to set one of the options under Delete/Remove Preference for Sent View: Always Delete removes the mail from the mail database (all views), Always Remove removes the mail from the Sent view but leaves it in the All Documents view, and Always Ask prompts you to make a choice each time you delete mail from the Sent view. Soft Delete Expire Time in Hours displays the number of hours a deleted message will remain in your Trash view until it is automatically deleted from your mail. Depending on your level of access to your mail database, this may be a read-only field. Enable Do Not Warn for Blank Subject Before Sending a Memo if you want to turn off the automatic alert that occurs when you attempt to send mail without adding a subject.
| 4. | Click the Letterhead tab. Select the default letterhead of your choice. A preview is provided at the bottom of the screen. When you change letterhead, memos created with your previous choice of letterhead do not change. New memos you create after selecting a letterhead here use the new letterhead. You can change letterhead as often as you like.
| 5. | Click the Signature tab. Select Automatically Append a Signature to the Bottom of My Outgoing Mail Messages if you want your signature added to all your mail memos. A signature can be a piece of text or an HTML file. Don't confuse this signature with electronic signatures, which are a security feature as described in Appendix A, "Understanding Security and Access Rights." To create a text signature, choose Text and enter the signature text in the Signature box. To use an existing file as your signature, select File and enter the name of the file (or click Browse and select the file).
 | Signatures that you create as text cannot be formatted, because the Signature feature of Notes does not allow that. However, if you attach an HTML file, formatting is preserved. If you want a scripted signature, create a signature in your word processing program and format it to your liking. Save it as an HTML file and attach it in the Signature file box. |
 | Hypertext Markup Language (HTML) is the coding used to format documents used on the Web. |
| 6. | Click the Follow Up tab. The options on this tab set the defaults for the Flag for Follow Up dialog box. You can set the default for flag priority, follow up date, follow up time, and alarms (see Chapter 4, "Managing Mail," for more information on flagging messages for follow up).
| 7. | Click the Message Marking tab. You use message marking to help identify mail that is important to you. There are two tabsSenders and Recipients.
On the Senders tab you can set up to three color combinations to identify mail from specific senders. Enter or select the name(s) whose mail you want to color code in one of the Sender names' boxes. Then select a background and/or text color. Mail from these senders will appear in your mail views with the designated coloring. On the Recipients tab, you specify what icons you want to see next to your incoming mail in mail views. Enable any or all of the options: Display a Solid Circle When I Am the Only Recipient in the To Field, Display a Half-circle When My Name Is One of UP TO This Many Names in the To Field (and specify the number), or Display an Empty Circle When My Name Is in the cc Field. If you receive mail under any other name (such as an Internet name), enter that name in the box at the bottom of the screen. When you belong to a group and mail is addressed to that group, the icons will not display for that email.
| 8. | Click OK.
|
|