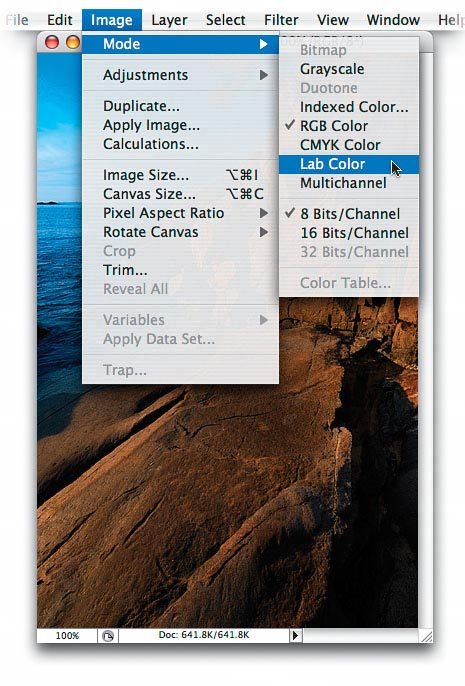
| HERE'S ONE OF THE MOST POPULAR METHODS FOR CREATING GREAT BLACK & WHITE CONVERSIONS This remains one of the most popular methods for consistently creating a black-and-white image from your color original. The basis of the effect is that you convert to Lab Color mode, which separates the detail in the image (the Lightness channel) from the color in the image (where most of the noise lives), and once the detail in the image is separated from the color, you use that channel as the basis to build your black-and-white conversion. Step 1. | CONVERT THE IMAGE TO LAB COLOR MODE
Start by opening the image you want to convert to black and white, then go under the Image menu, under Mode, and choose Lab Color (as shown here).
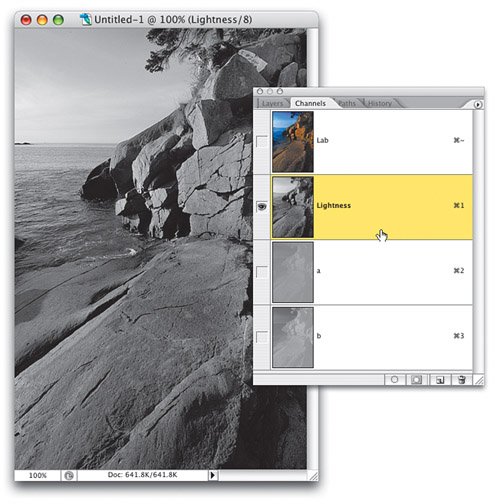
 ©SCOTT KELBY | | | Step 2. | GO TO THE CHANNELS PALETTE AND CLICK ON THE LIGHTNESS CHANNEL
If you take a look in the Channels palette, you'll see that the image is made up of a Lightness channel (where all the detail is), and "a" and "b" channels (where all the color is). You're going to use the Lightness channel as the basis for your black-and-white conversion, so click on the Lightness channel.
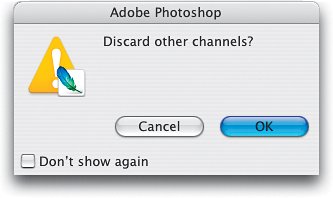
 | Step 3. | GO UNDER THE IMAGE MENU, UNDER MODE, AND CHOOSE GRAYSCALE. CLICK OK TO DISCARD CHANNELS
Now go under the Image menu, under Mode, and choose Grayscale. This brings up a warning dialog, which asks if you want to discard the other channels (meaning the "a" and "b" channels), and you do, so click OK. You'll notice that as you change from Lab Color to Grayscale, the image doesn't change onscreen, and that's a good thingyou want the Lightness channel you chose earlier to remain intact, and that's exactly what happens when you make your grayscale conversion using this method.
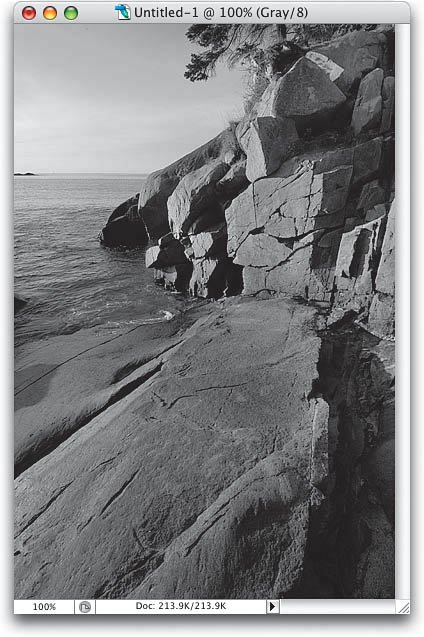
 | | | Step 4. | THE LIGHTNESS CHANNEL ALONE MAY GIVE YOU A GREAT-LOOKING CONVERSION
The Lightness channel, all by itself, often looks significantly better than a standard grayscale conversion, so you may want to just save the file at this point and be done with it. However, it's possible that the Lightness channel looks either too light or too dark to you (if it's one or the other, it's generally too light). If that's the case, there's usually a pretty easy fix (as you'll see in the next step).
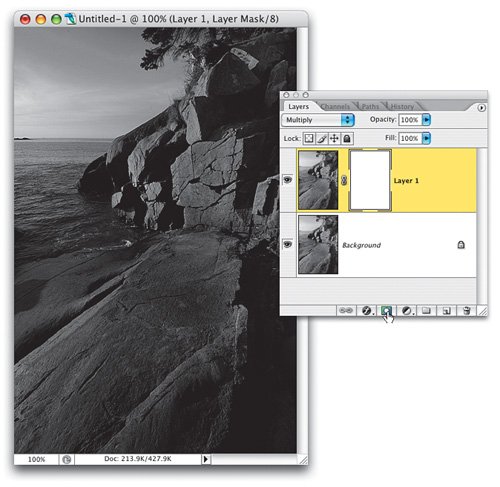
 | Step 5. | IF THE LIGHTNESS CHANNEL IS TOO LIGHT, DUPLICATE THE LAYER THEN CHOOSE MULTIPLY MODE
Go to the Layers palette and press Command-J (PC: Control-J) to duplicate the Background layer. If the image is too light, simply change the layer blend mode to Multiply, which makes the image quite a bit darker. Often, this will do the trick, but if it's too dark, all you have to do is lower the opacity for this Multiply layer until the image looks good to you. You're basically "dialing in" your ideal black-and-white image. Although this works a surprising amount of the time, there are also times where adding the Multiply layer makes parts of the image look great, while making other parts of the image look too dark. If that's the case with your image, go on to the next step.
 | | | Step 6. | CLICK THE ADD LAYER MASK ICON
Click on the Add Layer Mask icon at the bottom of the Layers palette to add a layer mask. Now, since the mask you just added is white (it's white by default), your image doesn't changeit looks exactly the same. However, you need to hide those areas that are too dark, and keep the darker areas that look good (in other words, you need the best of all the layers).
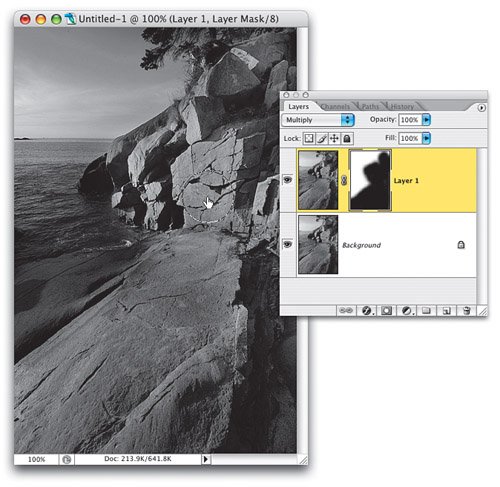
 | Step 7. | HIDE AREAS THAT MULTIPLY CAUSED TO BE TOO DARK BY PAINTING OVER THEM WITH BLACK
Start by pressing X until your Foreground color is black. Then grab the Brush tool (B), choose a medium-sized, soft-edged brush from the Brush Picker, and paint over the areas of the photo that are too dark (as shown here, where we're painting over the rocks, because they look too dark). As you paint, those darker areas are hidden, and now those areas appear just like they did before you added the Multiply layer. That's ityou've got one image that combines the best of the Lightness channel, and the best of the Multiply layer. Now you can flatten the image by choosing Flatten Image from the Layers palette's flyout menu to complete your black-and-white conversion.
 |
|