Color Correcting Digital Camera Images
|
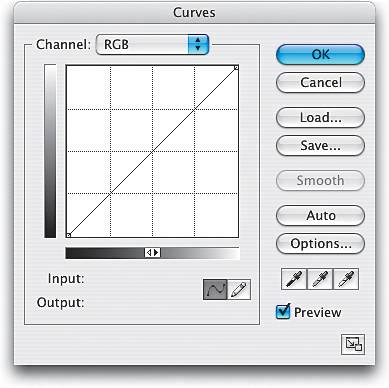
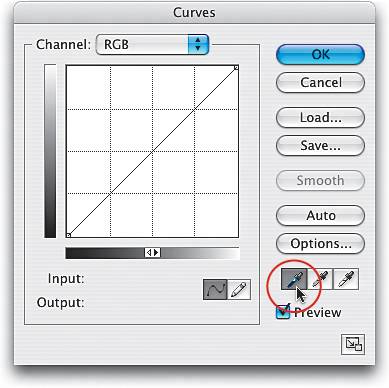
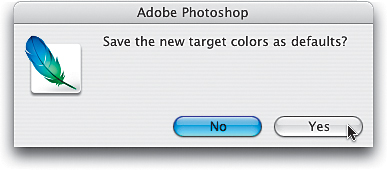
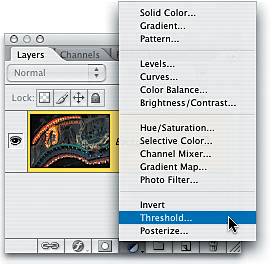
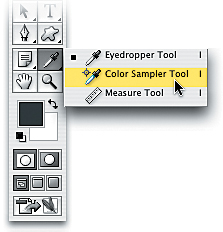
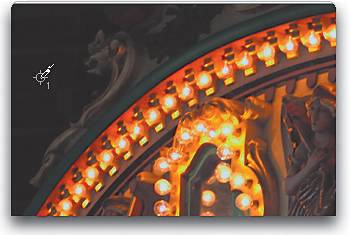
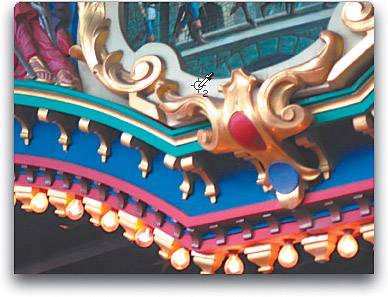
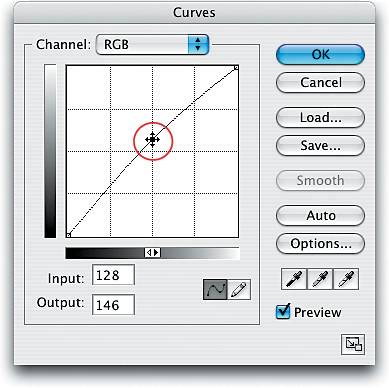
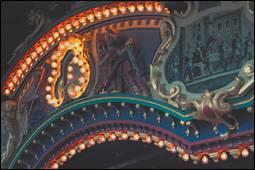
| As far as digital technology has come, there's still one thing that digital cameras won't do: give you perfect color every time. In fact, if they gave us perfect color 50% of the time, that would be incredible; but unfortunately, every digital camera (and every scanner) sneaks in some kind of color cast in your image. Generally, it's a red cast, but depending on the camera, it could be blue. Either way, you can be pretty surethere's a cast. (Think of it this way: If there weren't, the term "color correction" wouldn't be used.) Here's how to get your color in line: Step OneOpen the RGB photo you want to color correct. (The photo shown here doesn't look too bad, but as we go through the correction process, you'll see that, like most photos, it really needed a correction.) 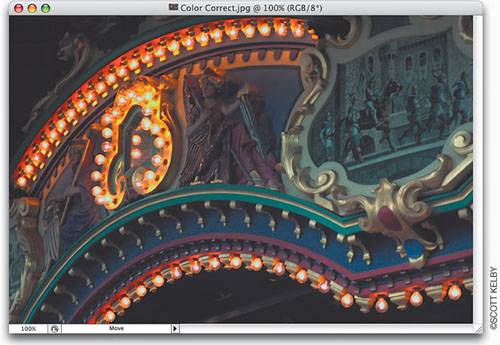 Step TwoGo under the Image menu, under Adjustments, and choose Curves. Curves is the hands-down choice of professionals for correcting color because it gives you a greater level of control than other tools, such as Levels (which we use for correcting black-and-white photos). The dialog may look intimidating at first, but the technique you're going to learn here requires no previous knowledge of Curves, and it's so easy, you'll be correcting photos using Curves immediately. Step ThreeFirst, we need to set some preferences in the Curves dialog so we'll get the results we want when color correcting. We'll start by setting a target color for our shadow areas. To set this preference, in the Curves dialog, double-click on the black Eyedropper tool (it's on the lower right-hand side of the dialog, the first Eyedropper from the left). A Color Picker will appear asking you to Select Target Shadow Color. This is where we'll enter values that, when applied, will help remove any color casts your camera introduced in the shadow areas of your photo. Step FourWe're going to enter values in the R, G, and B (Red, Green, and Blue) fields of this dialog (the Red field is highlighted here): 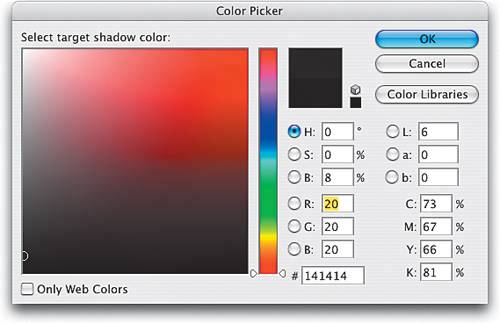 For R, enter 20 For G, enter 20 For B, enter 20 Click OK. Because these figures are evenly balanced (neutral), they help ensure that your shadow area won't have too much of one color (which is exactly what causes a color casttoo much of one color). Additionally, using the numbers I'm giving you in this chapter will help your photos maintain enough shadow and highlight detail in case you decide to output them to a printing press (for a brochure, magazine cover, print ad, etc.). Step FiveNow we'll set a preference to make our highlight areas neutral. Double-click on the white Eyedropper (the third of the three Eyedroppers in the Curves dialog). The Color Picker will appear asking you to Select Target Highlight Color. Click in the R field, and then enter these values (note: To move from field to field, just press the Tab key): 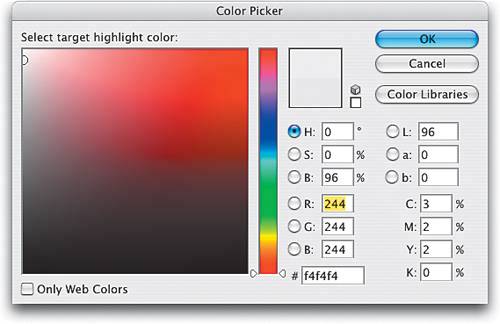 For R, enter 244 For G, enter 244 For B, enter 244 Click OK to set those values as your highlight target. Step SixNow, set your midtone preference. You know the drill: Double-click on the midtone Eyedropper (the middle of the three Eyedroppers) so you can Select Target Midtone Color. Enter these values in the RGB fields: 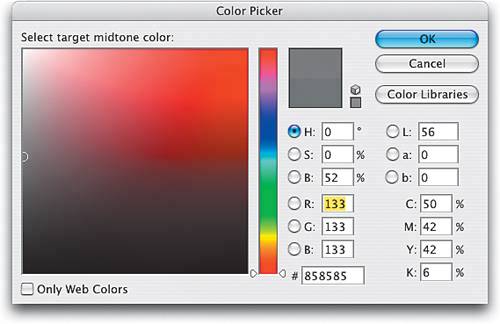 For R, enter 133 For G, enter 133 For B, enter 133 Then click OK to set those values as your midtone target. Step SevenOkay, now that you've entered your preferences (target colors) in the Curves dialog, you're going to use these Eyedropper tools that reside in the Curves dialog to do most of your correction work. Your job is to determine where the shadow, midtone, and highlight areas are, and then click the correct Eyedropper in the right place (you'll learn how to do that in just a moment). So remember your job: Find the shadow, midtone, and highlight areas, and click the correct Eyedropper in the right spot. Sounds easy, right? It is. You start by setting the shadows first, so you'll need to find an area in your photo that's supposed to be black. If you can't find something that's supposed to be the color black, then it gets a bit trickierin the absence of something black, you have to determine which area in the image is the darkest. If you're not sure where the darkest part of the photo is, you can use a trick to have Photoshop tell you exactly where it is. Step EightIf you still have the Curves dialog open, click OK to exit it for now. You'll get a warning dialog asking you if you want to "Save the new target colors as defaults." Click Yes, and from that point on, you won't have to enter these values each time you correct a photo, because they'll already be entered for youthey're now the default settings. Step NineGo to the Layers palette and click on the half-white/half-black circle icon to bring up the Create New Adjustment Layer pop-up menu (it's the fourth icon from the left at the bottom of the palette). Choose Threshold from this pop-up menu. Step TenWhen the Threshold dialog appears, drag the Threshold Level slider under the histogram all the way to the left. Your photo will turn completely white. Slowly drag the Threshold slider back to the right, and as you do, you'll start to see some of your photo reappear. The first area that appears is the darkest part of your image. That's itthat's Photoshop telling you exactly where the darkest part of the image is. Click OK to close the Threshold dialog. This adds an adjustment layer in your Layers palette. 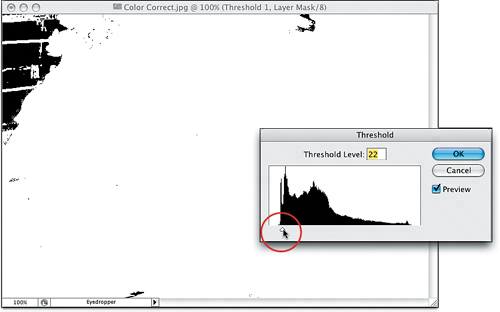 Step ElevenNow that you know where your shadow area is, you can mark it. Click-and-hold on the Eyedropper tool in the Toolbox, and from the flyout menu that appears, choose the Color Sampler tool. Click this Color Sampler once on the area that is darkest and a target cursor will appear, marking that spot. When you do this, the Info palette automatically appears onscreen. You don't need this palette right now, so you can close it. Now to find a white area in your image.... Step TwelveYou can use the same Threshold technique to find the highlight areas. Go to the Layers palette and double-click on the adjustment layer thumbnail to bring up the Threshold dialog again, but this time drag the slider all the way to the right. Slowly drag the Threshold slider back toward the left, and as you do, the first area that appears in white is the lightest part of your image. Click OK, and then click the Color Sampler tool once on the brightest area to mark it as your highlight point. 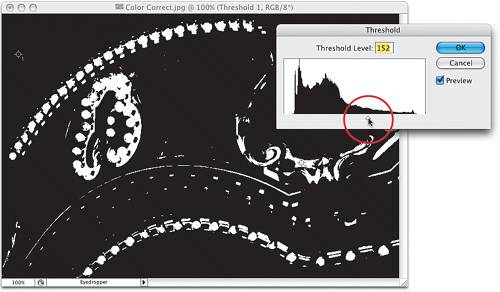 Step ThirteenYou're now done with your Threshold adjustment layer, so in the Layers palette, click-and-drag the adjustment layer onto the Trash icon to delete it. Click Yes in the warning dialog asking if you're sure you want to delete the layer. Your photo will look normal again, but now there are two target markers visible on your photo. Next, press Command-M (PC: Control-M) to bring up the Curves dialog. 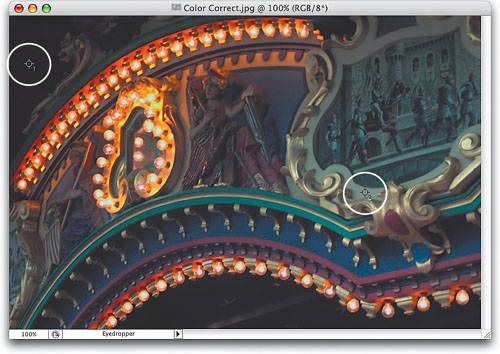 Step FourteenFirst, select the shadow Eyedropper (the one half filled with black) from the bottom right of the Curves dialog. Move your cursor outside the Curves dialog into your photo and click once directly on the center of the No. 1 target. When you click on the No. 1 target, the shadow areas will be corrected. (Basically, you just reassigned the shadow areas to your new neutral shadow color.) Tip If you click on the No. 1 target and your photo looks horrible, you either clicked in the wrong spot or what you thought was the shadow point actually wasn't. Undo the shadow setting by pressing Command-Z (PC: Control-Z) and try again. If that doesn't work, don't sweat it; just keep clicking in areas that look like the darkest part of your photo until it looks right. You can do this with the highlights and midtones, too. Step FifteenWhile still in the Curves dialog, switch to the highlight Eyedropper (the one filled with white). Move your cursor over your photo and click once directly on the center of the No. 2 target to assign that as your highlight. This will correct the highlight colors. Step SixteenNow that the shadows and highlights are set, you'll need to correct the mid-tones in the photo. Click the midtone Eyedropper (the middle of the three, half filled with gray) in an area within the photo that looks medium gray (in the photo shown here, you'll click the midtone Eyedropper in the gray moulding above the gold trim). Doing this corrects the midtones, and depending on the photo, this can either be a subtle or dramatic difference, but you'll never know until you try. Unfortunately, not every image contains an area that is gray, so you won't always be able to correct the midtones. Step SeventeenThere's one more important adjustment to make before you click OK in the Curves dialog to apply your correction. In the Curves grid, click on the center of the curve and drag it upward a bit to brighten the midtones of the image. This is a visual adjustment, so it's up to you to determine how much to adjust, but it should be subtlejust enough to brighten and bring out the midtone detail. When it looks right to you, click OK to apply your correction to the highlights, midtones, and shadows, removing any color casts and brightening the overall contrast. Step EighteenYou can now remove the two Color Sampler targets on your photo by going up to the Options Bar and clicking on the Clear button to complete your RGB color correction. If you want to try this on a CMYK image, read on for more details. Before After CMYK Correction SettingsThe values I gave you at the beginning of this correction technique were for photos that would be reproduced in RGB mode (i.e., your final output would be to a photo-quality color inkjet printer, a color laser printer, a dye-sub printer, etc.). However, if you're color correcting your photos for final output to a printing press (for a brochure, catalog, print ad, magazine, etc.), you need to use an entirely different set of values for your highlights, midtones, and shadows. Therefore, these numbers are entered into the CMYK fields, rather than the RGB fields. I've provided a set of values that are very common for prepress correction, because they enable significant details to be reproduced on press. 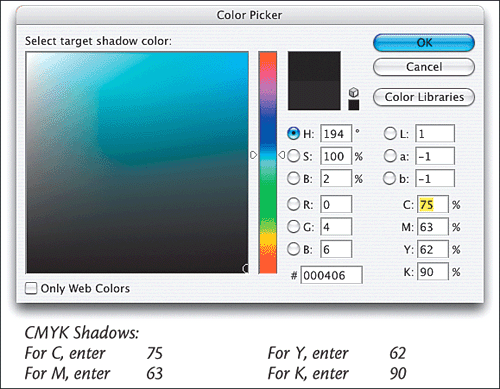 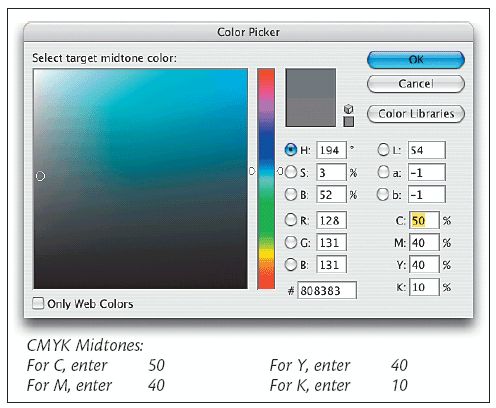 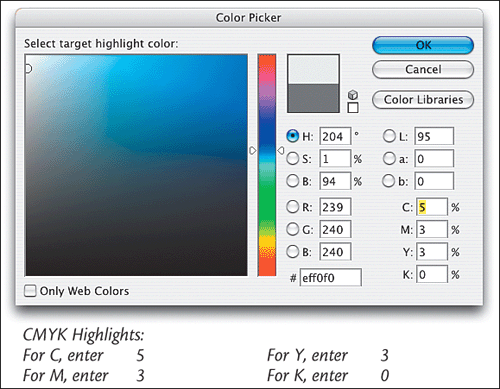 |


|
EAN: N/A
Pages: 187