Before You Color Correct Anything, Do This First
|
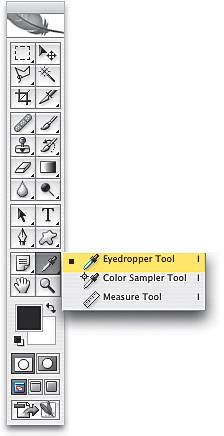
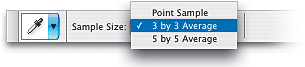
Before You Color Correct Anything, Do This First!Before we correct even a single photo, there are two quick little changes we need to make in Photoshop to get better, more accurate corrections. Although it's just two simple changes, don't underestimate their impactthis is critically important stuff. Step OneGo to the Toolbox and click on the Eyedropper tool (or just press the letter I). The default Sample Size setting for this tool (Point Sample) is fine for using the Eyedropper to steal a color from within a photo to make it your Foreground color. However, Point Sample doesn't work well when you're using it to read values in a particular area (like flesh tones) for color correction, because it gives you the reading from only one individual pixel, rather than a reading of the entire area under your cursor. Step TwoFor example, flesh tone is actually composed of dozens of different-colored pixels (just open an image of a person, zoom way in using the Zoom tool [Z], and you'll see what I mean). If you're color correcting, you want a reading that is representative of the area under your Eyedropper, not just one of the pixels within that area, which could hurt your correction decision-making. That's why you need to go to the Options Bar, under the Sample Size pop-up menu, and choose 3 by 3 Average. This changes the Eyedropper to give you a 3-by-3-pixel average (so it's sampling more pixels) of the area you're reading. Step ThreeThe second part is setting up Photoshop visually for color correction. Although having a colorful desktop background is fine when we're doing just about anything else in Photoshop, you'll rarely find a professional doing color correction with a colorful desktop background. Why? Because that colorful background, which appears behind the image you're working on, changes how you perceive color. So much so, that it will influence how you color correct the photo. That's why the first thing pro photographers do when they're about to color correct an image is change their desktop background to a neutral gray.  Step FourTo get the neutral gray correction background, click on the center button (the group of three buttons) at the bottom of the Toolbox, but honestly it's faster to press the letter F once on your keyboard. This immediately centers your photo onscreen and puts that neutral gray background around your photo. This view mode is technically called Full Screen Mode with Menu Bar, but unless you work at Adobe, you'll probably just call it "correction mode." To return to regular mode, just press the F key twice. (Note: If you're using a PC, you can also enlarge the Photoshop interface, which uses a gray background by default. Just click on the Maximize button in the top-right corner of the Photoshop window.) Now compare the captures on this page and ask yourself, "Which view would give me a better chance of a proper color correction?" I thought you'd ask that.  |
|
EAN: N/A
Pages: 187