Bracketing with Camera Raw
|
If you forgot to bracket in the camera itself, you can use Camera Raw to create multiple exposures, and then open those images in Photoshop, where you can composite them together to create an image that one exposure alone couldn't capture. Here's how it's done: Step OneOpen the RAW image you want to apply a bracketing technique to. In this example, the kettle is too dark, but the background the kettle was shot on looks fairly good, so we're going to expose this first image for the highlights. Start by increasing the Exposure and Brightness settings by dragging the sliders to the right, and then lower the Shadows by dragging its slider to the left (the Auto checkboxes will be deselected automatically). Now the kettle, which was quite dark in the original RAW file, is fairly well exposed, so it's time to click on the Open button at the bottom of the Camera Raw dialog to open this version in Photoshop. 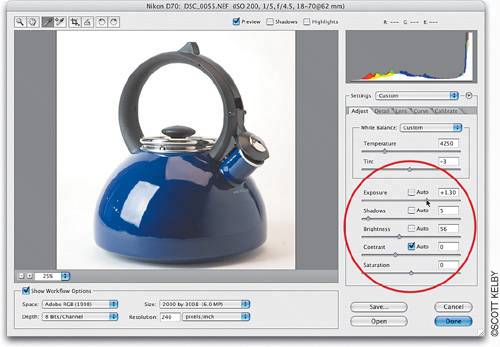 Step TwoNow go back to the Adobe Bridge (or wherever the original image is), and reopen the same RAW file in Camera Raw. This time, we're going to expose it for the shadows, so reduce the Exposure setting, increase the Shadows, decrease the Brightness, and decrease the Contrast to create an image with deep, rich shadow areas that still have some detail and the nice gray background. Once it looks good in the preview, click on the Open button to open this shadow-heavy version in Photoshop. 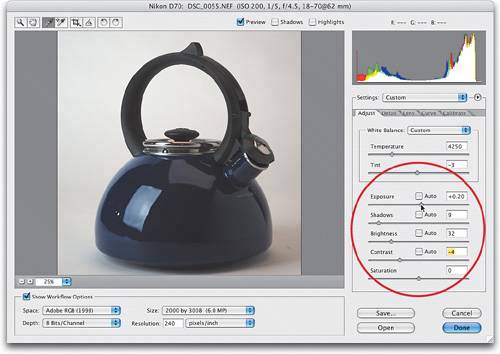 Step ThreeNow you should have both versions open in Photoshop: the brighter one exposed for the highlights (to bring out the kettle) and the darker one exposed for the shadows (to bring out the gray background and the shadows below the kettle). Arrange the windows so you can see both onscreen at the same time. 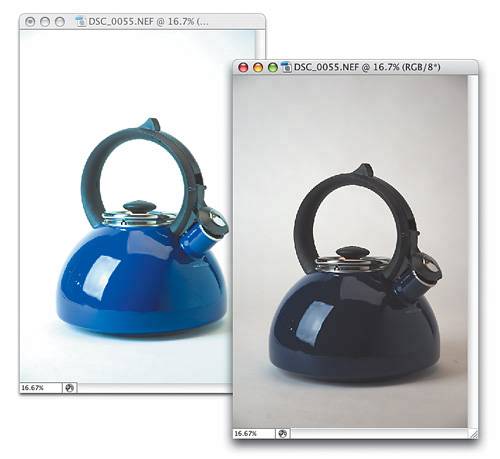 Step FourPress V to get the Move tool, press-and-hold the Shift key, and drag-and-drop the darker version on top of the lighter version. The key to this part is holding down the Shift key while you drag, which perfectly aligns the dark copy (that now appears on its own layer in the Layers palette) with the lighter version on the Background layer. (This exact alignment of one identical photo over another is referred to as being "pin registered.") You can now close the shadow document without saving, as both versions of the image are contained within the lighter version. 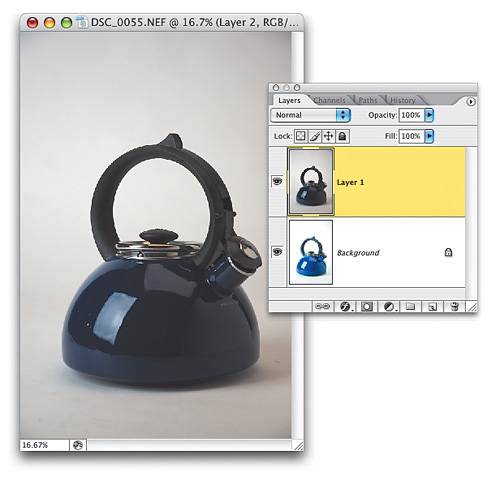 Step FiveGo to the Layers palette, hold down the Option (PC: Alt) key, and click on the Add Layer Mask icon at the bottom of the Layers palette. This puts a black mask over your darker image, covering it so you only see the lighter image on the Background layer. 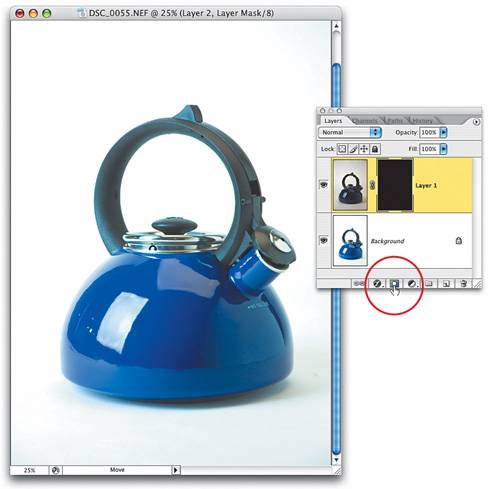 Step SixNow you get to "reveal" the darker parts, but only where you want them. Here's how: Press the letter B to get the Brush tool, and then click on the down-facing arrow next to the word "Brush" in the Options Bar and choose a medium-size, soft-edged brush from the Brush Picker. Now, press the letter D to set your Foreground color to white, and start painting over the areas of the photo that you want to be darker (in this case, the base of the kettle). As you paint with white directly on that black mask, the white reveals the dark version beneath the mask. 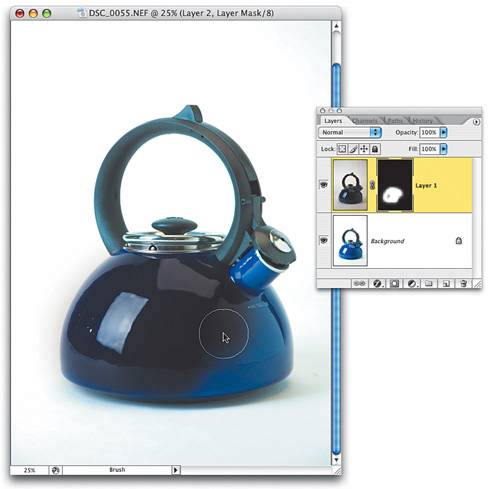 Step SevenKeep going until you've painted the dark areas that you want back in (in this case, you get a composite where the kettle is from the darker bracketed version, while the background and shadows beneath the kettle are from the lighter bracket). If the dark areas seem too intense, slightly lower the Opacity in the Layers palette. So what you wind up with is an image like the one shown hereone where the object and background are perfectly exposedit's the best of two photos combined.  |

|
EAN: N/A
Pages: 187
- Chapter V Consumer Complaint Behavior in the Online Environment
- Chapter VI Web Site Quality and Usability in E-Commerce
- Chapter VIII Personalization Systems and Their Deployment as Web Site Interface Design Decisions
- Chapter IX Extrinsic Plus Intrinsic Human Factors Influencing the Web Usage
- Chapter XIV Product Catalog and Shopping Cart Effective Design