Converting Bitmaps to Vector Graphics


One of the most reliable ways of keeping the download time of your Flash movie quick is to use vector-based graphics in place of bitmaps whenever possible. Because vector-based graphics use mathematics to describe objects, as opposed to the pixel-by-pixel storage used in bitmaps, vector graphics usually, but not always, are the optimal choice.

What kind of bitmapped images are suitable for conversion to vector graphics? It depends on the effect you are trying to achieve. If you try to convert a highly detailed image to a vector graphic, but still try to keep it as photo-realistic as possible, you'll end up with a vector image that produces a much larger file than you would have gotten by just using the original bitmap. However, if you don't need or want the bitmap to be photo-realistic , you might find that you can actually save file size and get interesting effects by converting it to a vector graphic.

Tip

You can use Macromedia's FreeHand or Adobe's Streamline to convert bitmaps to vector art. You actually have a higher degree of control over the final product by using one of these, but the Flash conversion process is very serviceable.


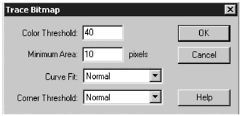
When you import a bitmap into Flash, you have the option of using Flash's Trace Bitmap command (Modify > Trace Bitmap) to convert it to vector art. (See Figure 5.4.)

Figure 5.4. You can control the appearance of your traced bitmap by changing the Color Threshold, Minimum Area, Curve Fit, and Corner Threshold settings in the Trace Bitmap dialog box.

graphics/05fig04.gif

There are four settings you can change when you're using Trace Bitmap:

  • Color Threshold. Enter a value between 0 and 500. When Flash converts a bitmap graphic to a vector graphic, it does so by comparing adjacent pixels. If the RGB values of two adjacent pixels have a difference of less than the Color Threshold value, they are considered to be the same color. The resulting color is a mix of the original colors. The higher the Color Threshold value you use, the fewer colors and shapes there will be in the final vector-based image. In this case, 1 would be considered a high setting, and 500 would be considered a low setting. In other words, with a setting of 1, you get a near photo-realistic vector image (and a huge file size). With a setting of 500, you most likely have an unrecognizable image with just 1 or a few colors (and a small file size).

  • Minimum Area. Enter a value between 1 and 1000. Flash uses this setting to determine how many adjacent pixels to consider when converting the image to vectors. Again, 1 is a high setting and 1000 is a low setting.

    Tip

    Where to start with these settings? It depends a lot on the image you're tracing, but I usually start with the Color Threshold at 50 and the Minimum Area at 10 pixels. Then it's test, test, test.

    The file size effects of both the Curve Fit and Corner Threshold are more subtle than the effects of the Color Threshold and Minimum area. Generally speaking, you see a file size increase if you choose Many Pixels for Curve Fit or Many Corners for Corner Threshold. Choosing Very Smooth for Curve Fit or Few Corners for Corner Threshold usually yields a slightly smaller file.


  • Curve Fit. This dictates how smoothly the resulting curves are drawn. There are six possible choices: Pixels, Very Tight, Tight, Normal, Smooth, and Very Smooth. The smoother the curve, the more complex it is to calculate. Very Smooth gives you longer curve segments while Pixels gives you multiple short curves. The fewer curves you have in your object, the faster it renders .

  • Corner Threshold. This determines how far a curve can bend before it is broken into two separate curves that are connected by corner points. The choices are Many Corners, Normal, and Few Corners.

By having all the settings, particularly the Color Threshold and Minimum Area, at their highest values, you can easily end up with a vector image with a larger file size than the original bitmap. In addition, choosing high settings is very CPU intensive . If you have a complex bitmap and you choose a setting of 0 for the Color Threshold and 1 for the Minimum Area, you might as well click OK and then go out to lunch . If your computer doesn't crash, it might be done with the conversion by the time you come back.

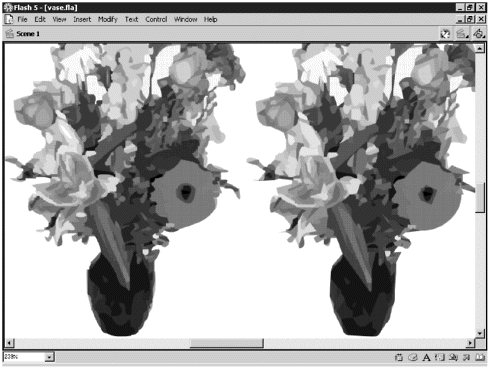
After you've traced your bitmap, you can reduce the size even more by selecting the traced image and choosing Modify > Optimize from the main menu. Figure 5.5 shows the difference between an unoptimized trace and an optimized one.

Figure 5.5. The image on the left was traced with a Color Threshold of 50 and a Minimum Area of 10. The image on the right is the same image optimized, with smoothing set to maximum. If you look closely, you'll see that the image on the right has more sharp angles and merged curves than the image on the left. The optimization reduced the number of curves by about 41 percent.

graphics/05fig05.gif

Note

Just as a test, I traced the bitmap for the next exercise with a Color Threshold of 0 and a Minimum Area of 1. I left both the Curve Fit and Corner Threshold set to Normal. My CPU usage immediately spiked to 100 percent and stayed there for eight minutes. It took another eight minutes at 100 percent CPU to deselect the traced bitmap after it was complete. The final SWF file size was 332KB, as opposed to the 8KB file I got when I used the unaltered bitmap. That's a great example of how not to use Trace Bitmap.


Exercise 5.2 demonstrates how these settings can affect your final file size.

Exercise 5.2 Converting a Bitmap Graphic to a Vector Graphic

The settings that you choose when using Trace Bitmap to convert a bitmap to a vector graphic have a significant impact on the final file size.

  1. Open vase.fla from the Chapter_05/Assets folder.

    This is a moderately complex image with a lot of colors, so you'll have a tough time getting the file size really small, but you'll get a good introduction on how to approach using Trace Bitmap. The image on the Stage is a photo of a vase of flowers that was saved as a JPEG with a quality setting of 100 percent and no blur.

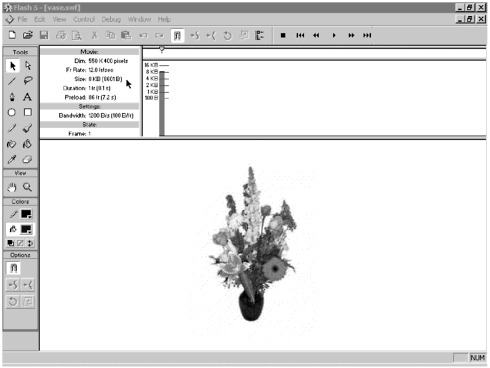
  2. Before you convert this bitmapped image to vectors, test your file (Control > Test Movie). Open the Bandwidth Profiler (View > Bandwidth Profiler) and check your file size. You should have a file that is about 8KB, assuming the default JPEG compression of 80 percent. (See Figure 5.6.)

    Figure 5.6. The Bandwidth Profiler shows a file size of about 8KB.

    graphics/05fig06.gif

  3. Back in your movie, select the image on the Stage and choose Modify > Trace Bitmap. Start with the following settings:

    Color Threshold: 50

    Minimum Area: 10

    Curve Fit: Normal

    Corner Threshold: Normal

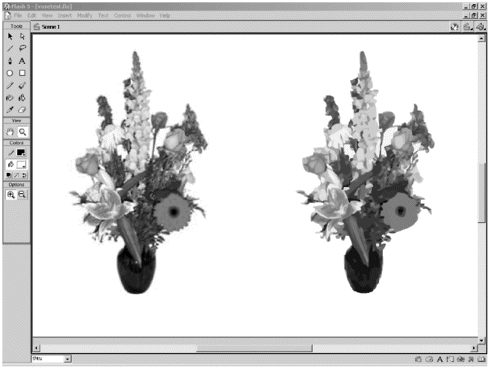
    You get an interesting painterly effect. Test your file and check the SWF size in the Bandwidth Profiler. The size comes in at about 22KB, so by tracing the image, you've actually increased your file size. (See Figure 5.7.)

    Figure 5.7. The image on the left still is in bitmap format and weighs in at about 8KB. The image on the right has been converted to a vector graphic, but is actually larger about 22KBthan the original bitmap.

    graphics/05fig07.gif

  4. Go back into your file and choose Edit > Undo (or Ctrl+Z or Command+Z) until you're back to your original JPEG. This time, choose Modify > Trace Bitmap and change your settings to:

    Color Threshold: 100

    Minimum Area: 20

    Curve Fit: Normal

    Corner Threshold: Normal

    The file size drops to about 13KB, but the quality loss is significant. Depending on what you plan to use it for, that might or might not be okay.

  5. Go back into your file and delete the traced image on the Stage. Open the Library (Window > Library) and drag a copy of vase50_noblur.jpg onto the Stage.

  6. Use the same settings you used in Step 3 and trace the bitmap. Test your movie. The file size actually goes up slightly, to 25KB. What's up with that?

  7. Go back into your file and delete the traced image on the Stage. Open the Library (Window > Library) and drag a copy of vase50_blur.jpg onto the Stage.

  8. Use the same settings you used in Step 3 and trace the bitmap. Test your movie again.

    You might see a little file-size creep again.

What's happening here? Compressed JPEGs always have artifacts created by the compression process. Those artifacts actually add to the file size when you are trying to use Trace Bitmap. As a rule, bring in the cleanest, most uncompressed file you have. Let Flash work its magic.

Note

How else could you approach this file? How about tracing the image and then separating out some of the flowers? Then you could convert the traced flowers to symbols and create your own bouquet. Alternately, you could skip using the Trace Bitmap feature and hand trace the elements of the bouquet you want to use, but that's a bit more time consuming.


So, for your own work, how are you going to know what settings to choose? It's going to take a little "guestimation" on your part. You might have to convert the image several times before you get the look and file size that you're after. In addition, you might find that you need to rethink your approach altogether. If you're unhappy with the look of the traced image, just choose Edit > Undo until you have your original bitmap back. You then can change your settings and run the Trace Bitmap command again.

You've imported bitmaps. You've converted bitmaps to vector graphics. What else can you do? You can import SWF files that were created by Flash or a third-party vendor.


Inside Flash
Inside Flash MX (2nd Edition) (Inside (New Riders))
ISBN: 0735712549
EAN: 2147483647
Year: 2005
Pages: 257
Authors: Jody Keating

flylib.com © 2008-2017.
If you may any questions please contact us: flylib@qtcs.net