17.19 DRAWING SHAPES, TEXT, AND IMAGES IN AWTSWING
|
17.19 DRAWING SHAPES, TEXT, AND IMAGES IN AWT/SWING
An understanding of the abstract class Graphics and its subclass Graphics2D is central to the programming required for drawing shapes, strings, and images in Java. An object of type Graphics is like a drawing instrument that knows what sized pen to use for the draw operation desired; what colors to use; how to draw a string and what font to use for that purpose; what origin and axes to use for the coordinates needed for all sorts of drawing; how to transform the coordinates if it is desired to draw transformed versions of the shapes, strings, and images; and so on. The process of drawing is usually referred to as rendering, and all of the information that is needed before a graphics object can be rendered is referred to as the graphics context.
To explain how an object of type Graphics is used in a program, it is best to start with a discussion of the paint method that is defined as a do-nothing method for the java.awt. Component class, which, besides being the ancestor class of all AWT components, is also the ancestor of the JComponent class from which the Swing components are derived. The header of this method is
public void paint(Graphics g)
The paint method must be overridden by the programmer for the rendering of graphical objects inside AWT components. It is in the override definition of paint that we tell the system what shapes, strings, or images we wish to see drawn inside an AWT component. What is particularly interesting is that even when we provide an override definition for paint, this function is almost never called directly in a program. The override definition will be invoked by the system automatically when it needs to render the component, which could happen when the system is trying to display the component for the first time, or if the system is trying to redraw the component because the user has resized the top-level window, and so on.[29] For each such event-driven invocation of paint, the system first automatically constructs a Graphics object needed for the argument of paint. Note that since Graphics is an abstract class, objects of this class cannot be created directly.
Whereas we provide an override definition for paint for drawing graphical objects inside an AWT component, for doing the same inside a Swing component we provide override definition for paintComponent. While it is true that the system automatically invokes paint (Graphics g) for rendering both AWT and Swing components, for the latter case the invocation of paint (Graphics g) is further decomposed into the following three invocations:
protected void paintComponent(Graphics g) protected void paintBorder(Graphics g) protected void paintChildren(Graphics g)
This means that if we wish to include the drawing of a shape, a string, or an image in the rendering of a Swing component, we must provide code to that effect in the override definition of paintComponent.
Since paint is almost never directly invoked by a programmer, then how is one to force re-rendering of a component. Let's say that we want a certain shape to appear inside a component after the user has clicked on some button. This would call for a re-rendering of the component. If we want a component to be re-rendered during user interaction, we must call repaint. The method repaint automatically calls the method update of the Component class, which in turn calls our override definition of paint. One never provides an override definition for repaint since it has to perform certain system-dependent tasks. However, in some cases involving animation, it may be necessary to provide an override definition for update. The headers for repaint and update are
public void repaint() public void update(Graphics g)
While a Graphics object renders shapes, strings, and images by coloring the pixels made available by the underlying output device, deciding which specific pixels to use is not always as straightforward as it seems. Suppose we want a straight line to be drawn between two points whose locations are specified using high-precision floating-point numbers. The straight line joining the two end points would in most cases pass between the pixels for the most part. The question then becomes as to which pixels should be colored by the Graphics object in order to display the line. One could, for example, color all pixels that are within a half-pixel distance of the analog line. The problem with this strategy is that we could end up with a two-pixel wide line if the analog line is exactly between two rows of pixels. Java uses the policy that the Graphics object will render such a straight line by a pixel-sized pen that colors the nearest pixel on the right side of the line. The same policy is applied to the rendering of outlines of all shapes. Filled shapes are created by filling the interiors of the analog (infinitely thin) closed curves.
Coloring pixels for drawing requires that the locations of those pixels be specified with respect to some coordinate system. Java uses (x,y) coordinates for this purpose, with the default location of the origin situated at the upper left outside corner of the component, and with x measured horizontally in pixels to the right and y measured vertically in pixels towards the bottom of the component. Let's say we want an ellipse to be drawn inside a component. The coordinates of the center of the ellipse will by default be set with respect to the outer upper left corner of the component for which we provide an override definition for either paint or paintComponent. This default location of the origin can sometimes be inconvenient if we are drawing inside a top-level window with a title bar. Say we want to place an ellipse in the center of the inside borders of the window, it would be difficult to do so with respect to the outside upper-left corner of the top-level window. To get around this difficulty, we would want to shift the origin to the upper left corner of the inside of the component. The get Insets() method, inherited from the Container class, returns an Insets object whose top, left, bottom, and right data members hold four values corresponding to the respective margins of the Container object. The margin at the top includes the title bar, the other margins being the border that surrounds the window. Therefore, the pixel coordinates given by the pair getInsets() .left, getInsets() .top corresponds to the top left corner of the drawable area of a window. To illustrate how getInsets is used to translate the origin, here is an override definition for paint that seeks to draw a rectangular shape at the pixel coordinates (180, 80) with respect to the upper left corner of the drawable part of an AWT component. The rectangle will be of width 60 pixels and height 40 pixels.
public void paint(Graphics g) { g.translate(getInsets() .left, getInsets() .top); //(A) g.setColor(Color.red); //(B) g.drawRect(180, 80, 60, 40); //(C) } The translate method of the Graphics object is used in line (A) to shift the default location of the origin to the upper left of the drawable area of the component. The method drawRect defined for the Graphics class does the actual drawing of the rectangular shape.
The statement in line (B) above changes the current color. Unless otherwise changed, all future graphics will be drawn using the color set by the setColor() method defined for the Graphics class. The argument to this is an object of type Color. A color can be specified by choosing one of the thirteen colors that are defined as constant members of the Color class, these being black, blue, cyan, darkGray, gray, green, lightGray, magenta, orange, pink, red, white, and yellow. A more general way to specify color is by its red, green, and blue constituents. For example, if we so wished, we could replace the statement in line (B) above by
g.setColor(new Color (128, 0, 128));
which by assigning a value of 128 to red, 0 to green, and 128 to blue results in a purplish-red sort of a color. Each color constituent takes a value between 0 and 255. If a particular color needs to be made brighter or darker, one can do so by using the brighter and darker methods of the Color class. For example, the above call to the setColor method could be replaced by
Color c = new Color(128, 0, 128); g.setColor(c.brighter() .brighter() .brighter());
Shown below is a program that draws a sampling of shapes on a screen. Each shape has been drawn inside its own anonymous JPanel object. The syntax used for the drawing of the various shapes is further explained after the program.
//RenderGraphics.java import java.awt.*; // for Color, GridLayout, Graphics, etc. import java.awt.event.*; // for WindowAdapter import javax.swing.*; public class RenderGraphics { static final int maxCharHeight = 15; static final Color bg = Color.lightGray; static final Color fg = Color.black; static int width; // for width of a shape panel static int height; // for height of a shape panel static int rectWidth; // width of shape's bounding rect static int rectHeight; // height of shape's bounding rect public static void main(String[] args) { JFrame f = new JFrame("Draw Shape Samples"); f.addWindowListener(new WindowAdapter() { public void windowClosing(WindowEvent e) { System.exit(0); } }); f.setBackground(bg); //(D) f.setForeground(fg); //(E) Container contentPane = f.getContentPane(); contentPane.setLayout(new GridLayout(0, 3)); //polyline: contentPane.add(new JPanel() { public void paintComponent(Graphics g) { super.paintComponent(g); //clears the background width = getWidth(); height = getHeight(); int stringY = height - 10; rectWidth = width - 20; rectHeight = stringY - maxCharHeight - 10; int x2Points[] = {10, 10+rectWidth, 10, 10+rectWidth}; int y2Points[] = {10, 10+rectHeight, 10+rectHeight, 10}; g.drawPolyline(x2Points, y2Points, x2Points.length); //(F) g.drawString("drawPolyline", 10, stringY); //(G) } }); //rounded rectangle: contentPane.add(new JPanel() { public void paintComponent(Graphics g) { super.paintComponent(g); width = getWidth(); height = getHeight(); int stringY = height - 10; rectWidth = width - 20; rectHeight = stringY - maxCharHeight - 10; g.drawRoundRect(10, 10, rectWidth, rectHeight, 10, 10); //(H) g.drawString("drawRect", 10, stringY); } }); //filled oval: contentPane.add(new JPanel() { public void paintComponent (Graphics g) { super.paintComponent(g); width = getWidth(); height = getHeight(); int stringY = height - 10; rectWidth = width - 80; rectHeight = stringY - maxCharHeight - 10; g.fillOval(40, 10, rectWidth, rectHeight); //(I) g.drawString("drawOval", 10, stringY); } }); f.setSize(new Dimension(550, 200)); f.setVisible(true); } }
The output of the program is shown in Figure 17.34.
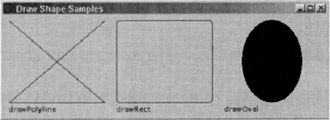
Figure 17.34
Note that for each "draw" method that draws a closed shape, there is a "fill" method in the Graphics class that draws a filled shape. The method calls are similar for the two cases. In addition to taking note of the syntax of the "draw" and "fill" calls, as in lines (H) and (I) above, the reader should also note how the pen color for the draw operation is set in line (E).
After paintComponent is invoked, the pen color can be changed as desired by invoking setColor on the graphics context, as shown previously in line (B).
Note that in the "fill" call for drawing the oval shape in line (I), the first argument to fillOval is the x-coordinate of the top left corner of the bounding rectangle of the oval, the second argument the y-coordinate of the same point, and the third and the fourth arguments are the width and the height of the bounding rectangle.
The reader should also take note of the call to drawString for drawing a string under each shape, as in line (G). The first argument to drawString is the string that needs to be drawn, and the second and the third arguments are the horizontal and the vertical coordinates in pixels for the leftmost point for the imaginary baseline under the drawn string. The method drawString uses the system-supplied default font for drawing the string. However, one can choose from a number of fonts that Java makes available through the Font class. For example, if we wished for a string to be drawn using the SansSerif font in italics with size 14, before invoking the drawString method, we'd first set the font by
Font f = new Font("SansSerif", Font.ITALIC, 14); g.setFont( f); where, as before, g is the Graphics object in the argument to the paint method.
A list of all font families available to Java can be retrieved by invoking one of the following methods
Font[] getAllFonts() String[]getAvailableFontFamilyNames() String[] getAvailableFontFamilyNames(Locale 1)
on a GraphicsEnvironment object. The first call, get AllFonts, returns an array of one-point sized instances of all the available fonts. The second call above returns the names of all the font families. And the last call returns an array of the localized names of the available font families. The GraphicsEnvironment class is abstract. The GraphicsEnvironment object for your current environment can only be constructed by invoking the getLocalGraphicsEnvironment method as shown below:
GraphicsEnvironment ge = GraphicsEnvironment.getLocalGraphicsEnvironment();
The names of all the available fonts may now be retrieved by
String[]fontList = ge.getAvailableFontFamilyNames();
The following program will display all the fonts available to Java on a given platform:
// FontFamilies. java import javax. swing .*; import java.awt.*; import java. awt.event . * ; class FontFamilies extends JPanel { public void paintComponent( Graphics g) { super. paint Component (g); g.translate(getInsets().left, getInsets().top); GraphicsEnvironment ge = GraphicsEnvironment.getLocalGraphicsEnvironment () ; String[] fontList = ge.getAvailableFontFamilyNames(); Font defaultFont = g.getFont(); for (int i = 0; i < fontList. length; i++) { g.setFont(defaultFont); g.drawString( fontList [ i ], 10, i * 14); Font f = new Font(fontList [ i ], Font. PLAIN, 12); g.setFont(f) ; g.drawString( "Purdue", 200 , i * 14); } } public static void main(String[]args) { JFrame f = new JFrame(); f.addWindowListener(new WindowAdapter() { public void windowClosing(WindowEvent e) { System. exit (0); } }); FontFamilies fd = new FontFamilies (); f.getContentPane().add(fd, BorderLayout . CENTER); f.setSize( 300, 300); f.setLocation( 200, 300); f.setVisible(true); } }
The output of this program on the author's Linux machine is shown in Figure 17.35.
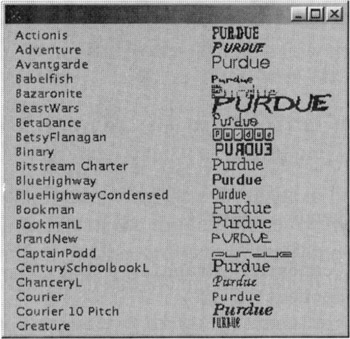
Figure 17.35
In addition to maintaining a list of all the available fonts, a GraphicsEnvironment object also maintains a list of GraphicsDevice objects available. Graphics-Device objects can be screens, printers, or image buffers and are the destinations of the Graphics2D drawing methods.
We will now discuss graphics rendering when a user's interaction alters the state of the GUI in such a way that it would need to be re-rendered by a call to repaint. The following program displays a yellow square in the middle of a top-level window. A corner of the square always stays pointed towards where the user clicks in the window. So as the user clicks at different points in the window, the yellow square rotates through an angle that keeps one of its corners pointed toward the point clicked on.
This program uses a Graphics2D object to rotate the square to its new position as the user clicks anywhere in the window. As mentioned earlier, Graphics2D extends Graphics to allow for coordinate transformations prior to and during the rendering process, and to give more sophisticated control over colors and fonts.
In our program, after the user has clicked somewhere inside the window, the new orientation of the yellow square is calculated from the x and the y coordinates of the point clicked on. This orientation is designated by the variable theta in the program. The variable name thetaPrevious denotes the orientation of the square prior to the user click. Therefore, after the user has clicked, the square needs to be rotated through an angle theta-thetaPrevious. The following statements extracted from the program show how a Graphics2D object is used to bring about this rotation of the square:
Graphics g; .... ..... Graphics2D g2d = (Graphics2D) g; ..... ..... //previous orientation of square: double thetaPrevious = ... //(J) //next orientation of square: double theta = ... //(K) ..... ..... g2d.translate(halfWindowWidth, halfWindowHeight); //(P) g2d.rotate(theta--thetaPrevious); //(Q) g2d.translate(- halfWindowWidth,--halfWindowHeight); //(R) .... .... g2d.setColor(Color.yellow); g2d.fillRect(rectOriginX, rectOriginY, rectWidth, rectHeight); thetaPrevious = theta;
In order to bring about an in-place rotation of the yellow square, we first translate the origin to the center of the square in line (P); we then rotate the square in line (Q) about the new origin; and then move the origin back to where it was originally in line (R). All of these transformation steps are stored away in the Graphcs2D object g2d. Subsequently, when a "draw" or a "fill" function is invoked, the actual drawing will incorporate those transformations. The rest of the program shown below is self-explanatory.
//RotatingRect . java import javax. swing . *; import java. awt. * ; import java. awt. event. *; public class RotatingRect { public static void main (String [] args) { JFrame f = new JFrame("Rotating Rectangle"); f.addWindowListener(new WindowAdapter() { public void windowClosing(WindowEvent e) { System. exit (0); } }); Container container = f.getContentPane() ; container. add (new RotatingRectPanel()); f.setLocation(300, 300); f.pack(); f. setVisible (true); } } class RotatingRectPanel extends JPanel { Graphics2D g2d; Point point = null; // point in window clicked on Dimension preferredSize = new Dimension(300, 300); //width and height of the rotating yellow square: int rectWidth = 60; int rectHeight = 60; //the following two data members needed for computing //rotation angles around the center of the square: int halfWindowWidth = preferredSize.width / 2; int halfWindowHeight = preferredSize.height / 2; //theta is desired orientation of the square //thetaPrevious is current orientation of the square double theta = 0.0; //(J) double thetaPrevious =0.0; //(K) //constructor: public RotatingRectPanel(){ addMouseListener(new MouseAdapter() { //(L) public void mousePressed(MouseEvent e) { //(M) //coordinates of the pointed clicked on: int x = e.getX(); //(N) int y = e.getY(); //(O) if (point == null) { point = new Point(x, y); } else { point.x = x; point.y = y; } repaint(); } }); } //important for panel sizing: public Dimension getPreferredSize(){ return preferredSize; } public void paintComponent (Graphics g) { super. paintComponent (g) ; //paint background int xFromCenter = 0; int yFromCenter = 0; int rectOriginX = halfWindowWidth - rectWidth / 2; int rectOriginY = halfWindowHeight - rectHeight / 2; if (g2d == null) g2d = (Graphics2D) g; if (point != null) { xFromCenter = point.x - halfWindowWidth; yFromCenter = point.y - halfWindowHeight; theta = Math.atan2(double) yFromCenter, (double) xFromCenter) + Math.PI/4.0; } g2d.translate(halfWindowWidth, halfWindowHeight); //(P) g2d.rotate(theta - thetaPrevious); //(Q) g2d.translate(- halfWindowWidth, - halfWindowHeight); //(R) g2d.setColor(Color.yellow); g2d.fillRect(rectOriginX, rectOriginY, rectWidth, rectHeight); thetaPrevious = theta; } }
The GUI for the above program looks as shown in Figure 17.36. As mentioned before, the user can click anywhere in the window and the rectangle will automatically rotate so that one of its corners points towards the direction of the mouse click.
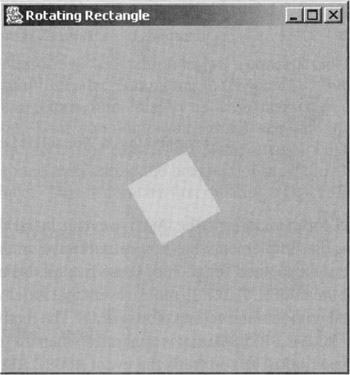
Figure 17.36
The above program provided an implementation for the mousePressed method of the MouseListener interface in line (M). This method is used to trap the MOUSE_PRESSED event. The MouseListener interface declares other methods for trapping other types of mouse events, such as mouse move, click, and drag, the last corresponding to the situation when you move a mouse with one of the mouse buttons pressed. The mouse events are delivered to an object of a class that implements either the MouseListener interface or the MouseMotionListener interface from the java. awt. event package. It is instructive to look at the definitions of these two interfaces to get a good sense of which interface to use for what application:
public abstract interface MouseListener extends EventListener { public abstract void mouseClicked(MouseEvent e); public abstract void mouseEntered(MouseEvent e); public abstract void mouseExited(MouseEvent e); public abstract void mousePressed(MouseEvent e); public abstract void mouseReleased(MouseEvent e); } public abstract interface MouseMotionListener extends EventListener { public abstract void mouseDragged(MouseEvent e); public abstract void mouseMoved(MouseEvent e); } As to what specific type of a mouse event has taken place can be ascertained by invoking the getIDO() method on the MouseEvent object. Depend on the nature of the mouse event, the get ID () method will return one of the following seven symbolic constants:
_ MOUSE_CLICKED | MOUSE_PRESSED | MOUSE_RELEASED | trapped by a MouseListener object MOUSE_ENTERED | MOUSE_EXITED | _ _ MOUSE_MOVED | trapped by a MouseMotionListener object MOUSE_DRAGGED | _
A MouseEvent object corresponding to the first five events listed above can be trapped by a GUI component that implements the MouseListener interface. There corresponds a MouseListener method for each of these five mouse events. The method mouseClicked traps the MOUSE_CLICKED mouse event that is delivered when a button is pressed and released without intervening mouse drag. The method mousePressed traps the mouse event MOUSE_PRESSED that is generated when the user presses a mouse button. The method mouseReleased traps the event MOUSE_RELEASED that is generated when the user releases a mouse button. The method mouseEntered traps the mouse event MOUSE_ENTERED that is delivered when the mouse pointer has entered the GUI component on which is invoked an "add" method for a MouseListener object. The method mouseExited traps the mouse event MOUSE_EXITED that is generated when the mouse pointer exits the component.
The other two types of mouse events listed above, MOUSE_MOVED and MOUSE_DRAGGED, can be trapped by a GUI component if it implements the MouseMotionListener interface. The method mouseMoved of this interface traps the former and the method mouseDragged traps the latter.
When a MouseEvent is trapped by any of the methods, the coordinates of the mouse pointer on the screen at that moment can be determined, as we do in lines (N) and (O) of the previous program, by invoking the methods getX and getY defined for the MouseEvent class of the java, awt. event package. One can also use the method getPoint defined for the same class and retrieve the pixel coordinates from the Point object returned.
Of course, as with other event listener interfaces, if an interface has more than one method, it is easier to use the corresponding adapter class in which the methods have been given the trivial do-nothing implementations, as we have done in line (L) of RotatingRect.java.
We will now discuss the "drawing" of gray-scale or color images in a window. Java accepts both of the commonly used image file formats, JPEG and GIF, for this purpose. An image file is read into a Java program by creating an object of type Image with the help of the get Image method of the Toolkit class in the following manner
Image image = Toolkit.getDefaultToolkit().getImage("filename.jpg"); Of course, as the reader would expect, for GIF files, the suffix for the file name must be "gif".
Images are loaded into Java "asynchronously," a concept that will become clearer when we delve into multithreaded computing in Chapter 18. But basically what that means is that getImage returns immediately because the image is loaded in a separate thread of computation. So if you don't wait for this separate thread to complete its job, you could end up processing only a part of the image. This potential source of difficulty is gotten around by tracking the progress of image loading with the help of a MediaTracker object. This is done by first creating a MediaTracker object by
MediaTracker tracker = new MediaTracker(this);
and then registering with the tracker the image whose loading we want to monitor. This is done by
tracker.addImage(image, 0); try { tracker.waitForID(0); } catch(InterruptedException e) {} The method addImage assigns and ID, in this case 0, to the image. Subsequently, we can invoke the method waitForID (0) to make sure that the image is completely loaded in. One can add any number of images to a MediaTracker object, by simply assigning a different identification number to each image with the addImage method. When multiple images need to be kept track of, inside the try block one can also invoke the waitForAll method for all the images together, instead of waitForID for each image separately.
After an image is fully loaded in, its various attributes, such as its width and height, can be retrieved through calls like
int width = image.getWidth(this); //(S) int height = image.getHeight(this); //(T)
To understand the argument this in the calls to getWidth and getHeight, you have to examine the prototypes of these two methods as defined for the abstract class Image in the java.awt package:
public abstract int getWidth(ImageObserver observer) //(U) public abstract int getHeight(ImageObserver observer) //(V)
where ImageObserver, an interface defined in the java.awt. image package, has been implemented by java. awt. Component. An object of type ImageObserver can keep track of asynchronous loading of an image and inform the rest of the GUI program about the availability of the various attributes of the image as its loading proceeds and as the attribute values become available. Since all AWT components descend from java, awt. Component, therefore all such components are ImageObserver objects. So by supplying this as an argument to the method calls in lines (S) and (T), we conform to the prototypes in lines (U) and (V). If the image has not yet been fully loaded and the method getWidth as in line (S) above is invoked, the method will return -1. The same applies to the method getHeight in line (T).
Now we are ready to actually draw an image in a window. Let's assume that we wish for the top left corner of the image to coincide with the origin of the drawable area. We will assume that the Graphics object associated with the window is g. Then the following invocation will do the job:
g.drawImage(image, 0, 0, this);
where the first argument, image, is the Image object corresponding to the image file read into Java, and the next two arguments the coordinates of the point corresponding to the top left corner of the displayed image. The last argument, this, is, as before, the component in its capacity as an ImageObserver object.
Sometimes we want a displayed image to expand or shrink as the user changes the window size. This can be accomplished by incorporating the following version of drawImage in the paint method:[30]
g.drawImage(image, 0, 0, clientWidth, clientHeight, this);
The difference between this call to drawImage and the call shown earlier is that we now have two additional arguments in the fourth and the fifth positions. Both of these are of type int and represent the scaled width and height to which we want the image to be drawn. Obviously, one could use a fixed relationship between the two so that the image does not get distorted as it is drawn to different scales. The following paint method uses this version of drawImage:
//ImageLoadAndDisplay.java import javax.swing.*; import java.awt.*; import java.awt.event.*; class ImageLoadAndDisplay extends JPanel { public void paintComponent(Graphics g) { super.paintComponent(g); g.translate(getInsets().left, getInsets().top); Dimension d = getSize(); Insets in = getInsets(); Image image = Toolkit.getDefaultToolkit().getImage( "images/slideshow/flower16.jpg"); MediaTracker tracker = new MediaTracker(this); tracker.addImage(image, 0); try { tracker.waitForID(0); } catch(InterruptedException e) {} int imageWidth = image.getWidth(this); int imageHeight = image.getHeight(this); int clientWidth = d.width - in.right - in.left; int clientHeight = d.height - in.bottom - in.top; g.drawImage(image, in.left, in.top, clientWidth, clientHeight, this); } public static void main(String[] args) { JFrame f = new JFrame("ImageLoadAndDisplay"); f.addWindowListener(new WindowAdapter() { public void windowClosing(WindowEvent e) { System.exit(0); } }); ImageLoadAndDisplay im = new ImageLoadAndDisplay(); f.getContentPane().add(im, BorderLayout.CENTER); f.setSize(1000, 600); f.setLocation(200, 300); f.setVisible(true); } }
The output of this program is shown in Figure 17.37 for an example image file.
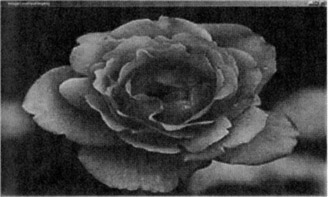
Figure 17.37
[29]If you provide an override definition for paint for an applet, it will automatically be called after the init and start methods. Java applets are discussed in Section 17.22.
[30]This can also be accomplished by invoking the following method
public Image getScaledInstanceint width, int height, int hints)defined for the Image class in java.awt package. When invoked on an Image object that was previously loaded in, this method returns a scaled version of the image whose new width and new height are the parameters of this method. If a negative value is given to either of the width and height parameters, then a value will be substituted for that parameter so as to maintain the aspect ratio of the image. The last parameter is a flag that controls the choice of algorithm to use for interpolation. This parameter can be set to one of the following symbolic constants: SCALE_DEFAULT, SCALE_FAST, SCALE_SMOOTH, SCALE_REPLICATE.
|
EAN: 2147483647
Pages: 273