Adding and Removing Keyframes
| [ LiB ] |
Adding and Removing Keyframes
Keyframes are points in time at which a certain attribute has to occur. You'll be using keyframes throughout the effects chapters in this book. For the purposes in this chapter, keyframes mark where you want to make adjustments to the audio levels. To add an audio keyframe, follow these steps:
-
Select the audio track to which you want to make an adjustment.
-
Make sure Audio Auto Gain is selected from the Timeline menu.
-
Place your Position Indicator on the point you want to make an adjustment.
-
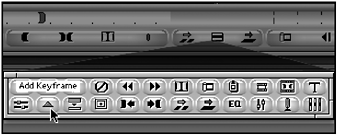
Press the N key on your keyboard or click on the Add Keyframe button from the Tool Palette (see Figure 7.16).
Figure 7.16. The Add Keyframe button adds keyframes to the Timeline.
-
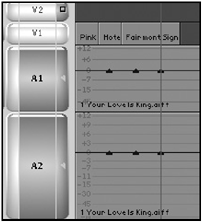
You'll notice a small triangle or keyframe is added to the audio track. This keyframe allows you to make an adjustment to your audio levels. If you only add one keyframe, you'll be adjusting the entire track. Notice in the following example I have added three keyframes, a keyframe to start my adjustment, a keyframe to make an adjustment upon, and a keyframe to end my adjustment (see Figure 7.17).
Figure 7.17. Keyframes are denoted by small triangles on the audio track.
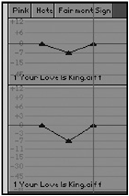
After you add a keyframe, simply click on the frame and make an adjustment by moving the keyframe up or down (see Figure 7.18). Doing so will raise or lower the volume at that point in the Timeline.
Figure 7.18. Adjusting your keyframes requires clicking and dragging them.
To remove a keyframe, click on the keyframe and press Delete on your keyboard. To determine if your audio levels are too low or too high, use the Audio tool, which is covered later in this chapter, to determine audio levels.
Adjusting Single and Multiple Keyframes
When you've added all the keyframes you need, you can make further adjustments at any time. To move a keyframe to a new position, either earlier or later in the Timeline, click on the keyframe and hold down the Option (Macintosh OS) or Alt (Windows) key. This will allow you to drag a keyframe to the left or right.
NOTE
![]() NOTE
NOTE
A keyframe can't be moved prior to or past another keyframe.
NOTE
 TIP
TIP
If you want the keyframe to snap to a decibel line, click on the keyframe and drag the keyframe up or down while holding the Control key (Windows) or the Command key (Macintosh).
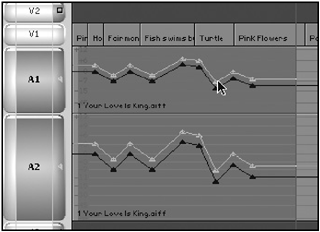
You can also adjust multiple keyframes by placing an IN and OUT point around the keyframes you want to adjust. Add a mark IN prior to the keyframes you want to adjust and place a mark OUT after the last keyframe you want to adjust. After marking your points, click on any one of the keyframes to make the adjustment to all the other frames (see Figure 7.19).
Figure 7.19. Adjusting keyframes from the IN to OUT points.
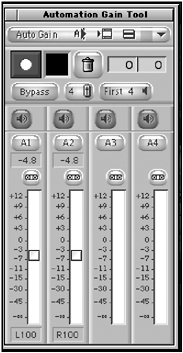
Automation Gain Tool
The Automation Gain tool can also add keyframes to audio tracks. Click on the Tools menu and choose the Automation Gain tool (see Figure 7.20).
Figure 7.20. The Automation Gain tool is another way of adding keyframes to your Timeline.
This tool automatically adds keyframes in real time as you play through your sequence. Basically it records your mouse moves as the sequence plays. To add keyframes using the Automation Gain tool, follow these steps:
-
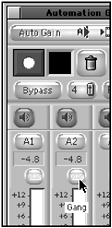
Turn on the tracks you want to adjust. If you have two or more tracks, make sure to gang them (see Figure 7.21).
Figure 7.21. The Gang buttons lock two or more tracks together.
-
Place the Position Indicator at the beginning of your Timeline. If you are only going to adjust a small section, mark an IN and OUT around the section you want to adjust.
-
With all the tracks turned on and ganged (if needed), click the large red record button.
-
As the tracks start to play, drag the track level buttons, for any track, up or down to adjust the levels. Don't worry about being precise; you can make changes after adding all the keyframes.
-
When you're done (the sequence plays through to the end or to the OUT point), your Timeline will have a series of keyframes that were added as you moved the levels up or down (see Figure 7.22).
Figure 7.22. Keyframes are automatically created as you make adjustments when using the Automation Gain tool.
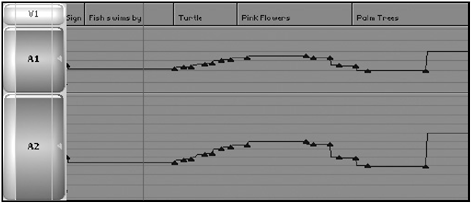
When you use the Automation Gain tool, the system adds a lot of unneeded keyframes. In the example illustrated in Figure 7.23, notice how many keyframes were added when the levels were raised.
Figure 7.23. The Automation Gain tool can add several unnecessary keyframes.
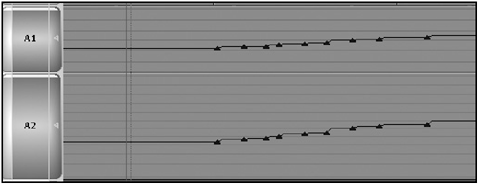
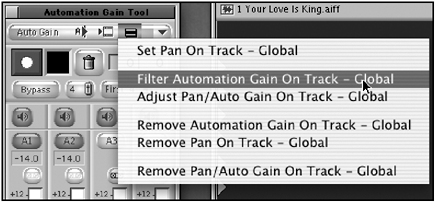
To clean up your Timeline without the headache of having to select and delete the keyframes you don't need, choose Filter Automation Gain On Track Global from the Automation Gain tool's Fast Menu (see Figure 7.24). The system goes through the Timeline and deletes any unnecessary keyframes.
Figure 7.24. Filtering out keyframes is easy on Avid Xpress Pro.
NOTE
TIP
You can filter out your keyframes several times until only the keyframes you need remain . Also make sure to zoom in to see keyframes. Sometimes when you're working on a long sequence, it will seem as if you don't have a lot of keyframes, when in reality you do.
| [ LiB ] |