Project Settings
| [ LiB ] |
Project Settings
Some of the most important settings are the project settings. I recommend you set your project settings before you perform any work in Avid Xpress Pro. Setting them prior to working will ensure they are correct. In fact, some of theses settings should not be changed after you've already started a project.
Audio Project Settings
The Audio Project Settings dialog box has four different tabs for setting up how audio is configured on a project-by-project basis (see Figure 12.5).
Figure 12.5. The Audio Project Settings dialog box has four tabs for making adjustments: Main, Input, Output, and Hardware.
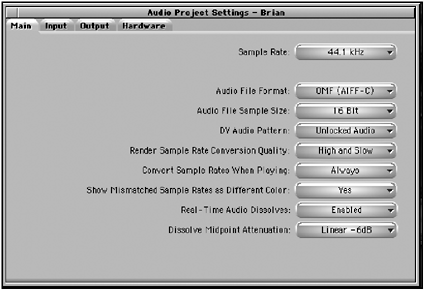
You don't need to adjust these settings every time you start a project. Essentially, the Main Settings tab is the only place you might need to make adjustments. These have several adjustments and settings as to how audio is treated, imported, and played back through Avid Xpress Pro. The first option is the Sample Rate. Avid Xpress Pro can create clips and sequences using three sample rates of audio32kHz, 44.1kHz, and 48kHz. Which sampling rate you choose might be determined by the source material. If your entire project is shot on DV, 48kHz is your best option due to the fact that most, if not all, DV cameras acquire audio at 48kHz. If you're using Avid's Mojo, you might want to sample audio at 44kHz if you're capturing some standard analog formats such as Hi 8mm or Beat SP. Most professional editing facilities use 48kHz as their standard. Consumer audio such as CDs is recorded at 44kHz.
If you mix clips with different sample rates, Avid Xpress Pro can play the clips, but they'll need to be converted to the same sample rate before you output them. To convert a clip or sequence's sample rate, follow these steps:
-
In the bin, select the clip or sequence that needs to be converted.
-
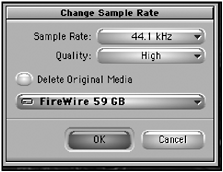
Select the Bin menu and choose Change Sample Rate. A dialog box will appear (see Figure 12.6).
Figure 12.6. When you convert a clip or sequence, a dialog box appears with several options.
-
Choose which sampling rate you want to convert to.
-
The Quality selection determines the quality of the conversion. Always choose High. If you were working on an off-line project and don't care about the quality of the conversion, you can choose another option.
-
Check the Delete Original Media box if you're converting an entire sequence. If you do not select this box, you'll have two master clips and two media files for every clip in the sequence. If you're simply converting a clip, you might want to keep the original.
-
Select a drive where the new file will exist and click OK.
-
If you converted an entire sequence, it might take some time, but each audio clip in the Timeline will be converted. If you convert a single clip, and then choose not to delete the original, you'll have two clips. The converted clip's name will have the word .new appended to it (see Figure 12.7). Notice how the two clips have different sample rates when viewed in Text View with the Audio Heading turned on.
Figure 12.7. If you decide to keep the original media, two clips will appear in a binthe original and the converted clip.

In the Audio Project Settings window, you do have options when dealing with mixed samples. Choose Always from the Convert Sample Rates When Playing menu. The Always option forces Avid Xpress Pro to convert the sample rate as the sequence plays. Sequences always play based on the sample rate of the first audio clip in the Timeline. Although any clips that need to be converted will sound poor, at least you can play through the sequence and still hear the audio. If you select Never, any clips with different sample rates don't play.
Another option when dealing with mixed sample rates is to select Yes in the Show Mismatched Sample Rates as Different Colors menu. Any clips in the Timeline with different sample rates are displayed with different colors.
There are two more adjustments in the Audio Projects Settings windowthe File Format and Real-Time Audio Dissolves . File Format simply refers to how an audio file is converted when imported into Avid Xpress Pro. To simplify your options here, choose OMF(Wave) for a Windows platform and OMF(AIFF-C) for a Macintosh platform. If you need to import an MP3 file, you'll need a conversion tool to convert the audio to a WAV or AIFF file.
If you've ever edited on an Avid system in the past, you are well aware that, while video dissolves have always been real-time effects, audio dissolves always had to be rendered. Those days are gone; well, sort of. In the Audio Project window, select Enabled in the Real-Time Audio Dissolves menu. This will allow you to play audio dissolves in realtime. However, if you experience audio performance delays on your system, it is recommended that you still render your audio dissolves. If you've already added audio dissolves and change this option, the audio dissolves will change from real time (shown by an orange dot) to non-realtime (shown by a blue dot).
General Settings
You should also set the general settings prior to editing. If you're editing on a Windows platform, you'll only need to adjust two settings here, the Temporary File Directory and the Default Starting Timecode. If you're on a Macintosh system, there are a couple more settings that you should be aware of. To open the General Settings window, click on the Settings tab in the Project window and scroll down until you see the general settings. Double-click to open the settings (see Figure 12.8).
Figure 12.8. The General Settings window has several options that you should adjust before you begin working on a project in Avid Xpress Pro.
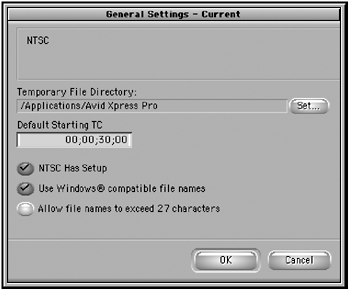
The top box in this window simply displays which format, NTSC or PAL, the project is set for. This can't be changed in this window. To change this setting, you'll need to start a new project. The Temporary File Directory is where any intermediate movie file is stored whenever you perform a Drag and Drop Export. These files can be as big as the actual exported file. By default, Avid Xpress Pro uses the same folder where the application is stored. This is not a great place to store these files. Many times this folder or directory is full. Instead, click on the Set button, which will open a directory box (see Figure 12.9), and choose the same folder where you want to save the actual exported media.
Figure 12.9. The default folder in the general settings resides in the same folder the application is in.

The Default Starting Timecode option should also be changed before starting a project on Avid Xpress Pro. The default starting timecode is 30 seconds. This might be fine for some projects, but most editors, and certainly broadcasters, prefer that their sequence starts at the top of one hour or 01:00:00:00. Another problem with starting a sequence at 30 seconds is how the sequence is displayed in the Timeline. Every time you look at the Master TC in the record monitor you'll need to remember that the sequence started at 30 seconds. So why not start a sequence at zero? If you ever need to "back into" starting timecode, you don't want and can't use any timecode that starts prior to zero.
For example, let's say you started your sequence at zero and want to match my timecode to a tape. If you wanted to add anything prior to the beginning of my sequence, such as color bars, tone, or slate, the timecode would need to roll before zero. Not a good idea. If you're editing a sequence for broadcast, I suggest you call the producer or the broadcast facility and find out what starting timecode they use.
NOTE
![]() NOTE
NOTE
There is a difference when you use semicolons versus colons with the starting timecode number. Semicolons indicate that your sequence will be drop-frame. Colons indicate a non-drop-frame sequence. Drop-frame and non-drop-frame timecodes only exist in NTSC projects. Without getting too technical, you should use a drop-frame timecode for any project that will be broadcast and non-drop-frame timecodes for any non-broadcast work.
NOTE
 TIP
TIP
If you have already started a project and want to change the starting timecode, don't worry; Avid Xpress Pro makes changing the starting timecode a breeze . You simply find the sequence you're working on in its bin and select the start timecode column. If the start timecode column is not part of the text view, open the headings window from the bin's Fast Menu and choose Start. Click in the Start Timecode tab and type a new starting timecode. Press return (see Figure 12.10). A warning dialog box will appear; click OK.
Another way to change a sequence's starting timecode is to click in the starting timecode box while in text view.

Another way is to select the sequence in the record monitor and choose Get Sequence Info from the File menu. Type the new timecode in the window that appears.
The other two options in the General Settings window are only for Macintosh users. If you're working on Avid Xpress Pro on a Macintosh and believe you might be moving the project over to a Windows platform, you'll want to pay particular attention to these two options. The first is Use Window-compatible filenames. Make sure this selection is on. This will prevent you from using certain characters in filenames that create problems when working on a Windows platform.
The other option is to allow your filenames to exceed 27 characters. You do not want to use this option if you're going to move from a Macintosh system to a Windows system. Regardless of moving from one platform to another, I suggest that you always keep filenames under 27 characters.
Media Creation Settings
The last project setting covered here is the Media Creation setting. This is a particularly useful setting for importing and capturing material. Adjustments to this setting now will save you a lot of time down the road as you import and capture material. To open these settings, choose the Settings tab from the Project window. Scroll down to Media Creation and double-click it to open its settings. The Media Creation window opens with several tabs (see Figure 12.11).
Figure 12.11. The Media Creation window displays a variety of tabs.
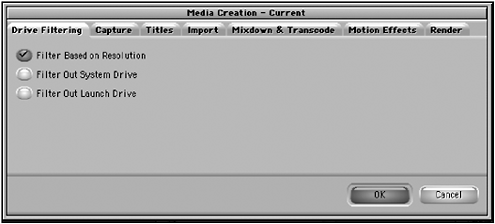
The first setting is for drive filtering, which prevents you from storing material on a drive that doesn't support a selected resolutionthe same drive your operating system is stored on and the same drive that Avid Xpress Pro application is stored on. Unless the only drive you're planning on using is the internal drive of your computer, I suggest you use all of these filters. This way, Avid Xpress Pro will not use your internal hard drive to store files. There are certain drives that Avid Xpress Pro might not recognize even if they are fast enough to play media from. If this occurs, try turning off the Filter Based on Resolution option.
The other tabs and settings in the Media Creation window simply allow you to set both the compression and/or resolution you want to use for each piece of material you import or capture. You can also set the drive and folder you want the material to be saved in. Take a look at the Titles tab as an example (see Figure 12.12).
Figure 12.12. The Titles tab in the Media Creation window.
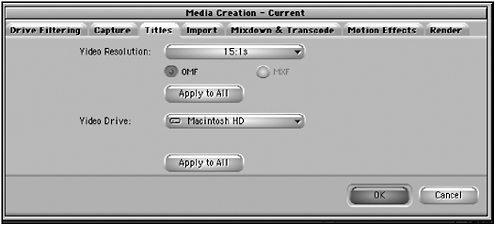
From the Titles tab, you can set the video resolution and the video drive prior to creating any titles. Later when you create a title, these settings will be the default settings for the title when you choose to save it. Notice that you can simply click the Apply to All button to set these settings to the Media Creation settings. For example, say you wanted all media to come in at DV 25 411, regardless whether it's a title, an imported graphic, or something you've captured. Set the Video Resolution once in the Capture tab and then click the Apply to All button. Every tab in the Media Creation settings is then set to DV 25 411.
| [ LiB ] |
- Article 285 Transient Voltage Surge Suppressors (TVSSs)
- Article 314 Outlet, Device, Pull, and Junction Boxes; Conduit Bodies; Fittings; and Handhole Enclosures
- Article 427: Fixed Electric Heating Equipment for Pipelines and Vessels
- Article 701 Legally Required Standby Systems
- Example No. D6 Maximum Demand for Range Loads