Test Phases
| Now that we've covered the basic test process, let's discuss the order for each test. Before diving into full load tests, we suggest starting with simple, single- user tests. After successfully completing these, move ahead with testing under load. Finally, after tuning the system under load, consider testing the system under load for extended periods (known as long-run testing). Let's discuss each of these test phases in more detail. Phase 1: Simple, Single-User PathsFirst, understand the performance of the individual script paths through your application. Begin the testing by running each major test script individually. This ensures that scripts run correctly and sometimes gives you surprisingly early insights into major performance issues. When you run a script with only one simulated user, focus on the response time. At this stage, the response time should easily fall within plan requirements for the functions tested . However, if you see large response times (say your Browse script shows consistent ten-second response times), don't go any further. Delay load testing until single-user performance falls well within acceptable response time limits. Even when you do simple- path , single-user runs, the basic concept of steady-state , repeatable measurements applies. For example, the first time you exercise a JSP, you may experience a significant compile time. Make sure to prime the environment before taking these measurements, usually by running a test once, throwing away the results, and then running the test and recording the results. Exit CriteriaIf you don't see good response time with one user, adding more load doesn't make sense, as more users only increase response times. Exit single-user testing only after the response time falls well within your planning ranges for this function. Obviously, if you want five-second response time for 1,000 users, and you're only getting four seconds for one user, the load test won't go very far before you find yourself addressing response time issues again. Before you leave this phase of testing, obtain a response time with a reasonable cushion for the projected load. What Can Go Wrong?Usually single-path runs go quite well. The application development team normally tests their code during development with these types of runs, so they generally deliver code in reasonable condition for the single user. However, occasionally problems arise during these tests. Here's a list of the more common single-user test issues.
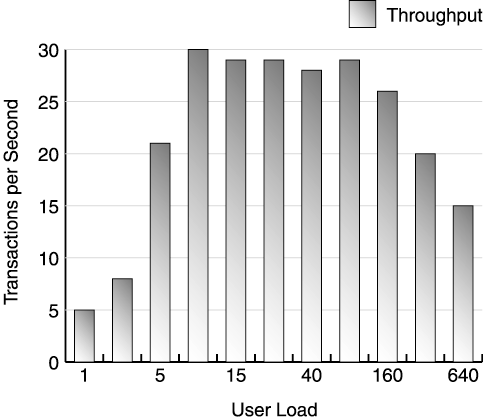
On a related topic, also use the single-user tests to look for misconfigured embedded HTML elements. Consider turning on your HTTP server's full access logging to check for 404 errors. Often the test scripts try to retrieve static elements not present in the test environment. Remove these elements, or configure the environment correctly to include them. Use the single-user test to flush out any problems in your test scripts or the test environment. A little time spent in the beginning often saves hours of analysis work later in the testing. Resolve these performance issues now before they amplify under load. Phase 2: User Ramp-UpOnce your single-user paths perform, begin testing the system under load. Of course, do not do this with all of your planned load right way; begin by gradually introducing load to your test environment. We recommend incrementally increasing load to establish the initial throughput plateau for your environment. After establishing this baseline, analyze your system for bottlenecks and make tuning adjustments to raise the plateau. Start with one user and increase your user load by small increments until you find the throughput plateau. At this point, run additional measurements by successively doubling the load. Use these measurements to confirm the plateau and to find the point on the plateau where response time no longer becomes acceptable for your environment. For example, if you run measurements at 1, 2, 5, 10, 15, and 20 users, you might obtain the results shown in Table 11.1 (note, "tps" means "transactions per second"). On the basis of these results, you conclude that the saturation point occurs at ten users, with a throughput plateau of 29 transactions per second. At this point, run additional measurements, doubling the client load each time until throughput really falls off or the response time is well above an acceptable threshold. Figure 11.8 shows the throughput from tests of 40, 80, 160, 320, and 640 virtual users against our system. Notice that we enter the buckle zone at around 160 users. Figure 11.8. Throughput curve to determine saturation point After establishing a baseline for your system, decide whether you need more performance from the areas of your web site under test. If your test plan calls for better performance, it's time to analyze the data further and make tuning adjustments (the goal being to move the plateau higher and/or to decrease the response time). Otherwise, if you find the performance acceptable, move on to your next set of tests. Table 11.1. Throughput for Progressive Test Runs
Exit CriteriaOK, in reality almost no one "moves on" after establishing the first load test plateau. Typically, the initial user ramp-up delivers disappointing performance results because of bottlenecks in the system. The user ramp-up phase often takes the bulk of your test time. After establishing a throughput plateau, you spend additional time improving the performance of the systems to increase throughput and lower response time to meet your goals. Also, you may find that, even after meeting your goals, additional tuning might squeeze additional capacity from your test systems. Determining when to leave this phase of testing requires some skill. While analyzing your data from a user ramp-up test, consider the following questions:
Of course, the first question is the most important: Do these results meet your test plan's exit criteria? If you answer yes to this question, you're probably ready to move to your next test. However, keep in mind that you might reach your goals without getting the most out of your systems. If your test reaches the saturation point without driving the CPU on your primary systems (normally the application servers) close to 100% utilization, you have a bottleneck in the system. Large, multi-CPU, symmetric multiprocessing (SMP) machines are an exception to this rule. A single application server instance rarely drives very large machines to 100% CPU utilization. Before you leave this phase, try to tune the systems to meet your performance goals. If you've met your goals, but you believe you're leaving lots of system capacity on the table, it's probably worthwhile to remove any major bottlenecks preventing full utilization of your systems. In the end, you decide when you've reached the point of diminishing returns in tuning and bottleneck removal. The following section discusses the process for removing bottlenecks in more detail, and Chapter 13 provides specific guidance on bottleneck symptoms and solutions. What Can Go Wrong?Early load testing usually uncovers load-related failures in the application. Remember, the developers test in single-user mode throughout development, but rarely (if ever) put their code under load. As you run your tests, don't forget the validation steps described earlier. Make sure the system runs correctly before diving into performance analysis, and check the logs for errors under load. Also, use a browser to run a few manual tests while load testing to check for multi-threading problems. The major activity for load testing, however, is bottleneck resolution. Chapter 13 describes the symptoms and possible resolutions of the bottlenecks we commonly encounter in the field. Please refer to this chapter for more details on identifying and resolving bottlenecks. For now, however, let's discuss how to prioritize the bottlenecks you find in load testing. Removing BottlenecksWe recommend beginning your bottleneck removal by focusing on CPU utilization. As we mentioned earlier, until you drive the CPU utilization of the application server(s) to near 100%, one or more bottlenecks exist in your system. Remove the bottlenecks hindering your CPU utilization first. Your saturation point often provides clues to the source of the bottleneck. The saturation point defines the lowest user load constrained by a limitation in the system. Either by using monitoring tools (discussed more in the next chapter), thread dumps, or the process of elimination , try to find the resource (connection pool, database, security server, and so on) that is constraining the system's performance. Consider the example from Chapter 1, where we initially saw a saturation point of five customers in the brick and mortar bookstore. The store's five checkout lines became a limiting factor for us after five customers began to check out. This prevented our throughput from exceeding five customers per minute. Likewise, in your web site, look for the constrained resource. Remember: Try to remove your bottlenecks in order of severity. If you devote resources to tuning your application database, but it's not the largest bottleneck in the system, you see little (if any) performance gains from this activity. Take the bottlenecks as they come, resolve them, and decide if the system requires further tuning. Reaching 100% CPU utilization does not guarantee optimal performance, however. After driving your systems to their capacity, focus on using the systems more efficiently . Usually this involves an examination of the web application code for poor programming practices; sometimes it involves fine-tuning resources such as container threads. System ResourcesOften your web site waits for external resources such as databases or security servers. While your servlet threads wait, they do no work, so the CPU utilization of your server remains low. Check the system usage statistics of your peripheral systems and suspect any system that is running near 100% CPU utilization. Never rely on external analysis alone. Combine external analysis with a thread dump of the application server, if at all possible. Remember, you want the most severe bottlenecks first, and although your database server needs a CPU upgrade, it may not be the biggest bottleneck in your web site. A thread dump shows you servlet, JSP, and even EJB activity during the test and helps you identify with great clarity the most significant bottleneck encountered during the run. Middleware and Application ResourcesSome bottlenecks originate in application resources such as queues and pools. If you see threads in your thread dump waiting for these resources, check their settings. Perhaps they're simply set too low, or perhaps an external system accessed via the pooled resources is not keeping pace with demand. Sometimes resources in front of the application servers restrict traffic flows. If all HTTP server threads become fully engaged serving static content, for example, the application servers become underutilized . Keep an eye on your middleware and application resources as you increase the load and test complexity. Referring back to the HTTP server again, it usually requires additional tuning if you enable security or if you add more application servers to the cluster it serves. Application ImplementationFrequently the bottleneck lies within the web application itself. Poorly written logging routines, bad string management, or excessive synchronization, among other things, often become the most performance-expensive elements of your system. Employing a code-profiling tool on the web application before testing begins eliminates some types of application problems. Others only appear under load testing, so don't be surprised to find you still require application tuning after completing a profiling exercise. Obtain and use programming skill to resolve these bottlenecks. After you have completed these steps, your system under test should run at close to 100% CPU utilization. Hopefully, the throughput of your site also increases , and you require more virtual users to reach your throughput saturation point. Again, 100% CPU utilization makes for a good start in your tuning, but it rarely marks the end of your efforts. After fully utilizing your CPU resources, focus on how to use them more efficiently. Efficiency also improves performance by reducing response times and increasing throughput. Regardless, avoid making your tuning exercise a "fine-tuning" experiment. Keep focused on meeting the objectives of your web site rather than squeezing the last bit of capacity out of your test environment. Any system contains a near infinite number of bottlenecks. Removing a few of these usually provides the largest benefits, while resolving the rest provides very little performance gain. Meet your goals, obtain good machine utilization, and move on. If you cannot meet your targets, or you cannot get past a utilization threshold, reconsider your test plan. Particularly if you cannot control parts of your environment (such as remote resources), or if you do not have code access to the web application, you may reach a point where further meaningful tuning is not possible. Consider moving on with scalability testing to compensate for poor individual server performance. |
EAN: 2147483647
Pages: 126