Test Environment Configurations
| Your test not only exercises the web application, but it also stresses the entire test environment. Just as we recommend starting with single-user testing before moving to user ramp-up testing, we also recommend starting your tests with a simple environment. As you better understand the performance of the simple environment, add complexity until your full environment comes under test. A simple-to-complex strategy allows you to find problems in a manageable environment and to introduce complexity systematically to understand each component's performance impact. Do not add more complexity until you reach an acceptable performance baseline on your current configuration. Start SimpleStart your tests with a single application server. Place any databases on one or more remote machines. Usually, we recommend putting the HTTP server on its own machine as well, depending on your ultimate production configuration. Of course, always use separate machines for the test clients . We recommend starting with this basic setup because it is easy to configure, allows you to identify most major application performance issues, and provides an excellent baseline of your core web site components . Also, keep the component features used at this point to a minimum. Do not introduce complex features such as security and shared HTTP session management yet. Use only those features essential to correct application execution to establish your initial baselines. Add ComplexityAfter removing the major bottlenecks and achieving acceptable performance with a simplified test environment, begin introducing real-world complexity to your test web site. Systematically add more components and more features to the site, establish a new baseline for each, tune as necessary, add the next component or feature, and repeat. Not only does this approach help you resolve system bottlenecks in a more ordered fashion, but it also provides critical information for web site capacity planning. By understanding the capacity of each hardware and software component of your site, you develop a good idea of how large your site needs to be to support your expected user loads. As you add components to your test system, repeat the baseline and tuning processes to resolve any newly introduced bottlenecks. We recommend introducing complexity into your site in the following order:
Let's discuss each of these steps in more detail. Core Web Site FeaturesMany web sites use the HTTP session sharing features of their application servers and the SSL security features of their HTTP servers. These two elements frequently introduce significant performance issues, so understanding the impact of each of these elements is important for capacity planning. If you use these features in your web site, introduce them into your test individually after tuning your basic web application. HTTP Session SharingAs we discussed in Chapter 3, many application server vendors provide some means for sharing HTTP session data among clustered application server instances. This allows the instances to share session data, which proves very useful for failover. (If one instance fails, the web site routes the user to another available instance, which retrieves the user's session information from the shared datastore.) As with other aspects of your web site, begin testing shared HTTP sessions with only one application server instance. After you baseline and tune your single application server instance, turn on session sharing, and measure the performance impact. (Note: This only works if you use a persistent HTTP session database to share session information. Distributed session sharing schemes require two or more application server instances.) For example, if you get 100 transactions per second throughput with a single application server instance without HTTP session sharing, you might only reach 85 transactions per second after enabling this feature. (HTTP session sharing often produces a 10%15% performance degradation.) [2] We also recommend testing your hardware cluster without HTTP session sharing enabled at first. This gives you a baseline for measuring the impact of session sharing across the cluster. Also, it makes it somewhat easier to find and resolve other cluster bottlenecks.
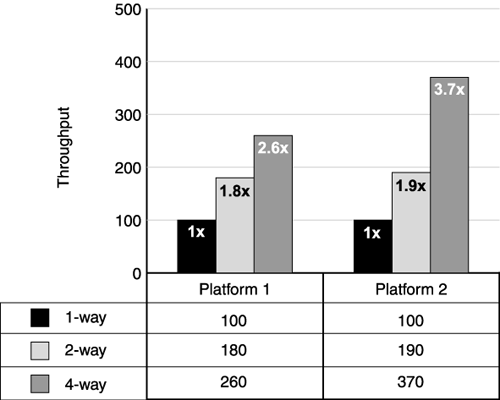
SecurityMost production web sites require encryption for some pages. Using SSL carries a significant performance overhead. The impact depends on how many pages the site encrypts, the size of the pages returned, and the number of pages accessed after initiating an SSL session. Depending on the site and the age of the HTTP server involved, the SSL degradation varies widely. Of course, the initial handshake protocol requires a significant portion of this time. Using HTTP affinity routing to eliminate repeated handshaking improves overall SSL performance. Again, test the site without SSL, if possible, before enabling this feature, so that you can gauge the performance impact. SSL requires lots of CPU for the encryption and decryption of requests and pages. See Chapter 3 for details on tuning your server for SSL. Vertical ScalingWe discussed vertical scaling in Chapters 2 and 4. As you may recall, vertical scaling refers to adding application server instances to a single server, increasing the physical capacity of the server (memory, CPU, and so on), or doing both. However, as we warned you earlier, not all platforms and JVMs benefit from vertical scaling. Before you develop capacity plans based on this technique, use your performance test to determine if this actually works for you. Analyze this scaling from both a hardware and JVM perspective. If you are running on a four-way server (a machine with four CPUs) in your test lab, try booting your server in one-way, two-way, and four-way configurations. Many operating system and server vendors give you control of the number of CPUs enabled on a boot. This allows you to find the best processor configuration for your application. For each configuration, perform a series of measurements and compare performance. Is the two-way configuration throughput close to two times the performance of the one-way configuration? Likewise, is the four-way performance close to four times the one-way throughput? If the answer to these questions is yes, your application, JVM, and operating system exhibit good SMP scaling characteristics at this level. Figure 11.9 shows the SMP scaling results of two operating system platforms. The first platform shows good SMP scaling as we move from a one-way to a two-way configuration (the two-way throughput is 1.8 times greater than one-way throughput). However, when we move to a four-way configuration, the throughput only reached 2.6 times that of the one-way system. (We see these same scaling patterns frequently on some PC-based and Linux systems, even for well-written applications.) Figure 11.9. SMP scaling comparisons Naturally, you cannot expect perfect scaling from a multiprocessor box. As you add processors, the box becomes less efficient in terms of throughput. Referring again to Figure 11.9, notice the scaling factors for the second platform. With four CPUs enabled, the throughput reaches 3.7 times that of the one-way configuration. Expect roughly this level of scale with well-behaved applications on traditional UNIX-based platforms with most JVMs. Also, look at the CPU utilization for these systems. As you add processors, does the application take advantage of them? Particularly on larger systems, a single application server instance often cannot utilize all the processing capacity of the box. In these cases, adding another application server instance often improves CPU utilization and throughput ( assuming the machine contains enough memory to support another JVM). Of course, if the CPU utilization already comes close to 100%, adding another application server instance does not increase throughput. However, if you believe another application instance might help, add just one new instance and run additional measurements. If throughput increases but you're still not fully utilizing the CPU, consider adding another if the machine's memory supports it. Continue this process until
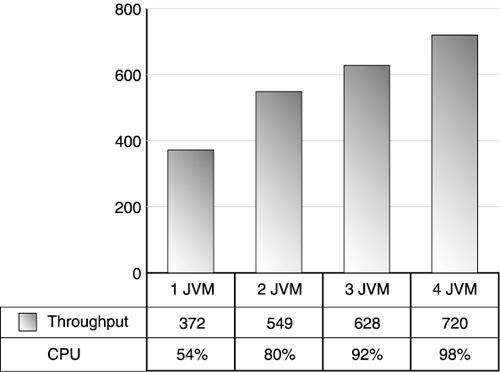
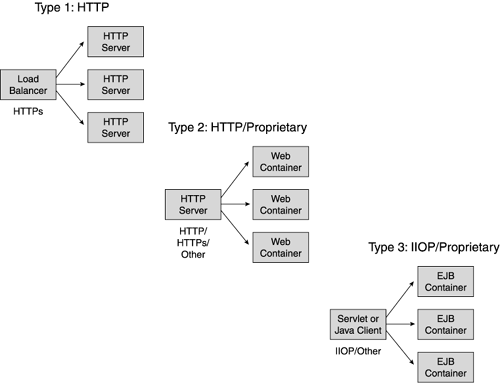
For example, Figure 11.10 shows a maximum throughput of 372 transactions per second with one JVM but only 54% CPU utilization. After exhausting standard attempts to remove any single application server bottlenecks, try additional instances (JVMs) to increase throughput. In this example, a second JVM increased throughput to 549 transactions per second, a third JVM to 628 transactions per second, and a fourth to 720 transactions per seconds. At this point the CPUs became saturated , and more JVMs provided no additional throughput. In this case, vertical scaling effectively doubled the overall throughput. Figure 11.10. Vertical scaling using multiple JVMs Keep in mind: This technique only works if the low CPU utilization is not caused by a bottleneck. If your single instance can't use all of the CPU because it's waiting for a poorly tuned remote database, adding another instance usually makes the situation worse . If you add instances, but don't see throughput improvements, go back and examine the single-instance environment for bottlenecks. Also, as you use vertical scaling, be realistic about the instances you require each server to support. We've encountered many grotesque misapplications of vertical scaling in the field. A four-way server typically supports 1 or 2 application server instances well; however, don't expect it to support 80. Keep your expectations realistic and validate them during testing. As you add instances, be careful to gauge the impact of this extra capacity on the rest of the environment. Adding more instances often requires capacity increases in remote systems, such as databases, and may also impact your network resources. Monitor the entire test environment as you progressively add instances to avoid overwhelming components. Finally, vertical scaling requires some type of routing mechanism to distribute load to the application server instances. Because the instances normally share the same IP address behind an HTTP server, the application server vendor usually provides a software balancer to handle request distribution. As we'll discuss further in the following section on horizontal scaling, understanding the overhead of this mechanism may be important to your overall performance. Horizontal ScalingBeyond vertical scaling, we look at increasing web site resources by adding more servers and placing application server instances (including EJB servers) on these instances. In this step, we duplicate the successful single-server pattern we developed through our performance testing and vertical scaling techniques discussed earlier, and form a machine cluster. To accomplish this, use load balancing techniques to distribute requests across duplicate servers. Horizontal scaling techniques apply to multiple points in your architecture. For example, if your architecture separates the HTTP servers from the application server, you might apply load balancing techniques in front of the HTTP servers as well as between the HTTP server and the web container. Similarly, if your architecture separates servlets from EJB business logic, you might apply load balancing between the web containers and the EJB containers. Figure 11.11 illustrates some common web site load balancing points. Figure 11.11. Load balancing architecture options The common load balancing points exist between the
Your architecture probably requires one or more points of load distribution. Referring back to Figure 11.11, almost all web sites use Type 1 load balancing. Many sites also use Type 2 balancing to support both vertical and horizontal scaling of an application server domain. This distribution type also works across a firewall. Type 3 load balancing comes into play for sites using EJBs in their web applications and/or supporting thick clients. You perform load balancing tests in a similar manner to previous tests: Start simple, and grow incrementally. Systematically add machines and repeat tests to fully understand the scaling characteristics at each point along the way. In this phase, it is important to understand the capacity ratio required between the servers. For example, if your architecture separates the web containers from the EJB containers, use scalability testing to find out if you need one EJB container per web container (a 1:1 ratio), or more in one tier than another. For complex business logic, you may require for every web container two EJB containers (a 1:2 ratio). More likely, however, the overhead of presentation logic in the web container may mean you use three web containers for every EJB container in the web site (a 3:1 ratio). During scaling tests, check for linear scalability as you increase the size of the cluster. Just as with vertical testing, as you double your cluster resources, expect throughput to nearly double as well. Make sure your cluster handles proportionally more load than a single server. For example, let's assume a single-server configuration performs 100 transactions per second with one second response time at a concurrent load of 1,000 users. As we increase the servers in our cluster, what kind of performance do we see relative to our single-server baseline? If you add a second identical configuration with a load balancer in front of the servers, does this cluster now support close to 2,000 users and 200 transactions per second, while maintaining one second response time? The test process for clustering requires multiple, iterative steps:
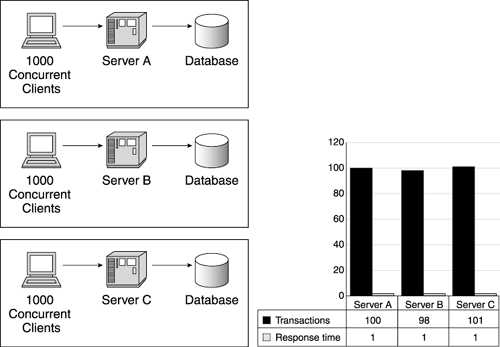
These steps are discussed in order in the following subsections. Test Each Server IndividuallyFirst, you need to understand the performance of the individual servers used in your clusters. Although we recommend using identical servers, if possible, in your cluster, do not assume even identical servers produce the same results. Before you run the servers as a cluster, run each individually to determine its behavior. If two "identical" servers don't perform within 5% of each other, this indicates a configuration problem or an error in your testing of the other machine. For example, we've seen cases where supposedly identical machines performed differently because someone enabled tracing on one of the machines, or because the machines differed in maintenance levels. Figure 11.12 illustrates a successful test of individual server performance. Figure 11.12. Testing individual server performance In this step, also consider the performance and utilization of resources shared by the cluster. As we mentioned in the vertical scaling section, keep in mind your test environment as a system. Adding capacity at the application server level may drive other resources such as the network and remote databases beyond their capacity. Therefore, monitor these devices as you begin ramping up your cluster. As you leave this step, hopefully you've answered the following questions:
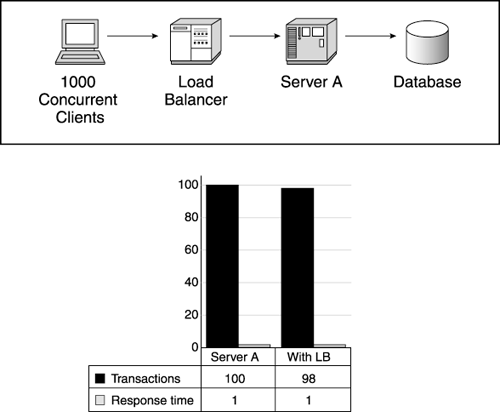
Quantify Load Balancing OverheadMost load balancing technology operates in a nonintrusive manner, but we recommend verifying this before beginning a scalability test. As we discussed in Chapter 3, some special configurations of load balancing software and hardware require more overhead than " vanilla " balancing. For example, if your load balancer makes processing decisions based on inspecting a cookie, this adds path length and slows down overall transaction rates. Now's the time to measure for any unexpected load balancing overhead. To accomplish this, measure the performance of a single server or web application instance with the load balancer included . While this seems counterintuitive (you don't need the balancer for a single resource), the balancing algorithm typically runs through the same steps with one server or ten. By comparing these results with your single-server baseline test (without the balancer), you obtain the impact, if any, of the balancer on the test. Figure 11.13 shows the performance of Server A with the addition of the load balancer. In this step, the client driver points to the load balancer rather than the individual server. (We used the same test here as shown with a single client in Figure 11.5). Note negligible load balancer overhead in this case (less than 2%). However, this technique does not always work for software load balancing (Types 2 and 3 as shown in Figure 11.11). These balancers often contain enough intelligence to optimize their "routing" in a single-instance case. Figure 11.13. Quantifying load balancer overhead Try to determine the answers to the following questions during this test step.
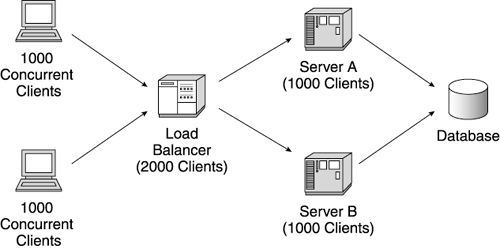
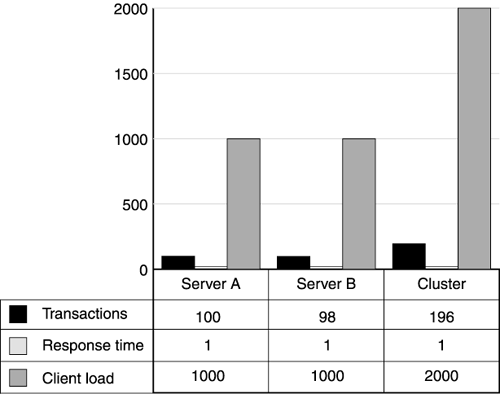
Cluster Performance and AnalysisIn this step, you actually put your load balancer to work distributing requests across two servers. Just as with the single-server tests, you run client ramp-ups to understand the throughput and response time dynamics. Plan to run twice the load you ran against the individual servers. Figure 11.14 shows a typical two-server cluster configuration. To compare a single-server test done with 1,000 concurrent users, drive 2,000 concurrent user requests to the load balancer. This equates to 1,000 concurrent users per server. Figure 11.14. Testing a two-server cluster As discussed in Chapter 7, if you use IP affinity, make sure your load driver simulates multiple IP addresses, or be sure to use multiple client driver machines. Otherwise, all the simulated users come from the same IP address, and IP-based affinity will route all the users to the same server, resulting in no load balancing. In this step, you look for linear scaling dynamics. A two-server cluster should typically provide almost two times the throughput (the sum of each individual server) with the same response time as a single server. Figure 11.15 shows the performance results for a 2,000 concurrent user run. As you can see, the total throughput of 196 transactions per second is nearly double the throughput of a single server. Also note that the response time remains at one second (an important point). This tells us the two-sever cluster supports linear scalability. Doubling the hardware capacity doubled the capacity of the web site without impacting the response times. Figure 11.15. Two-server cluster scalability results If your results are not similar to those shown in Figure 11.15, follow the techniques we described earlier to look for bottlenecks. Cluster scaling usually shows linear scale unless the cluster exhausts shared resources, such as the network or remote systems. Remember, your cluster now serves twice as many user requests, which means a shared application or HTTP session database also receives twice the traffic. Scale shared resources as you scale the servers on your web site. Resolve the following questions during this step:
Add Another Server and Repeat Step 3Continue to add additional servers until you verify that the site supports your peak loads. Remember as you add each server to check for new bottlenecks, particularly in shared resources. |
EAN: 2147483647
Pages: 126