Example Triggers
|
The following sections demonstrate how to create triggers for the DemoDictionary that we have been building throughout this book. Several of these triggers can be implemented using SQL scripts. In most cases, if your trigger is simple enough to implement in SQL, you probably want to use a SQL script.
Two of the triggers you need are too complex to implement in SQL. For triggers like these, you must resort to another development environment. Creating these triggers is demonstrated in Delphi, C#, and VB.NET. As in the preceding chapter, the steps that demonstrate how to create these trigger projects assume that you are already familiar with these development environments.
Unlike in the preceding chapter, creating triggers using Visual Basic 6 is not discussed in detail. As described in the preceding chapter, you are discouraged from creating AEPs using Visual Basic 6, except in very limited situations, due to potential performance bottlenecks that they can introduce. In short, because Visual Basic 6–created AEPs make use of a single threaded apartment (STA), it is not possible for two threads on the Advantage Database Server to run the same Visual Basic 6–created AEP or AEPs located within the same AEP container concurrently.
With triggers, the issue is the same, but the problem is far more significant. Specifically, when a trigger container COM object is created using Visual Basic 6, the COM object uses an STA, and as a result, only one ADS thread at a time can invoke any of the trigger functions within a single trigger container. However, since triggers tend to execute far more often than AEPs, the performance bottleneck that these COM triggers would introduce makes it almost inconceivable to use them. As a result, Advantage does not provide a template for creating triggers using Visual Basic 6. If you are a Visual Basic 6 developer, please create your triggers using one of the other available options.
With respect to the examples provided in this section, we wanted to keep the trigger examples relatively simple, so you can concentrate more on what a trigger can do than on how to do it. Therefore, we are going to use four triggers to implement data archiving.
The first trigger will be associated with the EMPLOYEE table. With this trigger, each time an employee record is deleted, a copy of the record will be inserted into an archive table, named EMP_BAK.
The second, third, and fourth triggers are associated with archiving customer data. The second trigger will be more complicated than the one used to archive employee records. Specifically, when a customer record is being deleted, the trigger will first check to see if the customer has any outstanding invoices. If that customer has one or more invoice records in which the Date Payment Received field is empty, an error will be returned, and the record will remain in the CUSTOMER table. But if there are no outstanding invoices for this customer, the customer’s record will be copied to the customer archive table, named CUST_BAK.ADT, and will be deleted from the CUSTOMER table.
The third trigger permits an archived customer record to be restored to the CUSTOMER table. This trigger, which will be attached to the CUST_BAK table, will trigger when a record is deleted from the CUST_BAK table. From within this trigger, a record being deleted from the CUST_BAK table will be reinserted into the CUSTOMER table, and then be removed from the CUST_BAK table. The effect of this second and third trigger is to make it impossible to ever lose a customer’s record. It merely gets moved back and forth between CUSTOMER and CUST_BAK.
The fourth trigger is used to make sure that the customer IDs added to the CUSTOMER table do not conflict with customer IDs appearing in the CUST_BAK table. If that were to happen, an attempt to archive a customer to CUST_BAK could potentially fail due to a violation of the unique index order on the CUST_BAK table.
The first and third triggers described here are relatively simple, and can be implemented in SQL. The second and fourth triggers, with their more complicated logic, cannot be written in SQL. These triggers will be implemented using Delphi, C#, and VB.NET.
| Note | If you ever wanted to permit client applications to write to the CUST_BAK table directly, you would need a fifth trigger. That trigger would be like the fourth trigger, in that it would verify that customer IDs being added to the CUST_BAK table do not currently exist in the CUSTOMER table. We are assuming with this sample database that CUST_BAK will never be used by client applications directly, making a fifth trigger unnecessary. |
Before you can create these triggers, there are two additional tables that you need to add to your data dictionary. These tables are named CUST_BAK and EMP_BAK, and they are currently free tables that are located in the same directory as your data dictionary. The following steps show you how to make these additions to your data dictionary:
-
With the DemoDictionary data dictionary opened in the Advantage Data Architect, right-click the TABLES node and select Add Existing Table(s).
-
From the Open dialog box, keep the CTRL key depressed while you left-click CUST_BAK.ADT and then EMP_BAK.ADT. With both of these files selected, click Open. Your expanded TABLES node in the tree view in the Advantage Database Manager should now look like that shown in Figure 8-1.
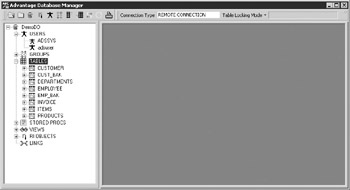
Figure 8-1: The CUST_BAK and EMP_BAK tables have been added to the data dictionary.
Writing Triggers in SQL
Triggers that are implemented using SQL scripts are easy to create and maintain in your data dictionary, and do not require any additional tools to create them. From within a SQL script, you can write one or more SQL statements (with the statements being separated by semicolons). These SQL statements can reference the tables of your data dictionary, free tables, as well as tables in other data dictionaries for which your data dictionary has defined links.
Your SQL statements also are likely to make use of the _ _old table (for delete and update triggers) and the _ _new table (for insert and update triggers).
Use the following steps to create two triggers, one for archiving employee table records, and the other to restore archived customer records:
-
With the DemoDictionary data dictionary opened in the Advantage Database Manager, expand the TABLES node. Right-click the EMPLOYEE table and select Triggers. The Advantage Database Manager responds by displaying the Triggers dialog box shown in Figure 8-2.
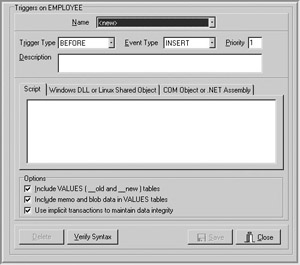
Figure 8-2: You use the Triggers dialog box to create SQL script triggers. -
Set Trigger Type to AFTER, and Event Type to DELETE. Leave Priority set to 1. Priority was discussed earlier in this chapter in the section “Trigger Priority.”
-
In the Description field, enter Trigger that archives deleted employee records.
-
Enter the following SQL statement into the Script pane:
INSERT INTO EMP_BAK ("Employee Number", "First Name", "Last Name", Salary, "Department Code", "Date Archived") SELECT "Employee Number", "First Name", "Last Name", Salary, "Department Code", CurDate() FROM __oldAt the Options section, leave the first two options checked, but uncheck Use Implicit Transactions To Maintain Data Integrity. There can be performance repercussions for enabling all three of these options, so you need to evaluate whether to enable them.
Since we will be using _ _old and/or _ _new tables, leave the Include Memo And Blob Data In VALUES Tables option checked. Unchecking this option can improve performance if your tables have large memo or BLOB fields and you will not be using this data in your triggers. ADS will build the _ _old and _ _new tables without including the memo or BLOB data in them. Since there are no memo or BLOB fields in the EMPLOYEE table, leaving this option checked does not affect performance.
The Use Implicit Transactions To Maintain Data Integrity option can be valuable when you are performing operations on two or more records from within the trigger. However, a transaction causes ADS to perform file I/O, which is costly, relatively speaking, when unnecessary. Since we are inserting a single record into the EMP_BAK table, the benefits of a transaction are not needed, and the performance benefits will be appreciated.
-
Click Save. The Trigger Name dialog box is displayed.
-
Set the trigger’s name to Archive Employee and click OK.
-
Your Triggers dialog box should now look something like that shown in Figure 8-3. Click Close to close this dialog box.
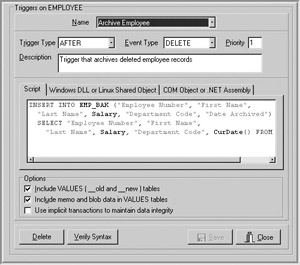
Figure 8-3: The Archive Employee trigger in the Triggers dialog box -
Now right-click the CUST_BAK table and select Triggers.
-
Set Trigger Type to AFTER, and set Event Type to DELETE.
-
Set Description to Restore customer to CUSTOMER table.
-
Enter the following SQL statement in the Script pane:
INSERT INTO CUSTOMER ("Customer ID", "Last Name", "First Name", Address, City, State, "Zip Code", "Phone Number", Notes) SELECT "Customer ID", "Last Name", "First Name", Address, City, State, "Zip Code", "Phone Number", Notes FROM __old -
Since the CUSTOMER table includes a MEMO field, it is essential that both the Include VALUES (_ _old and _ _new) Tables and Include Memo And Blob Data In VALUES Tables options are checked. For the same reason given for the previous trigger, uncheck Use implicit transactions to maintain data integrity.
-
Click Save. When prompted, set the trigger name to Restore Customer and click OK. Your Triggers dialog box should now look like that shown in Figure 8-4.
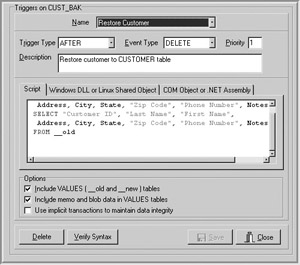
Figure 8-4: The Restore Customer trigger in the Triggers dialog box
These two triggers are now created and configured. If you want to test how they work, you can open the EMPLOYEE table in the Table Browser (right-click EMPLOYEE and select Open). Insert a new record and enter a unique employee number, and a first and last name. Click the Post edit button in the navigator to save the new record.
With your cursor on the newly inserted record, click the Delete button in the navigator. Two things happen. First, the record is deleted from the EMPLOYEE table. Second, this record is inserted into the EMP_BAK table, along with the date that the record was archived. You can see this by opening the EMP_BAK table in the Table Browser.
To view a previously created trigger, display the Triggers dialog box by either right-clicking the table to which the trigger applies in the Table Browser and selecting Open, or expanding the node of that table and clicking the Triggers node. Then select the trigger from the Name dropdown list.
Creating Triggers in Delphi
You create a Windows DLL when you create a trigger project in Delphi using the template provided by Advantage. This template is installed when you install the Advantage TDataSet Descendant. Templates are also available when you install the TDataSet Descendant for C++Builder and for Kylix. With Kylix, however, the template will create a shared object library.
Creating the Trigger Project
Use the following steps to create a trigger:
-
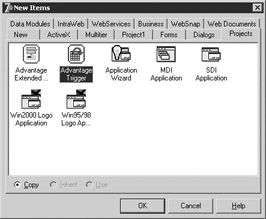
Select File | New | Other from Delphi’s main menu to display the Object Repository.
-
Select the Projects tab from the Object Repository to display the Projects page.
-
Select the Advantage Trigger template and click OK. When prompted, save this project to a directory where you want to store the source files.
Saving the Project Using a New Name
Delphi projects created from a project template are an exact copy of an existing project that has been added to the Object Repository. In case you ever plan to create more than one trigger project, it is a good idea to rename this project to something that is unique. The following steps show you how:
-
From Delphi’s main menu, select File | Save Project As.
-
Using the Save dialog box, set File Name to TriggerD.
-
Click Save.
Changing the Trigger Function Name
The trigger project created from the template contains a function named MyFunction that you use as the basis for your trigger. One of the first things you need to do is create a second trigger by copying the one found in the template. Next, you will change the names of both of these triggers to something that better reflects what the triggers do. You must also change the exports clause, updating the name of the trigger function that appears there initially, as well as adding the name of the second trigger function.
Use the following steps to change the name of MyFunction:
-
Locate the MyFunction implementation in the editor. Select the entire function and copy it to the clipboard.
-
Move your cursor past the end of the first function, and paste the copy from the clipboard.
-
Change the name of the first function to ArcCustomer, and the name of the second function to CheckCustArc.
-
Locate the exports clause and change MyFunction to ArcCustomer, and add CheckCustArc. Your complete exports clause will look something like the following:
exports ArcCustomer, CheckCustArc;
Writing Your Trigger Functions
You are now ready to modify the two trigger functions and compile your project. Use the following steps:
-
Modify both of your trigger functions to look like those shown in Listing 8-1.
-
When you are done updating the functions, select Project | Compile TriggerD.dpr from the main menu.
You are now done. Your compiled DLL, named TriggerD.DLL, will be located in the directory where you saved your trigger project. While it is not required that you do so, we recommend that you copy TriggerD.DLL to the same directory where your DemoDictionary data dictionary is stored.
| ON THE CD | This listing is also located in listing8-1.txt on this book’s CD-ROM (see Appendix B). |
Listing 8-1
function ArcCustomer ( ulConnectionID : UNSIGNED32; hConnection : ADSHANDLE; pcTriggerName : PChar; pcTableName : PChar; ulEventType : UNSIGNED32; ulTriggerType : UNSIGNED32; ulRecNo : UNSIGNED32 ) : UNSIGNED32; {$IFDEF WIN32}stdcall;{$ENDIF} {$IFDEF LINUX}cdecl;{$ENDIF} var oConn : TAdsConnection; InvQuery: TAdsQuery; ArcQuery: TAdsQuery; begin Result := 0; oConn := TAdsConnection.CreateWithHandle( nil, hConnection ); InvQuery := TAdsQuery.Create(nil); ArcQuery := TAdsQuery.Create(nil); try try oConn.Name := 'conn'; InvQuery.DatabaseName := 'conn'; ArcQuery.DatabaseName := 'conn'; //Check for outstanding invoices InvQuery.SQL.Text := 'SELECT COUNT(*) as "num" FROM INVOICE '+ 'WHERE "Customer ID" IN '+ '(SELECT "Customer ID" FROM __old) ' + 'AND "Date Payment Received" IS NULL'; InvQuery.Open; if InvQuery.Fields[0].AsInteger > 0 then begin SetError(oConn, 5500, 'Customer '+ ' has outstanding invoices. Cannot archive'); Exit; end; //No outstanding invoices. Archive customer record ArcQuery.SQL.Text := 'INSERT INTO CUST_BAK ' + '("Customer ID", "Last Name", "First Name", "Address", '+ 'City, State, "Zip Code", "Phone Number", "Notes", '+ '"Date Archived") SELECT "Customer ID", "Last Name", '+ '"First Name", "Address", City, State, "Zip Code", '+ '"Phone Number", "Notes", CURDATE() FROM __old'; ArcQuery.ExecSQL; ArcQuery.SQL.Text := 'DELETE FROM CUSTOMER '+ 'WHERE "Customer ID" IN '+ '(SELECT "Customer ID" FROM __old)'; ArcQuery.ExecSQL; except on E : EADSDatabaseError do SetError( oConn, E.ACEErrorCode, E.message ); on E : Exception do SetError( oConn, 0, E.message ); end; finally InvQuery.Close; InvQuery.Free; ArcQuery.Free; oConn.Free; end; end; function CheckCustArc ( ulConnectionID : UNSIGNED32; hConnection : ADSHANDLE; pcTriggerName : PChar; pcTableName : PChar; ulEventType : UNSIGNED32; ulTriggerType : UNSIGNED32; ulRecNo : UNSIGNED32 ) : UNSIGNED32; {$IFDEF WIN32}stdcall;{$ENDIF} {$IFDEF LINUX}cdecl;{$ENDIF} var oConn : TAdsConnection; ArcQuery: TAdsQuery; begin Result := 0; oConn := TAdsConnection.CreateWithHandle( nil, hConnection ); ArcQuery := TAdsQuery.Create(nil); try try oConn.Name := 'conn'; ArcQuery.DatabaseName := 'conn'; //Check for outstanding invoices ArcQuery.SQL.Text := 'SELECT COUNT(*) as "num" FROM CUST_BAK '+ 'WHERE "Customer ID" IN '+ '(SELECT "Customer ID" FROM __new) '; ArcQuery.Open; if ArcQuery.Fields[0].AsInteger > 0 then begin SetError(oConn, 5501, 'A customer with that ID '+ 'already exists in CUST_BAK. Customer ID '+ 'must be unique'); Exit; end; except on E : EADSDatabaseError do SetError( oConn, E.ACEErrorCode, E.message ); on E : Exception do SetError( oConn, 0, E.message ); end; finally ArcQuery.Close; ArcQuery.Free; oConn.Free; end; end;
Creating Triggers in C# with Visual Studio .NET
When you create a trigger using C# with Visual Studio .NET, you begin with a template that is automatically installed when you install the Advantage .NET Data Provider.
| Note | Advantage also provides a template for C#Builder developers. Using that template and the code provided in Listing 8-2, you can create this same project using C#Builder. |
Creating the Trigger Project
Use the following steps to create a new trigger project in Visual Studio .NET using the trigger template installed with the Advantage .NET Data Provider:
-
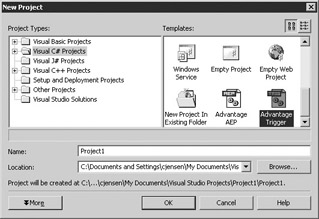
Begin by selecting File | New | Project. Visual Studio responds by displaying the New Project dialog box.
-
In the Project Types tree view, select Visual C# Projects. The available templates are displayed in the Templates pane, which appears to the right of the Project Types tree view, shown here:
-
Scroll the Templates pane until you see the Advantage Trigger template. Select this template.
-
Set Project Name to TriggerCS.
-
Next, use the Browse button to choose the directory to which you want to save this project.
-
Click OK to continue.
-
Your new C# trigger project should now be open in Visual Studio, as shown in Figure 8-5.
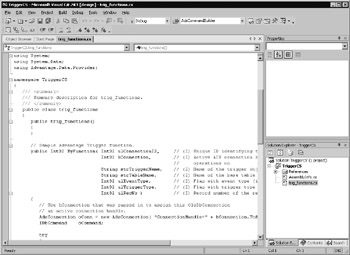
Figure 8-5: A new trigger project in Visual Studio .NET
Copying and Renaming Your Triggers
The trigger project created from the template contains a method named MyFunction that you use as the basis for your trigger. One of the first things you need to do is create a second trigger by copying the one found in the template. Next, you will change the names of both of these triggers to something that better reflects what the triggers do.
Use the following steps to copy the trigger method and assign new names to your two triggers:
-
Locate the MyFunction implementation in the editor. Select the entire method and copy it to the clipboard.
-
Move your cursor past the end of the first method, and paste the copy from the clipboard.
-
Change the name of the first method to ArcCustomer, and the name of the second method to CheckCustArc.
Writing Your Triggers
You are now ready to modify the two trigger methods and compile your project. Use the following steps:
-
Modify both of your trigger methods to look like those shown in Listing 8-2.
-
When you are done updating the methods, select Build | Build TriggerCS from Visual Studio .NET’s main menu.
-
If the project compiled correctly, set your Solutions Configuration to Release, and select Build | Build TriggerCS again.
You are now done. Your compiled DLL, named TriggerCS.DLL, will be located in the bin\Release directory under where your project is located. While it is not required that you do so, we recommend that you copy TriggerCS.DLL to the same directory where your DemoDictionary data dictionary is stored.
| ON THE CD | This listing is also located in listing 8-2.txt on this book’s CD-ROM (see Appendix B). |
Listing 8-2
public Int32 ArcCustomer( Int32 ulConnectionID, Int32 hConnection, String strTriggerName, String strTableName, Int32 ulEventType, Int32 ulTriggerType, Int32 ulRecNo ) { // Use hConnection that was passed in to assign this //AdsConnection an active connection handle. AdsConnection oConn = new AdsConnection( "ConnectionHandle="+hConnection.ToString() ); IDbCommand oCommand; Int32 recCount; IDataReader oReader; try { oConn.Open(); oCommand = oConn.CreateCommand(); oCommand.CommandText = "SELECT COUNT(*) as \"num\" "+ "FROM INVOICE "+ "WHERE [Customer ID] IN "+ "(SELECT [Customer ID] FROM __old) " + "AND [Date Payment Received] IS NULL"; oReader = oCommand.ExecuteReader(); oReader.Read(); recCount = oReader.GetInt32(0); oReader.Close(); if (recCount > 0) { oCommand.CommandText = "INSERT INTO __error "+ "VALUES( 5500, 'Customer has outstanding invoices. "+ "Cannot archive' )"; oCommand.ExecuteNonQuery(); return 0; } oCommand.CommandText = "INSERT INTO CUST_BAK " + "([Customer ID], [Last Name], [First Name], Address, "+ "City, State, [Zip Code], [Phone Number], Notes, "+ "[Date Archived]) SELECT [Customer ID], [Last Name], "+ "[First Name], Address, City, State, [Zip Code], "+ "[Phone Number], Notes, CURDATE() FROM __old"; oCommand.ExecuteNonQuery(); oCommand.CommandText = "DELETE FROM CUSTOMER "+ "WHERE [Customer ID] IN " + "(SELECT [Customer ID] FROM __old)"; oCommand.ExecuteNonQuery(); } catch( Exception e ) { AdsCommand oErrCommand = oConn.CreateCommand(); oErrCommand.CommandText = "INSERT INTO __error VALUES( 0, '" + e.Message + "' )"; oErrCommand.ExecuteNonQuery(); } return 0; } // MyFunction public Int32 CheckCustArc( Int32 ulConnectionID, Int32 hConnection, String strTriggerName, String strTableName, Int32 ulEventType, Int32 ulTriggerType, Int32 ulRecNo ) { AdsConnection oConn = new AdsConnection( "ConnectionHandle=" + hConnection.ToString() ); IDbCommand oCommand; Int32 recCount; IDataReader oReader; try { oConn.Open(); oCommand = oConn.CreateCommand(); oCommand.CommandText = "SELECT COUNT(*) as [num] "+ "FROM CUST_BAK WHERE [Customer ID] IN "+ "(SELECT [Customer ID] FROM __new)"; oReader = oCommand.ExecuteReader(); oReader.Read(); recCount = oReader.GetInt32(0); oReader.Close(); if (recCount > 0) { oCommand.CommandText = "INSERT INTO __error "+ "VALUES( 5501, 'A customer with that ID "+ "already exists in CUST_BAK. Customer ID "+ "must be unique')"; oCommand.ExecuteNonQuery(); return 0; } } catch( Exception e ) { AdsCommand oErrCommand = oConn.CreateCommand(); oErrCommand.CommandText = "INSERT INTO __error VALUES( 0, '" + e.Message + "' )"; oErrCommand.ExecuteNonQuery(); } return 0; } // CheckCustArc
Registering Your Trigger
When you compile your project with Visual Studio, it registers your .NET class library in the Windows registry on your development machine. If your data dictionary is on this same machine, you are ready to configure and test your trigger.
If you are running ADS as a remote server, and your data dictionary is on a machine other than the one where you compiled your .NET project, you must install the .NET class library before you can configure the trigger in the data dictionary. The same process must be used if you want to move your trigger executable from the directory to which the Visual Studio compiled it to the directory in which your data dictionary is stored, even if this is on the same machine.
This installation is performed using the regasm.exe utility, which is installed as part of the .NET framework. Since you cannot run the .NET class library without having installed the .NET framework, this utility should be on any machine on which you will run .NET triggers.
| Note | Depending on who is going to use your triggers, and how you are going to distribute them, you may want to sign and strongly name your .NET assemblies. Refer to the .NET Framework SDK (software development kit) for more information on signing and strong names. |
The following steps describe how to install your .NET class library:
-
Copy your .NET class library to the directory in which your data dictionary resides.
-
Open a command (CMD.EXE) window and navigate to the directory into which you copied your class library.
-
If regasm.exe is in a directory on your DOS path, you can register your library using a command similar to the following:
regasm TriggerCS.dll /codebase
-
If regasm is not on your DOS path, you must enter the fully qualified path to regasm. (If you do not know where regasm.exe is stored, use the Windows Explorer’s searching capabilities to find it.) The command might look something like the following:
c:\Windows\Microsoft.NET\Framework\v1.1.4322\regasm TriggerCS.dll /codebase
Note The preceding command-line entry must be entered as a single command (on one line).
The use of the /codebase command-line option is required here because you have not installed your trigger executable in the global assembly cache (GAC). If you did register your .NET executable in the GAC, you do not have to perform the preceding steps. While storing your class library in the GAC permits you to share it, sharing is really not an advantage in this case. Placing your trigger in the same directory as your data dictionary ensures that you do not introduce version control problems with triggers that are used in more than one data dictionary.
Also, when you use the /codebase command-line option, unless you have signed your compiled library, you will see several lines of message warning you that you are registering an assembly that is not signed, and that it does not use a strong name. Giving your assembly a strong name and signing it are options that you may want to consider. Those topics, however, are beyond the scope of this book.
| Tip | You can unregister a .NET class library using the same command line, replacing /codebase with /unregister as the command-line option. In fact, if you must update or replace a trigger, it is strongly recommended that you first unregister the old version before registering the updated version. Otherwise you may end up with multiple entries in your Windows registry. |
Creating Triggers in VB.NET with Visual Studio .NET
You create triggers in VB.NET using the same steps as outlined in the earlier section “Creating Triggers in C# with Visual Studio .NET.” There are only two differences:
-
When the New Project dialog box is displayed, set Project Name to TriggerVB7 instead of TriggerCS.
-
Your trigger methods are implemented in VB.NET instead of C#.
Modify both of your trigger methods to look like the code shown in Listing 8-3:
| ON THE CD | This listing is also located in listing8-3.txt on this book’s CD-ROM (see Appendix B). |
Listing 8-3
Public Function ArcCustomer(ByVal ulConnectionID As Int32, _ ByVal hConnection As Int32, _ ByVal strTriggerName As String, _ ByVal strTableName As String, _ ByVal ulEventType As Int32, _ ByVal ulTriggerType As Int32, _ ByVal ulRecNo As Int32) As Int32 Dim oConn As AdsConnection Dim oCommand As IDbCommand Dim RecCount As Int32 Dim oReader As IDataReader Try oConn = New AdsConnection( _ "ConnectionHandle=" & hConnection) oConn.Open() oCommand = oConn.CreateCommand oCommand.CommandText = "SELECT COUNT(*) as [num]" + _ "FROM INVOICE WHERE [Customer ID] IN " + _ "(SELECT [Customer ID] FROM __old) " + _ "AND [Date Payment Received] IS NULL" oReader = oCommand.ExecuteReader() oReader.Read() RecCount = oReader.GetInt32(0) oReader.Close() If RecCount > 0 Then Dim oErrCommand As AdsCommand oErrCommand = oConn.CreateCommand() oErrCommand.CommandText = "INSERT INTO __error " + _ "VALUES( 5500, 'Customer has outstanding invoices. " + _ "Cannot archive' )" oErrCommand.ExecuteNonQuery() ArcCustomer = 0 Exit Function End If oCommand = oConn.CreateCommand() oCommand.CommandText = "INSERT INTO CUST_BAK " + _ "([Customer ID], [Last Name], [First Name], Address, " + _ "City, State, [Zip Code], [Phone Number], Notes, " + _ "[Date Archived]) SELECT [Customer ID], [Last Name], " + _ "[First Name], Address, City, State, [Zip Code], " + _ "[Phone Number], Notes, CURDATE() FROM __old" oCommand.ExecuteNonQuery() oCommand = oConn.CreateCommand() oCommand.CommandText = "DELETE FROM CUSTOMER " + _ "WHERE [Customer ID] IN " + _ "(SELECT [Customer ID] FROM __old)" oCommand.ExecuteNonQuery() Catch Ex As Exception Dim oErrCommand As AdsCommand oErrCommand = oConn.CreateCommand oErrCommand.CommandText = "INSERT INTO __error " + _ "VALUES( 0, '" & Ex.Message & "' )" oErrCommand.ExecuteNonQuery() Finally ArcCustomer = 0 End Try End Function 'ArcCustomer Public Function CheckCustArc(ByVal ulConnectionID As Int32, _ ByVal hConnection As Int32, _ ByVal strTriggerName As String, _ ByVal strTableName As String, _ ByVal ulEventType As Int32, _ ByVal ulTriggerType As Int32, _ ByVal ulRecNo As Int32) As Int32 Dim oConn As AdsConnection Dim oCommand As IDbCommand Dim RecCount As Int32 Dim oReader As IDataReader Try oConn = New AdsConnection( _ "ConnectionHandle=" & hConnection) oConn.Open() oCommand = oConn.CreateCommand oCommand.CommandText = "SELECT COUNT(*) as [num] " + _ "FROM CUST_BAK WHERE [Customer ID] IN " + _ "(SELECT [Customer ID] FROM __new)" oReader = oCommand.ExecuteReader() oReader.Read() RecCount = oReader.GetInt32(0) oReader.Close() If RecCount > 0 Then oCommand.CommandText = "INSERT INTO __error " + _ "VALUES( 5501, 'A customer with that ID " + _ "already exists in CUST_BAK. Customer ID " + _ "must be unique' )" oCommand.ExecuteNonQuery() CheckCustArc = 0 Exit Function End If Catch Ex As Exception Dim oErrCommand As AdsCommand oErrCommand = oConn.CreateCommand oErrCommand.CommandText = "INSERT INTO __error VALUES( 0, '" & _ Ex.Message & "' )" oErrCommand.ExecuteNonQuery() Finally CheckCustArc = 0 End Try End Function 'CheckCustArc
|
EAN: 2147483647
Pages: 129