Using Triggers
|
Triggers, like AEPs, can be registered with a data dictionary either using the Advantage Data Architect or programmatically by writing SQL or writing in your development language to the Advantage Client Engine API. Registering triggers programmatically is something you can do if you need to register a trigger with a data dictionary at runtime, but most developers only need to register their triggers at design time. As is the case with so many of the objects you work with in a data dictionary, the Advantage Data Architect is the preferred tool for registering triggers.
Unlike AEPs, which are invoked by a client, triggers are associated with a specific event for a specific table. As a result, you do not find a TRIGGERS node under your data dictionary node, like you do with stored procedures. Instead, you will find the node for working with triggers under each table in the TABLES branch of the Advantage Database Manager tree view.
Registering Triggers
You already registered the two SQL script-based triggers into your data dictionary. Use the following steps to register your compiled triggers:
-
Expand the CUSTOMER table node from the Advantage Database Manager tree view.
-
Click the Triggers node to display the Triggers dialog box.
-
Set Trigger Type to INSTEAD OF, and Event Type to DELETE.
-
Set Description to Archive customer records with no outstanding invoices.
-
If your trigger container is a DLL or a shared object file, click the Windows DLL or Linux Shared Object tab. The Triggers dialog box should look like that shown in Figure 8-6. Click the browse button to the right of the Container Path and Filename field, and use the displayed Open dialog box to select your trigger container. If you created the Delphi trigger earlier in this chapter, select TriggerD.dll and click Open.
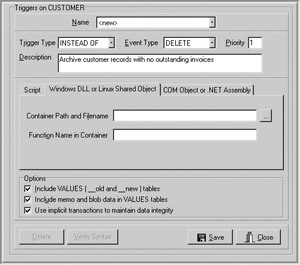
Figure 8-6: Registering a DLL-based triggerIf your trigger container is a .NET class library, click the COM Object or .NET Assembly tab. When you do this, your Triggers dialog box will look like that shown in Figure 8-7. Click the browse button to the right of the Program ID (ProgID) field to display the Select ProgID dialog box, shown here:

Figure 8-7: Registering a COM or .NET class library trigger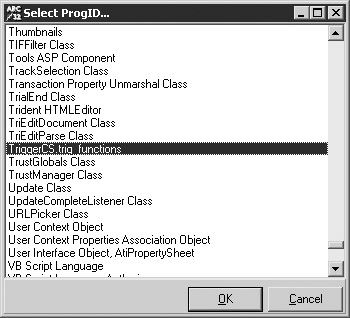
Use this dialog box to select the ProgID for your trigger container and then click OK. This ProgID should be the name of the project plus the name of the public class inside that class library, separated by a period. If you followed the steps given earlier in this chapter to create the class library using C#, your ProgID will be TriggerCS.trig_functions. If you created the Visual Basic .NET project, it will be TriggerVB7.trig_functions.
-
If you are registering a DLL trigger, set the Function Name in Container to the name of your exported trigger function. If you are registering a COM or .NET class library, you set the Method Name in Class field to the name of the method. If you created one of the projects described in this chapter, set this field to ArcCustomer.
-
Leave the checkboxes in the Options section checked, meaning that your triggers will have access to the old and new values, will include BLOB data, and will operate within an implicit transaction (if you are running ADS).
-
Click Save to save your trigger. The Advantage Database Manager will respond by displaying the Trigger Name dialog box. Set the trigger name to Archive Customers and click OK.
-
We are now going to register the CheckCustArc trigger. This trigger needs to be configured to be used as both a BEFORE update and a BEFORE insert trigger. Let’s begin with the BEFORE update trigger. With the Triggers dialog box for the CUSTOMER table still displayed, set Name to <new>.
-
Set Trigger Type to BEFORE and Event Type to UPDATE.
-
Set Description to Verify unique ID before update.
-
Select the pane you used in step 5. Select the library or ProgID for your trigger, and then set the Function Name or the Method Name to CheckCustArc.
-
Click Save. When prompted for the trigger name, enter Verify ID Update.
-
Set Name to <new> once more.
-
Set Trigger Type to BEFORE and Event Type to INSERT.
-
Set Description to Verify unique ID before insert.
-
Choose the same library and function/method name as you did for the Verify ID Update trigger.
-
Click Save. Save this trigger using the name Verify ID Insert. Click OK when you are done.
Updating and Deleting Triggers
You can update a trigger’s description, as well as change which library and function/ method to use for the trigger. To do this, open the Triggers dialog box, and then select the trigger you want to update. To delete the trigger, click Delete. After you are done, click the Save button to save your changes.
If you change your trigger’s library or function/method name, the new trigger will be used once the old trigger can be unloaded. With triggers implemented as DLLs, COM objects, and .NET class libraries, this will occur when the last user to use a trigger in the trigger’s container drops their connection to ADS. With SQL scripts, this will occur as soon as the trigger stops executing.
Debugging Triggers
You cannot debug SQL script triggers. For all other trigger types, the process is nearly identical to that which you use when you debug an AEP. Specifically, while in your development environment, set up a host or calling application. Then, with your trigger project open and breakpoints set, start the debugger, which will automatically launch the host or calling application. See your development environment’s documentation for details on how to do this.
Also, recall that most developers debug trigger containers using ALS, but with ADS 7.0 and later, you can use the -exe command-line option with the ads.exe host or calling application to debug triggers using ADS.
| Note | As is the case with Delphi AEPs, some development environments may require that you change your project options before you can successfully debug your project. For example, with triggers written in Delphi, you often have to enable debugger-related linker options. Remember to disable these options before you distribute your trigger libraries, as these options cause your projects to be very large. |
Deploying Triggers
Your triggers that are implemented as SQL scripts are stored in your data dictionary. There is nothing special that you need to do to deploy your SQL script triggers, other than deploy your updated data dictionary.
If your triggers are entirely SQL based, and you are adding triggers to an existing dictionary, it is not necessary to re-deploy that dictionary. Instead, you can write a simple SQL script that adds one or more triggers to your existing dictionary. If you decide to take this approach, you do not even have to write the SQL manually. You can use the Data Dictionary Differentiator to generate the SQL scripts that update your existing data dictionary.
For all other types of triggers, the issues of deployment are the same for triggers as they are for AEPs. Specifically, you will need to deploy your trigger containers to the machines on which they will be executed. Furthermore, for COM and .NET class libraries, you must register the library in order for ADS or ALS to load it. You might also want to consider signing and using strong names for .NET class libraries. If your development environment has an installer builder, you should be able to use it to register your .NET class libraries and COM objects.
Note that if you are deploying updated COM or .NET class library triggers, it is highly recommended that you first unregister your older versions before replacing and registering the new versions. Failure to unregister older versions before replacing them may leave unwanted entries in that machine’s Windows registry.
|
EAN: 2147483647
Pages: 129