Building a Pivot Table Using External Data Sources
| The general idea behind building your pivot table using an external data source is that you can create and use a pivot cache from a set of data that is not located in your Excel workbook. This means you can create a pivot table without one cell of data in your Excel workbook! Although there are many ways you can apply external data sources, one of the main benefits from this functionality is the ability to work around Excel's data management limitations. Working Around Excel's Data Management LimitationsThere is no argument that Excel is very good at processing and analyzing data. In fact, pivot tables themselves are a testament to the analytical power of Excel. However, with all its strengths comes one noticeable weakness. Excel makes for a poor data management platformprimarily for three reasons:
This is why in smart organizations, the task of data management is not performed by Excel; rather, it is primarily performed by databases such as Microsoft Access and SQL Server. These databases are used to store millions of records that can be rapidly searched and retrieved. The effect of this separation in tasks is that you have a data management layer (your database) and a presentation layer (Excel). The trick is to find the best way to get information from your data management layer to your presentation layer for use by your pivot table. Under normal circumstances, you would simply import or paste data from your database directly into an Excel spreadsheet as a standalone dataset. From there you could use it as a local data source for your pivot table (local meaning in the spreadsheet within which you are working). However, there are a few situations where creating a local data source in Excel is just not practical:
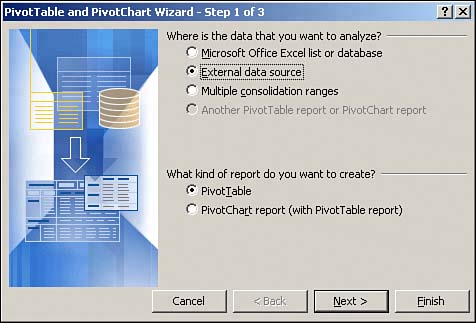
Using an external data source in a pivot table would provide a way to avoid these problems. About MS QueryOutside the realm of VBA, Excel cannot, in and of itself, link to external data sources. Rather, it gets its ability to link to external data sources from a little-known supplementary program called MS Query. MS Query is a standalone program, installed with the Office suite, that can be used through Excel or on its own. You will normally find this program under C:\Program Files\Microsoft Office\Office**\MSQRY32.exe (where the ** is the version of office you have installed). CAUTION MS Query may or may not be installed on your system, based on how you performed your Office installation. Keep in mind that if you do not have the MSQRY32.exe program installed on your system, you will not be able to link to external data sources in Excel. To install MS Query you will need your Microsoft Office installation disc. Start the Microsoft Office Setup and choose to customize your installation. While you are customizing your installation, look for Office Tools. You will find an entry called Microsoft Query under Office Tools. Make sure you set it to Run from My Computer and then complete the installation. Microsoft has not invested a lot of time and effort in developing or promoting MS Query over the years. Indeed, most people using MS Query would agree that the interface is a bit dated and the documentation is modest at best. Alas, with new and exciting XML capabilities at Excel's doorstep, MS Query is not likely to get very much attention any time soon. Nevertheless, MS Query still has its role to play in helping Excel link to external data sources. Throughout this chapter, you will learn basic techniques that explain the process of using external data as it pertains to pivot tables. Keep in mind that although these techniques are based in an Excel environment, using Excel wizards, the engine behind this functionality is MS Query. TIP In order to keep this book focused on pivot tables, you will just skim the surface of using external data with Excel. If you are interested in a more detailed lesson on data management using Excel and MS Query, you may want to look into a book titled Managing Data with Excel (Business Solutions), (ISBN 0789731002) by Conrad Carlberg. This book, recently updated and re-released by Que, is an excellent guide to the brilliant things you can do with Excel as it pertains to data management. CASE STUDY: Analyze a Dataset with More Than 83,000 Records with a Pivot TableSay that you have an Access database called MyExternalData.mdb on your system. You want to analyze the data in the database with an Excel pivot table, but there are more than 83,000 rows of data in the table. Although you cannot import this data into Excel as local data, you can build a pivot table using external data. TIP The MyExternalData.mdb Access file can be found at http://www.MrExcel.com/pivotbookdata.html. Simply download the file anywhere on your system, making sure you note its path and location for use in this walkthrough. To start building a pivot table from an external data source, simply go to the application toolbar, select Data, and then select PivotTable and PivotChart Report. After you have activated the PivotTable and PivotChart Wizard, select External Data Source, as shown in Figure 9.1, and click the Next button. Figure 9.1. Select Data and then PivotTable and PivotChart Report. Next, select External Data Source and click Next.
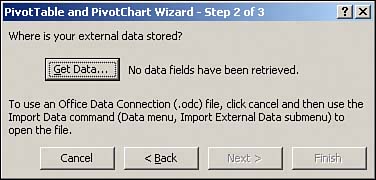
The next dialog box, shown in Figure 9.2, is PivotTable and PivotChart Wizard Step 2 of 3. Select Get Data to initiate MS Query and to start defining your data source. Figure 9.2. Selecting Get Data will initiate MS Query.
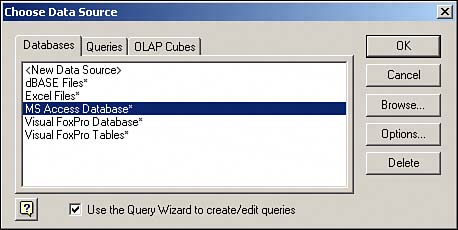
Looking at Figure 9.3, you will notice that your dialog box no longer refers to creating a pivot table. This is because, at this point, you are no longer working with an Excel wizard. You are now working with a MS Query wizard aimed at collecting all the definitions needed to establish your external data source. Figure 9.3. Select the MS Access Database entry and place a check in the Use the Query Wizard to Create/Edit Queries check box. Click OK to continue.
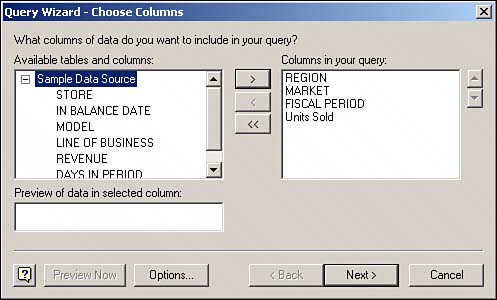
The first step in defining an external data source for your pivot table is to choose a data source. In this case, your data source is in an Access file, so you would select MS Access Database. In order to continue using the wizard, you will need to check the Use the Query Wizard to Create/Edit Queries check box. Click OK to continue. Now that MS Query knows that you are working with an Access database, you will have to identify which Access database you want to work with. To do this, simply use the browser to find your database then click OK. The dialog box that comes up next is a field selector. Use the tree view on the left to expand the tables in your database and view the fields. Then move the fields you will need in your pivot table to the list on the right using the buttons in the middle, as shown in Figure 9.4. Figure 9.4. Move the desired fields using the ">" button.
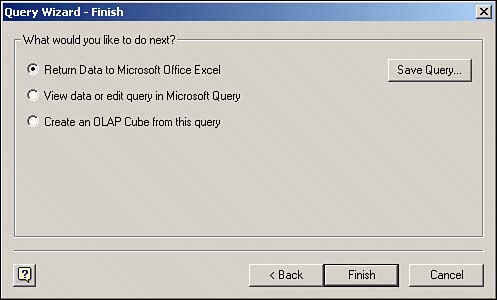
NOTE The two dialog boxes you skipped over in this walkthrough provide for some basic filtering and sorting options that are, for the most part, self-explanatory. In this walkthrough, you will not make use of these features. After you are satisfied that you have all the fields you will need, click the Next button three times until you come to the dialog box titled Query Wizard Finish. You will finally have to tell MS Query what you want to do with your resulting query. You have the option of returning the data to Microsoft Excel, opening MS Query to view and edit your query, or creating an OLAP cube from your resulting data. In this scenario, you want to select the option Return Data to Microsoft Office Excel, as shown in Figure 9.5. Figure 9.5. Select the Return Data to Microsoft Office Excel option and then click Finish.
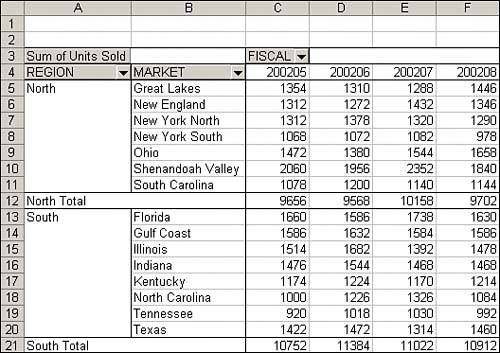
NOTE When you are creating a pivot table with external data, the option Return Data to Microsoft Excel does not place the resulting data directly into your spreadsheet, as this option would suggest. Instead, the resulting data goes directly into your pivot table's pivot cache. The benefit of this behavior is that you can create pivot tables using datasets that exceed the 65,536-row limit of Excel. You will be taken back to the PivotTable and PivotChart Wizard Step 2 of 3 dialog box, as shown previously in Figure 9.2. You are once again working with the Excel wizard. Notice the text next to the Get Data button reads "Data fields have been retrieved." This is the sign that all has gone well and you are ready to go to the next step. Step 3 of the PivotTable Wizard will seem like familiar territory again. In this step, you select where you want your pivot table to reside. The resulting pivot table is shown in Figure 9.6. After your data has been brought into Excel, you can create, refresh, and manage your pivot table, just as you would any other. Figure 9.6. After your data has been brought into Excel, you can create, refresh, and manage your pivot table, just as you would any other pivot table.
To add and edit fields used in your pivot cache, simply right-click anywhere inside your pivot table, select PivotTable Wizard, click the Back button, and then select Get Data. You will be taken to the dialog box previously shown in Figure 9.4. CAUTION If you move or rename your Access database after you have created your pivot table, you will not be able to refresh your pivot table. If you do get an error when trying to refresh, simply click OK to close the error message box, select Database in the subsequent dialog box, and then use the browser to locate your file again. Click OK twice to get back to your pivot table, which is now pointed to the correct file. |
EAN: 2147483647
Pages: 140