Installing Linux over a Network
When you re installing Red Hat Linux over a network connection, you generally aren t going to use the Red Hat installation CDs. Therefore, you need a boot disk. Red Hat provides boot disk images that you can write to floppies and CDs.
Once you have the boot disk, you can start the Red Hat Linux network installation process. In this chapter, we proceed with text-mode installation, since we covered graphical mode in Chapter 03 . In any case, graphical-mode installations aren t allowed if you re installing from an FTP or Apache server.
The Red Hat Linux installation program is known as Anaconda. You can customize the Anaconda installation process to omit installation options such as games . For more details, read Chapter 05 .
Making Boot Disks
Red Hat provides boot disk images on the first installation CD, in the /images directory. You can even use the first installation CD itself as a network boot disk. There are two basic files that you can use to create an installation boot disk; several driver images are also available that you can use to create 1.44MB driver floppy disks.
The appropriate files in the /images directory are briefly described in Table 4.1.
| Filename | Description |
|---|---|
| bootdisk.img | Used to create a standard boot floppy for local and network installations. |
| drvblock.img | Contains additional block device drivers; may be needed for many SCSI hard drives . |
| drvnet.img | Includes additional network device drivers. |
| pcmciadd.img | Adds additional PCMCIA drivers for many laptop computers. |
| boot.iso | Includes data from all boot and driver disks; since it s too big for a 1.44MB floppy, it s set up to be recorded on a CD. |
You can write an .img file to a 1.44MB floppy disk in one of three basic ways. If you have a Linux computer, you can use the cat or dd command. For example, you can use either of the following commands to write the contents of bootdisk.img to a 1.44MB floppy drive. These commands assume that you ve mounted the first Red Hat Linux installation CD on the /mnt/ cdrom directory:
# dd if=/mnt/cdrom/images/bootdisk.img of=/dev/fd0 # cat /mnt/cdrom/images/bootdisk.img > /dev/fd0
A second approach is to write the contents of these image files to a 1.44MB floppy drive in Microsoft Windows. The key utility is on the first Red Hat Linux installation CD, in the /dosutils directory. The command-line version of this interface is RAWRITE.EXE . In Microsoft Windows, open an MS-DOS command-line window. Insert your first Red Hat Linux installation CD. If your CD is on drive E, run the following commands:
E:\> DOSUTILS\RAWRITE Enter disk image source file name: E:\IMAGES\BOOTDISK.IMG Enter target diskette drive: A: Please insert a formatted diskette in drive A: and press -ENTER- :
You can also create a boot CD from the boot.iso file. For more information, refer to the cdrecord command described in Chapter 14 . You can even start a network installation using the first Red Hat Linux 9 installation CD; just remember to start the installation using the linux askmethod or text askmethod command.
Text Mode: Booting
Now we ll examine a text-mode network installation. As described in the last section, there are three basic options for boot disks:
-
A floppy disk written from the bootdisk.img file
-
A CD written from the boot.iso file
-
The first Red Hat Linux installation CD
In all of these cases, you ll see the menu shown in Figure 4.3.
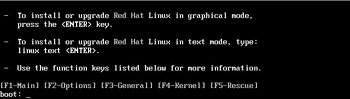
Figure 4.3: Red Hat Linux installation menu
We installed Red Hat Linux in graphical mode in Chapter 03 . That chapter was more focused on regular users. Now we ll look at the administrative side of things in more detail. As you can see from the initial menu, several other menus are available. You can get to the Installer Boot Options menu by pressing F2. The menu is shown in Figure 4.4.
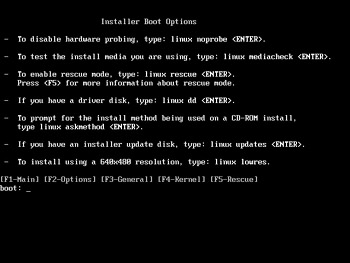
Figure 4.4: Installer Boot Options
This menu lists some of the available options for what you can enter at the boot: prompt. Table 4.2 describes these options.
| Option | Description |
|---|---|
| linux noprobe | Disables detection of key hardware components ; if you select this option, be prepared to use driver disks. |
| linux mediacheck | Adds an additional step to the process, where the integrity of media such as installation CDs are tested against embedded MD5 checksums. |
| linux rescue | Starts a process that detects current Linux partitions on your system; can be used to recover from a number of different boot failures (for details, see Chapter 11 ). |
| linux dd | Adds an additional step to the process, prompting for a driver disk; when you use the standard Red Hat bootdisk.img floppy, Linux prompts for the driver disk automatically. |
| linux askmethod | If you re starting the installation process from the first Red Hat installation CD, allows you to select a network installation source. |
| linux updates | Allows you to use an update floppy disk; mostly for upgrades. |
| linux lowres | Starts a graphical-mode installation process in a screen with 640 480 resolution. |
| Note | If you want to start the installation in text mode, just substitute text for linux in one of the options in Table 4.2. Alternatively, you can start the installation in text mode by using the linux text or text commands. |
In other words, if you re starting the installation process from the bootdisk.img floppy or the boot.iso CD, you ll want to enter the following:
boot: linux text
Alternatively, if you re starting the installation process from the first installation CD, enter this:
boot: text askmethod
One of the things you can do at the boot prompt is to specify the parameters of some hardware. Figure 4.5, the Kernel Parameter Help screen, provides the basics of what you can do. For more information, run the man bootparam command on another Linux computer.
Text Mode: Step by Step
Now that you ve started the installation process, let s examine how this works, step by step. We ll describe the text-mode process in detail, based on starting from a bootdisk.img installation floppy. The other startup methods are less complex.
| Tip | This is a very long section. If you re planning to read it all at once, it might help to take a break before you begin. |
-
Boot your computer with the Red Hat Linux installation floppy, created from the bootdisk.img file, using the techniques described earlier in the "Making Boot Disks" section.
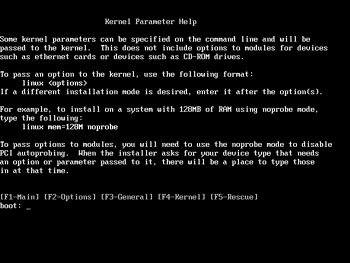
Figure 4.5: Kernel Parameter Help -
When you see the prompt, enter the following:
boot: linux text
Note If you re using the first Red Hat Installation CD, enter text askmethod at the boot: prompt.
You ll see a series of messages installing a basic kernel and the text-mode version of the Anaconda installation program.
-
Select a language from the Choose A Language screen, shown in Figure 4.6. While English is the default, you can install Red Hat Linux with prompts in some 18 different languages and dialects. You can use the Up and Down arrow keys to make your selection. When you ve selected your language, use the Tab button to highlight OK, and then press Enter or F12 to continue.
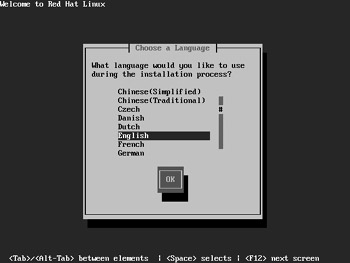
Figure 4.6: Choosing a languageNote With the various text-mode menus, you can use the arrow and Tab keys to navigate between selections. Once you ve made your selection, you can press F12, or highlight OK and press Enter or the spacebar to continue. If there are settings that you can toggle, highlight the desired setting and press your spacebar.
-
Select a keyboard from the Keyboard Type screen, shown in Figure 4.7. While the us keyboard is the default, you can set up a Red Hat Linux installation on over 60 different keyboards, many of them customized for other languages. Once you ve selected your keyboard, press F12 to continue.
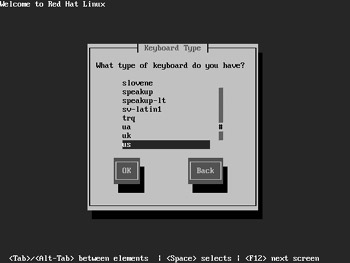
Figure 4.7: Choosing a keyboard type -
Select from the network installation methods shown in Figure 4.8. As we described earlier, you can install from an NFS, an FTP, or an HTTP (Apache) server. Make your selection and press F12 to continue.
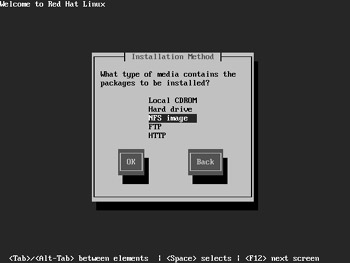
Figure 4.8: Specifying an installation methodNote If you have more than one network card, you ll see a menu where you re allowed to select between your cards, such as eth0 and eth1 . There s no easy way to tell which card is connected to which network. If you select the wrong card, you ll see an error message in the next few steps. Some trial and error may be required; if you select the wrong network card, use the Back options in the menus, and then try the other card.
-
Additional drivers may be required with the bootdisk.img -based installation floppy, as shown in Figure 4.9. Select Use A Driver Disk and press Enter to continue. If you don t see the No Driver Found screen, that means you probably started from the first Red Hat installation CD or the boot.iso -based CD; in that case, skip ahead to step 10.
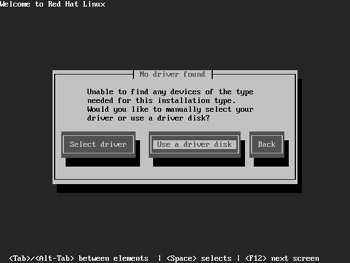
Figure 4.9: The No Driver Found screen -
Now that you need a new driver, you can select a driver disk, as shown in Figure 4.10. You can use one of the driver floppies that you may have created earlier in the section Making Boot Disks. In that case, select fd0 . If you can use the first Red Hat installation CD as a driver disk, select the device associated with your CD, usually hdb or hdc . After you make your selection, press F12 to continue.
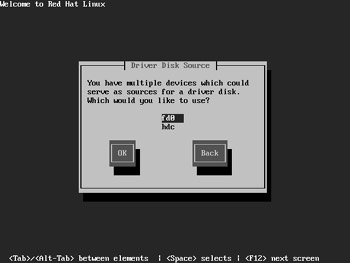
Figure 4.10: Selecting a driver disk source -
At the prompt shown in Figure 4.11, insert the driver disk (floppy or CD) appropriate for your network card or hard drive. If you need both, you ll be prompted to repeat the process with the other disk.
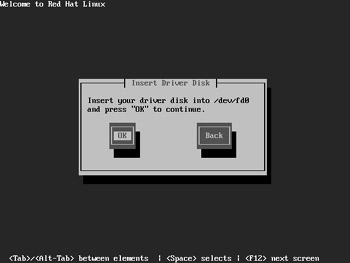
Figure 4.11: Insert a driver disk. -
If you need a different driver disk, you ll see the Error screen shown in Figure 4.12. Select Load Another Disk and press Enter to continue. If you continue to see the same message, your driver disk may be corrupt or may not support your hardware. Return to step 7. If you don t see the Error screen, proceed to step 10.
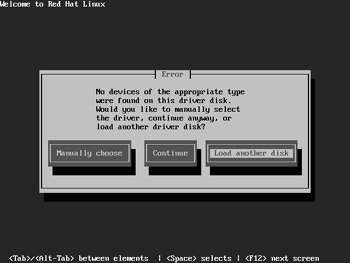
Figure 4.12: Prompt for another driver disk -
Now that you have installed drivers for your network card and hard drive, you re ready to set up the connection to the network server. In the Configure TCP/IP screen shown in Figure 4.13, you ll need to set up TCP/IP settings for your computer.
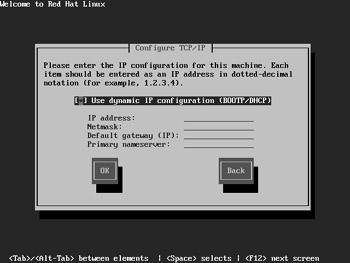
Figure 4.13: Configuring TCP/IPIf there is a DHCP (Dynamic Host Configuration Protocol) server available for your network, you can keep the Use Dynamic IP Configuration (BOOTP/DHCP) setting active; otherwise , you ll need to set up key IP address information for your system. In that case, highlight the setting and press the spacebar to deselect it. For more information on IP addressing, see Chapter 20 . Make your selections and press F12 to continue. If you have a second network card, you ll repeat this step with that card.
Tip If you have a home network, you may already have a DHCP server. Many hardware routers, such as those associated with cable modems or DSL adapters, include their own DHCP server. If you have one of these components, check the documentation associated with that router. Make sure the assigned IP addresses matches the subnet you ve configured for your network.
-
What you ll do next varies slightly depending on whether you re installing from an NFS, an Apache HTTP, or an FTP server. In any of these cases, you ll need to cite the name or IP address of the server, as well as the location of the installation files. Figures 4.14, 4.15, and 4.16 illustrate what you might enter for each of these types of servers, based on the server setup instructions earlier in this chapter. For example, Figure 4.14 works if you ve installed the RedHat directory as part of the /mnt/inst directory on the NFS server. Figures 4.15 and 4.16 are based on the settings described earlier for copying installation files to an HTTP or a FTP server.
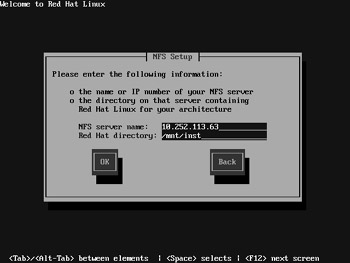
Figure 4.14: NFS Setup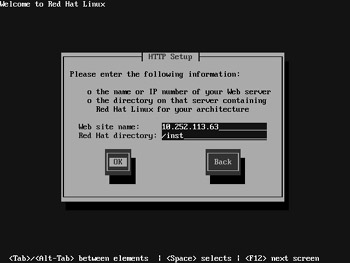
Figure 4.15: HTTP Setup
Figure 4.16: FTP SetupIf you re installing from an FTP server, you ll see in Figure 4.16 that you can install from a non-anonymous FTP server, that is, where you have a user account with a password. If you select this option, you ll be prompted for your username and password.
-
If you re successful connecting to any network server, you ll eventually see the following message:
Running anaconda, the Red Hat Linux System installer - please wait
followed by the welcome screen shown in Figure 4.17. The steps that follow are independent of the installation server that you re using. Select OK to continue.
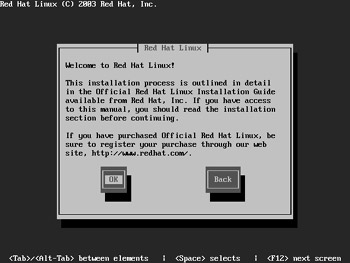
Figure 4.17: The welcome screenNote If you ever install a Red Hat Linux beta, about this time you ll see a warning to that effect, along with an opportunity to stop the installation process.
-
Select a mouse from the Mouse Selection screen, shown in Figure 4.18. You can select from nearly 40 types of pointing devices, including several that connect to USB interfaces. In most cases, if you select a two-button mouse, the Emulate 3 Buttons option is automatically selected.

4.18 : NFS SetupNote The Emulate 3 Buttons option lets you simulate the functionality of a middle mouse button by pressing the left and right buttons simultaneously . You can select or deselect this option by highlighting it and pressing the spacebar.
-
If you re installing Red Hat Linux on a computer that already has a previous version of Red Hat, you ll see the System To Upgrade screen shown in Figure 4.19. If you re planning to upgrade an existing installation of Red Hat Linux, select it. Or, you can set up a fresh installation of Red Hat Linux in the same space by selecting Reinstall System.
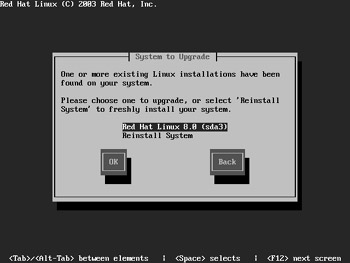
Figure 4.19: Option to upgradeIf you choose to upgrade an existing Red Hat Linux installation, read the next section. Otherwise, select Reinstall System and press F12 to continue.
-
Select an Installation Type. As shown in Figure 4.20, you have four options. Each option is associated with different default package groups, as described in the Installation Options sidebar. For the purpose of this chapter, we ll select a Server installation; the steps associated with the other options are nearly identical. Make your selection and press F12 to continue.
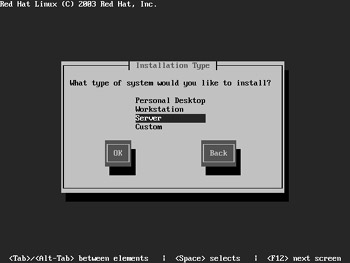
Figure 4.20: Installation Type options
Installation Options There are four standard Red Hat Linux installation options: Personal Desktop, Workstation, Server, and Custom. While customized installations are possible in each case, each option is associated with a set of default package groups. Each package group includes a set of RPM packages, documented in the comps .xml file, and described in Web Chapter 5, which can be found on the Sybex website at www.sybex.com .
Older versions of Red Hat Linux included a Laptop installation option, which incorporated packages associated with standard laptop hardware. These packages are now incorporated in the Personal Desktop and Workstation installation options.
For your reference, the package groups that are installed by default are listed here.
Group
Personal Desktop
Workstation
Server
Custom
Administration Tools
*
*
*
Authoring and Publishing
DNS Name Server
Development Tools
*
Editors
*
*
Engineering and Scientific
FTP Server
GNOME Desktop Environment
*
*
*
GNOME Software Development
*
Games and Entertainment
*
*
Graphical Internet
*
*
*
Graphics
*
*
*
KDE Desktop Environment
KDE Software Development
Kernel Development
Mail Server
Network Servers
News Server
Office/Productivity
*
*
*
Printing Support
*
*
*
*
SQL Database Server
Server Configuration Tools
*
Sound and Video
*
*
*
System Tools
Text-based Internet
*
*
*
*
Web Server
*
Windows File Server
*
X Software Development
*
X Window System
*
*
*
Approximate Size of installed files
1700MB
2100MB
850MB
1500MB
-
Next, you ll select the Disk Partitioning Setup, as shown in Figure 4.21. If you select Autopartition, Red Hat Linux automatically configures partitions for you, based on the required packages, your RAM, and the size of available partitions on your hard drive(s). If you select Disk Druid, skip to step 18. Make your selection and press Enter to continue.
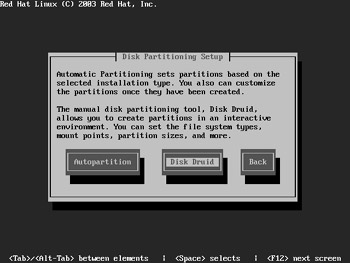
Figure 4.21: Disk Partitioning SetupNote If this is a new hard disk, you may see a warning that the partition table is unreadable. You ll be given an opportunity to initialize the drive. You ll have to answer yes to install Red Hat Linux on this hard drive.
-
If you ve chosen to let Red Hat autopartition your system, you ll see the Automatic Partitioning window, shown in Figure 4.22. If you re installing Red Hat Linux on a computer with Linux and Microsoft Windows partitions, be careful. The default option for a Server installation would delete your Microsoft Windows operating system. The options are described in Table 4.3. Make your selection and press F12 to continue.
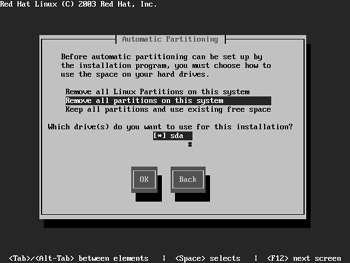
Figure 4.22: Automatic PartitioningTable 4.3: Automatic Partitioning Options Option
Description
Remove All Linux Partitions On This System
Deletes all partitions formatted to Linux filesystems; does not affect partitions formatted to other filesystems, such as those associated with Microsoft Windows.
Remove All Partitions On This System
Deletes all partitions on this computer.
Keep All Partitions And Use Existing Free Space
Assumes that you have unpartitioned free space on your hard drive(s); if you don t, this option leads to an error message.
Which Drive(s) Do You Want To Use For This Installation?
If you have more than one physical hard drive, you re allowed to select the drives where Red Hat Linux is to be installed.
-
You re asked to confirm your selection, as shown in Figure 4.23. If you re satisfied with your choice, select Yes and press Enter to continue.

Figure 4.23: You ll see this warning before you delete partitions. -
You re taken to a Disk Druid screen, where you can review the choices made by Anaconda s Automatic Partitioning. The default Server configuration on a computer with 192MB of RAM and a 4GB hard drive is shown in Figure 4.24. When space permits , Red Hat normally assigns twice the amount of RAM as a swap partition.
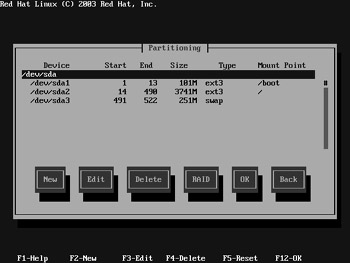
Figure 4.24: Disk Druid -
You can edit configured partitions. For example, if you had the configuration shown in Figure 4.24, you could highlight /dev/sda2 , associated with the root ( / ) directory. You could then use the Tab key to highlight Edit and press Enter; this would take you to the Add Partition window, where you can change the settings associated with /dev/sda2 . Figure 4.25 shows this menu, and Table 4.4 describes the options.
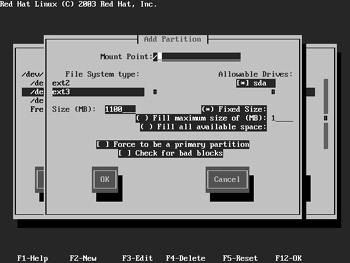
Figure 4.25: Editing a configured partitionTable 4.4: Options in the Add Partition Window Option
Description
Mount Point
Specifies the directory to be mounted on the partition; for mountable directories, consult the discussion on the Filesystem Hierarchy Standard in Chapter 07 .
File System Type
Sets the format for the partition; you re allowed to select form the Linux ext2 or ext3 standards, the Linux swap format, a Logical Volume Manager (LVM) volume, a software RAID volume, or a Microsoft Windows “style vfat format.
Allowable Drives
Notes the hard drive device associated with the partition.
Size (MB)
Specifies the size of the partition, in MB; this can be fixed, growable to a specific size, or can be set to fill any remaining free space on the hard drive.
Force To Be A Primary Partition
Generally, you ll want the partition with the /boot directory to be on a primary partition below cylinder 1024.
Check For Bad Blocks
Sets up a physical check of the partition for unreadable sectors.
-
You can also add new partitions. For example, I ve added a partition for the /var directory to help control the remaining free space, as shown in Figure 4.26.

Figure 4.26: Adding a partition -
If you ve configured two or more software RAID partitions, you can configure a RAID device. Back in the main Disk Druid screen shown in Figure 4.24, select RAID and press Enter. If you have sufficient available software RAID partitions, you ll see the Make RAID Device menu, shown in Figure 4.27.
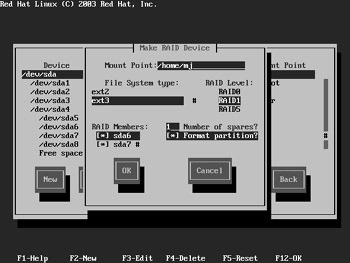
Figure 4.27: The Make RAID Device menuIn this case, I ve created a RAID1 level device, with three RAID member partitions: sda6 , sda7 , and sda8 . Since RAID1 requires only two partitions, one is used as a spare. For more information on RAID, see Chapter 14 .
Note The Red Hat Linux text-mode menus don t allow you to manually configure Logical Volume Manager filesystems. However, it s possible in the graphical-mode installation shown in Chapter 03 as well as Kickstart installations shown in Chapter 05 .
Partition Sizes One important decision during Red Hat Linux installation is on the size and number of your partitions. As described in Chapters 3 and 7 , you can mount different directories on physically separate hard drive partitions. This can protect you, because an overload on many partitions may not crash your computer.
If you have less than 2GB or 3GB available on your hard drive, the choices are simple. You don t have much extra room on your hard drive and are therefore pretty much limited to separate partitions for a root ( / ) and /boot directory and a swap partition. This and several typical partition configurations are described in Chapter 07 .
If you have more space, you have more flexibility. You may be able to configure separate partitions for several different directories. As described in Chapter 07 , some directories should not be mounted on separate partitions.
Some examples of directories you might want to mount are shown below and include the minimum space required when you install everything in Red Hat Linux (this may be larger than the size of the files installed in the particular directory). Remember, you ll likely need additional room for users, applications, and log files. For example, large websites may produce gigabytes of log files every day!
Directory
Description
/boot
Contains the boot files, including the Linux kernel; the default 100MB size should be sufficient.
/
The top-level root ( / ) directory; includes all directories not mounted on separate partitions. When other directories shown are mounted on separate partitions, the remaining directories under root ( / ) contain about 110MB of files under the "Everything" installation.
/home
Includes home directories for all users except root; when selecting a size, you need to consider longer- term needs of current and future users.
/home/mj
Limits the amount of space available for a specific user; you can also do this with quotas described in Chapter 09 .
/opt
Contains files for many third-party applications; about 17MB of files are installed via the Everything installation.
/tmp
Includes files that are automatically deleted on a regular basis; suitable for downloads. About 5MB of files are installed via the Everything installation.
/usr
Contains many programs and lots of data; an Everything installation requires over 5300MB of space. Some third-party programs may also require space in this directory.
/var
Includes directories for log files and print spools; should leave several hundred MB of empty space in this directory. About 210MB of files are installed via the Everything installation.
-
Create and delete additional partitions as desired. I ve created the series of partitions shown in Figure 4.28. When you ve finished, press F12 to continue.
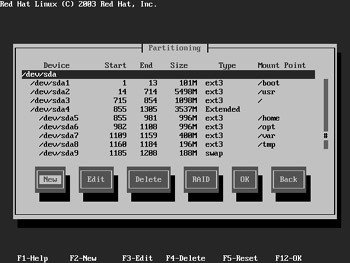
Figure 4.28: A partition configuration -
Now you can select your bootloader. You have three choices, as shown in Figure 4.29. The default is GRUB, the Grand Unified Boot Loader, which is the default described in Chapter 11 . The main alternative is LILO, the Linux Loader, which was the default on older versions of Red Hat Linux. You can choose to use another bootloader, such as those associated with the proprietary Partition Magic or System Commander programs. Since Red Hat has deprecated LILO, we will stick with the default GRUB bootloader. Make your selection and press F12 to continue.
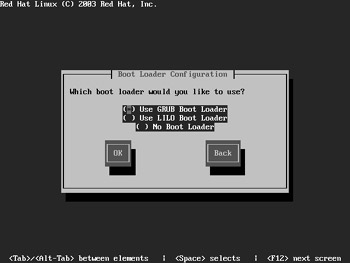
Figure 4.29: Selecting a bootloaderNote The terms boot loader and bootloader are used interchangeably.
Note It s possible use a floppy disk as a bootloader. Just be sure to create a boot disk in step 40 after Red Hat Linux actually installs packages on your system.
-
If there are special parameters associated with your kernel, you can enter them in the second Boot Loader Configuration screen, shown in Figure 4.30. You can enter kernel parameters described earlier in the section entitled Text Mode: Booting. Red Hat Linux may do this automatically for you. For example, in the corresponding graphical screen in Chapter 03 , Red Hat included the hdc=ide-scsi parameter, which is required for many IDE CD drives. Make any required selections and press F12 to continue.
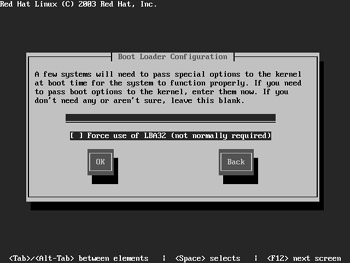
Figure 4.30: Here is your chance to add special kernel parametersNote Generally, you won t need to activate the Force Use Of LBA32 option. Logical Block Addressing (LBA) allows Linux to see beyond the 1024th cylinder on your hard drive. It s active by default on most computers and is detected automatically by GRUB. Even if it isn t active, it does not matter as long as the partition with your /boot directory is located below that cylinder limit.
-
If you re using GRUB, you can set a password. This prevents users with physical access to your computer from booting it in single-user mode to change your root password. This is an excellent idea. Activate the Use A GRUB Password option, and enter the password of your choice, as shown in Figure 4.31, then press F12 to continue.
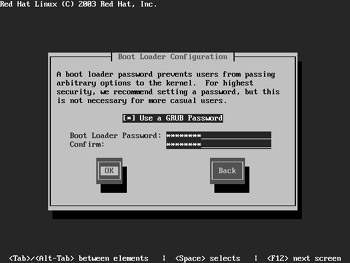
Figure 4.31: Creating a GRUB passwordNote If your passwords don t match, you ll see a warning to that effect. After pressing Enter, you re then taken to the original screen where you can try to set your password again.
-
Next, you can select the default operating system for your computer. If you re only using Red Hat Linux on your computer, this does not matter; you get only one choice. However, if Anaconda detects more than one operating system on your computer, you get to set a default. For example, the screen shown in Figure 4.32 allows you to select between the operating systems labeled DOS and Red Hat Linux.
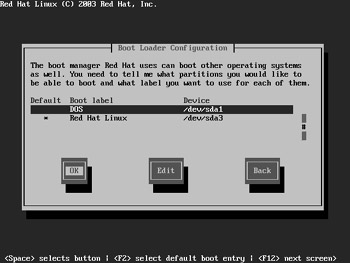
Figure 4.32: Selecting a default operating systemIn this case, the operating system on the partition labeled /dev/sda1 is Microsoft Windows NT 4. For more information on how this works in GRUB, see Chapter 11 . Select the default operating system of your choice, use the Tab key to select OK, and then press Enter to continue.
-
Now you can set the location of your bootloader. Typically, it should be placed on the Master Boot Record (MBR) of your hard drive. However, if you already have a different bootloader on your computer, you may want to choose First Sector Of Boot Partition, which corresponds to the partition with the /boot directory. Typical choices are shown in Figure 4.33. Make your selection and press F12 to continue.
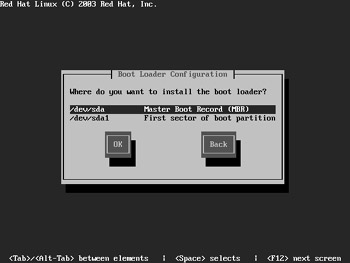
Figure 4.33: Locating the bootloaderNote If you have more than two hard drives, be careful. The BIOS on a typical PC can only find the /boot directory if it s on one of the first two IDE ( hda , hdb ) or SCSI ( sda , sdb ) hard drives. The SCSI drive must have an ID Number of 0 or 1. If you have both IDE and SCSI hard drives, it must be on the first one of these drives; the SCSI drive must have a ID number of 0.
-
Now you can complete your network configuration. Since you re installing from a network server, you ve already entered basic IP address information for this computer. If you re satisfied with the settings shown in Figure 4.34, press F12 to continue. (Note that the configuration in this case is for the network card labeled eth0 .) Otherwise, deselect Use BOOTP/DHCP, which allows you to change the settings shown in Table 4.5.
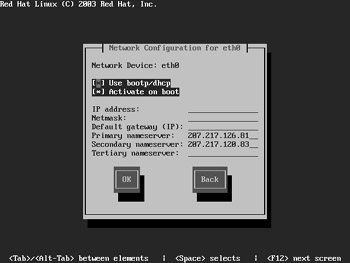
Figure 4.34: Configuring network settingsTable 4.5: Network Configuration Settings Setting
Description
Use BOOTP/DHCP
Makes the computer look for a DHCP server on a local or remote network; the BOOTP protocol makes it possible to get IP address information from a DHCP server on a remote network.
Activate On Boot
Sets the computer to activate this network configuration when you start Linux.
IP Address
Configures the IP address associated with this network card; for more information on IP addressing, see Chapter 20 .
Netmask
Short for network mask or subnet mask; for more information, see Chapter 20 .
Default Gateway (IP)
Notes the IP address of the computer or router that is also connected to an external network such as the Internet.
Primary Nameserver
Configures a DNS server for this network; the IP address can be outside your LAN.
Secondary Nameserver
Configures a DNS server for this network; the IP address can be outside your LAN.
Tertiary Nameserver
Configures a DNS server for this network; the IP address can be outside your LAN.
Note If you have more than one network card, you get to repeat step 29 with the next card.
-
If you set a static IP address, you ll now see a Hostname Configuration window, where you can assign a hostname for your computer. Do so and press F12 to continue.
-
Next, you can configure a firewall for your computer. It s generally not necessary for computers inside a LAN that s already protected by a firewall. However, if you re installing Red Hat Linux on a computer that is also connected to another network such as the Internet, a firewall is critical. As shown in Figure 4.35, three firewall configurations are available. For the purpose of this installation, we ll configure a high-security firewall. Highlight this option, and press the spacebar to select it.
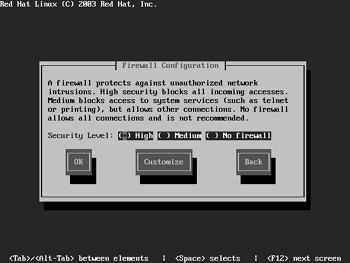
Figure 4.35: Configuring the firewallNote Even the standard Red Hat high-security firewall allows the computer to get information from a DNS server, which is essential for browsing the Internet. This holds true as long as you ve listed the IP address for at least one nameserver earlier in the installation process.
-
Now we ll customize the firewall. Alternatively, you can customize the firewall after installation using the techniques described in Chapter 22 . After selecting High, use the Tab key to highlight Customize, and then press Enter. That opens the Firewall Configuration - Customize screen, shown in Figure 4.36. The options shown in Figure 4.36 are described in Table 4.6. Make the desired changes and press F12 to return to the basic Firewall Configuration screen in Figure 4.35. Press F12 again to continue.
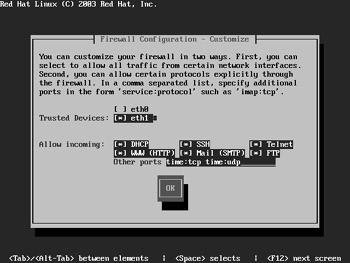
Figure 4.36: Customizing a firewallTable 4.6: Firewall Configuration Customization Options Option
Description
Trusted Devices
Lets you activate a network card as a trusted device; important if you have more than one network card. Any firewall you create won t stop any traffic that passes through that trusted device. It s common to activate this option for a network card connected to an internal network.
DHCP
Allows incoming DHCP information. You re allowing an external DHCP server to assign IP address information for computers on your network; essential for BOOTP access.
SSH
Permits Secure Shell access; you re allowing encrypted remote connections using this service, as described in Chapter 23 .
Telnet
Permits Secure Shell access; you re allowing clear-text remote connections using this service, as described in Chapter 23 .
WWW
Allows incoming requests to a web server on your network.
Mail
Allows incoming requests to an outgoing e-mail server on your network.
FTP
Permits incoming requests to an FTP server on your network.
Other Ports
You can allow in data through one of the other TCP/IP ports described in /etc/services; the format is in the service:protocol format, such as time:tcp,time:udp .
-
In this step, you can customize the language packages installed with Red Hat Linux. As you can see in Figure 4.37, English (USA) is installed by default. Support for 120 different languages and or dialects is available. If you choose Select All, support for all languages will be installed. If you choose Reset, support for only English (USA) will be installed. Make your choices and press F12 to continue.
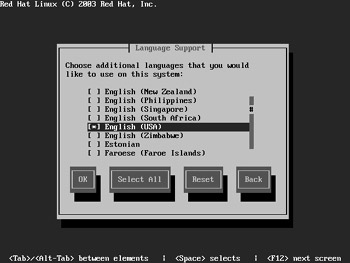
Figure 4.37: Selecting supported languagesNote If you select more than one language, you ll see a Default Language screen, where you select the default language for your system.
-
Next, you can select the hardware clock settings and time zone for your computer. The options are shown in Figure 4.38. If you select Hardware Clock Set To GMT, you should set the clock in your PC s BIOS to Greenwich Mean Time. In addition, you need to select the time zone most closely associated with your location.
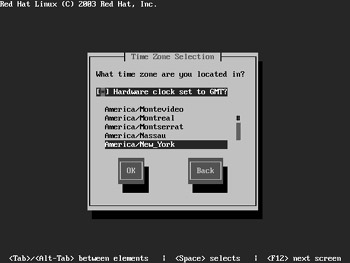
Figure 4.38: Selecting a time zoneNote The advantage of activating the Hardware Clock Set To GMT option is that Linux can then adjust your clock for daylight saving time. However, if you have another operating system on your computer, such as Microsoft Windows, this setting would alter that clock.
-
Now you need to select a root password for your system. This is the password that you ll use to log into the root or superuser account. Make your selections, as shown in Figure 4.39, and then press F12 to continue.
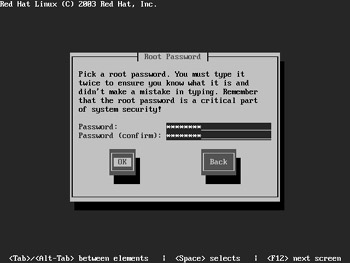
Figure 4.39: Creating a root password Diverging Steps After step 35, what you see varies, depending on the installation type. If you selected a Personal Desktop or Workstation installation back in step 15, you ll see a screen where you can customize your software selection. If you activate this option, you ll get to step 36 and a view similar to Figure 4.41. Otherwise, skip to step 39.
If you selected a Custom installation, you ll see the Authentication Configuration screen shown in Figure 4.40. The associated options are shown below.
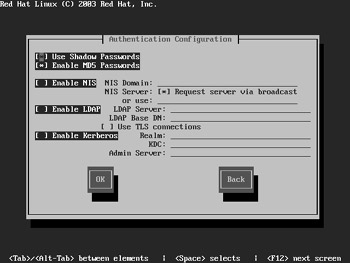
Figure 4.40: Authentication ConfigurationIf you selected a Server installation, proceed to step 36.
Option
Description
Use Shadow Passwords
Enables the shadow password suite, with passwords protected in /etc/shadow .
Enable MD5 Passwords
Allows the MD5 form of password encryption.
Enable NIS
Triggers use of the Network Information Service (NIS), which provides a common database of usernames and passwords for a LAN; for more information, see Chapter 28 .
NIS Domain
Enter the name of the NIS domain in this text box.
Request Server via Broadcast
Select this option to send a broadcast message to other computers on your network to identify the NIS server.
Or Use:
Sets the name of the NIS server for your network if you disable the broadcast option.
Enable LDAP
Enables use of a Lightweight Directory Assistance Protocol (LDAP) server for authentication and related LAN databases.
LDAP Server
Sets the name of the server with the LDAP database.
LDAP Base DN
Allows you to look up account information with the LDAP Distinguished Name (DN).
Use TLS Connections
Lets your computer use Transport Layer Security (TLS) to send encrypted usernames and passwords to an LDAP server.
Enable Kerberos
Allows the use of the Kerberos 5 system, developed at MIT; supports strong encryption of usernames and passwords.
Realm
Permits you to access a Kerberos enabled network.
KDC
Lets you access a Key Distribution Center (KDC) server which issues Kerberos authentication tickets.
Admin Server
Allows you to access a Kerberos server using the kadmind utility.
-
It s time to select the package groups that will be installed, as shown in Figure 4.41. The default groups are customized for the type of installation, as described in the Installations Options sidebar earlier in this chapter. You can further customize your installation by selecting or deselecting the package groups of your choice. Each package group is described in more detail in Web Chapter 05 .
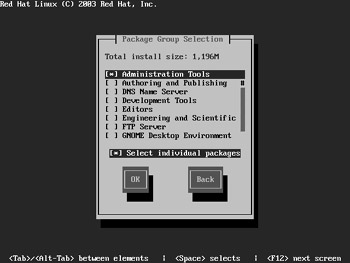
Figure 4.41: Selecting package groupsIf you need to customize your installation further, you can activate the Select Individual Packages option. For the purpose of this chapter, I ve done this to continue on to step 37.
Note The package groups that you install aren t final; you can always install individual packages using the rpm command described in Chapter 11 and the redhat-config-packages utility described in Chapter 19 .
-
You can select individual packages to install. For example, as Figure 4.42 shows, you can select individual packages within the Editors package group. The current size of each package (and group) is shown in the right side of the figure, which can help if you re concerned about available space on your hard drive. Make your selections and press F12 to continue.
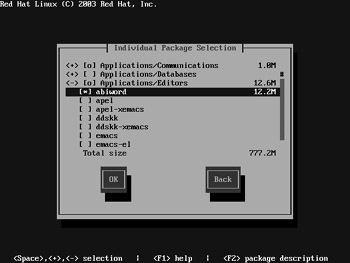
Figure 4.42: Selecting individual packages -
Anaconda checks your selected packages for dependencies. An example is shown in Figure 4.43, which lists unsatisfied dependencies. Based on the figure, the control-center and firstboot packages won t work unless you also install the metacity and xscreensaver packages. The options are described in Table 4.7. Normally, you ll select the Install Packages To Satisfy Dependencies option, and press F12 to continue.
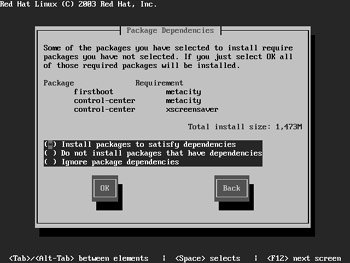
Figure 4.43: Satisfying package dependenciesTable 4.7: Package Dependency Options Option
Description
Install Packages To Satisfy Dependencies
Adds the packages in the Requirement column to the installation list.
Do Not Install Packages That Have Dependencies
Removes the packages from the Package column from the installation list.
Ignore Package Dependencies
Does not change the package installation list; there is a risk that programs associated with the cited packages may fail.
-
You get one last chance to stop before Anaconda starts installing Red Hat Linux on your system, as shown in Figure 4.44. The cited file, /root/install.log , will include a complete list of installed packages. If you re ready, highlight OK and press F12 to continue.
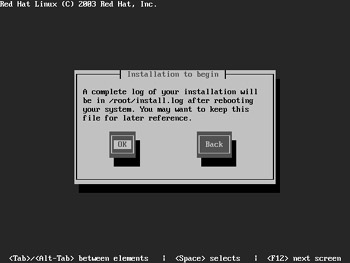
Figure 4.44: You re ready to install Red Hat Linux.Now Anaconda formats your selected partitions. It may take several minutes to start the installation process. Figure 4.45 shows the installation process in action. You can track the current status of the installation.
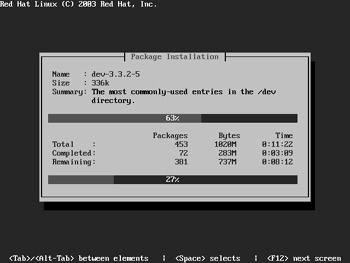
Figure 4.45: The installation process at workOnce the installation process is complete, Anaconda performs a postinstall configuration automatically. Depending on the speed of your network and the number and size of packages that you ve installed, the entire installation process could take a few minutes or several hours. Finally, we re ready for the next step.
-
At this point, we re ready to create a boot disk. It s a good idea; if you ever accidentally damage your bootloader or MBR, it can help you start Red Hat Linux. In the menu shown in Figure 4.46, choose Yes to create a boot disk. In the following menu, select Make Boot Disk when you ve inserted a floppy disk in the drive.
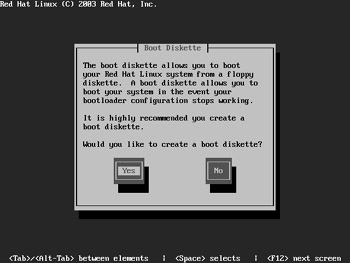
Figure 4.46: Creating a boot disk -
Now we re moving into the home stretch ”configuring the graphics system. The Video Card Configuration menu, shown in Figure 4.47, illustrates what Red Hat Linux was able to detect for your video card. If you don t want to configure your graphics system at this time, you can select Skip X Configuration and press Enter. You ll be taken to step 45.
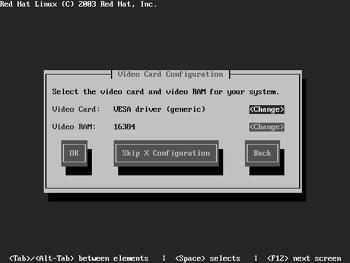
Figure 4.47: Configuring your video card -
If you re not satisfied with the current configuration, you can change it. For example, you can highlight the Change option for the video card and press Enter. This opens the Video Card menu, shown in Figure 4.48.
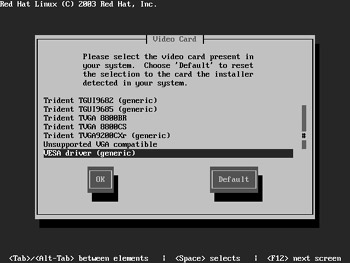
Figure 4.48: Selecting a video cardThere are a whole series of video cards available; most are proprietary. If you can t find the make and model for your card, you can try a different card from the same manufacturer, or you can select Unsupported VGA Compatible or VESA Driver (Generic). These options correspond to default VGA and SVGA drivers. Select an appropriate driver and press F12 to continue.
Note VGA is short for Video Graphics Array, the basic color system for most monitors built today. One slightly higher but still common standard is SVGA, short for Super VGA. The Red Hat SVGA driver is VESA, which is short for the Video Electronics Standards Association; VESA also represents the group of standards associated with SVGA.
-
Red Hat Linux may not detect all of the RAM associated with your video card. In that case, you can highlight the Change option associated with Video RAM and press Enter. This opens the Video RAM menu, shown in Figure 4.49. Select the amount of Video RAM associated with your video card and press F12 to return to the Video Card configuration menu. If you re satisfied with the overall configuration, press F12 again to continue.
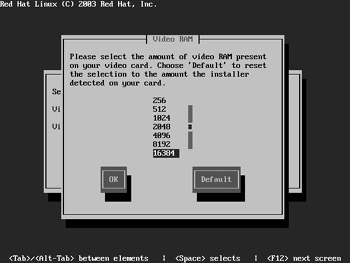
Figure 4.49: Specifying your Video RAM -
When you configure a video card, you also need to configure a monitor. In the Monitor Configuration screen, shown in Figure 4.50, you can specify a make and model for your monitor, as well as the allowable horizontal (HSync Rate) and vertical sync rates (VSync Rate).
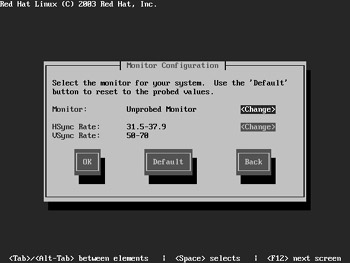
Figure 4.50: Configuring your monitor -
If you re not satisfied with the current configuration, you can change it. For example, you can highlight the Change option for the Monitor and press Enter. This opens the Monitor menu, shown in Figure 4.51.
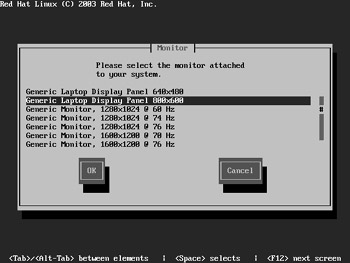
Figure 4.51: Specifying a MonitorAs you can see, there are a whole series of monitors; most are proprietary. If you can t find the make and model for your monitor, you can try a different card from the same manufacturer. In addition, a substantial number of generic monitors are available, including several for laptop computers. Select an appropriate monitor and press F12 to return to the Monitor Configuration window.
-
Next, you ll get to change allowable monitor sync rates, as shown in Figure 4.52. The horizontal sync rate is the amount of time it takes for your system to redraw one horizontal line on your screen; typically it s listed in KHz. The vertical sync rate is the amount of time it takes for your system to redraw the entire screen; typically that is listed in Hz. If you want to make a change, highlight the Change option associated with the HSync and VSync Rates and press Enter.
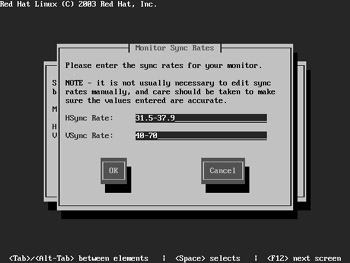
Figure 4.52: Setting monitor sync ratesWarning Be careful! Where possible, check the documentation for your monitor. If you specify horizontal or vertical rates that are too high, signals from the video card could permanently damage your monitor.
Change the rates as desired and press F12 to return to the Monitor configuration menu. If you re satisfied with the overall configuration, press F12 again to continue.
-
Next, you ll get to specify several defaults. As shown in the X Customization menu in Figure 4.53, you can specify a color depth, resolution, and default login mode.
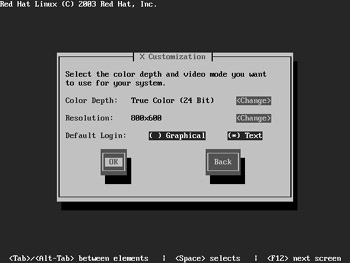
Figure 4.53: Selecting graphical startup defaults -
If you re not satisfied with the current configuration, you can change it. For example, you can highlight the Change option for Color Depth and press Enter. This opens the Color Depth menu, shown in Figure 4.54. Select the color depth of your choice and press F12 to return to the X Customization menu.
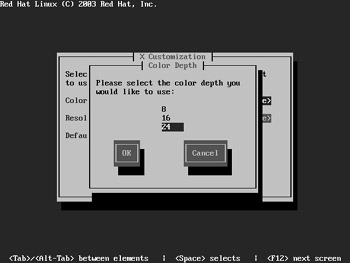
Figure 4.54: Selecting a color depth -
Now you can change the resolution, as shown in Figure 4.55. Highlight the preferred default resolution of your choice and press Enter.
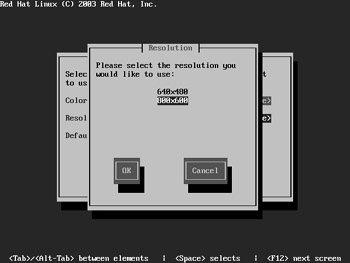
Figure 4.55: Specifying a monitor resolutionAvailable resolutions are based on the memory in your video card, your specified color depth, and the specifications of your monitor. Select the resolution of your choice and press F12 to return to the X Customization menu.
-
Also in the X Customization menu, you can change the Default Login mode for your Linux system. This changes the default runlevel in your /etc/inittab file, described in Chapter 11 . You can set up a login at the text or graphical consoles. For a view of available graphical consoles, see Chapter 15 . Make any desired changes and press F12 to continue.
-
Finally, installation and preliminary configuration are complete. You should see the screen shown in Figure 4.56. When you press Enter, Anaconda reboots your computer. The next thing you should see after reboot is the bootloader that you selected during the process.
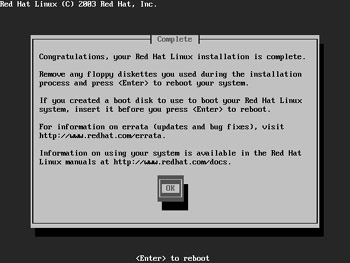
Figure 4.56: Installation is complete.Note If you configured a login at the graphical console in step 50, Red Hat Linux reboots and starts the firstboot utility. The steps and views are identical as described in the section on the Red Hat Setup Agent towards the end of Chapter 03 .
Text-Mode Upgrades
It s also possible to upgrade a previous version of Red Hat Linux. If Anaconda detects the previous version, you ll see the System To Upgrade menu. We looked at it briefly earlier, in step 14 of the full installation process. For your convenience, we ll review the menu here in Figure 4.57. We won t go through the full step-by-step process, since many of the steps are similar to the previously described text-mode installation.

Figure 4.57: The System To Upgrade screen
In this case, Anaconda has found the /boot directory associated with Red Hat Linux 8.0 installed on the /dev/sda3 partition. If you simply want to upgrade your packages to Red Hat Linux 9, select this option and press F12 to continue.
| Note | If you re upgrading from a version of Linux with partitions formatted to the second extended filesystem (ext2), you re given the opportunity to convert to the Red Hat 9 default third extended filesystem (ext3). For more information on filesystems, see Chapter 07 . |
Next, you ll be able to choose whether you want to customize the packages that you might want to upgrade. For example, if you re upgrading from Red Hat 7.2, you might not be ready to move your web server from Apache version 1.3. x to 2.0. x . In that case, you will want to customize the upgrade, as shown in Figure 4.58. Otherwise, Anaconda automatically installs new versions of packages, when available. Make your selection and press F12 to continue.
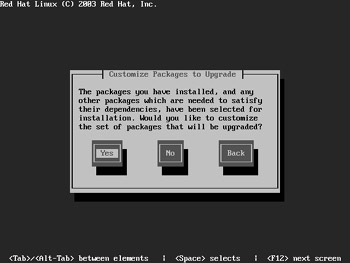
Figure 4.58: The Customize Packages To Upgrade screen
The screen that follows allows you to upgrade or install a new bootloader. As shown in Figure 4.59, you have three choices, which are described in Table 4.8. If you have a special bootloader configuration file, such as one with special kernel entries, you may not want to wipe it out with the Create New Boot Loader Configuration option.
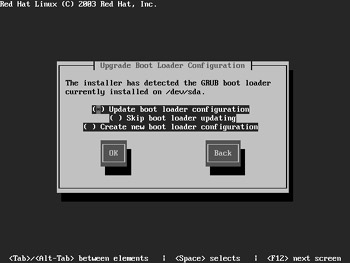
Figure 4.59: Upgrading the bootloader
| Option | Description |
|---|---|
| Update Boot Loader Configuration | Upgrades the bootloader package without changing the configuration file. |
| Skip Boot Loader Updating | Does not upgrade the bootloader package, and does not change the configuration file. |
| Create New Boot Loader Configuration | Installs a new bootloader package; you ll have to change the configuration file. |
We ll select the first option. Select the option of your choice and press F12 to continue. Assuming that you re customizing packages to be upgraded, Anaconda proceeds to read the current packages on your system. That process took nearly 20 minutes for me when upgrading a Red Hat Linux 8.0 system without a GUI.
Once the upgrade assessment process is complete, you re taken to the Individual Package Selection screen, shown in Figure 4.60. The packages selected in this menu are limited to the planned upgrades. For example, as you can see in the figure, for this particular system, Anaconda will upgrade the ash shell.
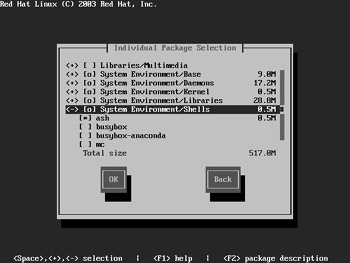
Figure 4.60: Upgrades and selecting individual packages
You can select or deselect the packages of your choice. If you re upgrading a server, pay particular attention to the System Environment/Daemons category. If you have a reliable service such as Apache or Samba, you may not want to upgrade it, at least at this time. Make any changes you need and then press F12 to continue.
Anaconda proceeds to check for dependencies. If it finds any, it goes through a process similar to that described back in Figure 4.43. This process may also take several minutes. When it completes, you ll see the Upgrade To Begin screen, shown in Figure 4.61. Once you press F12, Anaconda starts the upgrade process.
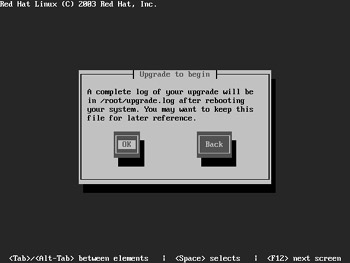
Figure 4.61: The upgrade is about to begin.
EAN: 2147483647
Pages: 220