Certification Objective 9.04: Keeping Servers in Sync
|
| < Day Day Up > |
|
A number of companies keep servers in different time zones around the world. This allows users to select the server closest to them, maximizing network performance. As a Linux administrator, it may be your responsibility to make sure that all of these servers are on the same time. You can set up time synchronization on a centralized server through the Network Time Protocol (NTP).
The Network Time Protocol
NTP works by synchronizing a computer to UTC, through a connection to a time server. The current time is distributed through a hierarchy of NTP servers, through TCP/IP port 123. One point worth noting is that NTP will never run a system clock backward. If the clock on your computer is fast, NTP slows down the clock until it is in sync with UTC.
NTP Configuration
The configuration file for NTP is /etc/ntp.conf. In RHEL 3, it is already preconfigured to use your computer as a time server. But synchronizing your computer with your computer's hardware clock may not be enough.
To see how the default works, open the /etc/ntp.conf file in a text editor. You'll find a server that is listed with the fudge command. The default server is listed at IP address 127.127.1.0. While this isn't the normal 'loopback' IP address, it is still within the 'loopback' subnet; therefore, this address points right back at your computer. Alternatively, you can set it to one of the standard time servers described at www.eecis.udel.edu/~mills/ntp/servers.html.
Another way to synchronize your computer is to use the Red Hat Date/Time Properties tool to set NTP. You can start it in two ways. You can enter the redhat-config-date command in a GUI console, or click Main Menu | System Settings | Date & Time. This opens the Date/Time Properties dialog box shown in Figure 9-15.
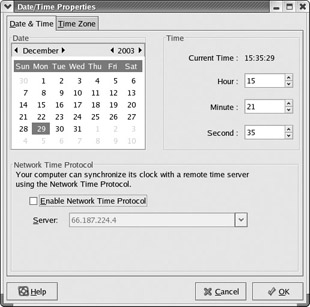
Figure 9-15: Date/Time Properties
When you select the Enable Network Time Protocol option and set a time server, ntpd is started and the name of the server is added to /etc/ntp.conf. If you want to set NTP to work after a reboot, you still need to make sure it starts the next time you reboot your computer with the appropriate chkconfig command.
|
| < Day Day Up > |
|
EAN: N/A
Pages: 194