Project: Product Sheet Back
| We'll be creating the back side of the product sheet now, which will explain, in greater detail, the specifics of the product or service you will be marketing. You will execute this project in 13 easy steps: STEPS
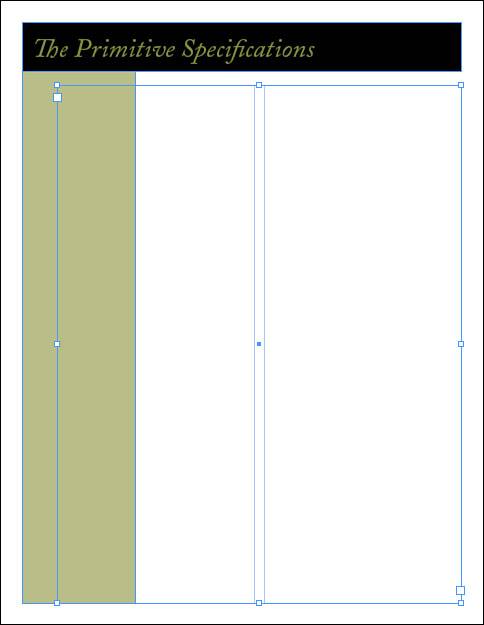
Step 1: Using the Pages Palette to Add a PageAssuming the file is already open, you will now add another page, the back of the sheet, to your file. You will do this with the Pages palette, which is accessed from the Window pull-down menu, from a floating palette, or from the dock on the right side of your window (by clicking the Pages tab). Click the triangle on the left or right of the palette (depending on how you accessed the palette) and select Insert Pages. Insert one page after page 1 and click OK (see Figure 6.17). Figure 6.17. Inserting a new page using the Pagrs palette menu.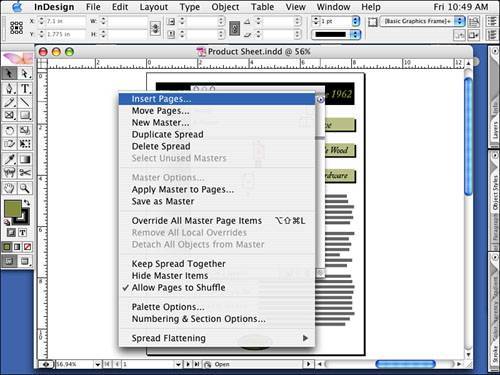 On the Pages palette, you should now see a second, miniature page with a number 2 on it. Double-click the miniature page and InDesign will take you to your new page 2. (You can also navigate to page 2 by using the page indicator at the bottom of your window.) Step 2: Tinting an ElementMake sure the proxy is set to the upper-left corner of the matrix. Create a vertical rectangle with the following coordinates: x: .375", y: .375", width: 2", height: 10.25". With the rectangle still selected, go to the Swatches palette and select the PANTONE fill, but this time apply a 50% tint at the top of the Swatches palette (see Figure 6.18). Figure 6.18. This vertical element will anchor the left side of the page. Step 3: Copying from One Page to AnotherNavigate back to page 1 and select the header across the top. Select Edit, Copy; navigate back to page 2; and select Edit, Paste. Drag the header to the upper-left corner, where the margins intersect. Highlight the text and type over it with your product or service specifications. For this step, I suggest you type The Primitive Specifications as I have done. Use Figure 6.19 as your guide. Figure 6.19. Another shortcut to formatting is copying and pasting a similar element, highlighting it, and typing over it. Step 4: Creating Multiple Columns Inside a Single Text BoxCreate a text box across your entire page with an x,y coordinate of x: 1", y: 1.5", width: 7.125", height: 9.125". Because both of these columns will be of equal size and there are no more pages in the file, you will take this single text box and make it a two-column text box. In the Control palette, with the Paragraph button selected, look to the far right, where you will see the Column button followed by an open field with the number 1 in it. Highlight the number 1 and change it to a 2 (see Figure 6.20). Figure 6.20. Another way to create multiple columns, this is especially suited for columns that have consistent dimensions. Tip
With the Text tool, click at the top of the first column and go to the Type pull-down menu. Select Fill with Placeholder Text. Highlight the text and apply (or tag) the Paragraph Text style found in the Paragraph Styles palette. Step 5: Creating a Drop CapClick anywhere in your first paragraph. Click the paragraph button on the left side of the Control palette. Remove the first line indent by editing the field in the Control palette and resetting this option to 0. Now, let's add a drop cap. In the middle of the Control palette, you will use the Drop Cap fields. Create a drop cap that is three lines deep by one character, and then click OK to activate the fields. Use Figure 6.21 as a visual guide. Figure 6.21. You can format your drop cap any way you like. Experiment with a different typeface or color. Type some random subheads in both columns. You could add hardware, installation, warranty, and Contact us by clicking in your text and making sure you place a paragraph (carriage) return before and after each subhead. Note
Apply the Subhead style sheet to the new subheads you have created. Under the subhead Contact Us, I added some generic contact information. Feel free to highlight the remaining placeholder text and type over it with your company contact information as well. Step 6: Aligning ElementsLet's create a special graphic and learn how to use text wrap. Off on your pasteboard (the area on either side of your sheet), you will compose a graphic. Create a rectangle that is .75" wide by 1" deep. Apply your PANTONE color to the fill, with no stroke. Create another rectangle, smaller than the first, with a white fill and a black 2-point stroke. Align the two to each other using the Control palette's two rows of alignment buttonsclick the middle button of the first row (align horizontal centers) and click the middle button of the second row (align vertical centers). Group these two rectangles together by selecting them both and selecting Object, Group. See the results in Figure 6.22. Figure 6.22. With InDesign's drawing tools, you can supplement your art files by creating graphic elements without having to use an additional program. Step 7: Using the Glyphs PaletteDraw a small text box, about the same size of the last rectangle you drew, somewhere on your pasteboard but away from your rectangles. Go to the Type pull-down menu and select the Glyphs palette (see Figure 6.23). Figure 6.23. The Glyphs palette displays every character of any typeface of every type family you have installed.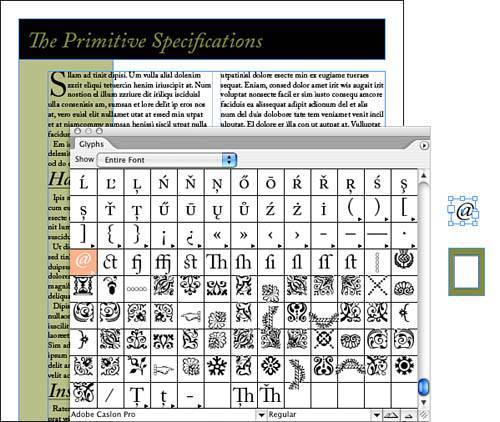 Step 8: Using OpenTypeOpenType is the new font file format developed by both Adobe and Microsoft. Two key benefits of it are its cross-platform compatibility and support for extended character sets. These character sets are accessed in InDesign by selecting Type, Glyphs. Make sure Adobe Caslon Pro, or your company typeface, is selected at the bottom of the palette. Scroll down through the glyphs until you find a symbol you would like to use. I chose the at symbol (@), as in "Contact us at...". Highlight the symbol and make it 36 points. Drag the text box over your two existing rectangles and, with the arrow keys, move the symbol visually into position (see Figure 6.24). Figure 6.24. I've chosen a special character in this glyphs set. Caution
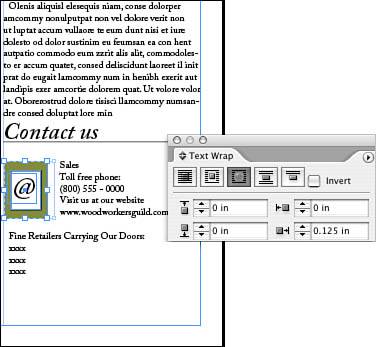
Step 9: Grouping and Text WrapGroup this box to the others and drag it under your contact subhead. Access the Text Wrap palette by selecting Window, Type and Tables, Text Wrap. With your grouped elements selected, click the third icon, Wrap Around Object Shape. Your text should wrap around your group. Feel free to use the arrow keys again to position the box. The left edge of the group should align with your column guide, but slide your group up and down until you get your first line of text to align with the top of your group (see Figure 6.25 for the positioning of the icon to the text). Figure 6.25. Note the additional vector that creates the wrap. It can be reshaped like any other vector to create unusual wraps. Save your work; turn off your guides, frame edges, and hidden characters; and review your work. Step 10: Managing File LinksTo manage a file link, open the Links palette under the Window pull-down menu. You should see the image cabinet.tiff and wwglogo.eps represented in the list on the Links palette. Next to the filenames are the pages on which these images are placed. Both should be labeled page 1. If you double-click either file in the palette, you will see information about the image, its status (that is, whether it's up-to-date, embedded, modified, or missing), and its current location on a physical drive. The up-to-date status is the preferred status. Any other status displays a symbol: Missing is indicated by a stop sign, modified is indicated by a yellow caution symbol, and embedded is represented by simple geometric shapes. To demonstrate these symbols, I've created a screen capture, shown in Figure 6.26, specifically displaying the missing, modified, and embedded symbols, respectively. Figure 6.26. The Links palette is a simple interface. The symbols used to convey the status of a link are straightforward and easy to interpret. No symbol means the link is up-to-date. Step 11: Preflighting Your ProjectMake sure you have saved your work; then go to the File menu and select Preflight. The preflight command checks your file to ensure it is in acceptable condition to submit to your print service provider. It checks for fonts, links, images, colors, inks, your print settings, and any external plug-ins you might have. All this information impacts your print service provider (see Figure 6.27 for an example of the preflight dialog box). Figure 6.27. Your dialog box should reflect an error-free summary.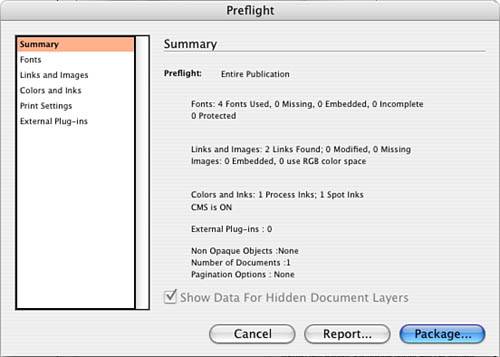 InDesign uses a yellow caution or warning sign (the same for missing fonts or modified links) to indicate problems. When you are clicking through the Preflight dialog box, look for the yellow signs with exclamation points because they indicate problems. You might have a problem such as a font used by the document is not turned on in your font management utility, you've moved or modified an image since you placed it in your document, or you have included an RGB image. If you have errors or warnings, you need to cancel out of this dialog box, fix the problem, and run the preflight again. Step 12: Creating a Color Composite ProofLet's print a content proof. Go to the File pulldown menu and select Print. Choose the appropriate settings for the printer that is available to you. Then go to the File pulldown menu and select Print. Again choose the appropriate settings for the printer available to you. On the General tab, select one copy. On the Setup tab, select 8.5" x 11" and Vertical Orientation (see Figure 6.28). Figure 6.28. The Print dialog box.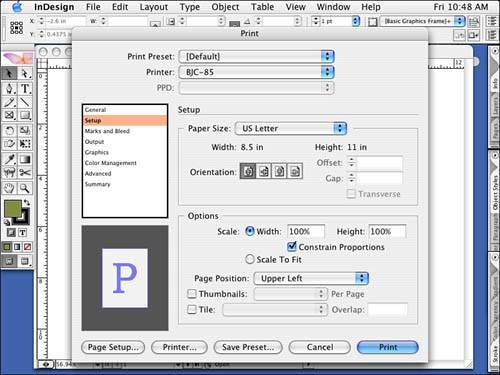 Leave the Scale setting alone. On the Marks and Bleed tab, turn off all the options. On the Output tab, if possible, print a color composite output for your work; if not, select Grayscale. On the Graphics tab, the default settings should work. The remaining tabs can be ignored for now. Print and review your proof. Make any necessary adjustments, save your changes, and print it again. Step 13: Creating a PDF for Alternative DistributionYou can make a PDF, which stands for Portable Document Format, and distribute the file via email, a website, or an FTP site. This is a file format developed by Adobe that allows for document distribution without the recipient of the document needing the software used to create the original document. Adobe distributes Acrobat Reader for free, allowing anyone to open a PDF. You can make a PDF from virtually any software application you might use. Adobe products, such as InDesign, natively support the creation of PDFs via the Export command. Benefits of the PDF structure include cross-platform compatibility, with images and fonts self-contained, and a prerendered form of PostScript that practically ensures printability. Anyone can make a PDF, receive a PDF, and distribute a PDF. A PDF can be made one-way, for viewing only (low resolution), or it can be made for the purpose of a printing press. We will make a simple PDF for easy distribution as an attachment via email. With your document open and already proofed, go to the File pull-down menu and select Export. Navigate your way to Chapter 6\06Finished_Projects and label and save the file as a PDF. At the bottom of the window, make sure Adobe PDF is selected in the Format drop-down box; then click Save (Figure 6.29 shows the Export dialog box). Figure 6.29. Make sure the PDF file format is selected. You should probably store your PDF with your InDesign production file.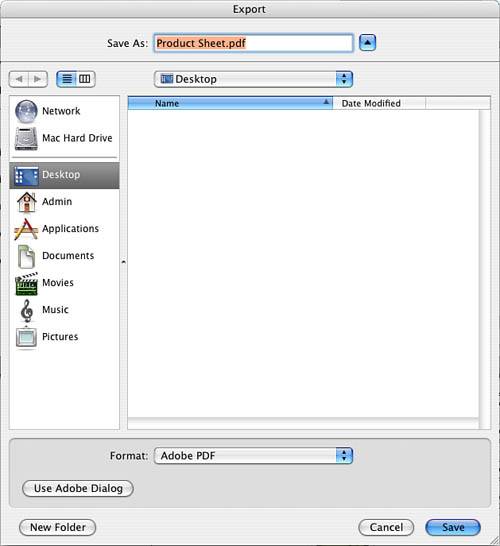 This first PDF we will make will be very simple. At the top of the Export PDF dialog box, select Print in the Preset drop-down box. Then click Export (see Figure 6.30). Figure 6.30. Presets make creating PDFs easy.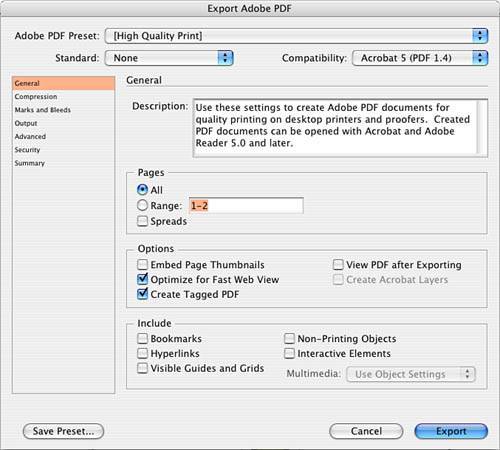 Note
To check your PDF, double-click your file and your PDF should open in either Adobe Reader or (if you own a full version of Acrobat) Acrobat. Inspect your PDF and, if it looks correct, distribute it electronically. If it requires adjustment, go back to your InDesign document, make your corrections, save it, and export it again. |


EAN: 2147483647
Pages: 148