Project: T-shirt Front
| You will accomplish this project in six easy steps: STEPS
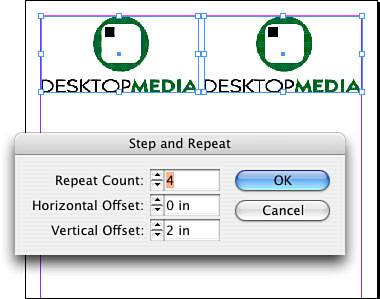
Step 1: Setting Up Your Document FormatLaunch InDesign; go to the File pull-down menu; and select New, Document using Figure 4.44 as a reference. Figure 4.44. The front transfer can be imaged on a letter-size substrate. Step 2: Placing an Art FileGo to the File pull-down menu and select the Place command. Navigate to the Chapter04\04Project_Files folder and select DMLOGO.eps. Click the paintbrush on your layout. Position the logo in the upper-left corner of the layout where the margins meet, and change the scale to 90%. Now we are going to duplicate the logo. Step 3: Copying an ElementWith your graphic still selected, go to the Edit pull-down menu and select Duplicate. A copy of the logo appears on your layout. Drag it to fit the upper-right corner of your layout (see Figure 4.45). Figure 4.45. These two elements, placed side by side, will be copied down the length of your page. Step 4: Stepping and RepeatingNow select both graphic elements by clicking the first element, holding down the Shift key, and clicking the second element. Now you will step and repeat the graphics to fill the page. Go to the Edit pull-down menu and select Step and Repeat. The repeat count is 4. The horizontal offset is 0" and the vertical offset is 2". Click OK (see Figure 4.46 to fill out the window). Figure 4.46. You do not want any horizontal movement, only vertical movement down your page. Note
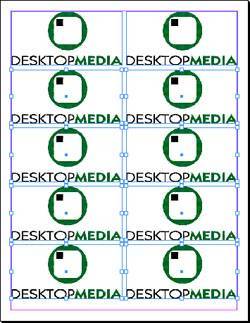
Step 5: Saving Your WorkLet's save our work. Go to the File pull-down menu, select Save As, and navigate to the folder in Chapter04\04Finished_Projects. Call this T-shirt Front. Figure 4.47 displays the finished layout. Figure 4.47. The multiple up imposition. Step 6: Printing a Flipped ImageLet's print a content proof to plain paper first. Go to the File pull-down menu and select Print. Choose the appropriate settings for the inkjet. Then go to the File pull-down menu and select Print. Again choose the appropriate settings for the printer available to you; if possible, print a color composite output for your work. Additionally, on the Setup tab, set the page position to Centered. On the Output tab, select Flip Horizontal. This is important to understand: Your image will come out backward after you iron it if you don't flip it when it is printed. Test print this to paper and hold the image up in a mirror to make sure it will iron on correctly. Review your proof, make any necessary adjustments, and save your changes. Print it again, this time to your iron-on transfer substrate. You will cut the logos apart and follow the manufacturer's directions for ironing. Use Figure 4.48 as your guide. Figure 4.48. Make sure the Flip option is selected for horizontal or reversed output.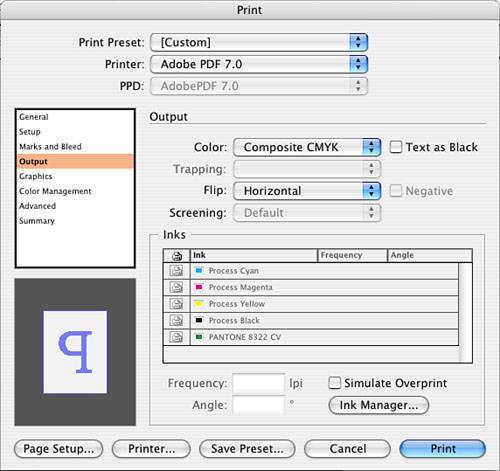 Close your file. |


EAN: 2147483647
Pages: 148
- Using SQL Data Definition Language (DDL) to Create Data Tables and Other Database Objects
- Creating Indexes for Fast Data Retrieval
- Understanding Transaction Isolation Levels and Concurrent Processing
- Writing External Applications to Query and Manipulate Database Data
- Exploiting MS-SQL Server Built-in Stored Procedures