Project: Envelope
| We'll be creating an envelope in 12 easy steps: STEPS
Note
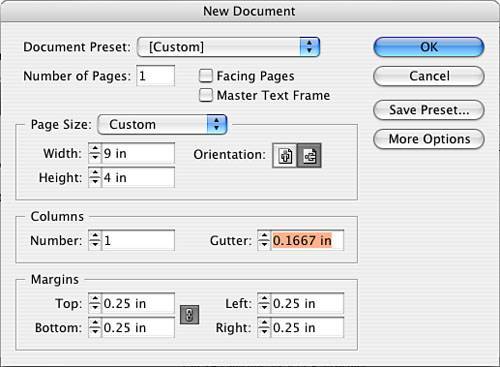
Step 1: Setting Up Your Document FormatAssuming InDesign is already launched, go to the File pull-down menu and select New, Document; then fill out the New Document window as shown in Figure 4.19. Figure 4.19. This is a standard business envelope setup. Note
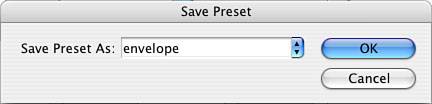
Step 2: Creating a Document PresetClick Save Preset, and name the preset Business Envelope. Click OK. Now when you need to send an envelope, you will have a document preset ready for you. When you choose a document preset, all the fields in the New Document window are filled out automatically for you! Click OK (see Figure 4.20). Figure 4.20. Name your preset something generic, to be used repeatedly. Tip
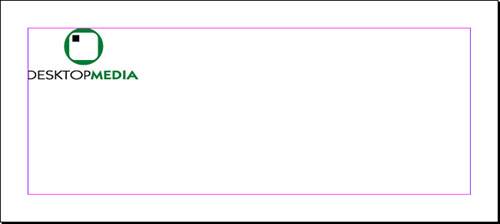
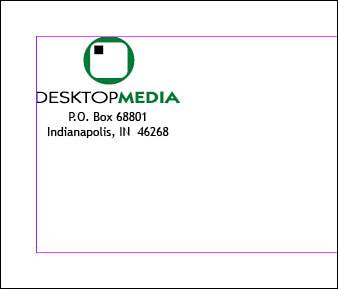
Step 3: Importing Art FilesGo to the File pull-down menu and select Place. Then navigate to your 04Project_Files folder. Find the logo named DMLOGO.eps. Select it and click Open. An icon in the shape of a paintbrush appears. Click anywhere on the page and the logo appears on the page, shown at its actual size. Step 4: Transforming with ToolsPosition the logo in the upper-left corner of the envelope's intersecting margin guides. Scale the logo with the Scale tool. With the logo selected, double-click the Scale tool in the Tool palette; a dialog box appears. Turn on Preview and change the Uniform Scale to 50%. The dialog box remains present but the logo previews with the new scale dimensions. Click OK (see Figure 4.21). Figure 4.21. This is how the logo should be positioned on the envelope. Step 5: Creating a Text ElementThis version of the company logo does not include the address. Create a text box, select the Text tool, and drag out a text box that is 2" wide by 1" tall. Drag it to fit to the bottom of the logo box. Type in the address, highlight the text, and change the font to a sans serif font like Trebuchet, 12 pts. Center the text in the box. Your address should look like Figure 4.22. Figure 4.22. This is the look and position of the company address. Step 6: Using a Swatch to Color a Graphic ElementCreate a square that is 1/4" in size using the Rectangle tool. Open the Swatches palette if it isn't already open and fill the square with the PMS color that was imported along with the logo: PMS 8322 CV. Make sure there is no colored stroke on the box by selecting the Stroke swatch in the Swatches palette and clicking None. Position the box at 4" (x coordinate) by 1.5" (y coordinate). Figure 4.23 illustrates the progress of your layout. Figure 4.23. The square anchors the area where the addressee will be aligned and placed.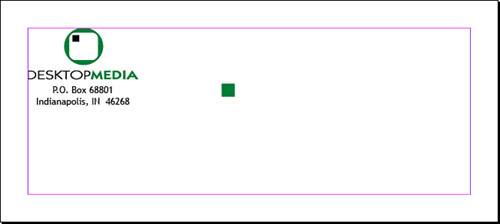 Step 7: Locking an ElementCreate a text box to the right of your newly positioned square. The text box's coordinates should be at 4.5" (x coordinate) and 1.5" (y coordinate). The width of the box should be 4" wide by 1" deep. This will accommodate five lines of copy at 12 points and auto leading. Go to the Object pull-down menu and select Lock Position. Now your address text box will stay positioned correctly. See Figure 4.24 for a visual reference. Figure 4.24. This locked box will allow you to type over the content, without the risk of moving the text frame out of position, and use this template repeatedly.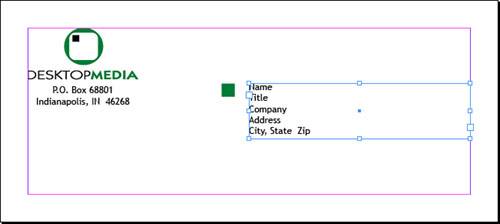 Step 8: Auto LeadingClick the Text tool in the text box and type in the lines shown previously in Figure 4.24. Highlight the text and change the font to Trebuchet, 12 points. Note
Step 9: Previewing Your WorkGo to the View pull-down menu and select Actual Size. It is helpful to turn off Frame Edges and Guides under the View pull-down menu. Turn them on when you need to see these visual boundaries again. Step 10: Saving Your WorkGo to the File pull-down menu and select Save As. Then navigate to the folder in Chapter04\04Finished_Projects. Name this company envelope. If you want, you can select Save As again and save it as a template. Close your file. Step 11: Printing a Composite ProofLet's print a content proof. Go to the File pull-down menu and select Print. Choose the appropriate settings for the printer that is available to you. Then go to the File pull-down menu and select Print. As with the letterhead and business card projects, select the appropriate settings for the printer available to you; if possible, print color composite output for your work. You might choose to print to an actual envelope or print the envelope layout to a letter size. It is also helpful to turn your page position on the Setup tab to Centered. Also, you should turn on crop marks, found on the Marks and Bleed tab. Review your proof, make any necessary adjustments, and save your changes. Print it again (see Figure 4.25 for reference). Figure 4.25. This is an example of how you might print a composite proof to your output device to a larger paper with crop marks turned on.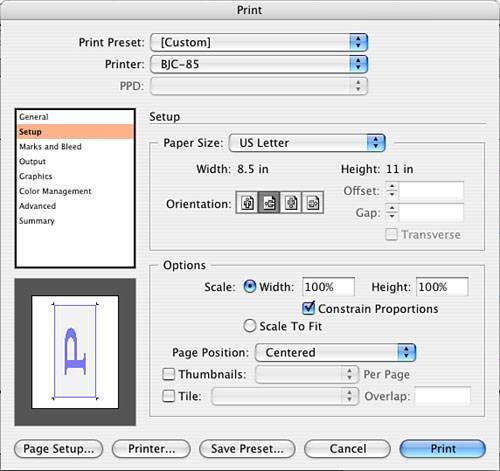 Step 12: Preflighting and Packaging Your FilesAlthough this topic is covered in more detail later in the book, there is no doubt that you will send the letterhead, business card, and envelope to your printer. It is important that you include all the necessary files (layout and supporting linked images and fonts) as well as good documentation (instructions for processing the job as well as a final content proof, preferably color), which your print vendor will use to compare to the electronic file when processing your job. You should send your content proof at 100% or actual size. If you can't send it at actual size, be sure you clearly mark the proof as something other than 100% so as not to confuse your printer. The Preflight command found under the File pull-down menu checks your work and alerts you to problems (see Figure 4.26). If problems exist, you can exit the window, fix the problems, and run your Preflight command again until no more errors exist. Figure 4.26. The Preflight dialog box, reporting the status of the currently open file. |
EAN: 2147483647
Pages: 148