Section 9.4. Multiuser Updates
So far, you have not enabled support for optimistic concurrency . You are now going to go back and check the "use optimistic concurrency" checkbox, but before you do, let's take a moment to put this concept in context.
As things stand now, you read data from the database and move the data into your data grid through the SqlDataSource . You have now added the ability to update (or delete) that information. Of course, more than one person may be interacting with the database simultaneously (few web applications support only single- user access).
You can easily imagine that this could cause tremendous problems of data corruption. Imagine, for example, that two people download a record:
Liberty Associates, Inc. / Boston / Jesse Liberty
The first editor changes the City from Boston to New York. The second editor changes the Contact Name from Jesse Liberty to Milo Liberty. Now, things get interesting. The first editor writes back the data record, and the database has the following:
Liberty Associates, Inc. / New York / Jesse Liberty
A moment later, the second editor updates the database. The database then has the following record:
Liberty Associates, Inc. / Boston / Milo Liberty
These earlier updated values are overwritten and lost. The technical term for this is bad .
To prevent this problem, you might be tempted to use any of the following strategies:
-
Lock the records. When one user is working with a record, other users can read the records but they cannot update them. This is called pessimistic record locking , and if you have many users, the database quickly becomes fully locked and unusable.
-
Update only the columns you change. This is great in theory, but it exposes you to the risk of having a database that is internally consistent but that no longer reflects reality. Suppose two sales people each check the inventory for a given book. The NumberOnHand is 1 . They each change only the NumberOnHand field to . The database is perfectly happy, but one customer is not going to get the book because you can only sell a given book once (much to my chagrin). To prevent this, you are back to locking records, and you read that we don't like that solution.
-
You could decide that before you make an update, you'll check to see if the record has changed and only make the update to unchanged records. Unfortunately, this still does not solve the problem. If you look at the database before updating it, there is the (admittedly small) chance that someone else will update the database between the time you peek at it and the time you write your changes. Given enough transactions over enough time, collisions and corrupted data will occur.
This is also inefficient because it requires accessing the database twice for each update (to read and then to write). In a high-volume application, the performance hit will be costly.
-
Attempt the change in a way guaranteed to generate an error if the record has changed and then handle these (rare) errors as they occur. This is called Optimistic Concurrency and is the method implemented for .NET.
9.4.1. Optimistic Concurrency
To implement optimistic concurrency, your WHERE clause will include the original values (stored for you automatically by the data set) so you can ensure the record will not be updated if it has been changed by another user. Thus, you do not need to "pre-read" the record; you can write (once) and if the record has changed, it will not be updated.
This approach has tremendous efficiency advantages. In the vast majority of cases, your update will succeed, and you will not have bothered with extra reads of the database. If your update succeeds, no lag exists between checking the data and the update, so there is no chance of someone sneaking in another write. Finally, if your update fails, you will know why and can take corrective action.
For this approach to work, your updates must fail if the data has changed in the database since the time you retrieved the data. Since the data source can tell you the original values it received from the database, you only need to pass those values back into the stored procedure as parameters and then add them to the Where clause in your Update statement. That is, you must extend your Where statement to say "where each field still has its original value."
When you update the record, the original values are checked against the values in the database. If they are different, you will not update any records until you fix the problem (which could only have been caused by someone else updating the records before you did).
To see how this is done, let's go back and turn on Optimistic Concurrency. Reopen the wizard (click on the smart tag on the data source and then click Next  Advanced... ), but this time ensure both checkboxes are checked.
Click OK, click Next, and click Finish. Once more, examine the source code, as shown in Example 9-3.
Example 9-3. Data source control with Optimistic Concurrency
<asp:SqlDataSource ID="SqlDataSource1" runat="server" SelectCommand="SELECT * FROM [Customers]" ConnectionString="<%$ ConnectionStrings:NorthwindConnectionString %>" DeleteCommand="DELETE FROM [Customers] WHERE [CustomerID] = @original_CustomerID AND [CompanyName] = @original_CompanyName AND [ContactName] = @original_ContactName AND [ContactTitle] = @original_ContactTitle AND [Address] = @original_Address AND [City] = @original_City AND [Region] = @original_Region AND [PostalCode] = @original_PostalCode AND [Country] = @original_Country AND [Phone] = @original_Phone AND [Fax] = @original_Fax" InsertCommand="INSERT INTO [Customers] ([CustomerID], [CompanyName], [ContactName], ContactTitle], [Address], [City], [Region], [PostalCode], [Country], [Phone], [Fax]) VALUES (@CustomerID, @CompanyName, @ContactName, @ContactTitle, @Address, @City, @Region, @PostalCode, @Country, @Phone, @Fax)" UpdateCommand="UPDATE [Customers] SET [CompanyName] = @CompanyName, [ContactName] = @ContactName, [ContactTitle] = @ContactTitle, [Address] = @Address, [City] = @City, [Region] = @Region, [PostalCode] = @PostalCode, [Country] = @Country, [Phone] = @Phone, [Fax] = @Fax WHERE [CustomerID] = @original_CustomerID AND [CompanyName] = @original_CompanyName AND [ContactName] = @original_ContactName AND [ContactTitle] = @original_ContactTitle AND [Address] = @original_Address AND [City] = @original_City AND [Region] = @original_Region AND [PostalCode] = @original_PostalCode AND [Country] = @original_Country AND [Phone] = @original_Phone AND [Fax] = @original_Fax" ConflictDetection="CompareAllValues"> <DeleteParameters> <asp:Parameter Type="String" Name="original_CustomerID" /> <asp:Parameter Type="String" Name="original_CompanyName" /> <asp:Parameter Type="String" Name="original_ContactName" /> <asp:Parameter Type="String" Name="original_ContactTitle" /> <asp:Parameter Type="String" Name="original_Address" /> <asp:Parameter Type="String" Name="original_City" /> <asp:Parameter Type="String" Name="original_Region" /> <asp:Parameter Type="String" Name="original_PostalCode" /> <asp:Parameter Type="String" Name="original_Country" /> <asp:Parameter Type="String" Name="original_Phone" /> <asp:Parameter Type="String" Name="original_Fax" /> </DeleteParameters> <UpdateParameters> <asp:Parameter Type="String" Name="CompanyName" /> <asp:Parameter Type="String" Name="ContactName" /> <asp:Parameter Type="String" Name="ContactTitle" /> <asp:Parameter Type="String" Name="Address" /> <asp:Parameter Type="String" Name="City" /> <asp:Parameter Type="String" Name="Region" /> <asp:Parameter Type="String" Name="PostalCode" /> <asp:Parameter Type="String" Name="Country" /> <asp:Parameter Type="String" Name="Phone" /> <asp:Parameter Type="String" Name="Fax" /> <asp:Parameter Type="String" Name="original_CustomerID" /> <asp:Parameter Type="String" Name="original_CompanyName" /> <asp:Parameter Type="String" Name="original_ContactName" /> <asp:Parameter Type="String" Name="original_ContactTitle" /> <asp:Parameter Type="String" Name="original_Address" /> <asp:Parameter Type="String" Name="original_City" /> <asp:Parameter Type="String" Name="original_Region" /> <asp:Parameter Type="String" Name="original_PostalCode" /> <asp:Parameter Type="String" Name="original_Country" /> <asp:Parameter Type="String" Name="original_Phone" /> <asp:Parameter Type="String" Name="original_Fax" /> </UpdateParameters> <InsertParameters> <asp:Parameter Type="String" Name="CustomerID" /> <asp:Parameter Type="String" Name="CompanyName" /> <asp:Parameter Type="String" Name="ContactName" /> <asp:Parameter Type="String" Name="ContactTitle" /> <asp:Parameter Type="String" Name="Address" /> <asp:Parameter Type="String" Name="City" /> <asp:Parameter Type="String" Name="Region" /> <asp:Parameter Type="String" Name="PostalCode" /> <asp:Parameter Type="String" Name="Country" /> <asp:Parameter Type="String" Name="Phone" /> <asp:Parameter Type="String" Name="Fax" /> </InsertParameters> </asp:SqlDataSource>
Don't panic. The only difference between Examples 9-2 and 9-3 is that in Example 9-3, the Where clause is extended to ensure the record has not been altered . The DeleteCommand illustrates this, and the UpdateCommand works the same way:
DeleteCommand="DELETE FROM [Customers] WHERE [CustomerID] = @original_CustomerID AND [CompanyName] = @original_CompanyName AND [ContactName] = @original_ContactName AND [ContactTitle] = @original_ContactTitle AND [Address] = @original_Address AND [City] = @original_City AND [Region] = @original_Region AND [PostalCode] = @original_PostalCode AND [Country] = @original_Country AND [Phone] = @original_Phone AND [Fax] = @original_Fax" You must, therefore, send in the parameter for the CustomerID and the original values of these fields:
<DeleteParameters> <asp:Parameter Type="String" Name="original_CustomerID" /> <asp:Parameter Type="String" Name="original_CompanyName" /> <asp:Parameter Type="String" Name="original_ContactName" /> <asp:Parameter Type="String" Name="original_ContactTitle" /> <asp:Parameter Type="String" Name="original_Address" /> <asp:Parameter Type="String" Name="original_City" /> <asp:Parameter Type="String" Name="original_Region" /> <asp:Parameter Type="String" Name="original_PostalCode" /> <asp:Parameter Type="String" Name="original_Country" /> <asp:Parameter Type="String" Name="original_Phone" /> <asp:Parameter Type="String" Name="original_Fax" /> </DeleteParameters> All of that work is done for you by the wizard.
The wizard has added the following attribute:
ConflictDetection="CompareAllValues"
The two possible values for the ConflictDetection parameter are CompareAllValues (in which case no changes will be made to the database if the original values have changed) or OverwriteChanges , in which case the new values will overwrite the old.
|
9.4.2. Displaying and Updating the Grid
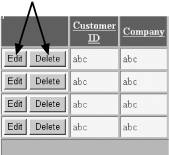
Now that your SqlDataSource object is ready to go, you only have to set up your GridView . First, in Design view, click on the smart tag and choose Edit Columns, restore the titles to the way you want and click the checkboxes to enable editing and deleting, as shown in Figure 9-11.
Figure 9-11. Enabling deleting and editing

If you prefer to have buttons for Edit and Delete, rather than links, click on the smart tag and click on Edit Columns.... When the Fields dialog box opens, click in Selected Fields on the Command Field entry. This brings up the Command Field Properties in the righthand window, where you can change the ButtonType from Link to Button by clicking on ButtonType in the Appearance section of the Fields editor.
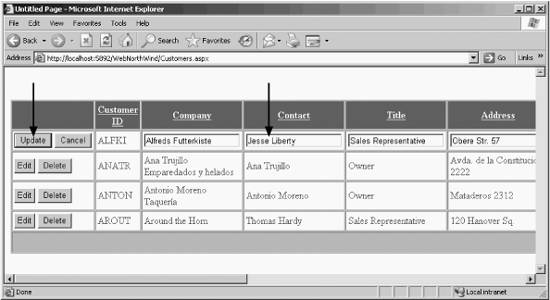
The result is that the commands (Edit and Delete) are shown as buttons, as shown in Figure 9-12.
Figure 9-12. Button commands
9.4.3. Take It for a Spin
Start the application. The customer database information is loaded into your GridView . When you click the Edit button, the data grid automatically enters edit mode. You'll notice that the editable text fields change to text boxes, and the command buttons change from Edit and Delete to Save and Cancel. Make a small change to one field, as shown in Figure 9-13.
Figure 9-13. Editing
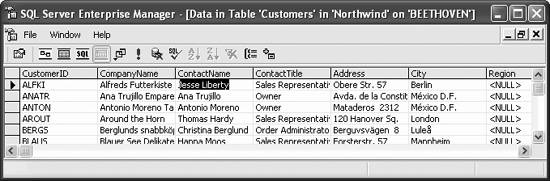
When you click Update, the grid and the database are updated, as you can confirm by opening the table in the database, as shown in Figure 9-14.
Figure 9-14. Updated database
|

9.4.4. Tracking the Update with Events
Some programmers get nervous when a control does so much work invisibly . After all, when all goes well, it is great not to have to sweat the details, but if something does go wrong, how can you tell whether your connection failed, no records were updated, an exception was thrown, or exactly what happened ? Related to that, what if you want to modify the behavior of the control in some way?
The ASP.NET controls, in general, and the data controls, in particular, overcome these concerns by providing numerous events that you can handle. For example, the GridView control has more than 20 events, such as RowCreated and RowDeleted . There is an event that fires when you press the Save button after editing a row ( RowUpdating ), and there is a second event after the row has been updated ( RowUpdated ). There are events for when the data is about to be bound and when it has been bound, and when the row is created, when it is about to be deleted and when it has been deleted, and more.
For example, after the GridView updates the row for you, the RowUpdated event is fired . To see this at work, create a handler:
-
Click on Design view.
-
Click on the GridView .
-
Click on the lightning bolt in the properties window.
-
Double-click in the method name column (currently blank) to the right of the RowUpdated event.
VS2005 will create an event handler named GridView1_RowUpdated( ) (more generally , controlName_EventName( ) ) and will place you in the code-behind page within the skeleton of that method.
The second argument to this method is of type GridViewUpdatedEventArgs . This object has useful information about the update, including a Boolean property, ExceptionHandled , that will be true if an exception was thrown when updating the data. In that case, the GridViewUpdatedEventArgs object contains the exception object.
Another property of GridViewUpdatedEventArgs tells you how many rows were affected by your update ( AffectedRows ). THRee ordered collections tell you what changes have taken place: Keys , OldValues , and NewValues .
|
You can examine the collection in the debugger to see the values for each column in the row in turn, as shown in Example 9-4.
Example 9-4. Handling the Row Updated event
protected void GridView1_RowUpdated( object sender, GridViewUpdatedEventArgs e ) { if ( e.ExceptionHandled ) { string exceptionMessage = e.Exception.Message; } else { int numRowsChanged = e.AffectedRows; foreach ( DictionaryEntry myDE in e.NewValues ) { string key = myDE.Key.ToString( ); string val = myDE.Value.ToString( ); } // end for each Dictionary Entry } // end else no exception } // end method GridView1_RowUpdated The if block tests to see if an exception was handled, and if so, sets a string ( exceptionMessage ) to the value of the Message in that exception. You would, presumably, display this message or log it, and then present the user with options on how to handle the exception.
If no exception has been thrown, you will get the number of rows that were affected, storing it in the local variable numRowsChanged . Again, you would presumably log this number or take action if it is zero. It might be zero because of a multiuser update conflict, as explained above.
Finally, in the example, you iterate through the NewValues collection to see that the values you updated on the grid are the values that were in the collection passed back to the database. In this example, you don't do anything with these values, but in a production program, you might log them or use them to provide progress reports .
9.4.5. Modifying the Grid Based on Events
Suppose you would like you to modify the grid so the contents of the Title column are red when the person listed is the owner of the company. You can do this by handling the RowDataBound event (which fires after each row's data is bound), as shown in Example 9-5.
Example 9-5. Handling the Row Data Bound event
protected void GridView1_RowDataBound( object sender, GridViewRowEventArgs e ) { if ( e.Row.RowType == DataControlRowType.DataRow ) { TableCell cell = e.Row.Cells[4]; if ( cell.Text.ToUpper( ) == "OWNER" ) { cell.ForeColor = System.Drawing.Color.Red; } // end if OWNER } // end if DataRow } // end method GridView1_RowDataBound The first if statement (highlighted in Example 9-5) tests if the type of Row passed in as a parameter is a DataRow (rather than a header, footer, or something else).
Once you know you are dealing with a DataRow , you can extract the cell you want to examine from that row (in this case, Title is the fifth cell, at offset 4).
You are ready to compare the cell's text field to the text string "OWNER." If they match, set the ForeColor property for the cell itself to Red, rendering the word Owner in red.
if ( cell.Text.ToUpper( ) == "OWNER" ) { cell.ForeColor = System.Drawing.Color.Red; } One question that might arise is how do you know that the cell a is TableCell type? This is another place where the development environment helps you. When you open the bracket on the Cells collection to place the index, a tool tip opens that tells you the index must be of type integer (that explains what that index does) and tells you the return type of the object obtained from the collection, as shown in Figure 9-15.
Figure 9-15. Indexing into the Cells collectiontool tip

|
9.4.6. Passing Parameters to the Select Query
Sometimes you do not want to display all the records in a table. For example, you might create a second grid on your current page that would display the Orders for the selected Company. To do this, you'll need a way to select a company and a way to pass the ID of the selected company to a second grid to display that company's orders.
|
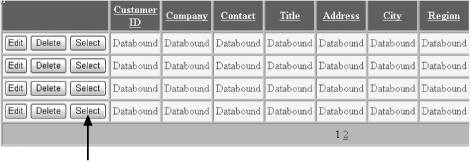
The first step is to add a Select button on the existing Grid. You can do this from Design view by clicking on the smart tag on the grid and checking the Enable Selection checkbox. The grid immediately adds a Select button to the first cell alongside the Edit and Delete buttons, as shown in Figure 9-16.
Figure 9-16. Adding the Select button
Next, create a second GridView , that will be used to display the orders. Drag the second grid onto the page and then open its smart tag. Create a new data source (name it NorthWindOrders ), but use the existing connection string. Choose the Orders table and then click the Where button, as shown in Figure 9-17.
Figure 9-17. Configuring the Orders table
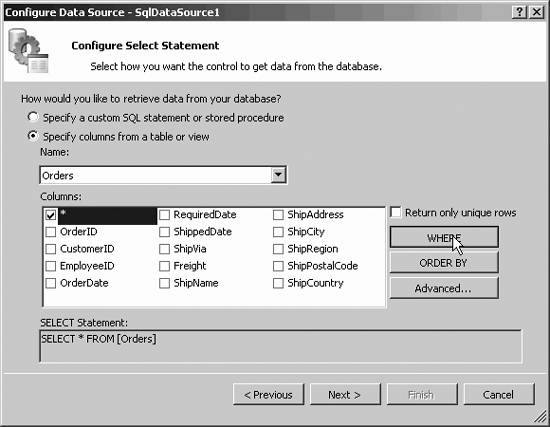
The Add WHERE Clause dialog opens. First, pick the column you want to match on, in this case CustomerID . Next, pick the operator, which can be equals, less than/greater than, like, contains, and so on. In this case, you'll use the default (=).
The third drop-down lets you pick the source for the CustomerID . You can pick None if you will be providing a source, or you can obtain the source from the form, a user's profile, a QueryString , or Session State. In this case, you'll obtain the source of the CustomerID from the first GridView , so choose Control .
When you choose Control , the Parameter Properties window wakes up. You are asked to provide the ID of the Control providing the parameter, in this case GridView1 , and ( optionally ) a default value. Once you've made all your choices, the screen will look like Figure 9-18.
Figure 9-18. Adding a WHERE clause

Now click Add. When you do, the upper portion of the dialog returns to its initial (blank) state and the WHERE clause is added to the WHERE Clause window.
Click OK until you are back at the Configure Select Statement dialog box. While you are at it, sort the results in OrderDate order by clicking on the Order By button, as shown in Figure 9-19.
Figure 9-19. Select the Order By button
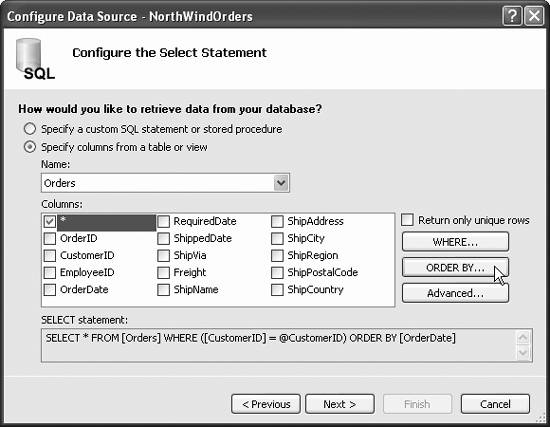
After you finish creating this SqlDataSource control, switch to Source view and look at the declaration created by VS2005:
<asp:SqlDataSource ID="NorthWindOrders" runat="server" ConnectionString="<%$ ConnectionStrings:NorthwindConnectionString %>" SelectCommand="SELECT * FROM [Orders] WHERE ([CustomerID] = @CustomerID) ORDER BY [OrderDate]"> <SelectParameters> <asp:ControlParameter Name="CustomerID" ControlID="GridView1" PropertyName="SelectedValue" Type="String" /> </SelectParameters> </asp:SqlDataSource>
The select statement now has a WHERE clause that includes a parameterized value ( @CustomerID ). In addition, within the definition of the SqlDataSource control is a definition of the SelectParameters , which includes one parameter of type asp:ControlParameter , and is a parameter that knows how to get its value from a control. The asp:ControlParameter has a property ControlID that tells it which control to check for its value, and a second property, PropertyName , that tells it which property in the GridView to check. A third property, Type , tells it that the type of the value it is getting is of type string , so it can properly pass that parameter to the Select statement.
You may now reformat your grid and edit the columns as you did for the first grid, and then try out your new page, which should look something like Figure 9-20.
Figure 9-20. Order grid displayed
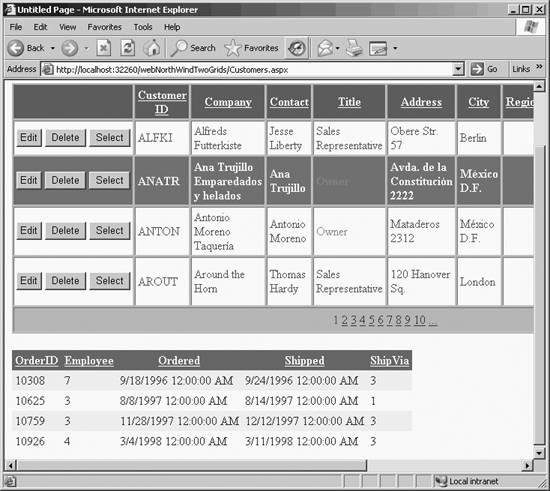
As you click on each select button in the upper grid, the orders for that customer are displayed in the new grid.
The DataGrid allows you to create various fields, as shown in Table 9-2.
Table 9-2. Column fields in GridView
| Field | Description |
|---|---|
| BoundField | The value of a field in a data source (default column type for GridView ). |
| ButtonField | Command button (Add, Remove, Select). |
| CheckBoxField | Displays a checkbox for an item in the GridView (typically used for Boolean values). |
| HyperLinkField | Like BoundField but displayed as a linkyou specify the destination URL. |
| ImageField | Display and image for an item in the GridView . |
| TemplateField | Allows the user to define the content for each item according to a specified template. |
EAN: 2147483647
Pages: 173