Configuring Security Features on Wireless Clients
|
| < Day Day Up > |
|
After you have configured your access points to utilize security features, you will then need to configure each wireless client to work with your access points. This means that each wireless client needs to be configured with the correct SSID and have the appropriate WEP key entered and selected.
Configuring Windows XP Clients
For Windows XP Clients, double-click the Wireless Network Connections icon on the taskbar to bring up the Wireless Network Connection Properties window (see Figure 10.43).
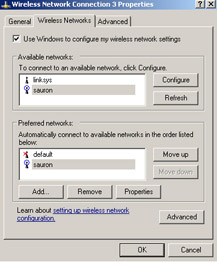
Figure 10.43: The Windows XP Wireless Network Connection Properties Window
Next, click the Add button to add a new preferred network. Enter the SSID of your network in the SSID textbox, and un-check The Key Is Provided For Me Automatically. Then, enter the WEP key for your wireless network in the Network Key and Confirm Network Key textboxes, as shown in Figure 10.44.
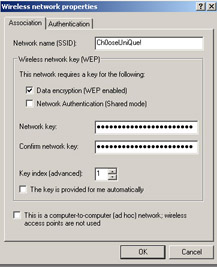
Figure 10.44: Configuring Windows XP Clients for Use
Finally, choose the appropriate key index (1–4) and click OK. If your settings are correct, you will be connected to your access point.
Configuring Windows 2000 Clients
Unlike Windows XP, with Windows 2000 you will need to configure the wireless client software that came with your wireless card. The examples shown in this section are for the ORiNOCO client manager. The exact steps for other client managers may differ, but the basic idea is the same.
-
Create a wireless profile for your access point.
-
Enter the SSID of your access point.
-
Enter the WEP key for your wireless network.
To create a wireless profile for your access point, double-click the client manager icon on the taskbar to open the Client Manager. Choose Actions | Add/Edit Configuration Profile to open the Add/Edit Configuration Profile window, as shown in Figure 10.45. Select the radio button next to a blank profile and enter the name of the profile.
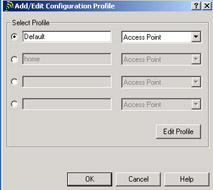
Figure 10.45: The Configuration Profiles
Next, click the Edit Profile button. On the Basic screen, enter the SSID of your access point in the Network Name textbox. Then, click the Encryption tab, as shown in Figure 10.46. Choose the Use Hexadecimal radio button and enter your WEP keys (1–4).
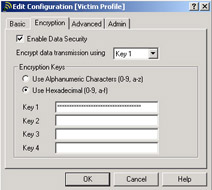
Figure 10.46: Entering the WEP Key
Finally, click OK to save your settings. Your wireless client is now configured for use with your access point.
Configuring Linux Clients
Configuring wireless clients for use with your network after security features have been enabled is a simple two-step process.
-
Edit the /etc/pcmcia/wirless.opts.
-
Restart PCMCIA services or reboot.
First, you need to edit the /etc/pcmcia/wireless.opts file (see Figure 10.47).
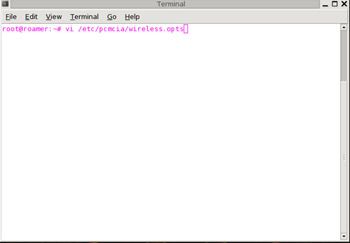
Figure 10.47: Editing the wireless.opts File
Ensure that the four lines starting with the line that reads START SECTION TO REMOVE have been commented out by placing a pound sign (#) in front of each, as shown in Figure 10.48.
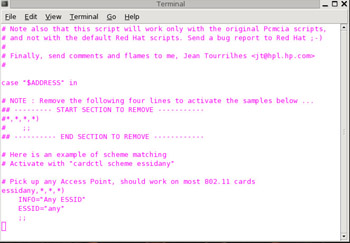
Figure 10.48: Commenting Lines Out of the wireless.
Next, find the appropriate section for your wireless card. Enter the SSID your access point uses in the ESSID section. Then, enter the WEP key for your wireless network in the KEY section, as shown in Figure 10.49, and save your changes.
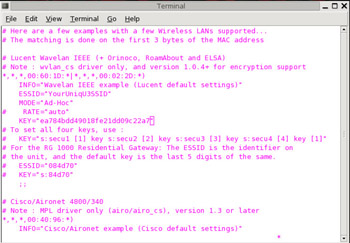
Figure 10.49: Entering the SSID and WEP Key
Before your settings take effect, you need to restart the Personal Computer Memory Card International Association (PCMCIA) services. The method for restarting PCMCIA services varies and depends on the Linux distribution you are using. In Slackware, Linux PCMCIA services are restarted by issuing the following command:
root@roamer: ~# /etc/rc.d/rc/pcmcia restart
If you are unsure how to restart PCMCIA services on your distribution, you can reboot. When the system restarts, your settings will take effect.
Enabling Security Features on the Xbox
Many Xbox owners like to take advantage of the Xbox Live feature. Xbox Live allows gamers to connect their Xbox to the Internet and play selected games against online opponents. Since the Xbox is often connected to a TV that isn’t necessarily in the same room with most of the household computer equipment, wireless networking is a natural choice for this connection.
There are several wireless bridges (like the Linksys WET 11 Wireless Ethernet Bridge) available that will connect the Xbox to a home network. These devices must be configured to use the wireless network’s security features.
First, log in to the WET 11. By default, the WET 11 is configured to use the IP address 192.168.1.251 (see Figure 10.50).
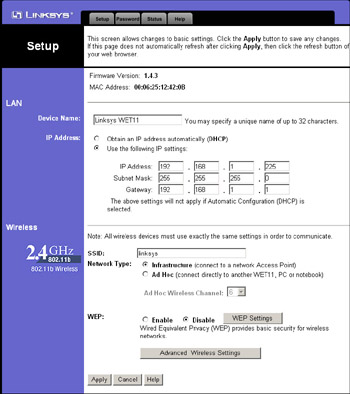
Figure 10.50: The Linksys WET 11 Initial Setup Screen
Enter the SSID for your wireless network in the SSID textbox, and then select the Enable radio button next to WEP (see Figure 10.51).
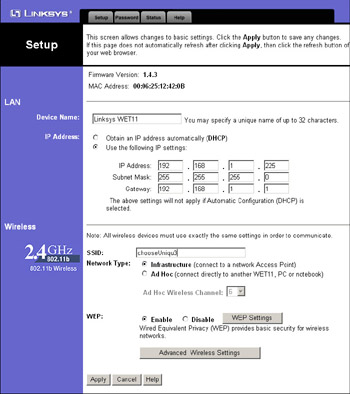
Figure 10.51: Set the SSID and Enable WEP
Click the WEP Settings button to open the Shared Keys window (see Figure 10.52). Select 128 bit 26 hex digits from the drop-down box and then enter the WEP keys that your wireless network uses. The WEP keys can be entered in either of two ways:
-
Generate the keys using the same passphrase used to generate the keys on your access point.
-
Manually enter the WEP keys that your access point uses.
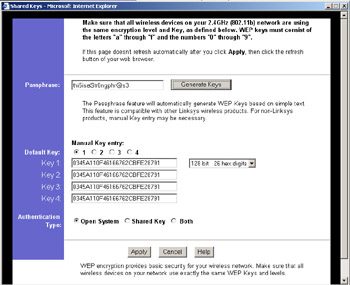
Figure 10.52: Enter the WEP KeysNext, click the Apply button on the Shared Keys window and the initial setup screen to save your settings. Finally, add the MAC address of your WET 11 to your allowed MAC address list on your access point.
|
| < Day Day Up > |
|
EAN: 2147483647
Pages: 125
- Chapter VI Web Site Quality and Usability in E-Commerce
- Chapter XI User Satisfaction with Web Portals: An Empirical Study
- Chapter XIII Shopping Agent Web Sites: A Comparative Shopping Environment
- Chapter XVI Turning Web Surfers into Loyal Customers: Cognitive Lock-In Through Interface Design and Web Site Usability
- Chapter XVII Internet Markets and E-Loyalty