Creating and Managing Scopes, Superscopes, and Multicast Scopes
Creating and Managing Scopes, Superscopes , and Multicast ScopesNow that you're familiar with how to install the DHCP Server service, let's take a look at how to configure it. The first step in configuring your DHCP server is to create a scope. Creating a ScopeBefore a DHCP server can provide clients with IP addresses, the server must be configured with a scope. A scope is a range of IP addresses that can be leased to DHCP clients on a given subnet. For example, if you have multiple subnets, each with DHCP clients, you have to create multiple scopes. In addition to IP addresses, a scope can also assign optional parameters to DHCP clients, including the IP address of DNS servers, WINS servers, and routers, and so on. Before creating scopes, consider the following guidelines:
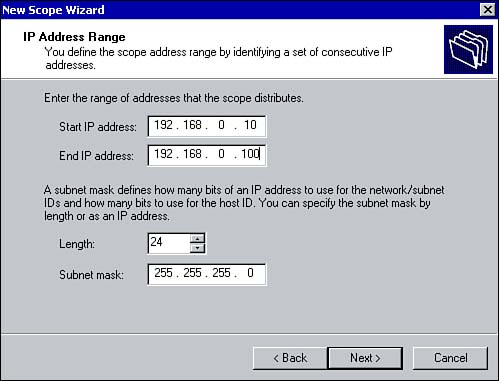
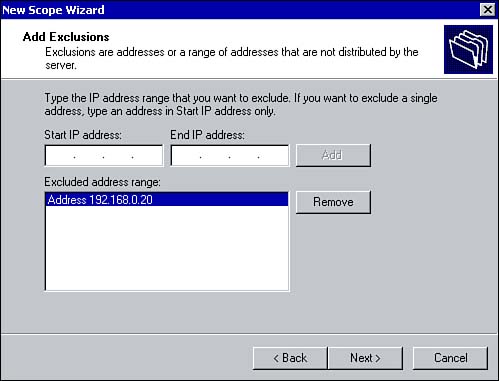
Creating a scope is a relatively simple process that can be accomplished through the DHCP management console. Once you select the New Scope option, a wizard prompts you for the required parameters. To create a new scope, perform the following steps:
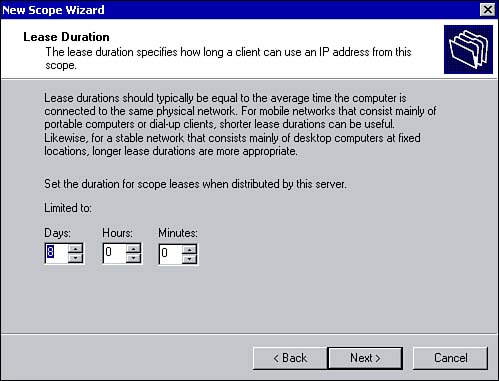
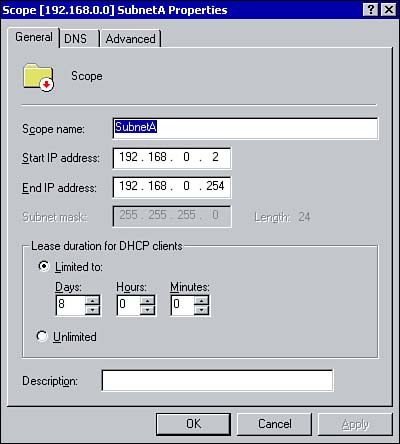
Lease DurationThe lease duration determines how long the client can continue to use the leased IP address before it must be renewed. The default lease duration is set to eight days, as you saw when you installed the DHCP Server service. The lease duration can be customized to meet the requirements of your network. For example, if the number of IP addresses exceeds the number of DHCP clients on the network, you can configure a longer lease duration. However, if the number of IP addresses available in the scope is comparable to the number of DCHP-enabled clients, you should configure a shorter lease duration to ensure an address will always be available for new and renewing clients. Also, if your network consists of a number of mobile users who move between subnets, consider configuring a shorter lease time. When a client receives an IP address from a DHCP server, a renewal process occurs as the lease approaches expiration. After 50% of the configured lease duration has elapsed, the client attempts to contact the DHCP server. The client that's requesting to renew its IP address broadcasts a DHCPREQUEST message. The DHCP server, if available, responds with a DHCPACK , granting the client's request to renew the IP address. Also, information about other DHCP options is included in this reply. If any information has changed since the client first obtained its lease, the client updates its configuration accordingly . If the server from which the client originally leased the IP address does not respond, the client again attempts to renew the IP address when 87.5% of the lease duration has elapsed. At this point, the client attempts to renew its current lease with any available DHCP server. If a server responds with a DHCP offer message ( DHCPOFFER ) to update the current client lease, the client can renew its lease based on the offering and continue operation. If the lease expires and no server has been contacted, the client must immediately discontinue using its leased IP address. The client then follows the same process used during its initial start up operation to obtain an IP address. The lease duration can be configured when you create a new scope. If you need to change it afterward, you can do so by right-clicking the scope within the DHCP console and choosing the Properties option. From the General tab, you can change the lease duration as shown in Figure 3.6. Figure 3.6. Reconfiguring the lease duration. Activating a ScopeAfter a scope has been created, it appears within the DHCP management console with a red arrow beside it. Before any addresses from the scope can be leased to clients, the scope itself must be activated. This is a simple process that you can perform from within the console. To do so, right-click the scope and select the Activate option. The red arrow disappears, indicating that clients can now receive IP addresses from the scope.
Client ReservationThere might be instances when a workstation on the network requires the same IP address every time. For example, if you have only a few IP addresses, you might need to reserve one for high-priority users. With a client reservation, the workstation can still be DHCP enabled, but the DHCP server will always assign the client the same IP address. In terms of administration, IP addressing remains centralized and the clients are assigned optional parameters through the DHCP server.
Configuring ScopesAfter a scope has been created, you can configure several DHCP options. The options can be configured at one of four levels:
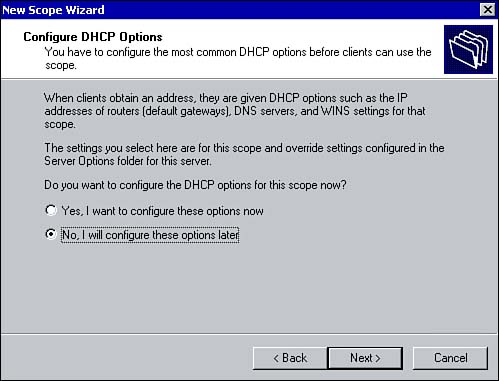
Server Level Scope ConfigurationOptions configured at the server level are applied to all DHCP clients regardless of the subnet they are on. Any options that should be applied to all DHCP clients should be configured at this level. For example, to configure all clients on the network to use the same DNS server, the option can be configured at the server level. When you are configuring scope options, any options configured at the scope or client level will override those configured at the server level. To configure server-level options, right-click the Server Options container listed under the DHCP server and select Configure options. Scope Level Scope ConfigurationIf you want to configure DHCP options so they apply only to DHCP clients on a specific subnet, the options should be configured at the scope level. For example, the IP address of the default gateway for a subnet should be applied at the scope level. Configuring scope-level options can be done by right-clicking the Scope Options container and selecting Configure options. Class Level Scope ConfigurationWindows 2000 now includes a fourth method for applying DHCP options. With User and Vendor Class Options, DHCP options can be applied to a group of clients with similar needs (such as a group of mobile users or a group of clients sharing the same vendor). User class options can be used to assign options to DHCP clients that have common needs for similar DHCP options configurations. For example, a user class may be used to configure options for mobile users. Vendor class options can be used to assign DHCP options on the basis of vendor information. For example, specific options can be assigned to clients running a specific version of Windows. Client Level Scope ConfigurationFinally, if you want to apply DHCP options only to a specific DHCP client, you can configure the options at the client level. You can configure options at this level only for clients that have a client reservation, which means they are DHCP clients but always lease the same IP address. Any option you configure at this level will override any option configured at the server and scope levels. To configure a client option, right-click the client reservation and select Configure options.
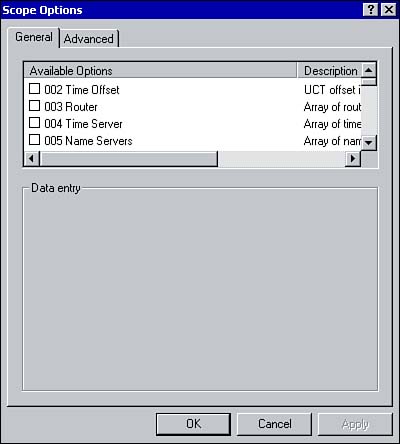
Now that you're familiar with how DHCP options can be applied, let's take a look at the different DHCP options that can be assigned to clients. DHCP OptionsAs already mentioned, a DHCP server can assign parameters other than just an IP address and subnet mask to a DHCP client. You can see all the available DHCP options through the Properties dialog box for the server, scope, class, or client reservation (see Figure 3.7) Table 3.1 provides a description of the commonly used DHCP options. Figure 3.7. DHCP options. Table 3.1. Common DHCP Options
SuperscopesAside from a regular scope, you can also create a second type of scope known as a superscope . In a multinetted environment (one that has multiple logical IP subnets defined on a single physical network), superscopes allow a DHCP server to assign leases to clients on multiple subnets. For example, a physical network is divided into two subnets, Subnet A and Subnet B, connected by a router. Subnet B contains two multinets. A single DHCP server is located on Subnet A. The DHCP server contains a single scope with a range of IP addresses to lease to clients on Subnet A. To have the DHCP server assign IP addresses to clients on Subnet B, you can create a superscope and add to it the IP address ranges for the multinets on Subnet B. The scope configuration on the DHCP server could be similar to the following: Subnet A Scope 1: 192.168.1.2192.168.1.254 Subnet B Superscope for Subnet B Scope 2: 192.168.2.2192.168.2.254 Scope 3: 192.168.3.2192.168.3.254 One of the biggest advantages of creating superscopes is to ease administration of a multinetted environment. Identifying which scopes go with which networks can be a difficult administration task. Creating superscopes and grouping scopes in some logical manner can make them easier to administer; for example, grouping all the scopes from a single floor in a large office building into a superscope eases the administration process. Superscopes are also used to support DHCP clients on a single physical network segment (such as a single Ethernet LAN segment) on which multiple logical IP networks are used. When more than one logical IP network is used on each physical subnet or network, such configurations are called multinets . Creating a SuperscopeTo create a new superscope within the DHCP management console, follow these steps:
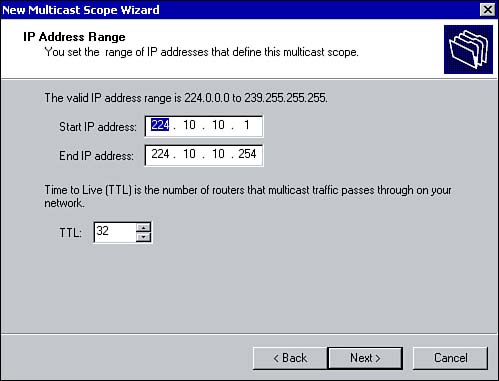
After the superscope has been created, it must be activated by right-clicking the scope and selecting the Activate option. Multicast ScopesMulticasting is the process of sending a message to a group of recipients as opposed to unicasting , in which a message is sent to a specific recipient. Normally, DHCP is used to assign each DHCP client a single unique IP address from a range of IP addresses configured in a scope. Windows 2000 extends the functionality to allow you to create multicast scopes so that messages destined to a multicast IP address can be sent to all clients in a multicast group. Multicast scopes are supported through a protocol known as the Multicast Address Dynamic Client Allocation Protocol (MADCAP) . MADCAP controls how the DHCP servers dynamically assign IP addresses on a TCP/IP network. The multicast server (in this case, the DHCP server) is configured with a group of Class D IP addresses (in the range of 224.0.0.0239.255.255.255) that can be assigned to multicast clients. The server is also responsible for maintaining the group membership list and updating the list as members join and leave a group. Creating Multicast ScopesTo create a multicast scope, follow these steps:
|
EAN: 2147483647
Pages: 167