| We have left the DataGrid control as a separate topic because the control is quite complex. It is the most robust grid control ever provided out-of-the-box from Microsoft. It is probably as robust as some of the third-party grid controls of only a couple of revisions back. The DataGrid has no unbound mode. It must be bound to a DataSource. But before you get excited, think for a minute. Since we can now create DataSets on the fly and use them in place of obsolete structures like arrays, we really can use the grid unbound to a database that is. All we have to do is create a DataTable or a DataSet, populate it with whatever way we want, and bind it to our grid. This is the same effect as an unbound grid control in previous versions of VB, but now we do not have to worry about using different techniques if the grid is bound or unbound . Also the DataSource is separate from the presentation component which is better architecturally. Since we don't have to worry about database specifics, we can limit our discussion to the presentation capabilities of the grid. These are numerous , but admittedly they were not easy to find. Say good-bye to the design editors of previous grid controls. There is no visual design tool for the grid. The way we VB programmers are, I wouldn't be surprised if one of you came up with one. There's a suggestion for a project for any of you with free time. To fully demonstrate the DataGrid's capabilities, we will need a demo project. We'll start with our familiar UI, as in Figure 8.13. Figure 8.13. The starter project. 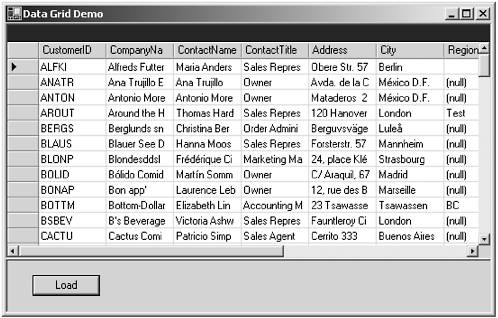 You can get ADOBook08-03Starter from the web site. To save time we will not go though all of the details of creating the project. We will also omit the database update code. We are going to concentrate on the presentation capabilities of the DataGrid control. The TableStyle Class There are two ways of customizing the default display of the DataGrid control. -
Use a custom DataView and bind the grid to it. That works for filtering and sorting, but you cannot customize the visual display of the DataGrid that way. The DataView is really intended for customizing the data itself, not the visual display of the DataGrid. -
Create a collection of custom TableStyle objects that we can use to alter the grid's appearance without touching the underlying data. Previous VB grid controls had a Columns collection that had properties such as Format, Visible, Width, and so forth for affecting the appearance of the grid. You could use the property page editor to change the values of these properties. There were also Style objects and a Styles collection that you could use to store alternate display formats that the user could switch to. This was a bit confusing. Which should I use, a custom style or the Columns collection? In this version, all of the appearance- related properties have been moved into the TableStyle class, Hopefully this will eliminate the confusion. Incidentally, the Columns collection has gone away as well. In keeping with the architecture of the DataSet, you now get the value of data in the grid using the Item property. This property is indexed by row and column. There is also a CurrentRowIndex property that returns the row index of the row the pointer in the indicator column is on. So to access a given column in the current row the code is as follows : TextBox1.Text = DataGrid1.Item(DataGird1.CurrentRowIndex, 3) This returns the data in the first row, fourth column. We get the native representation of the data converted to a string for display in the text box. It uses the default Windows format unless changed. One flaw in this system is that you can no longer access a column by its name. In previous DataGrids, the Column collection contained named column objects. The physical layout of the grid could change by a user moving columns around, and so forth, but the column could still be accessed by its name . Now, the user can no longer move columns at runtime. In my experience, no user actually used this feature, but it was still nice to have and be able to offer users the ability to customize the grid at runtime. Now we will have to purchase a third-party grid control if we want this feature. Setting Up TableStyles There are two ways to set up TableStyles: in design mode or programmatically at runtime. Let's look at doing it at design time first. Let's take our starter project and add some buttons . Make the form look like Figure 8.14. Figure 8.14. The form ready for the TableStyles demo. 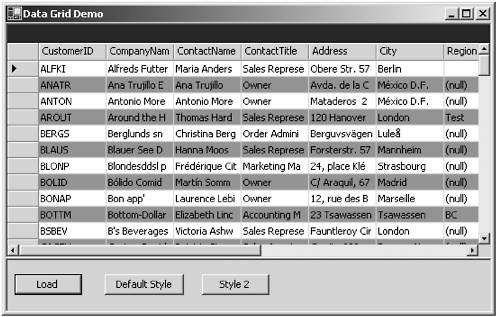 Since this book is in black and white, the color of the alternating rows is dark teal (0, 192, 192 in RGB notation). You can use the direct AlternatingRowColor property to set this up. In our TableStyle object, we will use a different color just because we can! To create our TableStyle object, we will open the collection editor. Do this by clicking the ellipsis button on the TablesStyles property in the Properties window as in Figure 8.15. Figure 8.15. Accessing the TablesStyles collection.  Once we click the button the now-familiar collection editor opens. Click the Add button to add a new TableStyle object to the collection as in Figure 8.16. Figure 8.16. The TableStyles collection editor.  At this point, we can edit global properties of the grid like the AlternatingBackColor. Let's change it to light aqua (192, 255, 255 in RGB notation). Before we can use the TableStyle, it must have at least one column defined. It does not inherit the columns of the default grid when you create the object, which is annoying. This is where a designer would come in handy. You have to manually create your columns. This can be a tedious task of pointing and clicking. To define your columns, we have to open yet another collection editor. Do this by going to the GridColumnStyles property and clicking the ellipsis button as in Figure 8.17. Figure 8.17. Accessing the GridColumns collection.  When the GridColumnStyle editor opens, click the Add button. One column is added to the TableStyle. Do this five more times to add five columns. The editor will now look like Figure 8.18. Figure 8.18. The GridColumnStyle editor.  The way we bind a GridColumnStyle to a column in a DataTable is though the MappingName property. If we drop down the list in the property pane, we will be able to select columns from the DataSource as in Figure 8.19. Figure 8.19. Setting the MappingName property.  Note that when we click the Add button, there are two choices for the kind of column we can add. The default, DataGridTextBoxColumn, adds a normal text style column to the grid. The other choice, DataGridBoolColumn, adds a column with a check box in it. This is for columns that have a true or false value. This is set up so you can add your own column editors to the system by subclassing the DataGridColumn abstract class. This is beyond the scope of this book, but if you want to look into it there are instructions in the Help files. Choose which type you wish to display by dropping down the button as in Figure 8.20. Figure 8.20. Selecting the column type.  Now go through all of the columns and enter the following column names in the MappingName properties: CustomerID, CompanyName, ContactName, ContactTitle, Phone. Close all the editors. Next we have to make a TableStyle active. This isn't as obvious as you would think nor is it very well implemented. The way I would have implemented this would have been to have an ActiveTableStyle property on the main grid control and then set this to the index or name of the style you wish to use. That way only one style could be active at any given time, which is what I would assume you would want. Another good way would have been to have an Activate method on the TableStyle object itself. Calling it would activate the TableStyle and deactivate any currently active TableStyle. The way the developers chose to do this is through the MappingName property of the TableStyle object itself. When you set the MappingName to a table, the TableStyle is displayed in the grid. We already set the names of the columns in the ColumnStyles. Doesn't this imply the table we are going to use? What if we set the MappingName property to a table other than the one we used for the ColumnStyles? It seems to me this should drill down; that is, by setting the DataSource of the grid itself we imply the available DataTable for the TableStyles. Then we set the MappingName on the TableStyle object to one of those tables, and then the MappingName of the ColumnStyle to an available column from the table. But this is not how it works at all. And what if you set more that one TableStyle object to the same MappingName? Which one gets used? The answer is that you will throw an error if you try to set the MappingName of two different TableStyles to the same name. You first have to clear out the active one, then set the new one. This is a really strange way of doing it. I remember years ago when there was a lot of experimentation with GUIs, one came out as an alternative to the Windows 3.1 program manager called New Wave. It had some nice ideas that were eventually incorporated into the Windows 95 shell, but one of the weird things it did was require the user to drag the trash can to an object such as a file to delete it. I remember some cynical reviewer remarking that "in real life we don't 'apply the trash-can to the garbage,' we throw the garbage in the trash." It is painfully clear that this might be the reason no one remembers the "New Wave" shell. I hope the same will not be said some day about the DataGrid and it's odd TableStyle architecture. Making It Work Now let's add a few lines of code to the project to make it work. The code is all in the button click event procedures and is pretty simple, so I'll just show it here: Private Sub Button1_Click(ByVal sender As System.Object, ByVal e As System.EventArgs) Handles Button1.Click SqlDataAdapter1.Fill(DsCust1) End Sub Private Sub Button3_Click(ByVal sender As System.Object, ByVal e As System.EventArgs) Handles Button3.Click DataGrid1.TableStyles(1).MappingName = "" DataGrid1.TableStyles(0).MappingName = "Customers" End Sub Private Sub Button2_Click(ByVal sender As System.Object, ByVal e As System.EventArgs) Handles Button2.Click DataGrid1.TableStyles(0).MappingName = "" DataGrid1.TableStyles(1).MappingName = "" End Sub Private Sub Button4_Click(ByVal sender As System.Object, ByVal e As System.EventArgs) Handles Button4.Click DataGrid1.TableStyles(0).MappingName = "" DataGrid1.TableStyles(1).MappingName = "Customers" End Sub Private Sub frmGridDemo_Closing(ByVal sender As Object, ByVal e As System.ComponentModel.CancelEventArgs) Handles MyBase.Closing If DsCust1.HasChanges Then If MsgBox("Save Changes?", MsgBoxStyle.YesNo) = MsgBoxResult.Yes Then SqlDataAdapter1.Update(DsCust1) End If End If End Sub Notice that to get back to the default grid display, we simply set the TableMapping property of all the TableStyle objects in the collection to the null string. By the way, if we set the TableMapping property to an invalid name, such as a table that doesn't exist, no error occurs. As a matter of fact, nothing at all happens. Another strange behavior. The last bit of code in the Closing event allows us to save the data to the database. Now let's look at the program running. The grid with the default settings looks like Figure 8.21. Figure 8.21. The grid with the default style. 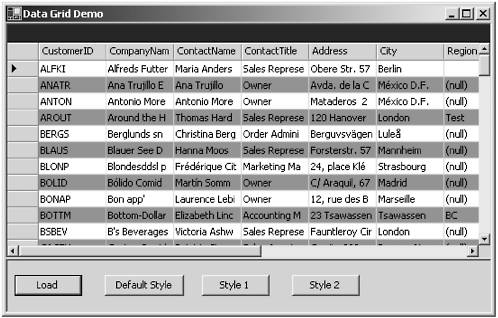 When we click the Style 1 button, we set the TableMapping property of the first TableStyle object to Customers. The grid then appears as in Figure 8.22. Figure 8.22. The grid with Style 1 displayed. 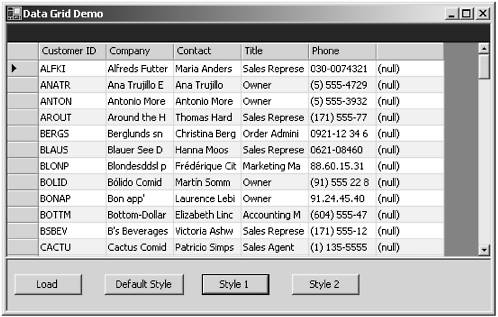 Besides the different columns, the alternating row color is now light aqua. Let's look at Style 2 (see Figure 8.23). Figure 8.23. The grid with Style 2 displayed.  To go back to the original display, click Default Style. This clears all the TableMapping settings and restores the original view. Sorting Data There are two ways to sort the data in a DataGrid: by single column or by multiple columns. The easier way is to allow the user to sort by clicking the column headings. This works the same way as Windows Explorer in Detail View, the first click sorts ascending , the second click sorts descending. The direction of the sort is indicated by a 3D arrow pointing up or down. The main drawback to this method is that the user can only sort by one column at a time. Also, you cannot control which columns the user is allowed to sort on. If we want to do this we will have to use a little code. This will demonstrate how to use the HitTest method to determine where the mouse was clicked over the grid. The HitTest Method In the previous version of the grid, there was a HeadClick event that fired and returned the column index of the column that was clicked. There were also other click events. Rather than have so many events, the designers decided to let the programmer figure out where the click occurred. There are already the mouse events that return x and y coordinates to where the mouse was when the event took place. All we need is a way to determine where in the control the mouse was clicked. The designers provided this in the form of the HitTest method. You pass it the x and y coordinates, and it returns a HitTestInfo object that contains the row, column, and type enumeration. The type enumeration will tell you where on the grid the click occurred. Examples are the column heading, in a cell , and so forth. You can then use this information to determine the DataTable column that you are positioned over and use that information to either sort the column or do nothing if it is a column you do not want to allow the user to sort on. To do this, first add a DataView object to the designer. Set the DataTable property to the Customers table. Then change the DataSource property of the DataGrid to the DataView object. You may have noticed by now that binding to a DataView will be a standard practice in the future. I can't see any reason not to use one as they are so versatile. Also, we have to set the AllowSorting property of the grid control to false. This disables the default behavior of sorting on the clicked column automatically. We must do this so we can control where the sorting is allowed. Next we have to add some code to the MouseUp event of the DataGrid. Here is the code: Private Sub DataGrid1_MouseUp(ByVal sender As Object, ByVal e As System.Windows.Forms.MouseEventArgs) Handles DataGrid1.MouseUp Dim ht As DataGrid.HitTestInfo Try ht = DataGrid1.HitTest(e.X, e.Y) If ht.Type = DataGrid.HitTestType.ColumnHeader Then If DsCust1.Customers.Columns(ht.Column).ColumnName = "ContactName" Or _ DsCust1.Customers.Columns(ht.Column).ColumnName = "CustomerID" Then DataView1.Sort = DsCust1.Customers.Columns(ht.Column).ColumnName End If End If Catch errobj As Exception MessageBox.Show(errobj.Message) End Try End Sub Even though it might appear complicated it is really simple. The event passes a MouseEventArgs object, which contains the x and y coordinates of the mouse position as properties. These properties are then passed to the HitTest method of the DataGrid. This returns the HitTestInfo object. The HitTestInfo object has a Type property which tells us where the user clicked on the grid. It also returns the column index. So if the user clicked in the column header, we can use the column index to get the name of the column from the underlying DataSet. We can then test the column name to see if it is one of the columns we want to allow the user to sort by. If it is we set the Sort property of the DataView to the column name. If not, we just do nothing. We can make one more change to emulate the default behavior of the DataGrid, which is to alternate between ascending and descending sorts each time the heading is clicked. We need to make one more change to the procedure. Private Sub DataGrid1_MouseUp(ByVal sender As Object, ByVal e As System.Windows.Forms.MouseEventArgs) Handles DataGrid1.MouseUp Dim ht As DataGrid.HitTestInfo Static strDirection() As String Try ReDim Preserve strDirection(DsCust1.Customers.Columns.Count - 1) ht = DataGrid1.HitTest(e.X, e.Y) If ht.Type = DataGrid.HitTestType.ColumnHeader Then If DsCust1.Customers.Columns(ht.Column).ColumnName = "ContactName" Or _ DsCust1.Customers.Columns(ht.Column).ColumnName = "CustomerID" Then If strDirection(ht.Column) = "" Then strDirection(ht.Column) = "Asc" DataView1.Sort = DsCust1.Customers.Columns(ht.Column).ColumnName & " " & strDirection(ht.Column) If strDirection(ht.Column) = "Asc" Then strDirection(ht.Column) = "Desc" Else strDirection(ht.Column) = "Asc" End If End If Catch errobj As Exception MessageBox.Show(errobj.Message) End Try End Sub What this does is create a static string array to store that last sort direction of each column. The keyword Static makes the variable retain its values between calls to the method. We use the Redim Preserve statement to set up the array initially. Then we simply toggle the value of the element that corresponds to the column index between Asc and Desc. We then append this value to the Sort property value. Sorting Multiple Columns In order to sort multiple columns, we need a way to select the columns we want to sort. This version of the grid does not have any column selection mechanism so we will have to invent one. Let's make it so that if the user right-clicks on the column header it selects the column. We will need a way to store the selected column names in a temporary collection until we apply the sort. Once the sort is applied, we will clear the collection. We can use a ListBox to display the columns we want to sort on. For now we will limit our demonstration to ascending sorts. We will leave it up to you to modify the code to sort either way. You don't want us to have all the fun, do you? The procedure for the user is right-click on the column he wishes to sort on in the most-significant to least-significant order. So the first column clicked will be the outermost sort, the next column within that, and so on. As the user clicks on the columns they will be added to the collection and the ListBox. If a column is clicked twice it will not be added the second time. Once the user has finished selecting, he can click the Sort button to apply the sort. After the user clicks the sort button, if he clicks another column heading the list clears and prepares for the next sort sequence. Again it sounds complicated but much of the work is already done. Here is the modified code and the button click event for the Sort button. The new code is in bold. Private Sub DataGrid1_MouseUp(ByVal sender As Object, ByVal e As System.Windows.Forms.MouseEventArgs) Handles DataGrid1.MouseUp Dim ht As DataGrid.HitTestInfo Static strDirection() As String Try If e.Button = MouseButtons.Left Then ReDim Preserve strDirection(DsCust1.Customers.Columns.Count - 1) ht = DataGrid1.HitTest(e.X, e.Y) If ht.Type = DataGrid.HitTestType.ColumnHeader Then If DsCust1.Customers.Columns(ht.Column).ColumnName = "ContactName" Or _ DsCust1.Customers.Columns(ht.Column).ColumnName = "CustomerID" Then If strDirection(ht.Column) = "" Then strDirection(ht.Column) = "Asc" DataView1.Sort = DsCust1.Customers.Columns(ht.Column).ColumnName & " " & strDirection(ht.Column) If strDirection(ht.Column) = "Asc" Then strDirection(ht.Column) = "Desc" Else strDirection(ht.Column) = "Asc" End If End If ElseIf e.Button = MouseButtons.Right Then ht = DataGrid1.HitTest(e.X, e.Y) If ht.Type = DataGrid.HitTestType.ColumnHeader Then If mCols Is Nothing Then ReDim mCols(0) Else ReDim Preserve mCols(mCols.GetUpperBound(0) + 1) End If If mCols.IndexOf(mCols, DsCust1.Customers.Columns(ht.Column).ColumnName) < 0 Then mCols(mCols.GetUpperBound(0)) = DsCust1.Customers.Columns(ht.Column).ColumnName ListBox1.DataSource = mCols End If ListBox1.DataSource = mCols End If End If Catch errobj As Exception MessageBox.Show(errobj.Message & vbCrLf & errobj.StackTrace) End Try End Sub Private Sub Button5_Click(ByVal sender As System.Object, ByVal e As System.EventArgs) Handles Button5.Click DataView1.Sort = Join(mCols, ", ") Erase mCols End Sub There is one more line of code that needs to be added and that is a declaration of the string array mCols. It is a simple Private mCols() As String. Notice that we are using the ability to bind a control to an array to populate the ListBox automatically. It saves us having to constantly maintain the list in the ListBox. There are a couple of items worth noting. First, I use the IndexOf method of the array object to test if a proposed new element exists in the array. If it does, the method returns the index. If it doesn't, the method returns 1. This is a handy method. It beats looping through the array and testing each item, although that's probably what it does internally. But it's code I didn't have to write. Also, notice the use of the Join function. This is a holdover from VB 6 that was kept in the language. This function takes a string array and converts it to a delimited string. The delimiter can be any character or characters you desire , although the most common is probably the comma. It has a companion function, Split, that takes a delimited string and converts it into any array. I'm glad they left these in, because the string class methods that are supposed to replace them only take single-character delimiters, which is a big deficiency. There is a lot more to the DataGrid than we have looked at, but I think I have given you enough to whet your appetite. As you can see, with a little code you can really do a lot with this grid control. Before you go out and drop some big bucks on one of the third-party controls, why not look into enhancing the one that came with Visual Studio. Now that VB is fully object oriented, you could subclass the control and add some of these techniques to the existing class to create your own customized version. Have fun! | 