Section 11.1. Introducing Eclipse
|
11.1. Introducing EclipseIf you're a Java developer, you know how finicky Java can feel at times. Missed import statements, forgotten variable declarations, omitted semi-colons, garbled syntax, and typos will cause the Java command-line compiler, javac, to cough and display pages of error messages. The error messages tell you that javac knows what the error is, so why doesn't it just fix the problem and let you continue developing? javac can't fix the problem; to do that, you can use an IDE, which will catch errors before you compile and suggest solutions. Java is badly in need of a good IDE, and the premiere Java IDE these days is Eclipse. You can see what it looks like in Figure 11-1. Figure 11-1. Eclipse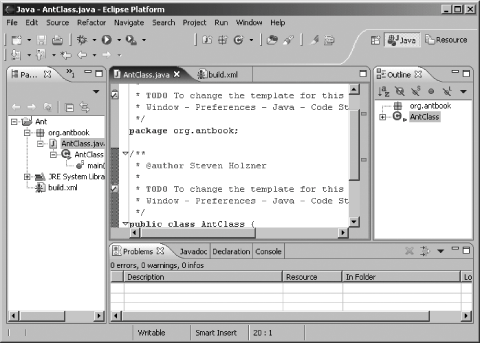 Eclipse is free for the downloading, like a number of other Java IDEs, but Eclipse has a serious advantage behind it, which is the power of IBM, reportedly spending $40 million developing it. It's now an open source project, largely under IBM's development but part of a software consortium named eclipse.org.
11.1.1. Getting EclipseEclipse is free for the downloading; all you have to do is navigate to http://www.eclipse.org/downloads. Select one of the download mirrors available on that page. When you do, you'll be presented with a list of the available downloads of these various types:
Select the download for your operating system and click the appropriate link to download it. Installing Eclipse is easy; all you've got to do is to unzip or untar it, depending on your operating system. Since you download the version of Eclipse targeted to your operating system, you'll find the executable file ready to run as soon as you uncompress Eclipse. You start Eclipse by running the Eclipse executable. When you first run Eclipse, you should see the Welcome page. To get an overview of Eclipse or to run a tutorial, click the appropriate links. To close this Welcome page, click the X in the page's tab. 11.1.2. Creating an Eclipse ProjectIf you've installed Eclipse and have got it running, you have access to the Ant/Eclipse interface and no extra work is needed. Development work in Eclipse is based on projects, and I'll create a new project to show how to use Ant inside Eclipse. To create a new project, select File On the next page, give this project the name AntExample. Leave the other defaults as they are and click Finish. This opens the new project in Eclipse; you can see the AntExample project at left in Eclipse's Package Explorer. This project is empty so far; to add Java code, select the AntExample project in the Package Explorer and select File This creates the code, AntClass.java, you see in the Eclipse editor at the center of Figure 11-2, complete with a main( ) method. Figure 11-2. A new Java class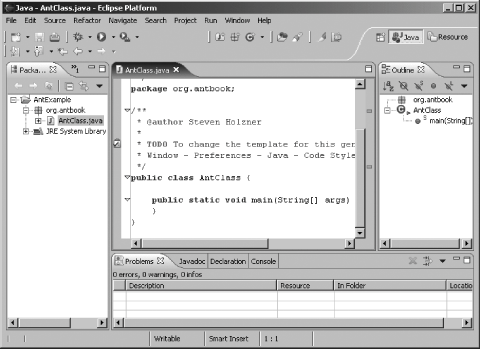 Add this code to make this class do something: public static void main(String args[]) { System.out.println("No worries."); }Click the Save icon in the toolbar to save the changes to AntClass.java, and select Run 11.1.3. Writing an Ant Build File in Eclipse To create an Ant build file in Eclipse, right-click the AntExample project in the Package Explorer and select New <?xml version="1.0" ?> <project default="main"> <target name="main" depends="compile, compress" description="Main target"> <echo> Building the .jar file. </echo> </target> <target name="compile" description="Compilation target"> <javac srcdir="org/antbook"/> </target> <target name="compress" description="Compression target"> <jar jarfile="Project.jar" basedir="org/antbook" includes="*.class" /> </target> </project> After entering this XML, save the new build file. The Eclipse support for Ant is evident; build.xml appears in the Package Explorer at left with an Ant icon and the syntax in the build file is colored with XML declarations in one color, attribute values in another, and Ant keywords in another, as shown (in glorious black and white) in Figure 11-3. The targets of this build file appear at right, in the Outline view. Figure 11-3. An Ant build file in Eclipse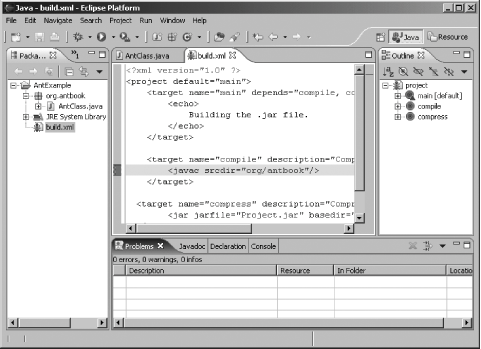
Support for Ant is evident in Eclipse's code assist (also called content assist), which was added for Ant build files in Eclipse 3.0. When you enter partial text for Ant elements or attributes, you can press Ctrl-Space to open code assist, which will list possible completions of what you've been typing, as shown in Figure 11-4. Figure 11-4. Using code assist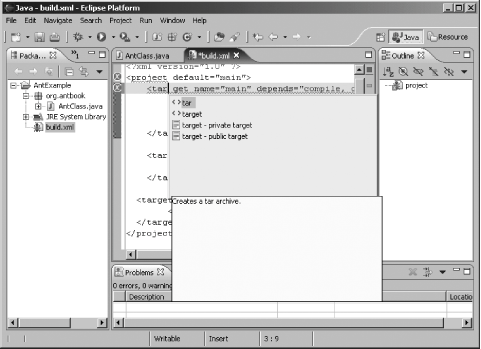
Eclipse 3.0 can catch syntax errors in Ant build files. For example, ending a target with </targe>, instead of a </target> tag, is immediately caught by the Eclipse Ant editor, as shown in Figure 11-5. If you let your cursor rest over the circled X icon to the left of the problem line, you'll see Eclipse's explanation of the problem: "Expected `</target>' to terminate element starting on line 3." This kind of syntax checking and corrections alone are worth the price of admission. Figure 11-5. Handling syntax errors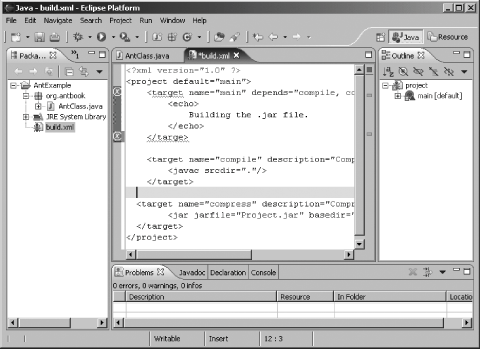
Want to see the value of a property? Let the mouse hover over it, and its value will appear in a tooltip.
|
|
EAN: 2147483647
Pages: 115

 New
New