Setting User Preferences On the Final Cut Pro menu, you'll find the first of three settings windows , User Preferences (see Figure 2.3). (You also can open this window by pressing Opt+Q.) This set of settings controls how FCP works with you, the user. Notice the set of tabs across the top of the User Preferences window. By clicking a tab, you can access the various settings, the first of which is General User Preferences. Figure 2.3. The User Preferences window. 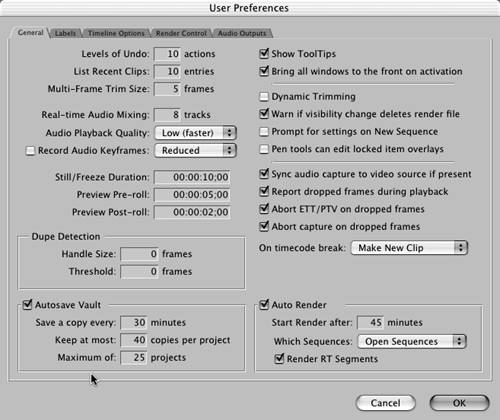 Understanding the Settings in the General User Preferences Levels of Undo sets the number of actions the computer keeps in memory, allowing you to press Cmd+Z to undo actions in the order you performed them, up to a total of 99. List Recent Clips is the number of clips that have been loaded into the Viewer. Multi-Frame Trim Size sets the number of frames you can quickly trim using the trimming tool that is included with Final Cut Pro. You can trim up to 99 frames . Real-time Audio Mixing sets the number of tracks you will attempt to monitor and mix in real time without mixing them down. The faster your machine, the more you can hear and mix in real time. If you experience dropped frames during playback, you can lower this setting and possibly eliminate them. Audio Playback Quality sets the quality of the conversion of mixed audio sampling rates within the same sequence (mixing 41kHz from CD music with 48kHz sound sync audio, for example). If you set this to lower than High, you can play back more tracks at one time at the expense of the playback quality. With Low selected, you might hear clicks or pops in the playback. Use lower quality while doing the general edit and higher when you are ready to focus on audio quality or audio editing. Mixing down the audio always results in high quality. When the Record Audio Keyframes box is checked, keyframes are recorded whenever audio level or panning controls are adjusted. The pop-up menu defines how detailed keyframe automation is when recorded using the Audio Mixer or audio filter controls: -
All records all the keyframes while you move a channel strip's fader or panning slider. The end result is a precise re-creation of the levels you set using the Audio Mixer. The negative thing about this setting is that it might record a single keyframe for each frame, creating a situation in which adjusting these keyframes manually isn't easy. -
Reduced reduces the number of recorded keyframes that are created when you move a channel strip's fader or panning slider. The resulting level or panning overlay in the Timeline or Viewer is an accurate reproduction of the levels you set, but it is easier to edit using the Selection or Pen tool. -
Peaks Only records the fewest number of keyframes necessary to approximate the levels you recorded when moving a channel strip's fader or panning slider. Keyframes recorded using the Peaks Only option reflect only the highest and lowest levels that were recorded. Still/Freeze Duration sets default In and Out points when you create a still. It also sets the duration of an imported image file. Preview Pre-roll and Preview Post-roll set the amount of pre-roll and post-roll when you preview an edit from the Trim window. Dupe Detection Handle Size and Dupe Detection Threshold affect when and how frames are used more than once in the same sequence shown in the Timeline. Dupe Detection Handle Size adds frames to the beginning and end of the clip regions , which are used for comparison to determine whether to display duplicate frame indicators. The default setting is 0. Dupe Detection Threshold allows you to set the minimum number of frames that must be duplicated before a duplicate frame's indicator appears. By default, this is set to 0 so that all instances of duplicated frames are indicated. You can set it as high as 99 frames. In this case, there would have to be a minimum of 99 consecutive duplicated frames before a duplicate frames indicator would appear. The Autosave Vault lets you access earlier saves of your project files. You set the location of these files by selecting it in the Scratch Disks tab of the System Settings window. Show ToolTips can be activated to turn on the small yellow boxes that name each of the buttons in the interface. Many of the ToolTips include the keyboard shortcut used for the function. If the Bring all windows to the front on activation box is selected, and Final Cut Pro is in the background behind another window or application, clicking one FCP window to bring it to the front brings all FCP windows to the front. If this option is not selected, only the window you click is brought forward. Dynamic Trimming allows for edit points in the Trim Edit window to follow the playhead's position. If this selection is chosen using the J, K, and L keys, the edit points move automatically with the playhead's position. When you press J, for example, pressing K when you see a new edit point automatically moves the edit point to the playhead's position in the Trim Edit window. Warn if visibility change deletes render file activates a warning dialog box if you turn off a track's visibility or turn off your monitoring of any track. When you turn off track monitoring in Final Cut Pro, you can lose render files. You can bring back renders if you've turned off a track's visibility by performing an Undo (press Cmd+Z). Prompt for settings on New Sequence displays a Settings dialog box when you ask the software to create a new sequence. This is handy if you want to double-check the sequence settings before you create a new one or if you're using mixed sequences in a project, such as OfflineRT and DV. Pen tools can edit locked item overlays can allow you to use keyframes and change opacities of video clips and levels of audio clips in tracks you have locked. Locked tracks are tracks of video or audio that you have put in a locked mode; you cannot edit these tracks or change them in any other way with the exception of this particular preference setting. When capturing audio from a controllable deck for the purpose of synchronizing it with a video clip to create a merged clip (such as syncing sound from a DAT recorder used on the set while shooting film), audio sync can be ensured only if the audio deck is genlocked to a video capture interface connected to your computer. Turning on the Sync audio capture to video source if present option ensures that the sync of audio captured from a genlocked audio deck is accurate. You can genlock a deck to a video capture card by connecting them both to a black burst generator. Report dropped frames during playback opens a dialog box to let you know that frames were dropped during a playback. Abort ETT/PTV on dropped frames aborts Edit to Tape or Print to Video operations if the computer drops frames during playback. Abort capture on dropped frames does just that. It stops the capture but saves all media captured to that point. All media with accurate timecode is saved, and a clip that references this media is saved in the Browser. The On timecode break pop-up menu has three options to choose from when FCP encounters a timecode break during capture: -
Make New Clip is the default setting. It's new to Final Cut Pro 4. Video that has been captured is saved as a single clip with its Out point set to the last frame of video that has correct timecode. FCP then continues capturing past this break, giving the clip the same name you logged it to be, adding a dash and a number at the end. This is great for capturing whole tapes that might have timecode breaks. You can be assured that all clips captured have accurate timecode. -
Abort Capture stops the process when broken timecode is detected , saves the capture up to that point, and stops the capture process. -
Warn After Capture sets FCP to capture over a timecode break. New to Final Cut Pro 4, this option causes an incorrect timecode to be logged after any break in the code. This keeps you from later recapturing the clips with accuracy. The Auto Render area of the General User Preferences is a new feature in FCP 4. You can set FCP to automatically begin rendering the sequence(s) you've selected through the pop-up menu, and you can select whether to include segments that contain real-time effects. Labels You can use the label settings, shown in Figure 2.4, in a number of ways. You can Ctrl-click a clip, a still image, or a sequence and change its icon display color in the Browser window. Here, you can change what the label color stands for by typing in the box next to the color. When you Ctrl-click a clip or other item in the Browser, you can select from the list of colored representations. Figure 2.4. The Labels tab. 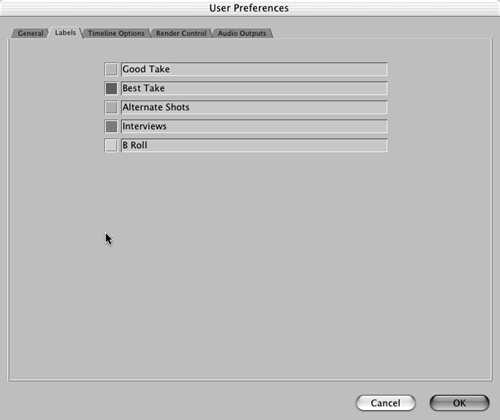 Timeline Options Figure 2.5 shows the window for setting the way your default Timelines are displayed. You can also open this window with the current sequence settings displayed and editable from the Sequence menu. If you change the Timeline Options here, only new sequences will be created with these parameters. If you open a current sequence's settings, you can change its parameters by highlighting it in the Browser and pressing Cmd+0. Figure 2.5. The default Timeline Options. 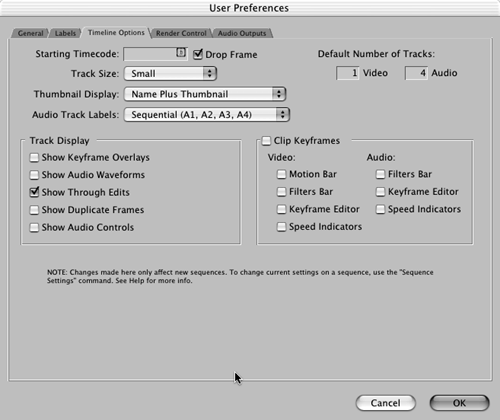 Starting Timecode provides a box to set the timecode numbering that is used in your sequences. This is handy when you need to have your program start at a given timecode. Many master tapes start at 00;58;30;00 to make room for bars and tone, slate, and black before the program starts at 1:00:00;00. The Drop Frame check box determines whether the sequence uses drop or nondrop frame timecode. When you edit in NTSC, turning this on lets you determine how long a sequence actually lasts. It accounts for the fact that NTSC video plays at 29.97 frames per second (fps) and not 30fps. It doesn't drop frames; rather, it adjusts for this by dropping frame numbers . Track Size provides a pop-up menu from which you can set a default track size width. Possible widths are Reduced, Small, Medium, and Large. Thumbnail Display sets the options of displaying the name only, the name plus the thumbnail (a representative frame of what the clip contains), and a filmstrip display (which displays a set of stills throughout the Timeline). Audio Track Labels offers two choices. Sequential simply numbers the tracks in order, and Paired labels the audio tracks in pairs such as A1a, A1b, A2a, and A2b. It makes sense to use these pairs if all your audio will be stereo. Show Keyframe Overlays creates new sequences whose overlays are turned on. You can toggle this feature on and off by pressing Opt+W with any sequence in the Timeline window. Show Audio Waveforms creates sequences whose audio waveforms appear in the audio clips. You can toggle this feature on and off by pressing Opt+Cmd+W with any sequence in your Timeline window. Show Through Edits turns on or off the feature of displaying in the Timeline edits between consecutive frames within the same clip (see Figure 2.6). You can delete these edits to make a clip become whole-looking in the Timeline if you Ctrl-click this edit and choose Join Through Edit or select the edit and press Delete. The little triangles on either side of a through edit are red in the Timeline window. Figure 2.6. Red triangles displaying a through edit. 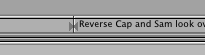 The parameters for Show Duplicate Frames are set in the General User Preferences. This feature warns you if you've used frames more than once. (You might not want to repeat a shot.) If you see a duplicate frame line in a clip, you can Ctrl-click that clip and select Dupe Frames (X) and the clip name and instantly move the position indicator to the clip containing the duplication. Show Audio Controls shows the solo (all tracks are muted except the selected track) and mute (turns off the sound of that particular track) buttons to the left of each audio track in the Timeline window. You also can turn these buttons on and off by toggling the speaker icon in the far-left corner of the Timeline window. Clip Keyframes creates new sequences that open with additional space below each video and audio track. Within this new space, you can Ctrl-click to view, add, or modify keyframes set for any given clip for each of the parameters you specify. If these are checked, they are displayed under the clip that these keyframe events have been ascribed to. Within this box are check boxes for Motion Bar, Filters Bar, Keyframe Editor, and Speed Indicators. You can change the Timeline's display to show motion keyframes, filter keyframes, and others by Ctrl-clicking in the area under any clip. New to FCP 4, this feature allows you to adjust your clip's keyframes directly in the Timeline window. Render Control The Render Control tab in the User Preferences, shown in Figure 2.7, controls how FCP attempts to play back real-time and unrendered effects. It might be useful for workflow reasons not to render all effects or to render them with a lower resolution or frame rate. If the Filters, Frame Blending For Speed, and Motion Blur check boxes are not checked, FCP plays through any clips containing these effects without attempting to render these CPU- intensive effects in real time. The same can be said of the Frame Rate and Resolution pop-up menus . You can lower these settings to help with real-time playback of your sequence. Of course, if you render all these effects, these settings are ignored. Figure 2.7. The Render Control tab. 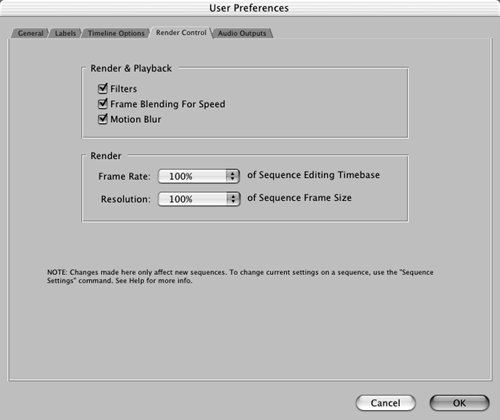 Audio Outputs The Audio Outputs tab, shown in Figure 2.8, is where you can select the number of audio tracks your system sends out. Depending on your audio hardware, you can select as many as 24 audio tracks. You need third-party audio cards to take advantage of this new feature in Final Cut Pro 4. Again, changing this setting from the User Preferences affects only new sequences created with any changes you've made. You can, however, change these settings on a current sequence by highlighting it in the Browser, pressing Cmd+0, and opening the sequence settings for that sequence. Figure 2.8. The Preset Editor's interface set up for a four-track output. 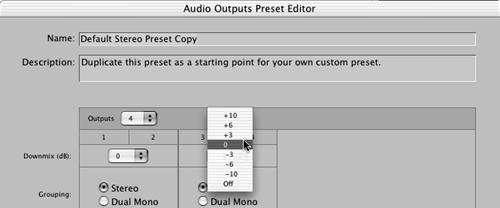 By duplicating the Default Stereo Preset, you can create a new preset containing your changes to the standard two-track output. Figure 2.8 shows the Preset Editor's interface set up for a four-track output. You can also downmix tracks (change their levels up or down at the same time). |