| The System Settings set of tabs is new to Final Cut Pro 4. It contains settings that affect how your computer is set up to operate Final Cut Pro. The first of the five tabs is Scratch Disks. Scratch Disks Figure 2.9 shows the first tab in the System Settings window. Scratch disks are disk drives and partitions that are selected for the storage of media files. Final Cut Pro 4 supports settings for up to 12 scratch disks at one time. Video files, audio files, and all render files can be set to be stored there. When the first disk is nearly full (as set in the Minimum Allowable Free Space On Scratch Disks box), the disk with the most available space is used next , and so on. It's recommended that you leave at least 50 to 100MB of any disk drive's capacity free. Figure 2.9. The Scratch Disks tab. 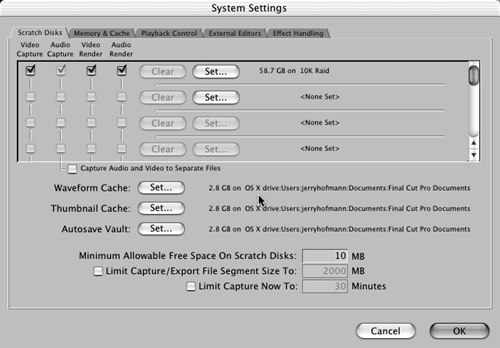 You can select a button in this window to capture audio and video to separate files. This might be useful if you will capture in low-resolution video but you intend to keep high-quality audio files that won't have to be captured again. This is called offline editing . Offline editing allows you to capture a lot more footage than you might otherwise be able to. When you are finished with your editing, you can simply recapture only the media that was used in your final sequence. Waveform Cache refers to the place where you set the audio waveform files to be stored. The same is true of the Thumbnail Cache (frames of video used to display representative frames of clips in the Browser and Timeline) and Autosave Vault location (automatic saves of your project file). These three file types are best left away from the drives you intend to use for media files; typically, this is your startup disk. The reason is that they get rewritten often and might cause fragmentation on the disks you use for media files, thus affecting performance. You can also limit the Capture/Export file segment size here (if you will send files to a system with file size limitations) and limit the Capture Now command (used in the Log and Capture window) to times and sizes. This might be a more efficient way to manage your media files. Setting a limit to your capture durations allows a large disk array to find the disk space required more efficiently . note If scratch disks are unmounted when you launch FCP, and they are specified in your scratch disk settings, Final Cut Pro 4 opens a dialog box allowing you to quit without changing these settings, reset scratch disk settings, or check again, allowing you to mount them (such as mounting a FireWire drive you forgot to mount before you launched Final Cut Pro).
Memory & Cache Figure 2.10 shows the Memory & Cache tab. With this set of controls, you can control the amount of RAM assigned to Final Cut Pro, the Still Cache setting for RAM, and the Thumbnail Cache settings for disk and RAM. Figure 2.10. The Memory & Cache tab. 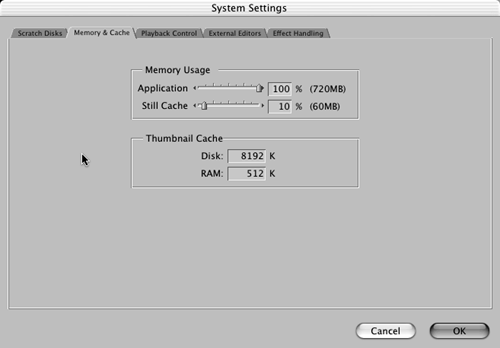 The total amount of RAM available is displayed on the far right of the first slider. Moving the sliders changes the amount of RAM used. By limiting the amount of RAM used by FCP, you can maintain performance by keeping Mac OS X from using virtual memory. This becomes more important if you are running multiple applications while running Final Cut Pro. Adding still cache to your system lets you play back more frames of stills in real time with your system. Thumbnail Cache (for disk or RAM) sets the amount of memory used to store thumbnails, which are pictures of your clips viewed from the Browser or Timeline window. Raising the levels of this memory used keeps you from rebuilding them as often. After the levels are built, they are available instantly if you access them again. Sometimes you'll use a lot of thumbnails. You can achieve greater performance of their redisplay by using higher settings for thumbnail storage. If you are not using a lot of stills, you might want to keep this setting lower and give more RAM resources to Final Cut Pro or another application you might be running. Much the same can be said of adding disk cache for thumbnails and RAM. RAM stores these and retrieves them for viewing faster than setting this cache to be stored on disk. When your available RAM for thumbnails is used up, FCP begins storing them on your disk. How much RAM your computer has dictates your optimal settings. Experimenting with these settings in your workflow will reveal the optimal settings for your computer setup. But there's no doubt that more RAM on your machine improves your system's overall performance. Playback Control Settings The Playback Control settings, shown in Figure 2.11, are yet another way to set up your system for real-time playback parameters. They are split into two sectionsPlayback and Record. These settings are system-wide (as opposed to the ones selected in the Render Control tab found in the User Preferences) and affect all sequences played back in your system. With these settings, you decide whether it's more important to play back with higher quality or to play back more real-time effects at the same time. Figure 2.11. The Playback Control tab. 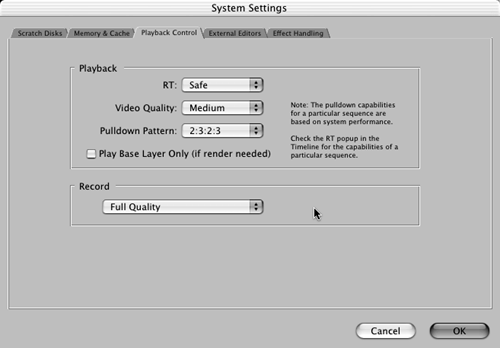 If you select Unlimited from the RT pop-up menu and set Video Quality to High, you ensure the highest playback quality for your video, but you might not be able to play back as many real-time effects reliably, for example. You can change these settings at any time and experiment with them to see what works best for your particular workflow and computer. Beneath these pop-up menus is another menu to select a pull-down pattern. These settings are for use when you are editing a 23.976fps timebase and you want to send 29.97fps out the FireWire for recording or viewing on an external video monitor but you want to edit using the 23.98fps your camera records. If you have a DV device that records at 23.976, you need to select one of these pull-down patterns for proper playback at 29.97fps. You can either select Full Quality as the Record setting or match the setting used in the Playback section. If you select Full Quality, you might have to render some of your effects for a reliable recording to take place without dropping frames. If you choose to match the Playback settings, recordings will follow the parameters you've set in the Playback settings (which might be fine for offline preview tapes, for example). Experimenting with your particular computer setup is key here. You'll find your optimal setting by trying different settings and seeing which one suits your particular needs or workflow. External Editors With the External Editors tab, shown in Figure 2.12, you can set which other applications (any third-party application, in fact) open upon command to edit stills, video files, and audio files, as well as open LiveType files, Apple's new animated titling program, from within Final Cut Pro. Figure 2.12. The External Editors tab. 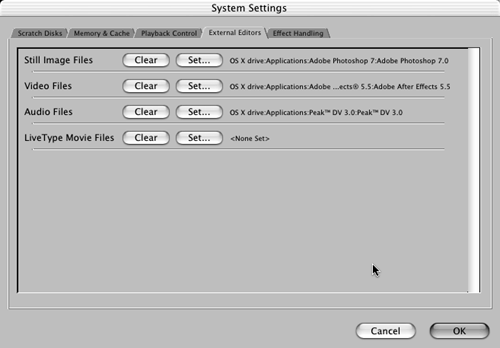 To designate an application as an "editing" application for the different types of media files you might be working with, you simply click the Set button to navigate to it. To open one of your clips in the assigned program ready for alteration, simply Ctrl-click it and select Open in Editor. The clip opens in the appropriate application for further alteration. You might want to open a still image in Photoshop, for example. The great thing about this new feature is that when you are finished modifying the clip or still you've edited in the other application, the saved changes can be imported into Final Cut Pro and are applied to all the clips in your project that reference this altered media file. It's great for streamlining a process you need to do to an audio track or video image. Effect Handling Part of Final Cut Pro's RT Extreme's new open architecture allows you to set the system to use RT Extreme for computation of real-time effects (Final Cut Pro), or you can select another device, possibly to handle your real-time effects (see Figure 2.13). Figure 2.13. The Effect Handling tab. 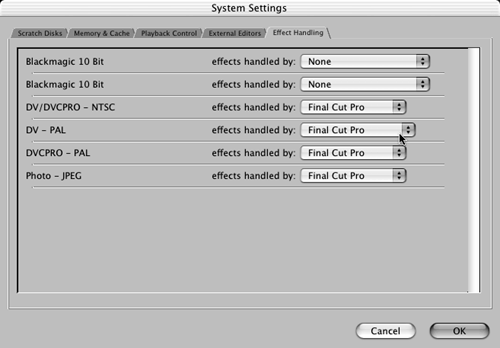 Each codec can be assigned its own handler for real-time effects with the Effect Handling settings. Do you want Final Cut Pro to use its own code for real-time effects handling, or do you want to use your video board or capture card's possible real-time effects? If your capture card can perform any real-time effects for a given codec you have installed, this shows up in the pop-up menu next to the codec's name . You should check with your card's manufacturer for the specifics of what that particular card can do. Many times a new software driver release for a capture card unleashes new real-time effects, so it's best to consult with the maker of your hardware card to keep up to date. |