Changing Settings Using the Audio/Video Settings Before you start a new project, you need to tell Final Cut Pro what format of material you are going to work with so that it can operate properly. The shortcut command is Opt+Cmd+Q. You can change your presets or create a custom setup from the Audio/Video Settings. The Summary window, shown in Figure 2.14, is always presented first; it summarizes the settings you are currently running. Notice that at the bottom of this window you can select the summary of settings you want to save as an Easy Setup. Figure 2.14. The Audio/Video Settings Summary tab.  The setting displayed in Figure 2.14 is a typical setup for DV NTSC editing with a DV camera or source deck attached to your Mac with a FireWire cable. Notice that the names next to the pop-up menus here match the names of the four other tabs across the top. You click the button at the bottom to create Easy Setups. After you've been through the four other windows and (possibly) have created a new and custom preset, you can come back to this screen, check the summary to make sure it is correct, and create and name a new Easy Setup if necessary. If you created custom setups for any of the four settings, you will see its name in the appropriate pop-up menu here in the Summary window. If you are working in DV NTSC, Figure 2.14 is the correct setting for most Sony FireWire-controlled equipment. Sequence Presets You can create custom setups for each of the categories by clicking the appropriate tab. The Sequence Presets tab is shown in Figure 2.15. Figure 2.15. The Sequence Presets tab. 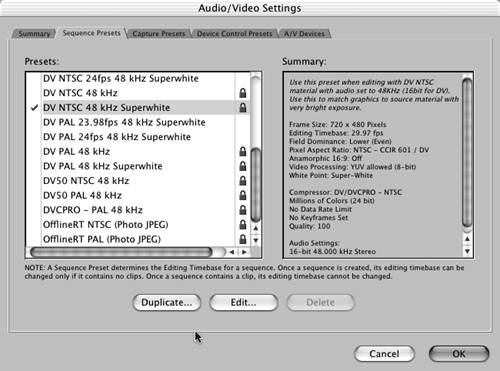 Nine different sequence presets are included with the software. They appear in the white box on the left. Notice that these presets have closed locks. This means that they are "standard" presets that cannot be edited directly. You can duplicate and edit these presets by clicking the Duplicate button in the bottom area of the window. After you have saved a custom sequence preset, it appears in the list on the left. If you make a mistake or you want to create a slightly different setup, you can edit these new presetsthey are not locked. Also notice the check mark next to the DV NTSC 48 kHz Superwhite preset. This check mark shows which default preset you are working with. You can change this default preset by clicking in the blank column next to its name. Many editors like to use multiple sequences while they work. If you tell Final Cut Pro to create a new sequence, the one with the check mark is the default sequence format that is created. This is important to understand if you have selected the option not to prompt for new settings upon creation of a new sequence in the General User Settings window. If you have selected for this prompt to happen, all saved presets show up on the resulting prompting window's pop-up menu. The summary of each preset is contained in a gray box on the right. Click each preset to see its summary. Each preset has a combination of settings suitable for a specific use: frame size , codec and frame rate, and more. tip It's best to set your sequence presets to as high a quality as possible even if you will deliver in a multimedia format or a stream for the Internet. You should edit in your native format and then process the appropriate compression after editing is complete. If you've shot DV, for example, edit in the DV format you shot in (NTSC or PAL) and use the appropriate and "matching" sequence preset.
If you highlight the DV NTSC 48 kHz preset and then click the Duplicate button near the bottom of this window, the Sequence Preset Editor opens, as shown in Figure 2.16. Here you can create custom sequence settings. For example, suppose you have video from DV sources, but all your audio was recorded at 41.1kHz. A "standard" 48kHz setting might tax your computer, because it needs to "up-convert" the native 41.1kHz audio to 48kHz to play it back in a DV NTSC or PAL 48kHz "standard" setting. You can relieve this computer overhead by setting up a 41.1kHz sequence setting during the editing process. Figure 2.16. The Sequence Preset Editor.  Creating a Custom Sequence Preset When creating a custom sequence preset, the first thing to do is give it a new name by typing it in the Name field. The Description field provides a place for a more-detailed description. Take a moment to investigate the pop-up menus on this screen to see which parameters you can change. There are a lot of them. Note that by checking the Anamorphic 16:9 check box, you can create a 16:9 anamorphic setup. Many cameras shoot in this relatively new format. You can view a widescreen format on newer widescreen TV sets. The aspect ratio of what is viewed on the sets that we all are familiar with is 4:3that is, four units wide and three units tall. Anamorphic 16:9 video stretches this picture so that squeezing it produces this new widescreeen aspect ratio. Here's a list of the most common video frame sizes: -
640x480 A 4:3 ratio for square pixel multimedia video. -
720x480 A 4:3 nonsquare pixel video frame size used for DV-NTSC video. This can be 16:9 if the Anamorphic 16:9 check box is checked. The pixel count does not change. -
720x486 A 4:3 nonsquare pixel video frame size used for standard CCIR 601-NTSC video. This can be 16:9 if the Anamorphic 16:9 check box is checked. The pixel count does not change. This requires additional hardware. -
720x576 A 4:3 nonsquare pixel video frame size used for CCIR 601-PAL or DV-PAL video. This can be 16:9 if the anamorphic 16:9 check box is checked. The pixel count does not change. This requires additional hardware. -
1280x720 A 16:9 square pixel resolution used for HDTV 720p. It requires additional hardware. -
1920x1080 A 16:9 higher square pixel resolution used for HDTV 1080i. It requires additional hardware. The 16:9 aspect ratio is the standard aspect ratio that HDTV uses. It gives the pictures a more "cinematic" look. It also does not crop the films we've enjoyed over the years in movie theaters. Soon, this 16:9 aspect ratio will be the standard that we all accept as normal, and the 4:3 ratio will go the way of the rounded TV screens of the early 1950s. You can change frame size, pixel aspect ratios, field dominance , editing timebase , and compressors for the video side of things. The video has an Advanced button to add even more options. The QuickTime audio settings can be changed here as well. Figure 2.17 shows the video settings, and Figure 2.18 shows the sound export settings. Figure 2.17. The advanced video settings.  Figure 2.18. The sound settings.  The Sequence Preset Editor has two tabs: General and Video Processing (see Figure 2.19). Figure 2.19. The Video Processing tab.  If the codec you are using (such as the DV NTSC codec) supports the YUV color space, you have options here to select RGB or YUV. A codec describes the compression/ decompression extension used with QuickTime to allow Final Cut Pro to capture, play back, and record to tape different video file formats. These files can have different amounts of compression applied to them. The more the file is compressed, the smaller the file size, but also the lower the video quality. Uncompressed video is the highest quality and can be edited with Final Cut Pro and the appropriate additional hardware. When Always Render in RGB is enabled, you force the rendering to happen in this color space instead of in YUV. The reasoning is that the renders of the two types of color space are slightly different. This option might cause subtle color changes in your rendered material. Use this option if you want to accomplish a specific compositing task and you think color clamping in the RGB color space might give you a better result than if you used the straight YUV color space. For example, if you are adding filters (such as those supplied by After Effects) that render only in RGB, you might want to add Final Cut Pro filters (which process in the YUV color space) to the same clips, thereby keeping the look of the renders the same. When you're editing DV, the Always Render in RGB box should usually remain disabled. When it is enabled, renders of DV video change the look of the original video. If your capture card doesn't support YUV rendering, you don't have the Always Render in RGB option. The other options in the Video Processing tab are as follows : -
Always Render in RGB forces codecs that normally process color using the YUV color space to process using the RGB color space instead. If selected, this option cause subtle changes in color in your rendered material. If the video capture codec you're using doesn't support YUV rendering, this option is unavailable. Use this option if you want to accomplish a specific compositing task and you think color clamping in the RGB color space might give you a preferred result over using the straight YUV color space. For example, if you're mixing After Effects filters, which process in RGB color space, with Final Cut Pro filters, which process in YUV color space, choosing this option ensures a consistent look. -
Render in 8-bit YUV enables 8-bit rendering using the YUV color space. This is the setting for footage captured from DV-25 source material, such as mini DV and DVCAM tape, or with third-party capture cards that capture 8-bit video in the YUV color space using an appropriate YUV-compatible codec such as cards sold by Aurora Video Systems or the Kona SD card from AJA. -
Render 10-bit material in high-precision YUV enables 10-bit rendering using the YUV color space. This is appropriate for footage captured from third-party capture cards that support capturing 10-bit video in the YUV color space using an appropriate YUV-compatible codec, such as AJA's Io or Kona SD card. Third-party capture cards capable of 10-bit YUV video let you capture clips with much more color detail, as well as with greater contrast ratios from blacks to whites, than do 8-bit sources. Final Cut Pro can capture and output from such a card using this higher level of quality. Selecting this option allows certain effects such as transitions and filters to be rendered at this quality. -
Render all YUV material in high-precision YUV enables 10-bit rendering even when you use 8-bit source clips. Sometimes, such as when you apply multiple filters to a clip, a higher bit depth improves the quality of the rendered file even though the original clip has only 8 bits of color information. The trade-off is that 10-bit rendering is slower than 8-bit rendering. Selecting this option improves the quality of rendered effects that support 10-bit precision. The pop-up menu near the center of the window allows you to change the process that Final Cut Pro uses with whites. DV camcorders can record whites higher than 100 IREthe brightest "legal" measure of the video signal shown on a waveform monitor. These levels above 100 IRE are called SuperWhite , and they are brighter than what is legal. If you intend to broadcast your video, it's recommended that you use the other available setting here: White. The White setting ensures that all your video renders are broadcast-legal, effectively limiting the luminance to 100 IRE. Your existing footage will not change and will still be at whatever level it was shot at. If your levels then are higher than 100 IRE, you would see a shift in luminance when the render file played back. IRE stands for the measurements of these signals as set by the Institute of Radio Engineers. Camera Masters Shot at Higher Than 100 IRE If your material was shot in DV and you have white levels higher than 100 IRE, I recommend using the SuperWhite setting to avoid clamping and getting sudden changes until you have achieved picture lock or close to it. During color correcting within Final Cut Pro, picture lock is achieved when few changes will be made to the video tracks. Any rendering done then will be part of a correction process toward the end of your workflow. This effectively keeps any shifts of luminance that show up during any part of the process at the same time. As part of the color correction/legal video pass, you also can nest the sequence and apply a Broadcast Safe filter to the nest. |
After you've set up the new preset, click the OK button. If you add a capture card, the card manufacturer supplies a new preset, which shows up in the Sequence Preset window after installation. The Capture Presets Tab The Capture Presets tab is shown in Figure 2.20. It looks similar to the Sequence Preset tab. It opens with locked presets that determine how you control the capture of your media. Two are for DV (NTSC and PAL), two are for OfflineRT (NTSC and PAL), and one is a Generic Capture Template (used to create custom presets). Figure 2.20. The Capture Presets tab. 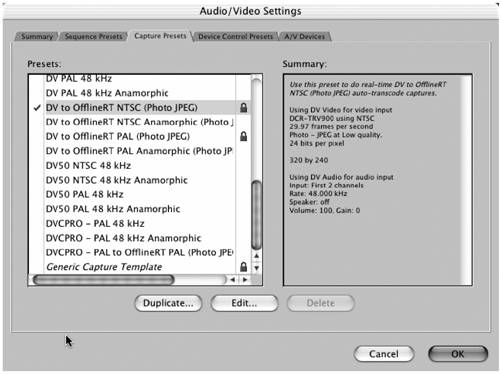 tip If a preset is not selected as a default, the Delete button becomes active. You cannot delete a locked preset.
note It's recommended that you capture your media with the highest quality you can and compress it later for delivery in multimedia formats. The idea is to process all your material in as high a quality as you can for as long as you can until you finally have to create the lower-resolution pictures and sound, which should be the last thing you do.
The Capture Presets tab works much the same as the Sequence Presets tab. You must duplicate the locked "standard" settings to create custom ones. The check marks set the default setting, and the Summary on the right summarizes the settings of the highlighted preset. A Generic Capture preset is available for this purpose, but you can duplicate the locked ones you start with as well and customize them. If you choose the DV NTSC 48 kHz preset and click the Duplicate button, the Capture Preset Editor window opens, as shown in Figure 2.21. You can change the name to better explain what the preset is. You can also type in the Description box a new description that might include the new feature of hearing the audio through your computer's speakers when viewing tapes with Final Cut Pro, for example. In this Editor window, you can change all the properties that make up a digital video file. Figure 2.21. The Capture Preset Editor window.  Investigate the pull-down menus to look at all the options. You see many of the same options found in the Sequence Preset Editor window. More-detailed information about all these settings is available in the Final Cut Pro Help that comes with your software. One QuickTime Audio setting that needs looking into is Rate (the record setting in kHz). Many cameras can record in more than one kHz setting. If you record material in the 12-bit recording mode, you need to change the standard setting of 48kHz to 32kHz. If you have recorded at the 16-bit setting, you use the 48kHz capture setting. This is especially important with DV material. If you mismatch these settings, your media that contains audio will have popping sounds and audio that drifts out of sync with clips that have synchronized audio and video. Even though you might have recorded in 12-bit mode with your camera, you should set the Audio kHz Rate setting to 16-bit 32kHz, because no 12-bit depth recording rate is available in Final Cut Pro. Whatever settings you choose, they should match your sequence settings; otherwise , you'll have to render each edit as you place it in the Timeline. Again, if you have installed a capture card, the manufacturer will have supplied presets appropriate for the use of that card, its codecs employed, frame sizes, and QuickTime Audio Settings. Note that an Anamorphic check box is available in the event you've shot in an anamorphic version of one of the sequence presets. The Anamorphic check box on the footage is automatically tagged as Anamorphic on capture. Device Control Presets The Device Control Presets tab, shown in Figure 2.22, sets up the deck control protocol you're getting ready to control your video device with, such as a camera or deck. Different machines use different control settings, and you might need to consult your deck's manual to find out which one it uses so that you can control your source machine or camera. Apple lists the compatible devices on its web site at http://www.apple.com/finalcutpro/qualification.html. It's recommended that you consult this web page before you buy a camera or deck to determine whether it will work with Final Cut Pro, but most do. Figure 2.22. The Device Control Presets tab.  Notice that four standard presets are locked: FireWire NTSC, FireWire PAL, FireWire PAL Basic, and Non-Controllable Device. Each can be duplicated and its copies edited to suit your particular deck or camera's needs. Non-Controllable Device is used when you cannot control the source deck or camera. It allows you to capture video from a deck such as a consumer VHS machine or any other device that cannot be controlled by your Final Cut Pro setup, and devices that do not have timecode recorded on their source material. If you have a FireWire-connected DV camera, you will probably use NTSC or PAL. However, if you are using certain DV cameras, you might have to duplicate this setting and make changes accordingly . For example, some cameras use a FireWire Basic setting. Apple's device qualification list lets you know how to set up these special cases. This list is accessible from the Final Cut Pro website (www.apple.com/finalcutpro/qualification). Some devices need extra scripts that can be added easily. Consult the list of qualified devices at the Final Cut Pro website. If you click the Duplicate button on the FireWire NTSC setting, you see the Device Control Preset Editor, shown in Figure 2.23. You can rename this new preset, give it a description, and change its protocol. Figure 2.23. The Device Control Preset Editor.  You can reset frame rates, specify a default timecode, and more to match the source device (a camera or videotape machine). Refer to the manual that came with your video device for more information on what type of control it uses. Many Sony machines use RS-422 controls, but most DV decks use one of two FireWire controls you'll find here (see Figure 2.24). Figure 2.24. RS-422 control.  When you use a serial control such as RS-422, you might have to account for a timecode capture offset. You do this by obtaining a source tape that has a window burn of timecode that matches its actual timecode, or display of the true timecode associated with the tape superimposed on the picture. Some videotape machines do this by digitizing a video signal with the machine's "Super" output. When you capture this material with this window burn, you might see a slight discrepancy of a few frames between the true timecode on the tape (as seen in the window burn) and what Final Cut Pro reports as the source's timecode. If so (and this is very likely to happen), you can adjust for this discrepancy in the Capture Offset box in the Device Control Preset Editor. You need a serial adapter for your Mac to control videotape or audio source and record machines with RS-422 or RS-232 remote control capability. Consult your owner's manual for the exact specifications your machine uses. A company called Gee Three sells a great solution for this adapter (http://www.geethree.com). Gee Three calls this a Stealth Port. If you are using a PowerBook, you need a USB serial adapter for serial control. Keyspan (http://www.keyspan.com) sells these adapters. Some capture cards include a serial port for control as well. If they do, the port they supply is listed in the white box of the Device Control Presets tab. You can also change the standard pre- and post-roll settings with the Device Control Preset Editor for your machine. This becomes important in certain cases. It's much easier to successfully capture video from a videotape machine or camera with a bit of pre-roll. Pre-roll means that the source device is given time to start rolling and getting up to speed with stability before the capture process really starts and you are creating a media file. You usually need at least 3 seconds for this to take place, and timecode breaks cannot exist in the timecode during this pre-roll. Thus, if you have material at 00:5:00:00, you must have consecutive timecode before that number. The camera or deck needs to find timecode number 00:4:57:00 and have no break of timecode between this number and the rest of your clip. Otherwise, the timecode that is recorded for that clip will be incorrect and could cause you headaches later if you need to recapture the material. If you have material at 0:00:00:00 (the start of a tape), you will not be able to capture much before 0:00:03:00. Keep this in mind when you shoot a new tape. Workarounds are available. If you must have this material, you can capture without logging the clip using Capture Now, but it's better to have recorded a bit of video at the start of a tape that you know you will not use and to have reserved this material for pre-roll time. Recording color bars here is your best bet, but rolling your camera on any unneeded material works as well. tip Keep in mind that the head of the tape gets extra wear because it's loaded and unloaded into videotape devices more often. Keeping usable material from this area of the tape is a good idea for this reason alone.
The A/V Devices Tab The last tab in the Audio/Video Settings is the A/V Devices tab, as shown in Figure 2.25. Figure 2.25. The A/V Devices tab.  On the A/V Devices tab, you can set up how your system views playback externally on a video monitor. You also can set up a different pathway out of your computer for recording video externally. If your system is set up to edit any of the DV formats, you should select Apple FireWire (NTSC or PAL). Additionally, you can click the option to set up a Different Output for Edit to Tape/Print to Video. These two major areas of the A/V Devices settings can be independent of each other. For example, you might want to view your video externally during playback but monitor your audio with your computer's speakers. When you are ready to record, you will want different settings so that your audio is sent out the FireWire port or capture card set up to record to your tape with the video. Two Mirror on desktop check boxes are on this screen as well. Clicking either check box allows the video to run on your computer's display at the same time you are viewing your video externally or recording it to tape with the Edit to Tape or Print to Video functions. If these check boxes are checked, you see the video play back in both places. This is handy if you cannot see the "client monitor" at the same time you are operating your system. This option taxes your computer, so experimenting with slower systems might be in order to make sure that your Mac can do this without stutters, especially if you depend on RT Extreme to send out real-time effects during the recording process. Turning off Mirror on desktop relieves your computer's overhead during the recording and playback process. If you have a third-party capture card, its audio and video outputs show up as an option in the pop-up menus as well. Two selectable options appear at the bottom of the A/V Devices window. The first instructs FCP not to warn you if an A/V device is not found upon launching FCP. The second allows you to defeat the warning that audio outputs are greater than the audio device channels available. |