Retrospect: Restoring Data
Restoring Data Using Retrospect
There are two main ways to restore our server in the event of a complete and total loss of all data.
The "long" way, which includes the following steps:
-
Reformat the server's hard disk
-
Reinstall Windows Server 2003
-
Reinstall Retrospect
-
Restore the server from backup data
The "short" way, which includes the following steps:
-
Before the server has failed, create a disaster recovery bootable CD using Retrospect
-
Boot from the disaster recovery CD and restore from backup data
The following tutorials walk through both methods . As with ntbackup, the following two tutorials completely erase all information on DC02.
Tutorial: Restoring a Server Using Retrospect: "The Long Way"
-
Insert your Windows Server 2003 CD and install a fresh copy of Server on DC02's "C" drive. When installing, make sure that you erase the C drive, and format it in NTFS format. When reinstalling, use the typical network settings. Be sure to remember what you set for the administrator username and password, as you will need it when reinstalling Retrospect. Do not bother with activating Server 2003 over the internet. All settings are restored when we run Retrospect.
-
Once the install of Server 2003 completes and the computer has rebooted, reinstall Retrospect . Launch Retrospect , exit, and then re-launch it. On the left side of the main window, click the option labeled Restore . On the right side of the window, click the item labeled Entire Volume .
-
A warning appears informing you that no backup sets can be found. We must point Retrospect in the direction of our catalog files, which are located on our second drive in the Retrospect catalog files folder. Click the Open button and navigate to the Denver Backup A.rbc catalog file and open it.
-
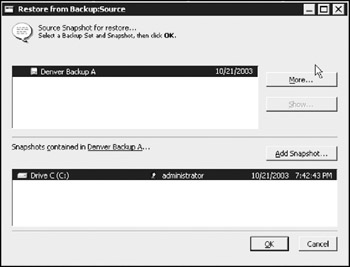
The Restore from Backup:Source window appears. Click Denver Backup A in the top portion of the window, and select the Drive C (C:) snapshot. Remember that the snapshot contains all necessary information needed to restore the server. By default, the most recent snapshot is displayed. ( Note: you may choose older snapshots by clicking Add Snapshot and selecting the desired snapshot ). Click OK :
The Destination Selection window appears. At the top of the window, ensure that Restore Entire Contents is selected, and click Drive C (C:) . Click OK . Retrospect warns you that you are about to overwrite all files on the destination drive. Click Replace .Retrospect presents you with a summary of the restoration options. Click Restore and OK .
-
Once the restore process completes, reboot the server in Directory Services Restore Mode (pressing F8 just as the system begins its reboot). It is important that you do this before booting the server into normal mode, as Retrospect must do some "house cleaning." Once Retrospect finishes, click OK to reboot again.
-
Server 2003 boots into normal mode, where Retrospect does a bit more cleanup work. Click OK to reboot once more.
DC02 is now fully restored.
EAN: 2147483647
Pages: 88