Retrospect: Backing Data Up
Tutorial: A Backup Scenario Using Retrospect Multi Server Edition
Before proceeding with our backup tutorial, we must obtain a copy of Retrospect Multiple Server Edition. Dantz Development does provide a time-limited trial copy of most of its Windows products. Download a copy of Retrospect Multi Server from http://www.dantz.com.( Note: at the time of this writing, the current version is 6.5 ). Install it on DC02. When prompted for the Retrospect user account, use DC02's administrator username and password.
-
Launch Retrospect . The main screen appears.
Before we can start our backup sessions, we must first create a backup set.
-
On the left side of the screen, click the option labeled Configure . On the right side of the screen, click the button labeled Backup Sets .
-
The Backup Sets window appears informing us that there are " No known Backup Sets ." On the right side of the window, click the Create New button. The backup set creation wizard appears. Click Next .
-
Just as with ntbackup, we backup to a separate hard drive (or hard drive partition). To that end, choose the option labeled Disk and click Next .
-
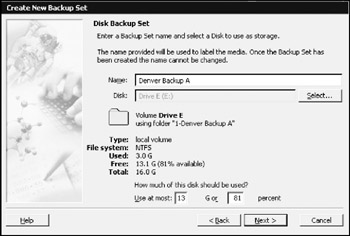
In the Name field, enter Denver Backup A . Next to the Disk field, click the Select button and choose your second hard drive. In the case of our example here, we use Drive E . Click OK :
-
Retrospect allows us to set a measure of security on this archive. For the purposes of this tutorial, leave the default settings of None and click Next .
-
Retrospect keeps a record of all data stored in a backup set in a file called a catalog file . It's a good idea to store the catalog file in a different location from the drive being backed up. Strangely enough, Retrospect's default setting is to store the catalog file on the system drive. However, since we are backing up the system drive, we need to move the catalog file to a different location; in this case, we move it to the second hard drive that will house the backup data. Click the Browse button and navigate to the second hard drive (again, for us this is the E drive). Create a new folder on this second drive and name it Retrospect Catalog Files . Double-click this new folder and click the Save button. Click Next and click Finish .
The Denver Backup A backup set appears in the Backup Sets window.
Close the Backup Sets window.
-
On the left column of the Retrospect screen, click Backup . A list of drives appears. Since we wish to back up only the system drive, choose Drive C (C:) and click OK .
-
Retrospect asks us for a backup set in which to store the backed up data. Since we only have one backup set, Denver Backup A , select it from the list and click OK .
-
The Immediate Backup window appears. We now need to make this a Recycle backup so that all files within the backup parameters get backed up for the first time. Click the Options button and select Recycle backup . Retrospect also allows us to compress the data as it is backed up to save on backup media space. Place a check in the box labeled Data compression (in software) . Click OK .
Get Info A word about compression: most tape backup devices made today provide built-in hardware based compression. Because the drive itself does the compression, the computer's processor is freed to work on other tasks . Retrospect knows this, and automatically disables software based compression if a backup device supports it in hardware.
-
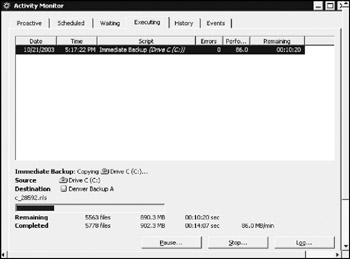
In the bottom right of the window, click Backup . Click OK to the recycle backup warning. The backup commences. Retrospect is capable of doing multiple backups at once. The only sign that a backup is actually running is the small status indicator in the bottom left of the Retrospect screen. If you need a bit more detail, click Activity Monitor on the left side of the screen, and then click Executing on the right side of the screen. This brings up a much more detailed view of what is happening in the backup process:
-
Wait for the backup to complete. Close the Activity Monitor . On the left portion of the window, click the Backup option. On the right side of the window, click Backup . Our previous backup options remain intact.
-
Click the button labeled Options . Set the backup type to Normal and click OK . Run the backup by clicking the Backup button.
What's the difference between this backup and the previous backup? Recall that the normal backup under Retrospect backs up only those files that have changed since the last backup .
-
Wait for the backup to complete.
EAN: 2147483647
Pages: 88